LVM 的基本概念
- 物理卷 Physical Volume (PV): 可以在上面建立卷组的媒介,可以是硬盘分区,也可以是硬盘本身或者- - 回环文件(loopback file)。物理卷包括一个特殊的 header,其余部分被切割为一块块物理区域(physical extents)
- 卷组 Volume group (VG): 将一组物理卷收集为一个管理单元
- 逻辑卷 Logical volume (LV): 虚拟分区,由物理区域(physical extents)组成
- 物理区域 Physical extent (PE): 硬盘可供指派给逻辑卷的最小单位(通常为 4MB)
lvm原理,具体流程是PV -> VG -> LV,弄懂什么是PV VG LV基本就可以了。
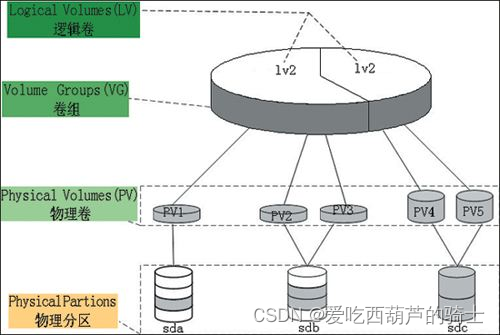
物理卷: 也就是图中第二层,是通过物理分区创建而来,与物理分区一一对应。创建为物理卷后,则可以将物理卷合并为一个大的卷组。通过命令pvdisplay 查看物理卷
卷组: 也就是图中第三层,卷组是不同的物理卷合并而成,可以将所有物理卷的大小整合成一个大的卷组,相当于一个大的整合的逻辑磁盘,然后在卷组中就可以根据需求划分逻辑卷。通过命令vgdisplay 查看卷组。
逻辑卷: 也就是图中最顶层,逻辑卷是从卷组中划分出来的,相当于逻辑分区,此逻辑卷就可以直接格式化挂载到目录,就可以直接使用了。通过命令lvdisplay 查看逻辑卷。
磁盘操作相关命令
df -h
Filesystem Size Used Avail Use% Mounted on
udev 955M 0 955M 0% /dev
tmpfs 198M 1.8M 196M 1% /run
/dev/mapper/ubuntu--vg-ubuntu--lv 19G 6.0G 12G 35% /
tmpfs 986M 0 986M 0% /dev/shm
tmpfs 5.0M 0 5.0M 0% /run/lock
tmpfs 986M 0 986M 0% /sys/fs/cgroup
/dev/loop1 91M 91M 0 100% /snap/core/6350
/dev/loop0 89M 89M 0 100% /snap/core/6964
/dev/sda2 976M 143M 767M 16% /boot
- 显示当前的 logical volume:lvdisplay
lvdisplay
--- Logical volume ---
LV Path /dev/ubuntu-vg/ubuntu-lv
LV Name ubuntu-lv
VG Name ubuntu-vg
LV UUID e2fKkR-oZeH-WV2A-ltCi-P76v-N9yv-aUtIg1
LV Write Access read/write
LV Creation host, time ubuntu-server, 2019-05-14 03:13:57 +0800
LV Status available
LV Size <19.00 GiB
Current LE 4863
Segments 1
Allocation inherit
Read ahead sectors auto
- currently set to 256
Block device 253:0
vgdisplay
--- Volume group ---
VG Name ubuntu-vg
System ID
Format lvm2
Metadata Areas 1
Metadata Sequence No 2
VG Access read/write
VG Status resizable
MAX LV 0
Cur LV 1
Open LV 1
Max PV 0
Cur PV 1
Act PV 1
VG Size <19.00 GiB
PE Size 4.00 MiB
Total PE 4863
Alloc PE / Size 4863 / <19.00 GiB
Free PE / Size 0 / 0
VG UUID dhI9ns-7lOI-pXf8-IOWL-F96N-JIYG-ZF6u82
pvdisplay
--- Physical volume ---
PV Name /dev/sda3
VG Name ubuntu-vg
PV Size <19.00 GiB / not usable 0
Allocatable yes (but full)
PE Size 4.00 MiB
Total PE 4863
Free PE 0
Allocated PE 4863
PV UUID TDFe2b-xsce-R8So-ldxR-ohcp-fx5J-n2JNOa
开始LVM扩容
查看fdisk
fdisk -l
Disk /dev/loop0: 88.4 MiB, 92733440 bytes, 181120 sectors
Units: sectors of 1 * 512 = 512 bytes
Sector size (logical/physical): 512 bytes / 512 bytes
I/O size (minimum/optimal): 512 bytes / 512 bytes
Disk /dev/loop1: 91 MiB, 95408128 bytes, 186344 sectors
Units: sectors of 1 * 512 = 512 bytes
Sector size (logical/physical): 512 bytes / 512 bytes
I/O size (minimum/optimal): 512 bytes / 512 bytes
Disk /dev/sda: 20 GiB, 21474836480 bytes, 41943040 sectors
Units: sectors of 1 * 512 = 512 bytes
Sector size (logical/physical): 512 bytes / 512 bytes
I/O size (minimum/optimal): 512 bytes / 512 bytes
Disklabel type: gpt
Disk identifier: F96F20D7-1F28-4B03-87CF-4FA3E81FDE29
Device Start End Sectors Size Type
/dev/sda1 2048 4095 2048 1M BIOS boot
/dev/sda2 4096 2101247 2097152 1G Linux filesystem
/dev/sda3 2101248 41940991 39839744 19G Linux filesystem
Disk /dev/mapper/ubuntu--vg-ubuntu--lv: 19 GiB, 20396900352 bytes, 39837696 sectors
Units: sectors of 1 * 512 = 512 bytes
Sector size (logical/physical): 512 bytes / 512 bytes
I/O size (minimum/optimal): 512 bytes / 512 bytes
查看所有储存设备
fdisk -l |grep '/dev'
Disk /dev/loop0: 88.4 MiB, 92733440 bytes, 181120 sectors
Disk /dev/loop1: 91 MiB, 95408128 bytes, 186344 sectors
Disk /dev/sda: 20 GiB, 21474836480 bytes, 41943040 sectors
/dev/sda1 2048 4095 2048 1M BIOS boot
/dev/sda2 4096 2101247 2097152 1G Linux filesystem
/dev/sda3 2101248 41940991 39839744 19G Linux filesystem
Disk /dev/mapper/ubuntu--vg-ubuntu--lv: 19 GiB, 20396900352 bytes, 39837696 sectors
fdisk -l |grep '/dev'
Disk /dev/loop0: 88.4 MiB, 92733440 bytes, 181120 sectors
Disk /dev/loop1: 91 MiB, 95408128 bytes, 186344 sectors
Disk /dev/sda: 20 GiB, 21474836480 bytes, 41943040 sectors
/dev/sda1 2048 4095 2048 1M BIOS boot
/dev/sda2 4096 2101247 2097152 1G Linux filesystem
/dev/sda3 2101248 41940991 39839744 19G Linux filesystem
Disk /dev/sdb: 20 GiB, 21474836480 bytes, 41943040 sectors
Disk /dev/mapper/ubuntu--vg-ubuntu--lv: 19 GiB, 20396900352 bytes, 39837696 sectors
创建sdb分区
fdisk /dev/sdb
Welcome to fdisk (util-linux 2.31.1).
Changes will remain in memory only, until you decide to write them.
Be careful before using the write command.
Device does not contain a recognized partition table.
Created a new DOS disklabel with disk identifier 0x0de15f1d.
Command (m for help): n
Partition type
p primary (0 primary, 0 extended, 4 free)
e extended (container for logical partitions)
Select (default p):
Using default response p.
Partition number (1-4, default 1):
First sector (2048-41943039, default 2048):
Last sector, +sectors or +size{K,M,G,T,P} (2048-41943039, default 41943039):
Created a new partition 1 of type 'Linux' and of size 20 GiB.
Command (m for help): w
The partition table has been altered.
Calling ioctl() to re-read partition table.
Syncing disks.
格式化磁盘
fdisk -l |grep '/dev'
Disk /dev/loop0: 88.4 MiB, 92733440 bytes, 181120 sectors
Disk /dev/loop1: 91 MiB, 95408128 bytes, 186344 sectors
Disk /dev/sda: 20 GiB, 21474836480 bytes, 41943040 sectors
/dev/sda1 2048 4095 2048 1M BIOS boot
/dev/sda2 4096 2101247 2097152 1G Linux filesystem
/dev/sda3 2101248 41940991 39839744 19G Linux filesystem
Disk /dev/sdb: 20 GiB, 21474836480 bytes, 41943040 sectors
/dev/sdb1 2048 41943039 41940992 20G 83 Linux
Disk /dev/mapper/ubuntu--vg-ubuntu--lv: 19 GiB, 20396900352 bytes, 39837696 sectors
- 格式化
请查好自己系统的文件系统类型,选择对应命令格式化:
mkfs -t ext4 /dev/sdb1
mke2fs 1.44.1 (24-Mar-2018)
Creating filesystem with 5242624 4k blocks and 1310720 inodes
Filesystem UUID: 6f11063f-c118-4099-90fc-2b083c181b23
Superblock backups stored on blocks:
32768, 98304, 163840, 229376, 294912, 819200, 884736, 1605632, 2654208,
4096000
Allocating group tables: done
Writing inode tables: done
Creating journal (32768 blocks): done
Writing superblocks and filesystem accounting information: done
mkfs.xfs -f /dev/sdc2
创建PV
pvcreate /dev/sdb1
WARNING: ext4 signature detected on /dev/sdb1 at offset 1080. Wipe it? [y/n]: y
Wiping ext4 signature on /dev/sdb1.
Physical volume "/dev/sdb1" successfully created.
查看卷组
pvscan
PV /dev/sda3 VG ubuntu-vg lvm2 [<19.00 GiB / 0 free]
PV /dev/sdb1 lvm2 [<20.00 GiB]
Total: 2 [<39.00 GiB] / in use: 1 [<19.00 GiB] / in no VG: 1 [<20.00 GiB]
扩容 VG
vgdisplay
--- Volume group ---
VG Name ubuntu-vg
System ID
Format lvm2
Metadata Areas 1
Metadata Sequence No 2
VG Access read/write
VG Status resizable
MAX LV 0
Cur LV 1
Open LV 1
Max PV 0
Cur PV 1
Act PV 1
VG Size <19.00 GiB
PE Size 4.00 MiB
Total PE 4863
Alloc PE / Size 4863 / <19.00 GiB
Free PE / Size 0 / 0
VG UUID dhI9ns-7lOI-pXf8-IOWL-F96N-JIYG-ZF6u82
vgextend ubuntu-vg /dev/sdb1
Volume group "ubuntu-vg" successfully extended
扩容LV
vgdisplay
--- Volume group ---
VG Name ubuntu-vg
System ID
Format lvm2
Metadata Areas 2
Metadata Sequence No 3
VG Access read/write
VG Status resizable
MAX LV 0
Cur LV 1
Open LV 1
Max PV 0
Cur PV 2
Act PV 2
VG Size 38.99 GiB
PE Size 4.00 MiB
Total PE 9982
Alloc PE / Size 4863 / <19.00 GiB
Free PE / Size 5119 / <20.00 GiB
VG UUID dhI9ns-7lOI-pXf8-IOWL-F96N-JIYG-ZF6u82
lvdisplay
--- Logical volume ---
LV Path /dev/ubuntu-vg/ubuntu-lv
LV Name ubuntu-lv
VG Name ubuntu-vg
LV UUID e2fKkR-oZeH-WV2A-ltCi-P76v-N9yv-aUtIg1
LV Write Access read/write
LV Creation host, time ubuntu-server, 2019-05-14 03:13:57 +0800
LV Status available
LV Size <19.00 GiB
Current LE 4863
Segments 1
Allocation inherit
Read ahead sectors auto
- currently set to 256
Block device 253:0
- 扩容LV
这个地方截图环境lv vg pv名字和上边不一致,按照自己环境配置扩容即可
[root@node1 ceph-csi-3.7.2]
Size of logical volume cl/root changed from <161.21 GiB (41269 extents) to 361.20 GiB (92468 extents).
Logical volume cl/root successfully resized.
[root@node1 ceph-csi-3.7.2]
meta-data=/dev/mapper/cl-root isize=512 agcount=11, agsize=4011520 blks
= sectsz=512 attr=2, projid32bit=1
= crc=1 finobt=1, sparse=1, rmapbt=0
= reflink=1
data = bsize=4096 blocks=42259456, imaxpct=25
= sunit=0 swidth=0 blks
naming =version 2 bsize=4096 ascii-ci=0, ftype=1
log =internal log bsize=4096 blocks=7835, version=2
= sectsz=512 sunit=0 blks, lazy-count=1
realtime =none extsz=4096 blocks=0, rtextents=0
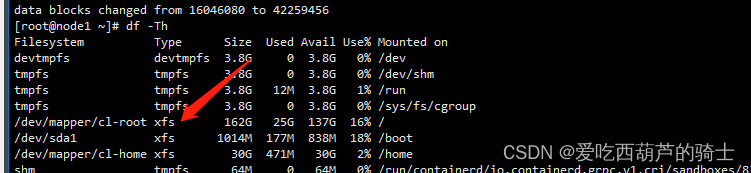
data blocks changed from 42259456 to 94687232
- 刷新分区
请查好自己系统的文件系统类型,选择对应命令格式化:
resize2fs /dev/ubuntu-vg/ubuntu-lv
Filesystem at /dev/ubuntu-vg/ubuntu-lv is mounted on /; on-line resizing required
old_desc_blocks = 3, new_desc_blocks = 5
The filesystem on /dev/ubuntu-vg/ubuntu-lv is now 10221568 (4k) blocks long.
xfs_growfs /dev/mapper/centos-root
lvdisplay
--- Logical volume ---
LV Path /dev/ubuntu-vg/ubuntu-lv
LV Name ubuntu-lv
VG Name ubuntu-vg
LV UUID e2fKkR-oZeH-WV2A-ltCi-P76v-N9yv-aUtIg1
LV Write Access read/write
LV Creation host, time ubuntu-server, 2019-05-14 03:13:57 +0800
LV Status available
LV Size 38.99 GiB
Current LE 9982
Segments 2
Allocation inherit
Read ahead sectors auto
- currently set to 256
Block device 253:0
参考原文地址:
https://blog.csdn.net/u010674101/article/details/118020008
https://www.cnblogs.com/khtt/p/16902118.html
本文内容由网友自发贡献,版权归原作者所有,本站不承担相应法律责任。如您发现有涉嫌抄袭侵权的内容,请联系:hwhale#tublm.com(使用前将#替换为@)