首先说一下开发环境:MDK5版本为5.26.2.0,CubeMX版本为6.6.1,FreeRTOS API选择的是 CMSIS v1,LWIP版本为2.1.2。单片机型号为STM32F429IGT6,以太网芯片为LAN8720A。
接下来开始进入正题,首先是基础的时钟、GPIO、LWIP方面的配置,具体流程如下:
1、时钟选择外部高速时钟(25M),系统时钟180M,SYS设置界面的Timebase Source项应当设置为SysTick以外的任何一项,因为SysTick将作为FreeRTOS系统的时钟源。
2、设置LED引脚PH10。
3、选择一组串口作为日志输出串口,打开串口,允许中断
4、配置ETH:
选择RMII连接方式。
勾上Ethernet global interrupt中断
修改ETH_TXD0、ETH_TXD1引脚为PG13 PG14
修改PHY引脚为 LAN8742A_PHY_ADDRESS 控制。
打开LWIP功能,关闭LWIP_DHCH,设置静态IP、子网掩码、网关。
进入Platform Settings页面选择网络芯片为LAN_8742A。
进入Key Options页面使能LWIP_NETIF_STATUS_CALLBACK。
在完成基础工程的配置以后再进入FreeRTOS的配置。进入FreeRTOS选项卡后选择CMSIS v1。相关设置直接默认,不需要改。直接进入Tasks and Queues选项卡设置任务。进入时会有一个默认任务,LWIP任务会自动加入该任务栈。双击该任务行任意位置,在弹出的界面中将Stack Size (Words)项的值改为256(更大也行),该项是设置该任务的内存大小,随后点击OK保存。为了测试方便我还创建了个Task2,任务名为LED_Task,其余默认,,随后点击OK保存。
最后 设置工程名称和保存地址,生成工程,打开工程进行如下操作:
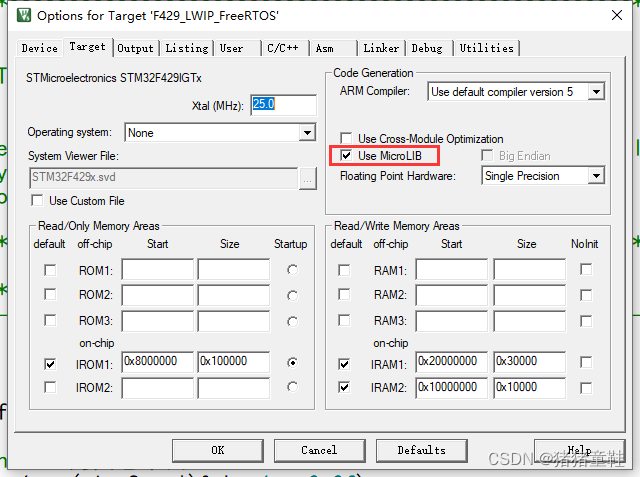
5、首先修改MDK5的一些设置,最重要的是把这个 Use MicroLIB 勾上,不勾跑不起来:
6、全局搜索“LAN8742A_PHY_ADDRESS ”宏定义,将其的值改为0,或者main函数开头添加以下语句:
	#ifdef LAN8742A_PHY_ADDRESS
	#undef LAN8742A_PHY_ADDRESS
	#define LAN8742A_PHY_ADDRESS 0U
	#endif
7、如有需要可以添加串口重定向:
首先加入头文件:#include "stdio.h"
随后在工程任意位置加入以下代码:
int fputc(int ch, FILE *f)
{
	//具体哪个串口可以更改huart1为其它串口
	HAL_UART_Transmit(&huart1 , (uint8_t *)&ch, 1 , 0x0f);
	return ch;
}
8、如果需要,可以在添加LWIP日志管理代码,粘贴于lwipopts.h中
#define LWIP_DEBUG 1
#if LWIP_DEBUG
#define LWIP_DBG_TYPES_ON               LWIP_DBG_ON
/* USER CODE BEGIN 1 */
#define LWIP_DBG_MIN_LEVEL              LWIP_DBG_LEVEL_OFF
//#define LWIP_DBG_MIN_LEVEL              LWIP_DBG_LEVEL_WARNING
//#define LWIP_DBG_MIN_LEVEL              LWIP_DBG_LEVEL_SERIOUS
//#define LWIP_DBG_MIN_LEVEL              LWIP_DBG_LEVEL_SEVERE

#define ETHARP_DEBUG                    LWIP_DBG_ON
#define NETIF_DEBUG                     LWIP_DBG_ON
#define PBUF_DEBUG                      LWIP_DBG_ON
#define API_LIB_DEBUG                   LWIP_DBG_ON
#define API_MSG_DEBUG                   LWIP_DBG_ON
#define SOCKETS_DEBUG                   LWIP_DBG_ON
#define ICMP_DEBUG                      LWIP_DBG_ON
#define IGMP_DEBUG                      LWIP_DBG_ON
#define INET_DEBUG                      LWIP_DBG_ON
#define IP_DEBUG                        LWIP_DBG_ON
#define IP_REASS_DEBUG                  LWIP_DBG_ON
#define RAW_DEBUG                       LWIP_DBG_ON
#define MEM_DEBUG                       LWIP_DBG_ON
#define MEMP_DEBUG                      LWIP_DBG_ON
#define SYS_DEBUG                       LWIP_DBG_ON
#define TCP_DEBUG                       LWIP_DBG_ON
#define TCP_INPUT_DEBUG                 LWIP_DBG_ON
#define TCP_FR_DEBUG                    LWIP_DBG_ON
#define TCP_RTO_DEBUG                   LWIP_DBG_ON
#define TCP_CWND_DEBUG                  LWIP_DBG_ON
#define TCP_WND_DEBUG                   LWIP_DBG_ON
#define TCP_OUTPUT_DEBUG                LWIP_DBG_ON
#define TCP_RST_DEBUG                   LWIP_DBG_ON
#define TCP_QLEN_DEBUG                  LWIP_DBG_ON
#define UDP_DEBUG                       LWIP_DBG_ON
#define TCPIP_DEBUG                     LWIP_DBG_ON
#define PPP_DEBUG                       LWIP_DBG_ON
#define SLIP_DEBUG                      LWIP_DBG_ON
#define DHCP_DEBUG                      LWIP_DBG_ON
#define AUTOIP_DEBUG                    LWIP_DBG_ON
#define SNMP_MSG_DEBUG                  LWIP_DBG_ON
#define SNMP_MIB_DEBUG                  LWIP_DBG_ON
#define DNS_DEBUG                       LWIP_DBG_ON
#endif //LWIP_DEBUG
若需关闭,将#define LWIP_DBG_TYPES_ON LWIP_DBG_ON 修改为
#define LWIP_DBG_TYPES_ON LWIP_DBG_OFF
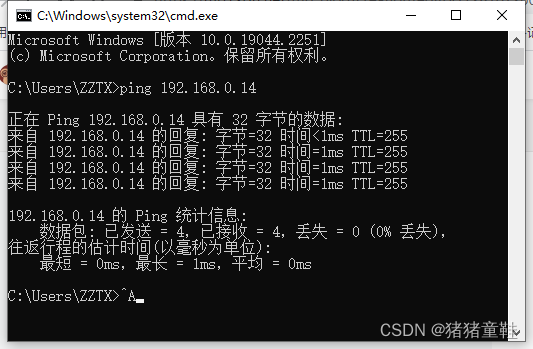
至此工程已经配置完成,编译工程下到开发板中,可以ping通,如下图:
在写这篇文章之前笔者就踩了大坑,那就是默认任务没有加大内存,也只设置了128 Words,然后一直ping不通,困了几天,后面是请教别的大佬才顺利解决。
第二天续写:
如果要实现TCP Server功能只需要新建两个文件,将其加入工程中(别忘了编译路径,我是放在了LWIP/APP目录下),代码如下:
tcpecho.c代码:
#include "tcpecho.h"

#include "lwip/opt.h"

#if LWIP_SOCKET
#include <lwip/sockets.h>

#include "lwip/sys.h"
#include "lwip/api.h"
/*-----------------------------------------------------------------------------------*/
#define LOCAL_PORT         5001
#define RECV_DATA         (1024)

static void
tcpecho_thread(void *arg)
{
  int sock = -1,connected;
  char *recv_data;
  struct sockaddr_in server_addr,client_addr;
  socklen_t sin_size;
  int recv_data_len;

  printf("本地端口号是%d\n\n",LOCAL_PORT);

  recv_data = (char *)pvPortMalloc(RECV_DATA);
  if (recv_data == NULL)
  {
      printf("No memory\n");
      goto __exit;
  }

  sock = socket(AF_INET, SOCK_STREAM, 0);
  if (sock < 0)
  {
      printf("Socket error\n");
      goto __exit;
  }

  server_addr.sin_family = AF_INET;
  server_addr.sin_addr.s_addr = INADDR_ANY;
  server_addr.sin_port = htons(LOCAL_PORT);
  memset(&(server_addr.sin_zero), 0, sizeof(server_addr.sin_zero));

  if (bind(sock, (struct sockaddr *)&server_addr, sizeof(struct sockaddr)) == -1)
  {
      printf("Unable to bind\n");
      goto __exit;
  }

  if (listen(sock, 5) == -1)
  {
      printf("Listen error\n");
      goto __exit;
  }

  while(1)
  {
    sin_size = sizeof(struct sockaddr_in);

    connected = accept(sock, (struct sockaddr *)&client_addr, &sin_size);

    printf("new client connected from (%s, %d)\n",
            inet_ntoa(client_addr.sin_addr), ntohs(client_addr.sin_port));
    {
      int flag = 1;

      setsockopt(connected,
                 IPPROTO_TCP,     /* set option at TCP level */
                 TCP_NODELAY,     /* name of option */
                 (void *) &flag,  /* the cast is historical cruft */
                 sizeof(int));    /* length of option value */
    }

    while(1)
    {
      recv_data_len = recv(connected, recv_data, RECV_DATA, 0);

      if (recv_data_len <= 0)
        break;

      printf("recv %d len data\n",recv_data_len);

      write(connected,recv_data,recv_data_len);

    }
    if (connected >= 0)
      closesocket(connected);

    connected = -1;
  }
__exit:
  if (sock >= 0) closesocket(sock);
  if (recv_data) free(recv_data);
}
/*-----------------------------------------------------------------------------------*/
void
tcpecho_init(void)
{
  sys_thread_new("tcpecho_thread", tcpecho_thread, NULL, 512, 4);
}
/*-----------------------------------------------------------------------------------*/

#endif /* LWIP_NETCONN */
tcpecho.h代码如下;
#ifndef LWIP_TCPECHO_H
#define LWIP_TCPECHO_H

void tcpecho_init(void);

#endif /* LWIP_TCPECHO_H */
之后在main.h添加代码头文件(其他地方也行,只要不报错):#include "tcpecho.h"
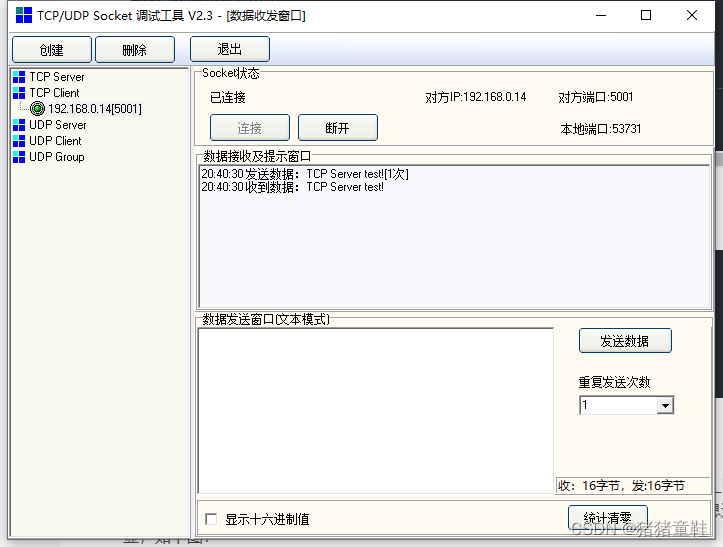
最后再找到FreeRTOS的第一个任务,将"tcpecho_init();"语句添加到语句 "MX_LWIP_Init();的后面即可",随后编译,再用网络调试助手进行TCP连接已经可以连接上,并且发送的信息还可以回显,如下图:
第三天续写:
如果要实现TCP_Client功能,只需在第一天的基础上做些许改动,具体步骤如下:
新建两个文件,将其加入工程中(别忘了编译路径,我是放在了LWIP/APP目录下),代码如下:
"client.c"代码如下:
/*
 * Copyright (c) 2001-2003 Swedish Institute of Computer Science.
 * All rights reserved.
 *
 * Redistribution and use in source and binary forms, with or without modification,
 * are permitted provided that the following conditions are met:
 *
 * 1. Redistributions of source code must retain the above copyright notice,
 *    this list of conditions and the following disclaimer.
 * 2. Redistributions in binary form must reproduce the above copyright notice,
 *    this list of conditions and the following disclaimer in the documentation
 *    and/or other materials provided with the distribution.
 * 3. The name of the author may not be used to endorse or promote products
 *    derived from this software without specific prior written permission.
 *
 * THIS SOFTWARE IS PROVIDED BY THE AUTHOR ``AS IS'' AND ANY EXPRESS OR IMPLIED
 * WARRANTIES, INCLUDING, BUT NOT LIMITED TO, THE IMPLIED WARRANTIES OF
 * MERCHANTABILITY AND FITNESS FOR A PARTICULAR PURPOSE ARE DISCLAIMED. IN NO EVENT
 * SHALL THE AUTHOR BE LIABLE FOR ANY DIRECT, INDIRECT, INCIDENTAL, SPECIAL,
 * EXEMPLARY, OR CONSEQUENTIAL DAMAGES (INCLUDING, BUT NOT LIMITED TO, PROCUREMENT
 * OF SUBSTITUTE GOODS OR SERVICES; LOSS OF USE, DATA, OR PROFITS; OR BUSINESS
 * INTERRUPTION) HOWEVER CAUSED AND ON ANY THEORY OF LIABILITY, WHETHER IN
 * CONTRACT, STRICT LIABILITY, OR TORT (INCLUDING NEGLIGENCE OR OTHERWISE) ARISING
 * IN ANY WAY OUT OF THE USE OF THIS SOFTWARE, EVEN IF ADVISED OF THE POSSIBILITY
 * OF SUCH DAMAGE.
 *
 * This file is part of the lwIP TCP/IP stack.
 *
 * Author: Adam Dunkels <adam@sics.se>
 *
 */
#include "client.h"

#include "lwip/opt.h"

#include "lwip/sys.h"
#include "lwip/api.h"

#include <lwip/sockets.h>


#define DEST_IP_ADDR0               192
#define DEST_IP_ADDR1               168
#define DEST_IP_ADDR2                 0
#define DEST_IP_ADDR3               15

#define DEST_PORT                  5001

static void client(void *thread_param)
{
  int sock = -1;
  struct sockaddr_in client_addr;

  ip4_addr_t ipaddr;

  uint8_t send_buf[]= "This is a TCP Client test...\n";

  printf("目地IP地址:%d.%d.%d.%d \t 端口号:%d\n\n",      \
          DEST_IP_ADDR0,DEST_IP_ADDR1,DEST_IP_ADDR2,DEST_IP_ADDR3,DEST_PORT);

  printf("请将电脑上位机设置为TCP Server.在User/arch/sys_arch.h文件中将目标IP地址修改为您电脑上的IP地址\n\n");

  printf("修改对应的宏定义:DEST_IP_ADDR0,DEST_IP_ADDR1,DEST_IP_ADDR2,DEST_IP_ADDR3,DEST_PORT\n\n");

  IP4_ADDR(&ipaddr,DEST_IP_ADDR0,DEST_IP_ADDR1,DEST_IP_ADDR2,DEST_IP_ADDR3);
  while(1)
  {
    sock = socket(AF_INET, SOCK_STREAM, 0);
    if (sock < 0)
    {
//      printf("Socket error\n");
      vTaskDelay(10);
      continue;
    }

    client_addr.sin_family = AF_INET;
    client_addr.sin_port = htons(DEST_PORT);
    client_addr.sin_addr.s_addr = ipaddr.addr;
    memset(&(client_addr.sin_zero), 0, sizeof(client_addr.sin_zero));

    if (connect(sock,
               (struct sockaddr *)&client_addr,
                sizeof(struct sockaddr)) == -1)
    {
//        printf("Connect failed!\n");
        closesocket(sock);
        vTaskDelay(10);
        continue;
    }

    printf("Connect to server successful!\n");

    while (1)
    {
      if(write(sock,send_buf,sizeof(send_buf)) < 0)
        break;

      vTaskDelay(1000);
    }

    closesocket(sock);
  }

}

void
client_init(void)
{
  sys_thread_new("client", client, NULL, 512, 4);
}
"client.h"代码如下:
#ifndef _CLIENT_H
#define _CLIENT_H

void client_init(void);

#endif /* _CLIENT_H */
之后在main.h添加代码头文件(其他地方也行,只要不报错):#include "tcpecho.h"
最后再找到FreeRTOS的第一个任务,将"tcpecho_init();"语句添加到语句 "client_init();的后面即可",随后编译,再用网络调试助手创建TCP_Server,将代码下入开发板一会可以看到已经可以连接上,定时接收到开发板发送的消息,并且电脑发送的信息还可以回显,如下图:

至此LWIP+FreeRTOS进行TCP连接的功能就已经全部实现了,但是我还发现一个问题就是当程序正常运行时如果按下复位键重启,任务可以正常运行,LED灯可以正常闪烁,但是LWIP不能正常运行,电脑也ping不通,除非开发板断电重启。这个问题我也是刚发现,具体问题还需后面继续查找,待找到原因后将会更新后续。
事隔接近10天后,终于把剩下的问题解决了,最近大降温,同时也比较忙,终于有时间把它解决了。
之前遗留的问题其实就是热插拔的问题。这段时间我也参考了很多大佬的解决办法,但是我尝试了适合我们这种静态IP的解决办法的就是增加3个字符:找到ethernetif.c文件,将其中的ethernet_link_thread函数的倒数第三条语句“HAL_ETH_Start(&heth);”修改成“HAL_ETH_Start_IT(&heth);”。其实就是在括号前加了“_IT”这三个字符。虽然只是简单的换了字符,但是启动方式却不一样,采用中断接收后热插拔的功能也就实现了。
至此STM32F4 LWIP+FreeRTOS实现TCP通信的博客终于告一段落!希望对大家有所帮助。
本文内容由网友自发贡献,版权归原作者所有,本站不承担相应法律责任。如您发现有涉嫌抄袭侵权的内容,请联系:hwhale#tublm.com(使用前将#替换为@)