文章目录
- 一、Django 模型——ORM
- 二、数据库配置
- 三、定义模型(创建数据表)
- 四、数据库基本操作
- - 插入数据
- - 获取数据
- (1)查询所有的数据行
- (2)where条件查询
- (3)获取单个对象
- (4)限制返回的数据
- (5)数据排序
- (6)混合查询
- - 更新数据
- - 删除数据
此文章参考菜鸟教程:Django 模型 | 菜鸟教程 (runoob.com)
Django版本:
>>> django.VERSION
(4, 1, 0, 'final', 0)
下面使用数据库为Mysql5.7
PS:基于前几章的进度进行修改
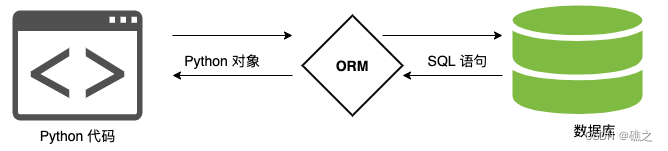
一、Django 模型——ORM
- Django对各种数据库都提供了很好的支持,例如:PostgreSQL、Mysql、Oracle等。并且
Django为这些数据库提供了统一的API,也就是说我们调用不同的数据库时,只需要使用一种方式即可 - Django 模型使用自带的
ORM,用于实现面向对象编程语言中不同类型系统数据之间的转换
对象关系映射(Object Relational Mapping,简称ORM):ORM模式是一种为了解决面向对象与关系数据库存在的互不匹配的现象的技术。简单的说,ORM是通过使用描述对象和数据库之间映射的元数据,将程序中的对象自动持久化到关系数据库中。
优点:
- 提高开发效率
- 不同数据库可以平滑切换
缺点:
- ORM代码转换成SQL语句时,需要花费一定的时间,会降低执行效率
- 长期写ORM代码,会降低SQL语句的能力
- ORM会将Python代码转换成SQL语句
- SQL语句通过pymysql传送到数据库服务端
- 在数据库执行SQL语句并且返回结果
二、数据库配置
- Django配置mysql数据库,在项目的
settings.py文件中找到DATABASES配置项进行修改
mysql> create database test default charset=utf8;
Query OK, 1 row affected, 1 warning (0.00 sec)
DATABASES = {
'default': {
'ENGINE': 'django.db.backends.sqlite3',
'NAME': BASE_DIR / 'db.sqlite3',
}
}
DATABASES = {
'default':
{
'ENGINE': 'django.db.backends.mysql',
'NAME': 'test',
'HOST': '10.10.30.69',
'PORT': 3306,
'USER': 'root',
'PASSWORD': 'fosafer.com',
}
}
- 然后修改项目目录中的
__init__.py文件,导入mysql模块
import pymysql
pymysql.install_as_MySQLdb()
- 这时可能会报错,找不到模块pymysql,可以安装一下
(test) PS F:\django\helloworld> pip install pymysql
Collecting pymysql
Using cached PyMySQL-1.0.2-py3-none-any.whl (43 kB)
Installing collected packages: pymysql
Successfully installed pymysql-1.0.2
WARNING: You are using pip version 22.0.4; however, version 22.2.2 is available.
You should consider upgrading via the 'F:\django\test\Scripts\python.exe -m pip install --upgrade pip' command.
(test) PS F:\django\helloworld> python .\manage.py runserver 0.0.0.0:8000
Watching for file changes with StatReloader
Performing system checks...
System check identified no issues (0 silenced).
You have 18 unapplied migration(s). Your project may not work properly until you apply the migrations for app(s): admin, auth, contenttypes, sessions.
Run 'python manage.py migrate' to apply them.
August 18, 2022 - 11:20:59
Django version 4.1, using settings 'helloworld.settings'
Starting development server at http://0.0.0.0:8000/
Quit the server with CTRL-BREAK.
三、定义模型(创建数据表)
(test) PS F:\django\helloworld> django-admin startapp TestModel
(test) PS F:\django\helloworld> ls
目录: F:\django\helloworld
Mode LastWriteTime Length Name
---- ------------- ------ ----
d----- 2022/8/17 14:17 helloworld
d----- 2022/8/18 10:45 static
d----- 2022/8/17 14:17 templates
d----- 2022/8/18 13:57 TestModel
-a---- 2022/8/17 10:49 0 db.sqlite3
-a---- 2022/8/17 10:49 688 manage.py
(test) PS F:\django\helloworld> cd TestModel
(test) PS F:\django\helloworld\TestModel> ls
目录: F:\django\helloworld\TestModel
Mode LastWriteTime Length Name
---- ------------- ------ ----
d----- 2022/8/18 13:57 migrations
-a---- 2022/8/18 13:57 66 admin.py
-a---- 2022/8/18 13:57 156 apps.py
-a---- 2022/8/18 13:57 60 models.py
-a---- 2022/8/18 13:57 63 tests.py
-a---- 2022/8/18 13:57 66 views.py
-a---- 2022/8/18 13:57 0 __init__.py
from django.db import models

class Aaa(models.Model):
    name = models.CharField(max_length=20)
    age = models.CharField(max_legth=3)
解析:
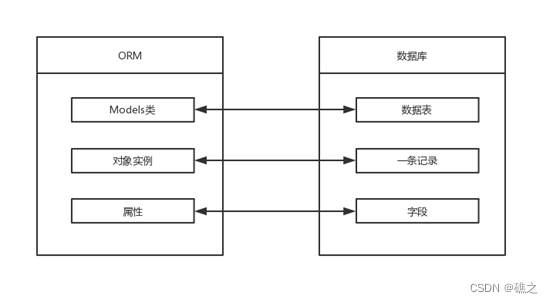
- 上面定义的类名称
Aaa,代表了数据库的表名 - Test类继承了
models.Model - 类中的字段代表数据表中的字段,也就是
name,数据类型有CharField(相当于varchar)、DateField(相当于datetime),而max_length参数用来限定长度
最终会创建一个名叫TestModel_aaa的表,名称是app+类的名称组成的,表中的字段有name,name字段的数据类型为varchar,限制20个长度,相当于下面的sql语句:
注意:如果没有设置主键,那么django会自动添加一个id的主键
CREATE TABLE TestModel_aaa(
    "id" serial NOT NULL PRIMARY KEY,
	"name" varchar(20) NOT NULL,
    "age" varchar(3) NOT NULL
);
创建模型之后需要告诉Django,在setting.py文件中,添加app,添加新创建模型名称即可
INSTALLED_APPS = [
'django.contrib.admin',
'django.contrib.auth',
'django.contrib.contenttypes',
'django.contrib.sessions',
'django.contrib.messages',
'django.contrib.staticfiles',
'TestModel',
]
(test) PS F:\django\helloworld> python manage.py migrate
- 执行上面的命令后,查看mysql数据库,可以发现已经创建了数据表
mysql> show tables;
+----------------------------+
| Tables_in_test |
+----------------------------+
| auth_group |
| auth_group_permissions |
| auth_permission |
| auth_user |
| auth_user_groups |
| auth_user_user_permissions |
| django_admin_log |
| django_content_type |
| django_migrations |
| django_session |
+----------------------------+
10 rows in set (0.00 sec)
- 下面来创建TestModel模型的表
(test) PS F:\django\helloworld> python manage.py makemigrations TestModel
- Create model Aaa
(test) PS F:\django\helloworld> python manage.py migrate TestModel
Applying TestModel.0001_initial... OK
- 再次查看数据库,发现创建了TestModel_aaa 表
mysql> show tables;
+----------------------------+
| Tables_in_test |
+----------------------------+
| TestModel_aaa |
| auth_group |
| auth_group_permissions |
| auth_permission |
| auth_user |
| auth_user_groups |
| auth_user_user_permissions |
| django_admin_log |
| django_content_type |
| django_migrations |
| django_session |
+----------------------------+
11 rows in set (0.00 sec)
- 查看表结构,可以看到 id 字段为主键
mysql> show create table TestModel_aaa;
+---------------+-------------------------------------------------------------------------------------------------------------------------------------------------------------------------------------------------+
| Table | Create Table |
+---------------+-------------------------------------------------------------------------------------------------------------------------------------------------------------------------------------------------+
| TestModel_aaa | CREATE TABLE `TestModel_aaa` (
`id` bigint(20) NOT NULL AUTO_INCREMENT,
`name` varchar(20) NOT NULL,
`age` varchar(3) NOT NULL,
PRIMARY KEY (`id`)
) ENGINE=InnoDB DEFAULT CHARSET=utf8 |
+---------------+-------------------------------------------------------------------------------------------------------------------------------------------------------------------------------------------------+
1 row in set (0.00 sec)
mysql> describe TestModel_aaa;
+-------+-------------+------+-----+---------+----------------+
| Field | Type | Null | Key | Default | Extra |
+-------+-------------+------+-----+---------+----------------+
| id | bigint(20) | NO | PRI | NULL | auto_increment |
| name | varchar(20) | NO | | NULL | |
| age | varchar(3) | NO | | NULL | |
+-------+-------------+------+-----+---------+----------------+
3 rows in set (0.00 sec)
四、数据库基本操作
- 插入数据
- 在
HelloWorld容器目录下添加testdb.py文件,并修改urls.py文件
- 修改HelloWorld/HelloWorld/urls.py 文件
from django.urls import path
from . import index_test,testdb
urlpatterns = [
path('hello/',index_test.Hello),
path('testdb/',testdb.testdb)
]
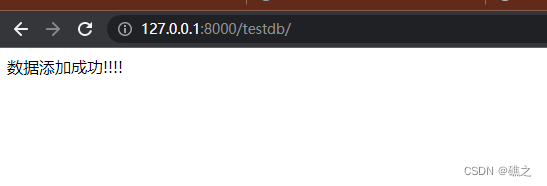
- 添加HelloWorld/HelloWorld/testdb.py 文件
from django.http import HttpResponse
from TestModel.models import Aaa
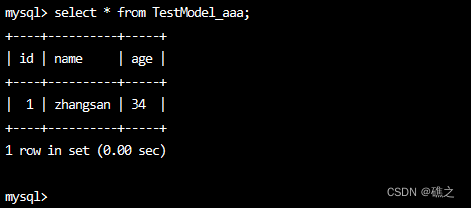
def testdb(request):
test1 = Aaa(name="zhangsan",age="34")
test1.save()
return HttpResponse("<p>数据添加成功!!!!</p>")
(test) PS F:\django\helloworld> python .\manage.py runserver 8000
Watching for file changes with StatReloader
Performing system checks...

System check identified no issues (0 silenced).
August 19, 2022 - 16:33:21
Django version 4.1, using settings 'helloworld.settings'
Starting development server at http://127.0.0.1:8000/
Quit the server with CTRL-BREAK.
- 获取数据
- 上面的
testdb.py编写的是插入数据,下面来看查询数据
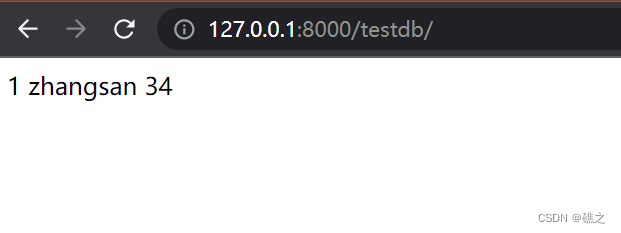
(1)查询所有的数据行
- 修改testdb.py
from django.http import HttpResponse
from TestModel.models import Aaa
def testdb(request):
response = ""
response_id = ""
response1 = ""
response2 = ""
list = Aaa.objects.all()
for i in list:
response1 = i.id
response2 += i.name + " " + i.age + ""
response = response2
response_id = str(response1)
return HttpResponse("<p>" + response_id + " " + response + "</p>")
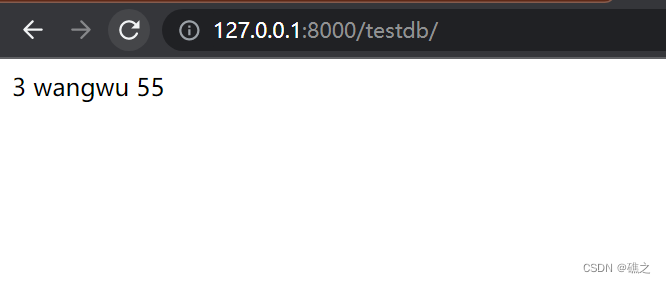
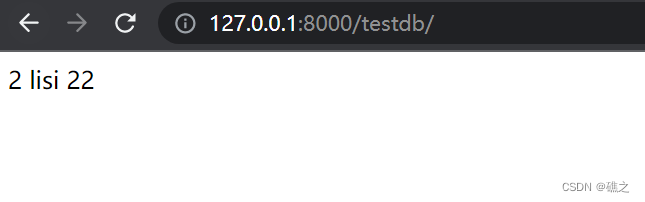
(2)where条件查询
- 现在数据库中,手动增加几条数据,以便看到效果:
mysql> insert into TestModel_aaa values(2,"lisi","22");
Query OK, 1 row affected (0.06 sec)
mysql> insert into TestModel_aaa values(3,"wangwu","55");
Query OK, 1 row affected (0.08 sec)
mysql> select * from TestModel_aaa;
+----+----------+-----+
| id | name | age |
+----+----------+-----+
| 1 | zhangsan | 34 |
| 2 | lisi | 22 |
| 3 | wangwu | 55 |
+----+----------+-----+
3 rows in set (0.00 sec)
- 修改testdb.py
from django.http import HttpResponse
from TestModel.models import Aaa
def testdb(request):
response = ""
response_id = ""
response1 = ""
response2 = ""
list = Aaa.objects.filter(id=3)
for i in list:
response1 = i.id
response2 += i.name + " " + i.age + ""
response = response2
response_id = str(response1)
return HttpResponse("<p>" + response_id + " " + response + "</p>")
from django.http import HttpResponse
from TestModel.models import Aaa
def testdb(request):
response = ""
response_id = ""
response1 = ""
response2 = ""
list = Aaa.objects.filter(name="lisi")
for i in list:
response1 = i.id
response2 += i.name + " " + i.age + ""
response = response2
response_id = str(response1)
return HttpResponse("<p>" + response_id + " " + response + "</p>")
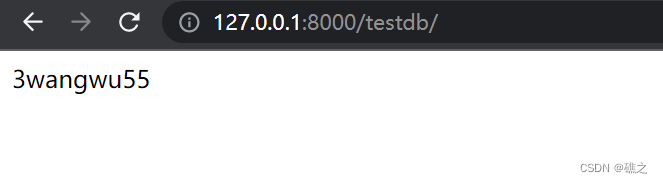
(3)获取单个对象
- 修改testdb.py
from django.http import HttpResponse
from TestModel.models import Aaa
def testdb(request):
list = Aaa.objects.get(id=3)
return HttpResponse("<p>" + str(list.id) + list.name + list.age +"</p>")
- 使用
get获取的是单个对象,不是可迭代数据,所以可以直接取值,下面来访问一下
(4)限制返回的数据
- 注释
offset 1:表示跳过第1行,因为是根据下标,所以第一行数据行是0开始
limit 2:表示获取前两行
- 下面修改testdb.py文件
from django.http import HttpResponse
from TestModel.models import Aaa
def testdb(request):
response = ""
response1 = ""
list = Aaa.objects.order_by("name")[0:2]
for i in list:
response1 += i.name + " "
response = response1
return HttpResponse("<p>" + response + "</p>")
-
访问,可以看到,显示的是前两行
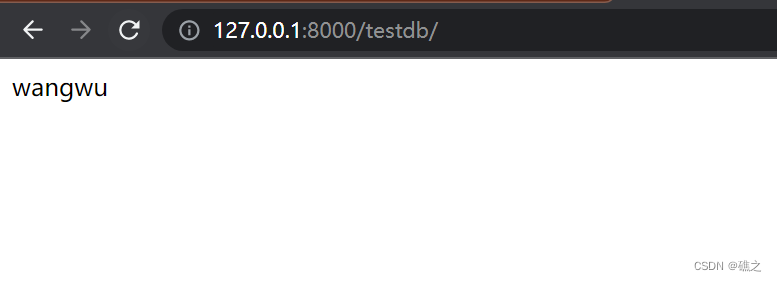
-
再次修改进行访问
from django.http import HttpResponse
from TestModel.models import Aaa
def testdb(request):
response = ""
response1 = ""
list = Aaa.objects.order_by("name")[1:2]
for i in list:
response1 += i.name + " "
response = response1
return HttpResponse("<p>" + response + "</p>")
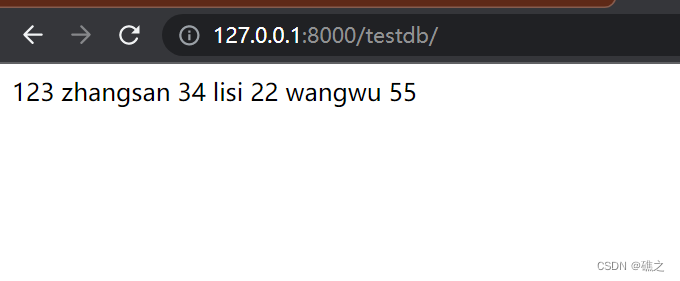
(5)数据排序
- 修改testdb.py文件
from django.http import HttpResponse
from TestModel.models import Aaa
def testdb(request):
response = ""
response_id = ""
response1 = ""
response2 = ""
list = Aaa.objects.order_by("id")
for i in list:
response1 += str(i.id)
response2 += i.name + " " + i.age + " "
response = response2
response_id = response1
return HttpResponse("<p>" + response_id + " " + response + "</p>")
-
访问
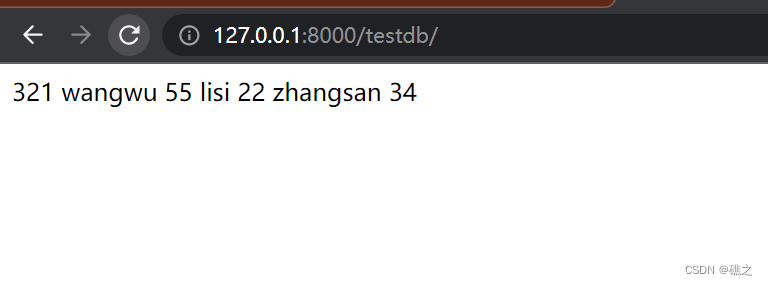
-
上面是从小到大,下面是从大到小
- 修改testdb.py文件
from django.http import HttpResponse
from TestModel.models import Aaa
def testdb(request):
response = ""
response_id = ""
response1 = ""
response2 = ""
list = Aaa.objects.order_by("-id")
for i in list:
response1 += str(i.id)
response2 += i.name + " " + i.age + " "
response = response2
response_id = response1
return HttpResponse("<p>" + response_id + " " + response + "</p>")
(6)混合查询
- 往数据库添加数据
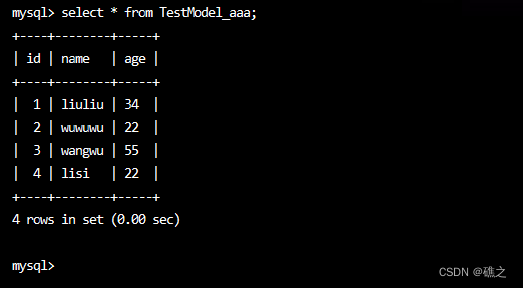
mysql> insert into TestModel_aaa values(4,"lisi","22");
Query OK, 1 row affected (0.15 sec)
mysql> select * from TestModel_aaa;
+----+----------+-----+
| id | name | age |
+----+----------+-----+
| 1 | zhangsan | 34 |
| 2 | lisi | 22 |
| 3 | wangwu | 55 |
| 4 | lisi | 22 |
+----+----------+-----+
4 rows in set (0.00 sec)
- 修改testdb.py文件
from django.http import HttpResponse
from TestModel.models import Aaa
def testdb(request):
response = ""
response_id = ""
response1 = ""
response2 = ""
list = Aaa.objects.filter(name="lisi").order_by("id")
for i in list:
response1 += str(i.id)
response2 += i.name + " " + i.age + " "
response = response2
response_id = response1
return HttpResponse("<p>" + response_id + " " + response + "</p>")

- 更新数据
- 修改testdb.py文件
from django.http import HttpResponse
from TestModel.models import Aaa
def testdb(request):
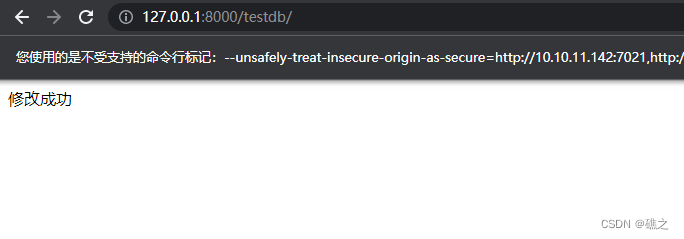
test1 = Aaa.objects.get(id=1)
test1.name = "liuliu"
test1.save()
return HttpResponse("<p>修改成功</p>")
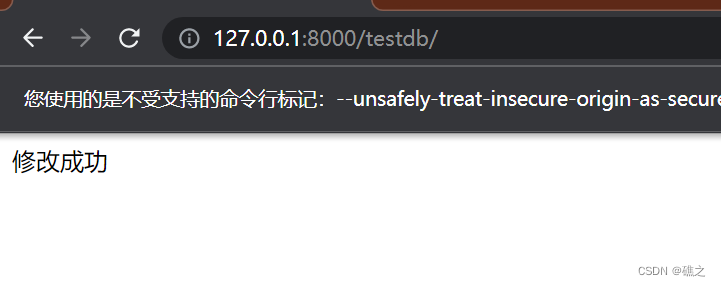
- 修改testdb.py
from django.http import HttpResponse
from TestModel.models import Aaa
def testdb(request):
Aaa.objects.filter(id=2).update(name="wuwuwu")
return HttpResponse("<p>修改成功</p>")
- 上面是根据条件修改,下面来看修改所有的列,与上面的方法同理,修改指定数据行使用
filter那么修改全部就是all
- 修改testdb.py
from django.http import HttpResponse
from TestModel.models import Aaa
def testdb(request):
Aaa.objects.all().update(age="120")
return HttpResponse("<p>全部修改成功</p>")

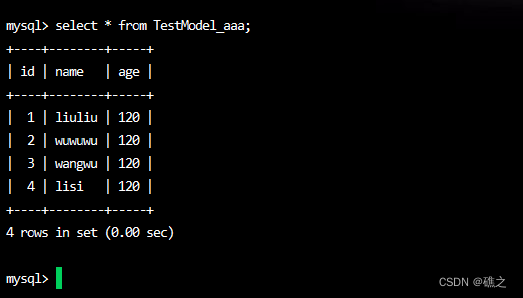
- 删除数据
- 修改testdb.py
from django.http import HttpResponse
from TestModel.models import Aaa
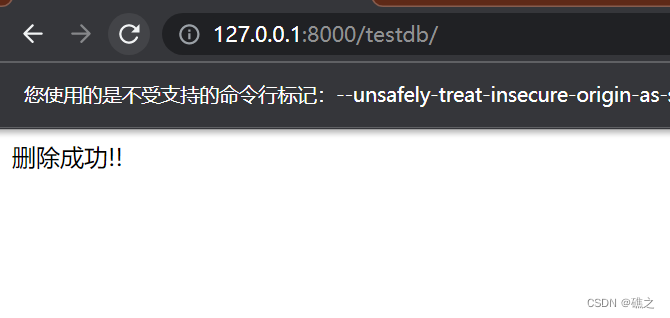
def testdb(request):
test1 = Aaa.objects.get(id=1)
test1.delete()
return HttpResponse("<p>删除成功!!</p>")
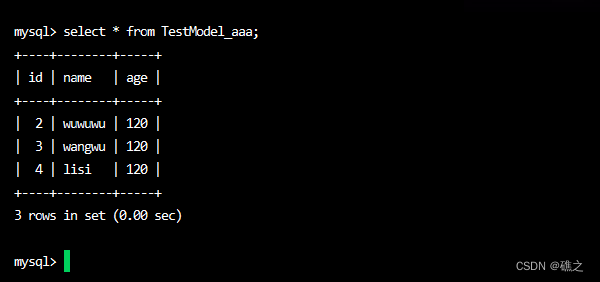
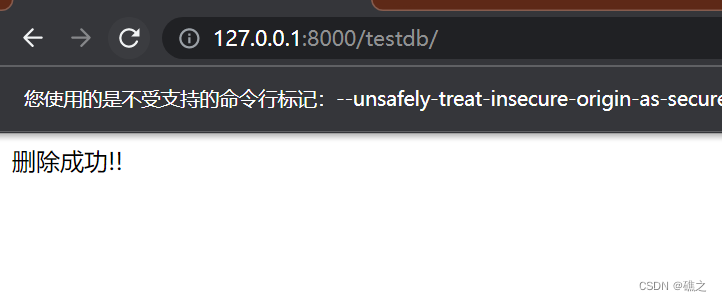
- 修改testdb.py
from django.http import HttpResponse
from TestModel.models import Aaa
def testdb(request):
Aaa.objects.filter(id=2).delete()
return HttpResponse("<p>删除成功!!</p>")

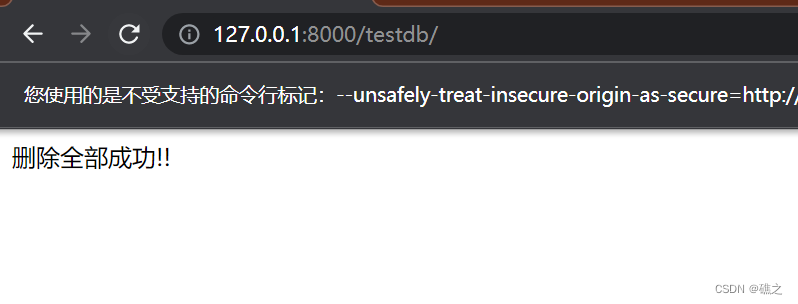
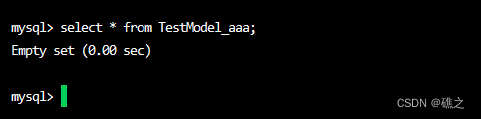
- 修改testdb.py
from django.http import HttpResponse
from TestModel.models import Aaa
def testdb(request):
Aaa.objects.all().delete()
return HttpResponse("<p>删除全部成功!!</p>")
本文内容由网友自发贡献,版权归原作者所有,本站不承担相应法律责任。如您发现有涉嫌抄袭侵权的内容,请联系:hwhale#tublm.com(使用前将#替换为@)