VNC登录用户缺省是root,但在安装oracle时必须用oracle用户的身份登录,下面我们就以oracle为例说明如何配置VNC,从而可以使用不同的用户登录到主机。
步骤描述如下:
步骤一:修改/etc/sysconfig/vncservers,添加oracle用户,修改后内容如下:
VNCSERVERS="1:root 2:root 3:oracle"
VNCSERVERARGS[1]="-geometry 1024x768"
VNCSERVERARGS[2]="-geometry 1024x768"
VNCSERVERARGS[3]="-geometry 1024x768"
步骤二:在系统中新建oracle用户
useradd oracle
passwd oracle
步骤三:将root用户下的路径复制到oracle用户的home路径下,并修改路径所属用户及组:
cp -r /root/.vnc ~oracle/.vnc
chown oracle ~oracle/.vnc/
chown oracle.oinstall -R ~oracle/.vnc/
chown oracle ~oracle/.vnc/*
chown oracle.oinstall -R ~oracle/.vnc/*
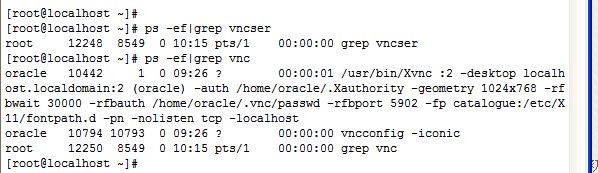
步骤四:重启VNC,观察id为3的端口是否启动
service vncserver restart
netstat -anlpt | grep 5903
vnc的端口从5901开始,每增加一个用户,端口号就在5901上加1。如果要单独关闭指定id的端口,可以使用命令:
vncserver -kill :id
如:
vncserver -kill :1
vncserver -kill :2
就将关闭5901和5902两个VNC端口
http://blog.sina.com.cn/s/blog_4a0a14170100f5lo.html
http://www.hackbase.com/tech/2012-03-21/66032.html


1、安装
yum install vnc*
2、启动
/etc/init.d/vncserver start
Starting VNC server: no displays configured [ OK ]
3、配置用户名
CODE:[root@localhost ~]# vi /etc/sysconfig/vncservers
# The VNCSERVERS variable is a list of display:user pairs.
#
# Uncomment the line below to start a VNC server on display :1
# as my 'myusername' (adjust this to your own). You will also
# need to set a VNC password; run 'man vncpasswd' to see how
# to do that.
#
# DO NOT RUN THIS SERVICE if your local area network is
# untrusted! For a secure way of using VNC, see
# URL:
http://www.uk.research.att.com/vnc/sshvnc.html
# VNCSERVERS="1:myusername"
VNCSERVERS="1:root" (注意:root是CentOS用户名)
如果建2个,可以用VNCSERVERS="1:root 2:linglong"来配置
3.用vncpasswd创建一个vnc的口令
注意这将同时在你的home目录下,创建一个隐藏的目录.vnc,其中有一个文件passwd保存着你的vnc口令.
CODE:
[root@localhost ~]# vncpasswd
Password:
Verify:
[root@localhost ~]# ls -d .vnc
.vnc
[root@localhost ~]# ls .vnc
passwd
4.启动vnc服务.
CODE:[root@localhost ~]# /sbin/service vncserver restart
Shutting down VNC server: 1:root [ OK ]
Starting VNC server: 1:root perl: warning: Setting locale failed.
perl: warning: Please check that your locale settings:
LANGUAGE = (unset),
LC_ALL = (unset),
LANG = "zh_EN.UTF-8"
are supported and installed on your system.
perl: warning: Falling back to the standard locale ("C").
New 'localhost.localdomain:1 (root)' desktop is localhost.localdomain:1
Starting applications specified in /root/.vnc/xstartup
Log file is /root/.vnc/localhost.localdomain:1.log
[ OK ]
察看一下.vnc这个目录的内容,应该类似于下面的东西.
注:在这里我刚开始出现“Warning: ***** is taken because of /tmp/.X1-lock”
在网上找了好多方法,终于找到解决办法了!
我直接将: /tmp/.X1-lock 删除就可以 了 ,命令式: rm /tmp/.X1-lock
如果还出现其他的文件错误 也可照样操作!
CODE:[root@localhost ~]# cd .vnc
[root@localhost .vnc]# ls
localhost.localdomain:1.log localhost.localdomain:2.log passwd
localhost.localdomain:1.pid localhost.localdomain:2.pid xstartup
[root@localhost .vnc]#
编辑这个名为xstartup的脚本,
将这内容前面的注释符号去掉,否则你将只能得到一个什么都没有的灰屏。
#!/bin/sh
# Uncomment the following two lines for normal desktop:
unset SESSION_MANAGER
exec /etc/X11/xinit/xinitrc
[ -x /etc/vnc/xstartup ] exec /etc/vnc/xstartup
[ -r $HOME/.Xresources ] xrdb $HOME/.Xresources
xsetroot -solid grey
vncconfig -iconic
xterm -geometry 80x24+10+10 -ls -title "$VNCDESKTOP Desktop"
twm
因为我们已经修改了启动脚本,现在来重新启动vncserver.
CODE:[root@localhost .vnc]# /sbin/service vncserver restart
Shutting down VNC server: 1:root [ OK ]
Starting VNC server: 1:root perl: warning: Setting locale failed.
perl: warning: Please check that your locale settings:
LANGUAGE = (unset),
LC_ALL = (unset),
LANG = "zh_EN.UTF-8"
are supported and installed on your system.
perl: warning: Falling back to the standard locale ("C").
New 'localhost.localdomain:1 (root)' desktop is localhost.localdomain:1
Starting applications specified in /root/.vnc/xstartup
Log file is /root/.vnc/localhost.localdomain:1.log
[ OK ]
[root@localhost .vnc]#
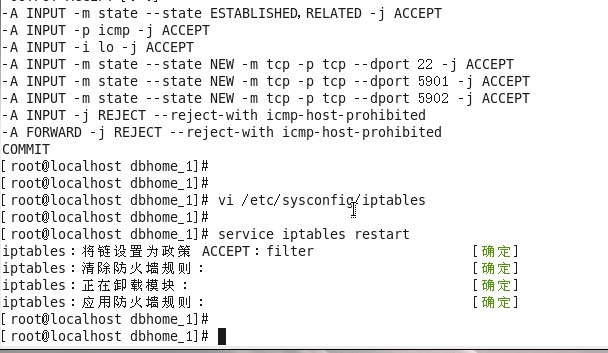
5.防火墙端口设置
在使用防火墙的情况下来连接到一个远程系统,需要打开端口5901.
加入以下红色的部分,然后重启iptables服务。
[root@localhost ~]# /sbin/service iptables restart
Flushing firewall rules: [ OK ]
Setting chains to policy ACCEPT: filter [ OK ]
Unloading iptables modules: [ OK ]
Applying iptables firewall rules: [ OK ]
[root@localhost ~]#
http://blog.163.com/yumen_guohou/blog/static/1683042812010628354781/
vim      /root/.vnc/xstartup   oracle用户 (/home/oracle/.vnc/xstartup)
twm &(默认文本类型桌面)修改为gnome-session(GNOME风格的桌面环境) startkde & (KDE风格桌面)
Redhat下VNC SERVER的配置
1、启动VNC SERVER
输入vncserver,第一次启动会要求输入验证密码,完成后,VNC SERVER就启动了
[root@localhost ~]# vncserver
You will require a password to access your desktops.
Password: //输入密码
Verify: //再次输入密码
xauth: creating new authority file /root/.Xauthority
New ‘localhost.localdomain:1 (root)’ desktop is localhost.localdomain:1
Creating default startup script /root/.vnc/xstartup
Starting applications specified in /root/.vnc/xstartup
Log file is /root/.vnc/localhost.localdomain:1.log
[root@localhost ~]#
2、编辑.vnc/xstartup
使用VI打开xstartup文件,如下:
[root@localhost /]# cd /root/.vnc
[root@localhost .vnc]# vi xstartup
删除全部内容,然后添加如下内容:
unset SESSION_MANAGER
exec /etc/X11/xinit/xinitrc
3、重启动VNC SERVER
[root@localhost ~]# vncserver -kill :1
Killing Xvnc process ID 21198
[root@localhost ~]# vncserver
New ‘localhost.localdomain:1 (root)’ desktop is localhost.localdomain:1
Starting applications specified in /root/.vnc/xstartup
Log file is /root/.vnc/localhost.localdomain:1.log
[root@localhost ~]#
4、查看VNC的监听端口
如下,VNC用到了三个端口:5801、5901、6001。
[root@localhost /]# netstat -nat
Active Internet connections (servers and established)
Proto Recv-Q Send-Q Local Address Foreign Address State
tcp 0 0 127.0.0.1:2208 0.0.0.0:* LISTEN
tcp 0 0 0.0.0.0:5801 0.0.0.0:* LISTEN
tcp 0 0 0.0.0.0:5901 0.0.0.0:* LISTEN
tcp 0 0 0.0.0.0:111 0.0.0.0:* LISTEN
tcp 0 0 0.0.0.0:6001 0.0.0.0:* LISTEN
tcp 0 0 0.0.0.0:724 0.0.0.0:* LISTEN
tcp 0 0 127.0.0.1:631 0.0.0.0:* LISTEN
tcp 0 0 127.0.0.1:2207 0.0.0.0:* LISTEN
tcp 0 0 172.200.102.3:5901 181.181.181.51:1669 ESTABLISHED
tcp 0 0 :::6001 :::* LISTEN
tcp 0 0 :::22 :::* LISTEN
tcp 0 1364 ::ffff:172.200.102.3:22 ::ffff:181.181.181.51:1599 ESTABLISHED
[root@localhost /]#
5、在防火墙上打开VNC用到的上面三个端口
[root@localhost /]# cd /etc/sysconfig
[root@localhost sysconfig]# vi iptables
添加如下三行:
-A RH-Firewall-1-INPUT -m state –state NEW -m tcp -p tcp –dport 5801 -j ACCEPT
-A RH-Firewall-1-INPUT -m state –state NEW -m tcp -p tcp –dport 5901 -j ACCEPT
-A RH-Firewall-1-INPUT -m state –state NEW -m tcp -p tcp –dport 6001 -j ACCEPT
重记动IPTABLES
[root@localhost sysconfig]# /etc/rc.d/init.d/iptables restart
Flushing firewall rules: [ OK ]
Setting chains to policy ACCEPT: filter [ OK ]
Unloading iptables modules: [ OK ]
Applying iptables firewall rules: [ OK ]
Loading additional iptables modules: ip_conntrack_netbios_ns ip_conntrack_ftp [ OK ]
或
[root@localhost sysconfig]#
6、使用VNC VIEW连接VNC SERVER
下载VNC VIEW,运行,然后输入IP:端口号,输入刚才设定的密码,进入REDHAT桌面。
http://www.aixchina.net/club/archiver/tid-27685.html
1、安装VNC
yum install vnc-server
2、添加多个用户
useradd user1 //添加用户user1
passwd user1 //设置用户的linux登录密码
su - user1 //切换到用户user1
vncpasswd //设置用户的user1登录密码
exit
useradd user2 //添加用户user2
passwd user2 //设置用户的linux登录密码
su - user2 //切换到用户user2
vncpasswd //设置用户的user2登录密码
exit
3、编辑vnc配置文件
vi /etc/sysconfig/vncservers
在最后加上:
VNCSERVERS="1:user1 2:user2"
VNCSERVERARGS[1]="-geometry 1024x768 -alwaysshared"
VNCSERVERARGS[2]="-geometry 1024x768 -alwaysshared"
注意:-geometry 1024x768表示分辨率;-alwaysshared 表示允许多终端同时登陆
配置多个桌面
Linux下VNC配置多个桌面和修改密码
可以使用如下的方法启动多个桌面的VNC
vncserver :1 vncserver :2 vncserver :3 ……
但是这种手工启动的方法在服务器重新启动之后将失效,因此,下面介绍如何让系统自动管理多个桌面的VNC,
方法是将需要自动管理的信息添加到/etc/sysconfig/vncservers配置文件中,先以桌面1为root用户桌面2为oracle用户为例进行配置如下:
格式为:VNCSERVERS="桌面号:使用的用户名 桌面号:使用的用户名"
[root@testdb ~]# vi /etc/sysconfig/vncservers
VNCSERVERS="1:root 2:oracle"
VNCSERVERARGS[1]="-geometry 1024x768"
VNCSERVERARGS[2]="-geometry 1024x768"
修改VNC访问的密码
使用命令vncpasswd对不同用户的VNC的密码进行修改,一定要注意,如果配置了不同用户的VNC
需要分别到各自用户中进行修改,例如在我的这个实验中,root用户和oracle用户需要分别修改,修改过程如下:
[root@testdb ~]# vncpasswd
Password:
Verify:
或vncpasswd oracle
vncpasswd root
4、打开对应的端口
打开5901至5902 端口用于vnc //如果需要配置更多的桌面,增加端口即可
iptables -I INPUT -p tcp --dport 5901:5902 -j ACCEPT
iptables -A INPUT -p tcp --dport 5901:5902 -j ACCEPT
永久保存
service iptables save
4.启动vncserver服务

service vncserver restart后vncview仍无法连接到vncserver,
此时可使用vncserver -list查看桌面,然后使用vncserver -kill :桌面号,最后使用vncserver :桌面号启动即可
1)启动全部桌面
service vncserver start
2)启动某一桌面
vncserver :1 //这里1表示第一个桌面
5、停止vncserver服务
1)停止全部桌面
service vncserver stop
2) 停止某一桌面
vncserver -kill :1 //停止第1个界面,要用kill命令来杀掉界面1的进程
6、查看当前有几个桌面在运行
service vncserver status
7、让vncserver服务随机启动
默认状态下,vncserver服务不是开机自动启动,需要手工启动。
chkconfig --list vncserver
chkconfig vncserver on
保存后,重启测试。
8.客户端登录vncserver服务
(1)先安装vncviewer来远程登录,
(2)然后在地址栏输入“主机地址:1”(即主机IP加界面号的方式)
http://blog.sina.com.cn/s/blog_4ab088470100x605.html
http://blog.csdn.net/jkxsanger/article/details/8897306
1.安装VNC
# rpm -ivh rpm -ivh vnc-server-4.1.2-9.el5.i386.rpm
# rpm -ivh vnc-4.1.2-9.el5.i386.rpm
VNC是Virtual Network Computing(虚拟网络计算机)的缩写。VNC是由AT&T的欧洲研究实验室开发的一款优秀的跨平台远程桌面控制软件,支持 Linux,Unix,Windows等操作系统跨平台远程桌面控制。VNC有两部分组成,分别是:服务端(vncserver)和客户端 (vncviewer)
1. 在配置VNC前,必须了解VNC的运行机制
Linux下的VNC可以同时启动多个vncserver,各个vncserver之间用显示编号(display number)来区分,每个vncserver服务监听3个端口,它们分别是:
5800+显示编号: VNC的httpd监听端口,如果VNC客户端为IE,Firefox等非vncviewer时必须开放。
5900+显示编号: VNC服务端与客户端通信的真正端口,必须无条件开放。
6000+显示编号: X监听端口,可选。
显示编号、开放的端口分别由/etc/sysconfig/vncservers文件中的VNCSERVERS和VNCSERVERARGS控制。
VNCSERVERS的设置方式为
“VNCSERVERS="显示编号1:用户名1 …"”,如:VNCSERVERS="1:root 2:aiezu"。
VNCSERVERARGS的设置方式为
VNCSERVERARGS[显示编号1]="参数一 参数值一 参数二 参数值二 ……",
如VNCSERVERARGS[2]="-geometry 800x600 -nohttpd",
VNCSERVERARGS的详细参数有:
-geometry 桌面分辨率,默认1024x768;
-nohttpd 不监听HTTP端口(58xx端口);
-nolisten tcp 不监听X端口(60xx端口);
-localhost 只允许从本机访问;
-AlwaysShared 默认只同时允许一个vncviewer连接,此参数允许同时连多个vncviewer;
-SecurityTypes None 登录不需要密码认证VncAuth默认值,要密码认证。
2. 修改/etc/sysconfig/vncserver文件
vi /etc/sysconfig/vncserver
VNCSERVERS="1:root"
VNCSERVERARGS[1]="-geometry 1024x768 -nolisten tcp"
本例我们开启两个vncserver,分别是root用户,显示编号为1和用户user2,显示编号为3,并且全不开启X监听端口60xx。
vi /etc/sysconfig/vncserver,添加如下三行:
VNCSERVERS="1:root 3:user2"
VNCSERVERARGS[1]="-geometry 800x600 -nolisten tcp -nohttpd -alwaysshared"
VNCSERVERARGS[3]="-geometry 1024x768 -nolisten tcp -nohttpd -alwaysshared"
防火墙相关:
如果Linux启用了防火墙,必须允许VNC的相关端口(58xx,59xx,60xx)。具体的端口,请参照第2大步骤的①小步骤的VNC运行机制介绍,本例开启,5901,5903端口就可以。在Linux命令提示符下输入"system-config-securitylevel-tui"启动防火墙配置工具,点"Customize",在"Other Port"中输入" 5901:tcp 5903:tcp",然后点"OK"既可。
3. 设置VNC用户密码
接下来设置VNC的密码,此步骤不可跳过,否则VNC Server将无法启动,在Linux Shell下执行下列命令:
# vncpasswd
设置VNC用户密码:此步骤不可跳过,否则VNC Server将无法启动
# su - user2
# vncpasswd
# su - root
# vncpasswd
4. 启动VNC
# service vncserver start
运行上面命令后,会在用户根目录($HOME)下的".vnc"文件夹下生成一系列文件。其中passwd为vnc用户密码文件,由vncpasswd生成。其他的都由vnc初次启动时生成,xstartup为VNC客户端连接时启动的脚本
5. 修改".vnc/xstartup"文件
#!/bin/sh
# Uncomment the following two lines for normal desktop:
unset SESSION_MANAGER
exec /etc/X11/xinit/xinitrc
[ -x /etc/vnc/xstartup ] && exec /etc/vnc/xstartup
[ -r $HOME/.Xresources ] && xrdb $HOME/.Xresources
xsetroot -solid grey
vncconfig -iconic &
#xterm -geometry 80x24+10+10 -ls -title "$VNCDESKTOP Desktop" &
twm &
就是去掉相关行的注释即可。
修改下面配置完成界面化的实现...
vi /root/.vnc/xstartup 去除注释下面兩行的注釋,使之生效。
unset SESSION_MANAGER
exec /etc/X11/xinit/xinitrc
最後一行修改為:gnome-session &
执行到上面步骤后,VNC Server已经能正常运行。但是默认设置下,客户连接时启动的是xterm,我们如果想看到桌面,必须将用户根目录下的".vnc/xstartup"文件中的最后两行注释掉,然后根据你安装的桌面坏境,添加一行"startkde &"或者"gnome-session &"。如下:
#!/bin/sh
# Uncomment the following two lines for normal desktop:
# unset SESSION_MANAGER
# exec /etc/X11/xinit/xinitrc
[ -x /etc/vnc/xstartup ] && exec /etc/vnc/xstartup
[ -r $HOME/.Xresources ] && xrdb $HOME/.Xresources
xsetroot -solid grey
vncconfig -iconic &
#xterm -geometry 80x24+10+10 -ls -title "$VNCDESKTOP Desktop" &
#twm &
startkde &
# gnome-session &
配置完各个用户根目录下的".vnc/xstartup"后,执行service vncserver restart 重新启动vncserver使配置生效。
6. 如果Linux启用了防火墙,必须允许VNC的相关端口(58xx,59xx,60xx)
7. 在windows下使用IE进行远程控制连接:
使用浏览器连接时,服务端的VNCSERVERARGS设置必须没有"-nohttpd参数",并且防火墙允许VNC的58xx和59xx端口通过。浏览器必须安装了Java支持插件,Java插件下载地址:http://www.java.com/zh_CN/download/manual.jsp
8. 如何使得linux启动时,vnc服务自动启动...
a. 系统设置>服务器设置>服务 中把 vncserver 打勾
b. chkconfig vncserver on
常见问题:
问:为什么成功连接后,没有显示桌面,而只是现实一个Terminal窗口? 答:在未修改用户根目录下的".vnc/xstartup"文件,xstartup的默认设置即是此情况。请按上面文件修改xstartup,然后运行"service vncserver restart"重新启动vncserver服务即可。
问:如何查看VNC正在运行的显示编号端口号? 答:在Linux命令提示符下执行"netstat -tlup|grep vnc",即可以查看到端口号,端口号的后两位即显示编号。
问:如何关闭指定的显示编号? 答:vncserver -kill :number 即可以关闭指定的显示编号和对应的端口号。
问:为何我通过浏览器连接VNC 端口时,浏览器显示了一个红叉。 答:那是因为你的浏览器没装Java插件的缘故,下载Java插件安装即可。
问:客户端连接时"Connetcion timed out(10060)"是怎么回事? 答:对于客户端连接时出现"Connetcion timed out(10060)"或者"No route to host:connect",请检查防火墙是否开启了58xx,59xx,vncserver是否正常运行,以及/etc/sysconfig /vncserver文件配置是否正确。
客户端的配置
如客户端为windows ,用putty详见SSH配置一文
客户端为linux:
1.vncviewer localhost:2 在本机执行
2.用ssh
ssh -L 5901:localhost:5901 -l foo myserver
需在sudo vi /etc/sysconfig/iptables中打开5901端口,
然后重启iptables
sudo /sbin/service iptables restart
或者直接用ip地址
ssh -L 5901:localhost:5901 -l foo 192.168.x.x
1.设置vncserver启动脚本(/etc/init.d/vncserver)实现系统自启动时启动vncserver.
# 在/etc/rc.d/rc.local文件中加入下面行
写道
/etc/init.d/vncserver start
#也可以用chkconfig命令实现系统自启动时启动vncserver
[root@CPAYNET005 ~]# chkconfig --level 2345 vncserver on
2、编辑/etc/sysconfig/vncservers
VNCSERVERS="1:root"
VNCSERVERARGS[1]="-geometry 1024x768"
在ARGS 中修改"1024x768"来适应自己的X桌面实际参数配置。可以在这里添加任何其他VNC服务器参数配置。在VNCSERVERS中修改 root 为你希望运行VNC桌面的用户。VNCSERVERS中的1表示VNC以桌面1运行,如果希望添加其他的桌面,可以修改配置如下:
写道
VNCSERVERS="1:user1 2:user2 3:user3"
3.设置vnc server的访问密码
使用vncpasswd命令
4、在RedHat系统上,使用以下命令启动VNC:
/etc/init.d/vncserver start
5、查看VNC Server启动情况
[root@CPAYNET005 ~]# netstat -tulnp
Active Internet connections (only servers)
Proto Recv-Q Send-Q Local Address Foreign Address State PID/Program name
tcp 0 0 0.0.0.0:5801 0.0.0.0:* LISTEN 5248/Xvnc
tcp 0 0 0.0.0.0:5901 0.0.0.0:* LISTEN 5248/Xvnc
tcp 0 0 0.0.0.0:6001 0.0.0.0:* LISTEN 5248/Xvnc
tcp 0 0 :::6001 :::* LISTEN 5248/Xvnc
注:如果在浏览器中通过web方式访问VNC则 端口为:5801,如果通过VNC客户端(比如VNC Viewer)来访问VNC则端口为:5901
NAME
Xvnc - an X server providing VNC connectivity
SYNOPSIS
Xvnc
-
[:
display] [-geometry
widthx
height] [-depth
depth] [-pixelformat rgb
NNN|bgr
NNN] [-udpinputport
port] [-rfbport
port] [-rfbwait
time] [-nocursor] [-rfbauth
passwd-file] [-httpd
dir] [-httpport
port] [-deferupdate
time] [-economictranslate] [-lazytight] [-desktop
name] [-alwaysshared] [-nevershared] [-dontdisconnect] [-viewonly] [-localhost] [-interface ipaddr] [-inetd] [-compatiblekbd] [
X-options...]
DESCRIPTION
Xvnc is a VNC (Virtual Network Computing) server. It acts like an X server with a virtual display. The display can be seen by a VNC viewer application, which may be running on a different machine: see
vncviewer(1). Xvnc is built inside the source code tree of XFree86, and shares many options with it.
Normally, you don't need to start Xvnc manually; use the vncserver(1) wrapper script instead. This script sets reasonable defaults for Xvnc session, checks many error conditions etc.
Please read the BUGS section if you plan to use VNC on an untrusted network.
OPTIONS
Xvnc supports many standard X server options and a number of VNC-specific options. To see what standard X server options are supported, please look at the
Xvnc
-help output and read the
Xserver(1) manual page for details on those options.
The VNC-specific options are as follows:
-geometry
width
x
height
-
Set desktop width and height.
-depth
depth
-
Set the colour depth of the visual to provide, in bits per pixel. Must be a value between 8 and 32.
-pixelformat
rgb
NNN|
bgr
NNN
-
Set colour format for pixels representation. The viewer can do the conversion to any other pixel format, but it is faster if the depth and pixel format of the server is the same as the equivalent values on the viewer display.
-udpinputport
port
-
UDP port for keyboard/pointer data.
-rfbport
port
-
TCP port for RFB protocol. The RFB protocol is used for commnunication between VNC server and clients.
-rfbwait
time
-
Maximum time, in milliseconds, to wait for an RFB client (VNC viewer).
-nocursor
-
Don't put up a pointer cursor on the desktop.
-rfbauth
passwd-file
-
Use authentication on RFB protocol from the specified file. The
passwd-file can be created using the
vncpasswd(1) utility.
-httpd
dir
-
Serve files via HTTP protocol from the specified directory. Normally, Java viewer classes are stored in such directory.
-httpport
port
-
TCP port on which Xvnc should listen for incoming HTTP connections (to allow access to the desktop from any Java-capable browser).
-deferupdate
time
-
Time in milliseconds, to defer screen updates (default 40). Deferring updates helps to coalesce many small desktop changes into a few larger updates thus saving network bandwidth.
-economictranslate
-
Use less memory-hungry pixel format translation.
-lazytight
-
Disable the "gradient" filter in Tight encoding (TightVNC-specific). The "gradient" filter often helps to improve data compression ratios, but may slow down the server performance. Please note that this filter is never used when a client enables JPEG compression in the Tight encoding.
-desktop
name
-
Set VNC desktop name ("x11" by default).
-alwaysshared
-
Always treat new clients as shared, never disconnect existing client on a new client connection.
-nevershared
-
Never treat new clients as shared, do not allow several simultaneous client connections.
-dontdisconnect
-
Don't disconnect existing clients when a new non-shared connection comes in, refuse new connection instead.
-viewonly
-
Don't accept keboard and pointer events from clients. All clients will be able to see the desktop but won't be able to control it.
-localhost
-
Only allow loopback connections from localhost. This option is useful in conjunction with SSH tunneling.
-interface
ipaddr
-
Listen for client connections only on the network interface with given
ipaddr.
-inetd
-
Xvnc is launched by inetd. This option causes
Xvncto redirect network input/output to stdin/stdout.
-compatiblekbd
-
Set META and ALT keys to the same X modifier flag, as in the original version of Xvnc by AT&T labs (TightVNC-specific).
BUGS
There are many security problems in current Xvnc implementation. It's recommended to restrict network access to Xvnc servers from untrusted network adresses. Probably, the best way to secure Xvnc server is to allow only loopback connections from the server machine (the
-localhost option) and to use SSH tunneling for remote access to the Xvnc server. For details on SSH tunneling, see <URL:
http://www.uk.research.att.com/vnc/sshvnc.html> .
SEE ALSO
vncserver(1),
vncviewer(1),
vncpasswd(1),
vncconnect(1),
sshd(1)
AUTHORS
Original VNC was developed in AT&T Laboratories Cambridge. TightVNC additions were implemented by Constantin Kaplinsky. Many other people participated in development, testing and support.
Man page authors:
Marcus Brinkmann <Marcus.Brinkmann at ruhr-uni-bochum.de>,
Tim Waugh <twaugh at redhat.com>,
Constantin Kaplinsky <const at tightvnc.com>
http://www.tightvnc.com/Xvnc.1.html
1. 在Linux下安装VNC
将Red Hat Enterprise Linux AS 5 DVD安装盘放入DVD光驱,执行下列命令进行安装:
- # mkdir -p /mnt/cdrom
- # mount -t auto /dev/cdrom /mnt/cdrom
- # cd /mnt/cdrom/Server
- # rpm -ivh rpm -ivh vnc-server-4.1.2-9.el5.i386.rpm
- # rpm -ivh vnc-4.1.2-9.el5.i386.rpm
2. 配置Linux下的VNC Server ①. VNC的运行机制介绍: 在配置VNC前,必须了解VNC的运行机制。Linux下的VNC可以同时启动多个vncserver,各个vncserver之间用显示编号(display number)来区分,每个vncserver服务监听3个端口,它们分别是: 5800+显示编号: VNC的httpd监听端口,如果VNC客户端为IE,Firefox等非vncviewer时必须开放。 5900+显示编号: VNC服务端与客户端通信的真正端口,必须无条件开放。 6000+显示编号: X监听端口,可选。 显示编号、开放的端口分别由/etc/sysconfig/vncservers文件中的VNCSERVERS和VNCSERVERARGS控制。VNCSERVERS的设置方式为“VNCSERVERS="显示编号1:用户名1 …"”,如:VNCSERVERS="1:root 2:aiezu"。VNCSERVERARGS的设置方式为VNCSERVERARGS[显示编号1]="参数一 参数值一 参数二 参数值二 ……",如VNCSERVERARGS[2]="-geometry 800x600 -nohttpd",VNCSERVERARGS的详细参数有:
| -geometry | 桌面分辨率,默认1024x768; |
| -nohttpd | 不监听HTTP端口(58xx端口); |
| -nolisten tcp | 不监听X端口(60xx端口); |
| -localhost | 只允许从本机访问; |
| -AlwaysShared | 默认只同时允许一个vncviewer连接,此参数允许同时连多个vncviewer; |
| -SecurityTypes None | 登录不需要密码认证VncAuth默认值,要密码认证。 |
②. 修改/etc/sysconfig/vncserver文件: 熟悉Linux下VNC的运行机制后,开始正式配置VNC Server。vi /etc/sysconfig/vncserver,添加如下三行:
- VNCSERVERS="1:root 3:aiezu"
- VNCSERVERARGS[1]="-geometry 800x600 -nolisten tcp"
- VNCSERVERARGS[3]="-geometry 1024x768 -nolisten tcp"
本例我们开启两个vncserver,分别是root用户,显示编号为1和用户aiezu,显示编号为3,并且全不开启X监听端口60xx。
③. 设置VNC用户密码: 接下来设置VNC的密码,此步骤不可跳过,否则VNC Server将无法启动,在Linux Shell下执行下列命令:
- # su - aiezu
- # vncpasswd
- Password:
- Verify:
- # su - root
- # vncpasswd
- Password:
- Verify:
- service vncserver start //启动vncserver
运行上面命令后,会在用户根目录($HOME)下的".vnc"文件夹下生成一系列文件。其中passwd为vnc用户密码文件,由vncpasswd生成。其他的都由vnc初次启动时生成,xstartup为VNC客户端连接时启动的脚本。
④. 修改".vnc/xstartup"文件: 执行到上面步骤后,VNC Server已经能正常运行。但是默认设置下,客户连接时启动的是xterm,我们如果想看到桌面,必须将用户根目录下的".vnc/xstartup"文件中的最后两行注释掉,然后根据你安装的桌面坏境,添加一行"startkde &"或者"gnome-session &"。如下:
- #!/bin/sh
-
- # Uncomment the following two lines for normal desktop:
- # unset SESSION_MANAGER
- # exec /etc/X11/xinit/xinitrc
- [ -x /etc/vnc/xstartup ] && exec /etc/vnc/xstartup
- [ -r $HOME/.Xresources ] && xrdb $HOME/.Xresources
- xsetroot -solid grey
- vncconfig -iconic &
- #xterm -geometry 80x24+10+10 -ls -title "$VNCDESKTOP Desktop" &
- #twm &
- startkde &
- # gnome-session &
配置完各个用户根目录下的".vnc/xstartup"后,执行service vncserver restart 重新启动vncserver使配置生效。
⑤. 配置防火墙:
如果Linux启用了防火墙,必须允许VNC的相关端口(58xx,59xx,60xx)。具体的端口,请参照第2大步骤的①小步骤的VNC运行机制介绍,本例开启5801,5803,5901,5903端口就可以。在Linux命令提示符下输入"system-config-securitylevel-tui"启动防火墙配置工具,点"Customize",在"Other Port"中输入"5801:tcp 5803:tcp 5901:tcp 5903:tcp",然后点"OK"既可。
VNC全屏和窗口模式的互换
⑴窗口转全屏:在调出的服务器端窗口的左上角图标处单击左键,或在任务栏服务器端窗口所在地单击右键,均可得出一个如下图的功能菜单,选其中的“Full screen”(全屏)即可由窗口转为全屏模式。
⑵全屏转窗口:按组合键“Ctrl+Esc”或直接按键盘上的窗口键均可现出本机的开始菜单和任务栏,再在任务栏服务器端窗口所在地单击右键,在如上图的功能菜单中再选其中的“Full screen”(全屏)即可由全屏转回窗口模式。
http://blog.sina.com.cn/s/blog_53864cba0100hrc3.html
VNC怎么和宿主机共享粘贴板
vncconfig -iconic
假设目标主机是linux,终端主机是windows(就是在windows上使用VNC登陆linux)
在linux中执行vncconfig -nowin&
在linux选中文字后,无需其他按键,直接在windows中可以黏贴。
在windows中选中文字,Ctrl+C,在linux中按中键黏贴。
具体表现为:
在使用vncconfig &命令后,上面的VNC config出现后,就可以按照上面说的进行复制粘贴了。
我的工作环境是这样的:服务器端使用Rays1.5r2,开了vncserver,桌面端使用WinXP,通过vncviewer访问服务器。
vncviewer支持server和viewer之间的剪贴板传输。但现在这项在我的环境下不管用。我猜是gnome的剪贴板管理机制的问题,如果单纯使用X环境,应该没问题。
以前使用vncviewer时有vncconfig这个命令,打开这个命令就可以激活剪贴板传输了。现在不知怎么搞的找不到这个命令了。经过查询RealVNC的maillist,找到了如下方法支持clipboard传输:
在xstartup的最后一行加入命令:
xcutsel &
这样在gnome桌面环境启动后会出现一个小小的程序,里面有3项:
1、quit
2、copy primary to 0
3、copy 0 to primary
在WinXP中复制ASCII内容后,点击3:copy 0 to primary,然后在gnome环境中点击鼠标中键,即可实现clipboard transfer。
同理,在gnome环境中复制ASCII内容后,点击2:copy primary to 0,然后就可以复制到WinXP中了。
http://blog.sina.com.cn/s/blog_6cef0cb50100rdbo.html
此OS下的vncserver如果要通过oracle登陆,需要在oracle帐户下执行vncserver :桌面号。/etc/sysconfig/vncservers中配置的VNCSERVERS参数不能决定使用vncviewer登陆后的帐户
PS:偶以前基本不用Linux的远程图形桌面,前几天有开发的同事配置CentOS的vnc有问题,找我解决,就顺便记录总结一下,这个总结是比较完整的。下面的配置在CentOS5.x和6.x、SUSE企业版亲测验证,其他发行版按理也通用:
一、安装相应桌面环境与vnc服务端和客户端:
# yum groupinstall "GNOME Desktop Environment"(CentOS 5.x安装GNOME桌面环境)
# yum groupinstall "X Window System" "Desktop"(CentOS 6.x安装GNOME桌面环境)
# yum groupinstall Xfce(CentOS安装Xfce桌面环境,可选)
# yum install vnc-server vnc* (CentOS 5.x里)
# yum install tigervnc-server tigervnc (CentOS 6.x里)
说明:Xfce与KDE,Gnome都是图形桌面环境,其特点是占用资源更小资源占用情况大致为:Gnome>KDE>Xfce。具体情况与版本有关。一般版本越新,资源占用越大。
二、VNC的启动和重启:
# /etc/init.d/vncserver restart
注:有时候上面的命令启动会报错,直接运行就可以:
# vncserver
注:关闭具体的vncserver命令:vncserver -kill :1 vncserver -kill :2
三、设置远程登陆到gnome桌面的配置:
# vim /etc/sysconfig/vncservers(SUSE企业版不用配置此文件)
再最后面加入如下两行:
VNCSERVERS="1:root"
VNCSERVERARGS[1]="-geometry 1024x768 -alwaysshared -depth 24"
说明:
1、-alwaysshared表示同一个显示端口允许多用户同时登录 -depth代为色深,参数有8、16、24、32;
2、这里的“用户名”是指linux系统用户的名称;
3、上面三行中第一行是设定可以使用VNC服务器的帐号,可以设定多个,但中间要用空格隔开。注意前面的数字“1”或是“2”,当你要从其它电脑来VNC服务器时,就需要用IP:1这种方法,而不能直接用IP。如假定你的VNC服务器IP是192.168.1.100,那想进入VNC服务器,并以peter用户登录时,需要在vncviewer里输入IP的地方输入:192.168.1.100:1,如果是root,那就是192.168.1.100:2;
4、下面两行[1][2]最好与上面那个相对应,后面的800X600可以换成你电脑支持的分辨率。注意中间的”x”不是“*”,而是小写字母”x”。
四、设置vnc访问密码:
# vncpasswd
说明:这里是为上面的root远程用户配密码,所以在root账户下配;依次类推,为别的账户配密码,就要在别的账户下设密码。
五:修改远程桌面显示配置文件:
# vim /root/.vnc/xstartup
#!/bin/sh
# Uncomment the following two lines for normal desktop:
unset SESSION_MANAGER
exec /etc/X11/xinit/xinitrc
[ -x /etc/vnc/xstartup ] && exec /etc/vnc/xstartup
[ -r $HOME/.Xresources ] && xrdb $HOME/.Xresources
xsetroot -solid grey
vncconfig -iconic &
xterm -geometry 80x24+10+10 -ls -title "$VNCDESKTOP Desktop" &
gnome-session & #set starting GNOME desktop
#startkde & #kde desktop
#twm & #Text interface
#/usr/bin/startxfce4
#exec /usr/bin/fluxbox
说明:
1、不修改此文件你看到的远程桌面很简单,相当于命令行操作,为了远程操作如同本地操作一样,务必参考以上方式进行修改;
2、只要你启用一次VNCserver,就能自动创建,方法如下:
# vncserver
通过上面的方法,就可以在用户家目录下的.vnc目录里创建xstartup文件。
六、vnc客户端登陆:
在vnc客户端中输入:服务器端IP:1 或 服务器端IP:2
iptables防火墙默认会阻止vnc远程桌面,所以需要在iptables允许通过。当你启动vnc服务后,你可以用netstat –tunlp命令来查看vnc服务所使用的端口,可以发现有5801,5901,6001等。使用下面命令开启这些端口:
# vim /etc/sysconfig/iptables
添加:
-A RH-Firewall-l-INPUT -p tcp -m tcp –dport 5801 -j ACCEPT
-A RH-Firewall-l-INPUT -p tcp -m tcp –dport 5901 -j ACCEPT
-A RH-Firewall-l-INPUT -p tcp -m tcp –dport 6001 -j ACCEPT
重启防火墙:
# /etc/init.d/iptables restart
或者直接关闭防火墙:
# /etc/init.d/iptables stop
七、开机自启动vncserver服务:
# chkconfig vncserver on
八、vnc的反向连接设置:
在大多数情况下,vncserver总处于监听状态,vnc client主动向服务器发出请求从而建立连接。然而在
一些特殊的场合,需要让vnc客户机处于监听状态,vncsrever主动向客户机发出连接请求,此谓vnc的
反向连接。
主要步骤:
a、启动vnc client,使vncviewer处于监听状态;
# vncviewer -listen
b、启动vncserver
# vncserver
c、在vncserver端执行vncconnect命令,发起server到client的请求;
# vncconnect -display :1 192.168.80.135
九、可能遇到的问题:
a、黑屏
在Linux里安装配置完VNC服务端,发现多用户登陆会出现黑屏的情况,具体的现象为:
客户端可以通过IP与会话号登陆进入系统,但登陆进去是漆黑一片,除了一个叉形的鼠标以外,伸手不见五指。
原因:用户的VNC的启动文件权限未设置正确。
解决方法:将黑屏用户的xstartup(一般为:/用户目录/.vnc/xstartup)文件的属性修改为755(rwxr-xr-x)。
完后杀掉所有已经启动的VNC客户端:
vncserver -kill :1
vncserver -kill :2 (注意:-kill与:1或:2中间有一空格)
最后重启vncserver服务即可! # /etc/init.d/vncserver restart
注意:vncserver只能由启动它的用户来关闭,即时是root也不能关闭其它用户开启的vncserver,
除非用kill命令暴力杀死进程。
b、Windown下如何登陆VNC Server
(1)从浏览器登录(浏览器需要安装JAVA支持库,作为java applet来实现,才能登录控制VNC服务器,可以yum install java*安装)
直接从浏览器中输入如下地址:
http://xxx.xxx.xxx.xxx:5801
(2)从VNC客户端登录
在windows上安装vnc客户端,然后输入xxx.xxx.xxx.xxx:x,连接登录。
备注:
a、输入的格式为IP:号码,号码要看你自己的配置而定。如192.168.80.128:1
b、登陆提示connection refused(10061),则是因为linux防火墙的问题,请检查防火墙设置。
c、后面的尾缀”:x”也是不能少的,要不然老提示failed to connect : connection refused (10061)
http://www.ha97.com/4634.html
黑屏则将1024×768 改为800×600 后重启
[root@centos66 init.d]# vncserver :3
You will require a password to access your desktops.
Password:
Verify:
xauth: creating new authority file /root/.Xauthority
New ‘centos66:3 (root)’ desktop is centos66:3
Creating default startup script /root/.vnc/xstartup
Starting applications specified in /root/.vnc/xstartup
Log file is /root/.vnc/centos66:3.log