ajax请求可以说是在前端开发工作中必不可少的一个东西
1、ajax请求原理
ajax技术的核心是XMLHttpRequest对象,其通过创建一个XMLHttpRequest对象,利用对象的open方法发送请求,判断对象中readyState属性(请求、响应过程的当前活动阶段)的值和status(Http的响应状态)的值,得到responseText等
open方法的三个参数
第一个参数:请求方式
第二个参数:请求的URL
第三个参数:是否异步(大多数使用异步请求)
readyState属性的值
0:未初始化。尚未调用open()方法
1:启动。已经调用open()方法,但尚未调用send()方法。
2:发送。已经调用send()方法,但尚未接收到响应。
3:接收。已经接收到部分响应数据。
4:完成。已经接收到全部响应数据,而且已经可以在客户端使用了。
status属性的值
成功:(>= 200 && < 300) || === 304
失败:除去成功的情况
2、jQuery、小程序风格的ajax请求封装
jQuery风格的代码样式
$.ajax({
url: xxx,
success: () => {},
fail: err => {},
})
复制代码
由上,我们知道在封装函数的时候,首先,它接收的是一个对象,所以,第一步:
const ajax = ({}) => {}
复制代码
接下来,我们定义对象内部需要接收的参数,有:url(请求的地址)、data(发送的数据)、method(请求方式)、header(请求头部信息)、success(请求成功回调函数)、fail(请求失败回调函数)、async(请求是否异步)、timeout(设置请求超时时间)、onTimeOut(超时处理回调函数)、...
const ajax = ({
url,
data = {},
method = 'get', // 默认为'get'请求
header,
async = true, // 默认为异步请求
timeout,
success,
fail,
}) => {}
复制代码
我们通常会使用get请求向服务器查询一些信息,也通常会在请求的url后面拼接上数据,像这样:
http://www.baidu.com?a=b&c=d...
复制代码
那我们如何实现呢?我们定义一个拼接url函数,需要两个参数,一个是本身的url,另外一个是向后台发送的数据param,所以:
// 数据拼接url
addURL = (url, param) => {
if(param && Object.keys(param).length) { // 数据不为空
// 判断url后添加的字符是'?'还是'&'
url += (url.indexOf('?') === -1 ? '?' : '&');
// 拼接数据
Object.keys(param).map(key => {
url += `${key}=${param[key]}`
})
}
return url;
}
复制代码
通常呢,我们使用get方法会遇到查询字符串格式错误的问题,所以,这时需要我们用encodeURIComponent()进行编码,上面代码改变如下:
addURL = (url, param) => {
if(param && Object.keys(param).length) {
url += (url.indexOf('?') === -1 ? '?' : '&');
Object.keys(param).map(key => {
url += encodeURIComponent(key) + '=' + encodeURIComponent(param[key])
})
}
}
复制代码
如果使用的是post方法,我们只需要将数据给服务端传递过去,最终,我们写出了封装后的代码:
const ajax = ({
url,
data = {},
method = 'get', // 默认为'get'请求
header,
async = true, // 默认为异步请求
timeout = 60 * 1000, //默认60s
success,
fail,
}) => {
const requestURL = method === 'get' ? this.addURL(url, data) : url;
const sendData = method === 'get' ? null : data;
const xhr = new XMLHttpRequest();
if(header && Object.keys(header).length) {
Object.keys(header).map(key => {
xhr.setRequestHeader(key, header[key]);
})
}
xhr.onreadystatechange = () => {
if(xhr.readyState === 4) {
try {
if((xhr.status >= 200 && xhr.status < 300) || xhr.status === 304) {
const response = xhr.responseText;
success(response);
} else {
const error = xhr.status + xhr.statusText;
fail(error);
}
} catch (ex) {
}
}
}
xhr.open(method, requestURL, async);
xhr.timeout = timeout;
xhr.ontimeout = () => {
console.log('timeout');
}
xhr.send(sendData);
}
// 拼接url
addURL = (url, param) => {
if(param && Object.keys(param).length) {
url += (url.indexOf('?') === -1 ? '?' : '&');
Object.keys(param).map(key => {
url += encodeURIComponent(key) + '=' + encodeURIComponent(param[key])
})
}
return url;
}
复制代码
上述代码中,利用了try-catch语句。这是因为当请求在指定时间内没有返回,就会自动终止,请求终止后,会调用ontimeout事件处理程序,如果readyState已经变为4,就会调用onreadystatechange事件处理程序,这种情况下,会在请求终止后再次访问status属性,就会导致浏览器报告错误,所以,为了避免错误,我们将status属性语句封装在try-catch语句中。
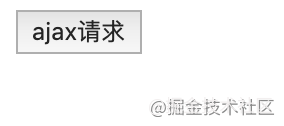
下面,我们验证一下,我们封装好的函数是否可用
// html
ajax请求
// js
const ajax_btn = document.getElementById('ajax_btn');
ajax_btn.onclik = () => {
ajax({
url: 'http://localhost:3001/123',
data: {},
header: {},
timeout: 20 * 1000,
success: res => {
console.log(res);
},
fail: err => {
throw err;
}
});
};
复制代码
页面样式
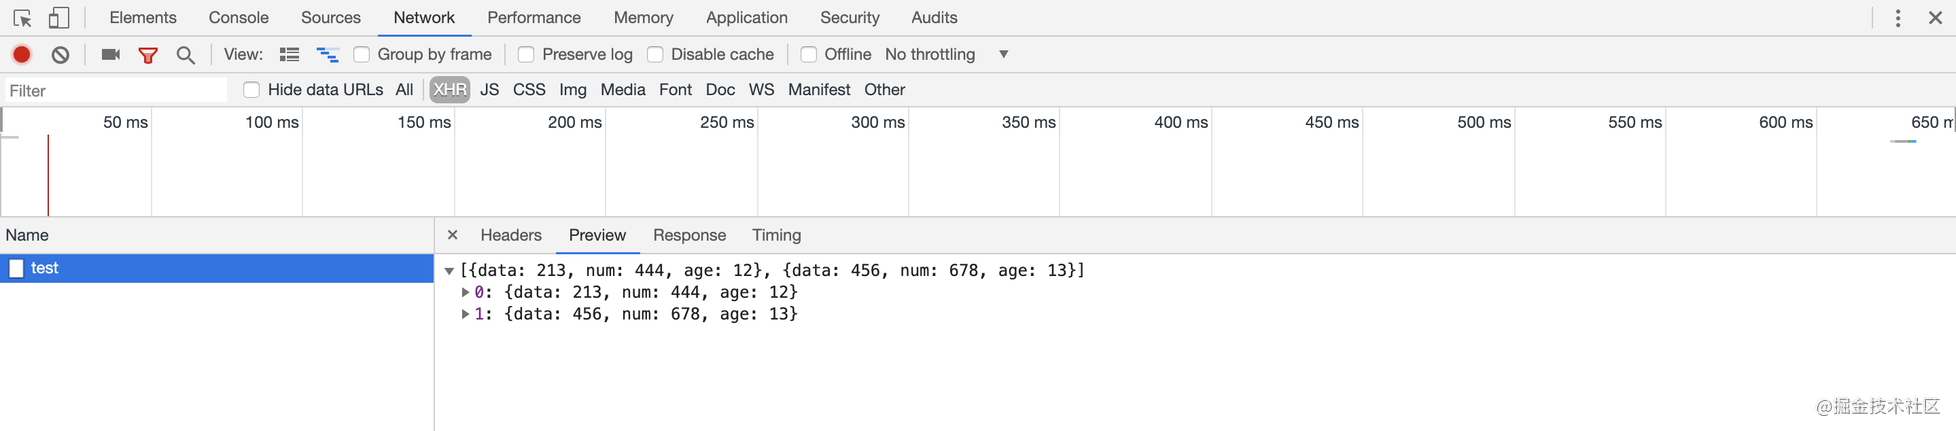
点击按钮,就会发送请求,接下来,是见证奇迹的时刻:

我们成功获得了服务端返回的数据(服务端是自己用node写的一个极其简易的接口)
3、promise风格的ajax请求封装
promise风格的代码
ajax.get('/api').then(res => {}).catch(err => {}).finally();
复制代码
定义封装ajax函数需要的参数
const ajax = ({
url,
data,
method = 'get',
header,
async = true,
timeout = 60 * 1000,
}) => {};
复制代码
接下来,按照jQuery风格的思路,进行封装
const ajax = ({
url,
data = {},
method = 'get', // 默认为'get'请求
header,
async = true, // 默认为异步请求
timeout = 60 * 1000, //默认60s
}) => {
return new Promise((resolve, reject) => {
const requestURL = method === 'get' ? this.addURL(url, data) : url;
const sendData = method === 'get' ? null : data;
const xhr = new XMLHttpRequest();
if(header && Object.keys(header).length) {
Object.keys(header).map(key => {
xhr.setRequestHeader(key, header[key]);
})
}
xhr.onreadystatechange = () => {
if(xhr.readyState === 4) {
try {
if((xhr.status >= 200 && xhr.status < 300) || xhr.status === 304) {
const response = xhr.responseText;
resolve(response);
} else {
const error = xhr.status + xhr.statusText;
reject(error);
}
} catch (ex) {
//
}
}
}
xhr.open(method, requestURL, async);
xhr.timeout = timeout;
xhr.ontimeout = () => {
console.log('timeout');
}
xhr.send(sendData);
})
}
// 拼接url
addURL = (url, param) => {
if(param && Object.keys(param).length) {
url += (url.indexOf('?') === -1 ? '?' : '&');
Object.keys(param).map(key => {
url += encodeURIComponent(key) + '=' + encodeURIComponent(param[key])
})
}
return url;
}
// get请求
ajax.get = (url, data) => {
return ajax({
url,
data,
})
}
// post请求
ajax.post = (url, data) => {
return ajax({
url,
data,
method = 'post',
})
}
复制代码
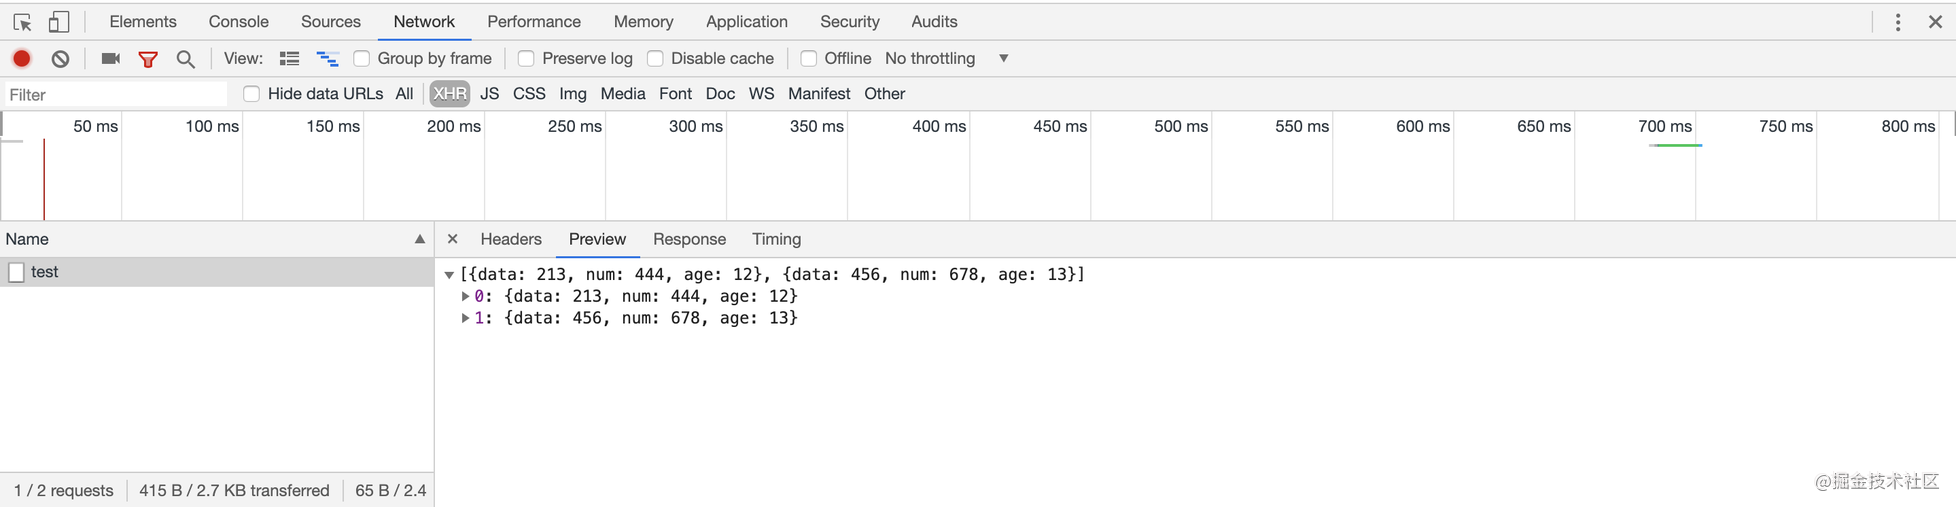
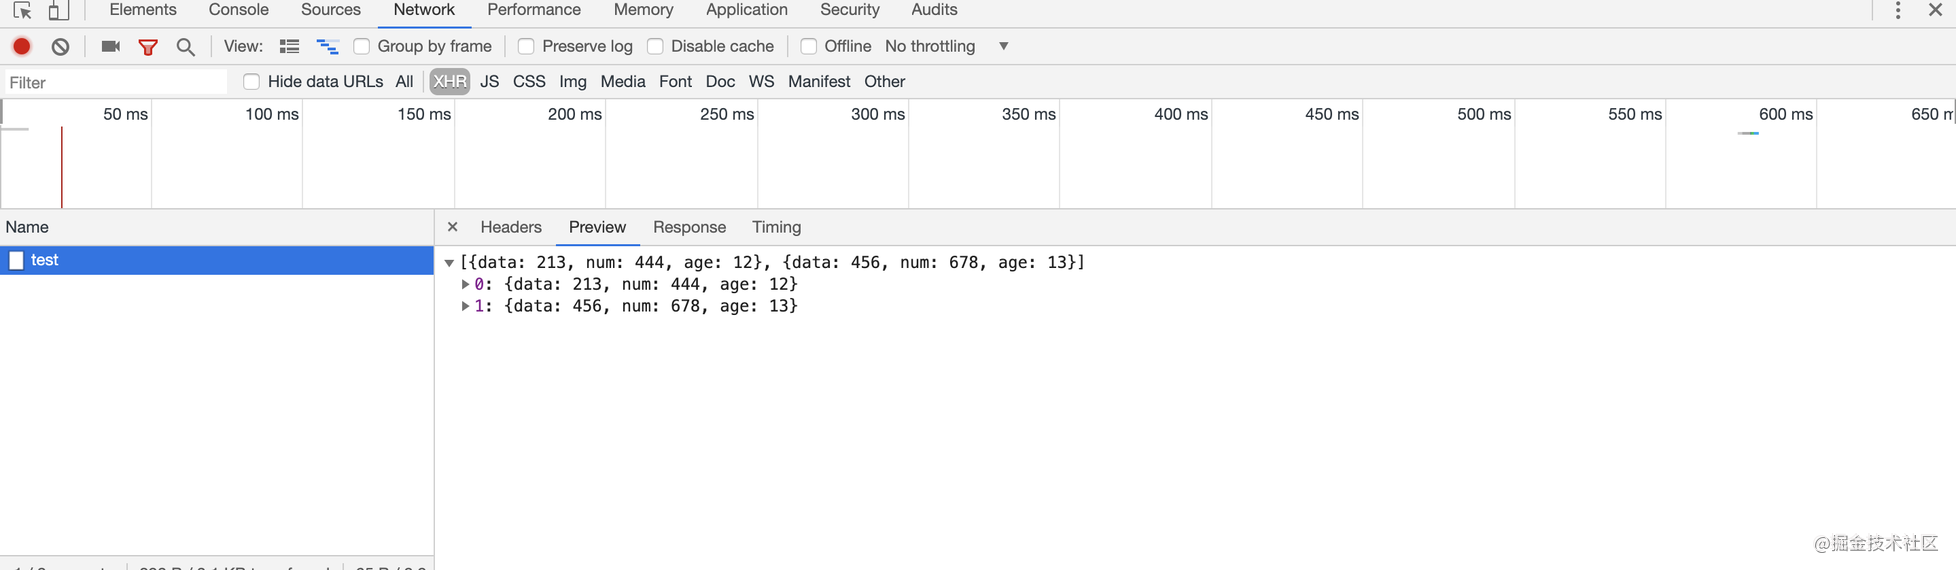
下面,我们验证一下封装好的promise风格的ajax函数的可用性
// html
ajax请求
// js
const ajax_btn = document.getElementById('ajax_btn');
ajax_btn.onclick = () => {
ajax.get('http://localhost:3001/test')
.then(res => {
console.log(res);
})
.catch(err => {
throw err;
})
.finally(console.log('finally'))
}
复制代码
点击按钮
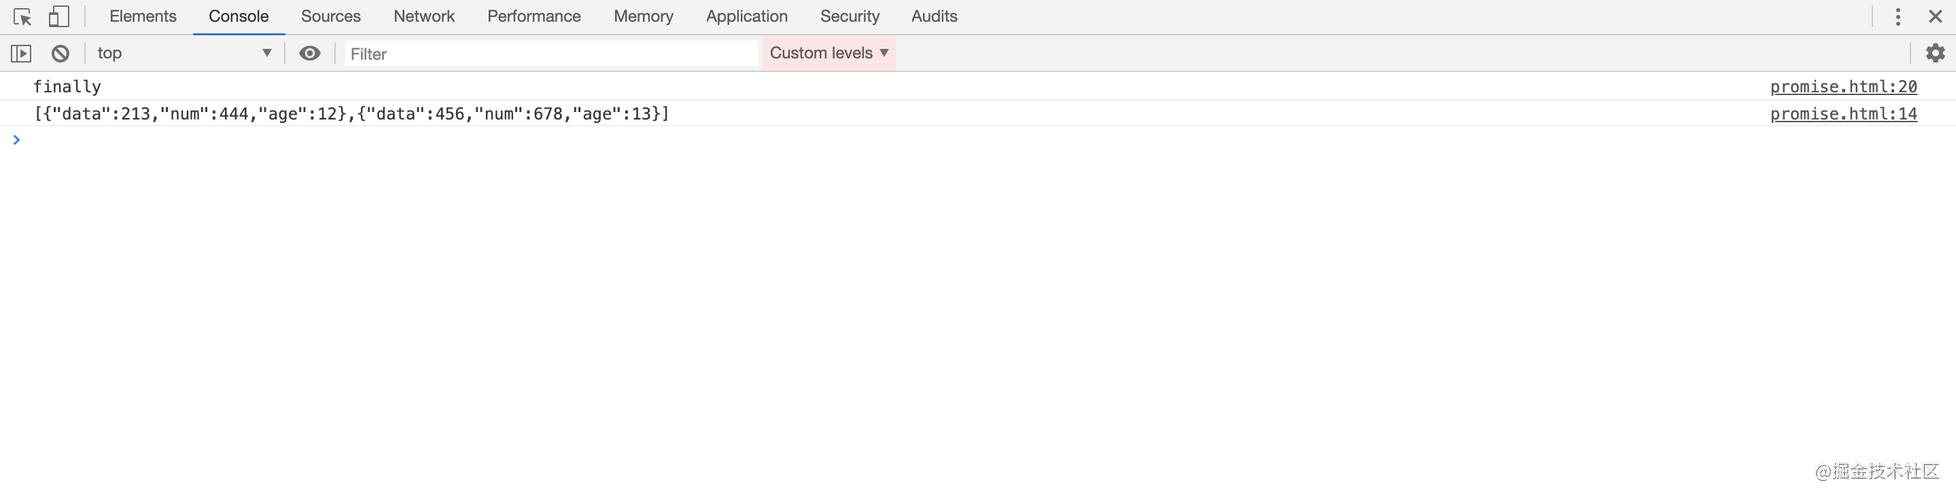
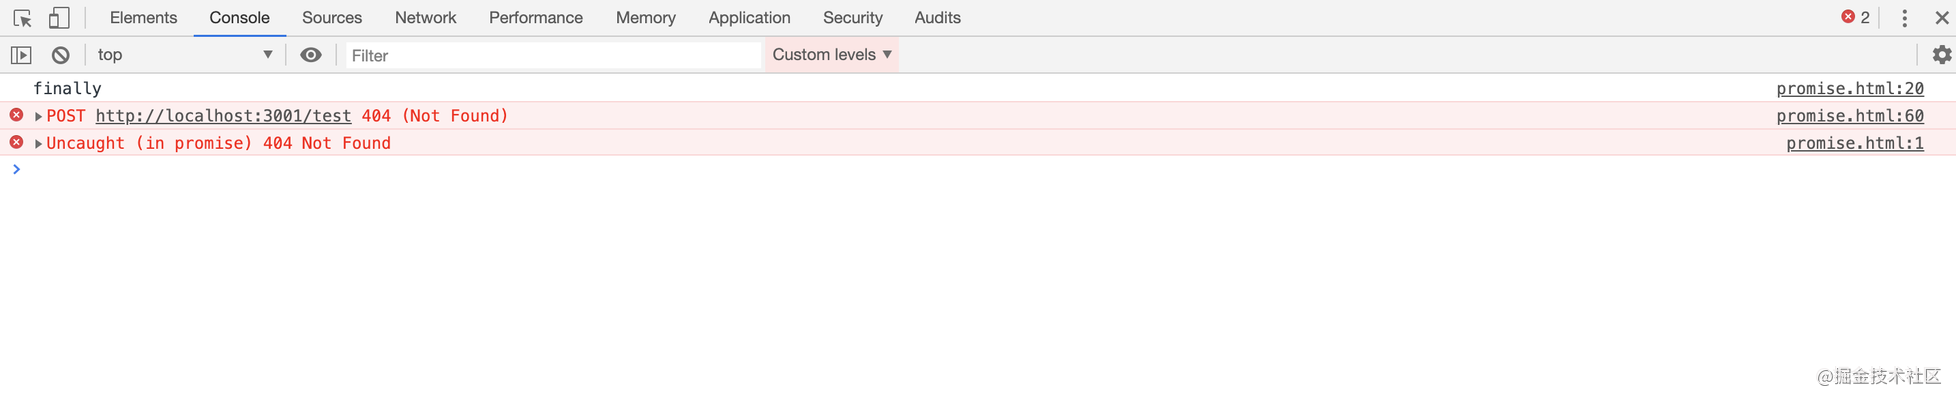
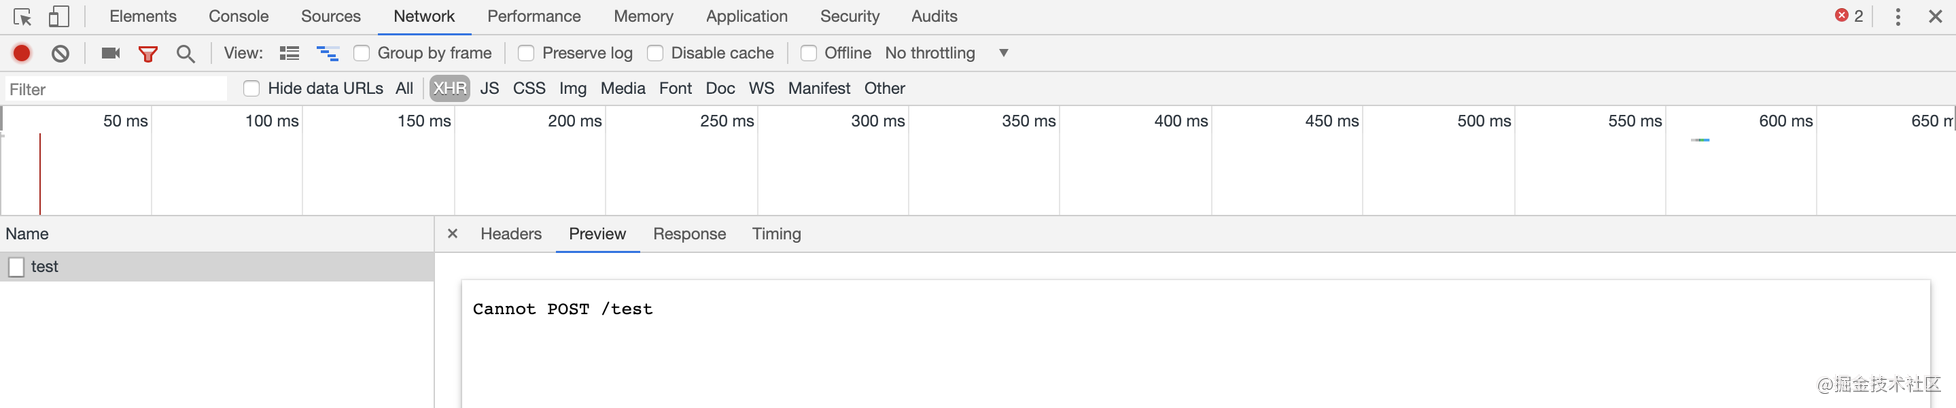
当我们将get请求换成post请求
至此,我们成功地封装了promise风格的ajax请求函数
4、优化
在IE中,XHR对象是通过MSXML库中的ActiveX对象实现的。所以,在IE中,可能会有三种不同版本的XHR对象(MSXML2.XMLHttp、MSXML2.XMLHttp.3.0、MSXML2.XMLHttp.6.0),如果我们要使用库中的XHR对象,就需要编写一个函数(只适用于IE7以前的版本)
function createXHR() {
if (typeof arguments.callee.activeXString !== 'string') {
const versions = ['MSXML2.XMLHttp.6.0', 'MSXML2.XMLHttp.3.0', 'MSXML2.XMLHttp'];
for(let i = 0; i< versions.length; i++) {
try {
new ActiveXObject(versions[i]);
arguments.callee.activeXString = versions[i];
break;
} catch (ex) {
// 跳过
}
}
}
return new ActiveXObject(arguments.callee.activeXString);
}
复制代码
如果想要支持IE7以上的版本,只需要在上述函数中加入对原生XHR对象的支持,即:
function createXHR() {
if (typeof XMLHttpRequest !== 'undefined') {
return new XMLHttpRequest();
} else if(typeof ActiveXObject !== 'undefined') {
if(typeof arguments.callee.activeXString !== 'string') {
const versions = ['MSXML2.XMLHttp.6.0', 'MSXML2.XMLHttp.3.0', 'MSXML2.XMLHttp'];
for(let i = 0; i< versions.length; i++) {
try {
new ActiveXObject(versions[i]);
arguments.callee.activeXString = versions[i];
break;
} catch (ex) {
// 跳过
}
}
}
return new ActiveXObject(arguments.callee.activeXString);
} else {
throw new Error('no XHR object available');
}
}
复制代码
通过这样的方式,我们可以直接创建XHR对象:
const xhr = new createXHR();
复制代码
效果: