官网 www.docker.com
github https://github.com/docker/docker.github.io
开源的容器引擎,可以让开发者打包应用以及依赖的库,然后发布到任何流行的linux发行版上,移植很方便
由go语言编写,基于apache2.0协议发布
基于linux kernel,要想在win下运行需要借助一个vm(虚拟机)来实现
自2013年开始,近些年发展迅猛
docker从1.13x开始,版本分为社区版ce和企业版ee,并且基于年月的时间线形式,当前最新稳定版为17.09 参考http://blog.csdn.net/chenhaifeng2016/article/details/68062414
Docker和传统的虚拟化比较
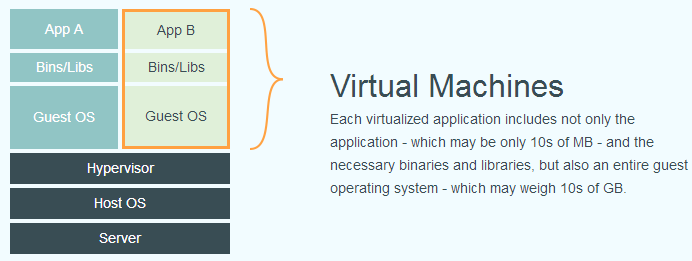
Docker的优势
•
启动非常快,秒级实现
• 资源利用率高,一台高配置服务器可以跑上千个docker容器
• 更快的交付和部署,一次创建和配置后,可以在任意地方运行
• 内核级别的虚拟化,不需要额外的hypevisor支持,会有更高的性能和效率
• 易迁移,平台依赖性不强
Docker核心概念
镜像,是一个只读的模板,类似于安装系统用到的那个iso文件,我们通过镜像来完成各种应用的部署。
容器,镜像类似于操作系统,而容器类似于虚拟机本身。它可以被启动、开始、停止、删除等操作,每个容器都是相互隔离的。
仓库,存放镜像的一个场所,仓库分为公开仓库和私有仓库。 最大的公开仓库是Docker hub(hub.docker.com),国内公开仓库(dockerpool.com)
Docker安装
• curl https://download.docker.com/linux/centos/docker-ce.repo -o /etc/yum.repos.d/docker.repo
• yum install -y docker-ce
[root@harry-02 ~]# curl https://download.docker.com/linux/centos/docker-ce.repo -o  /etc/yum.repos.d/docker.repo
  % Total    % Received % Xferd  Average Speed   Time    Time     Time  Current
                                 Dload  Upload   Total   Spent    Left  Speed
  0     0    0     0    0     0      0      0 --:--:-- --:--:-- --:  0     0    0     0    0     0      0      0 --:--:-- --:--:-- --:  0     0    0     0    0     0      0      0 --:--:--  0:00:01 --:  0     0    0     0    0     0      0      0 --:--:--  0:00:02 --:  0     0    0     0    0     0      0      0 --:--:--  0:00:03 --:100  2424  100  2424    0     0    706      0  0:00:03  0:00:03 --:--:--   706
[root@harry-02 ~]# yum -y install docker-ce
已加载插件:fastestmirror
Determining fastest mirrors
 * base: mirrors.cn99.com
 * extras: mirrors.163.com
 * updates: mirrors.cn99.com
base                                        | 3.6 kB     00:00
docker-ce-stable                            | 3.5 kB     00:00
extras                                      | 3.4 kB     00:00
• 速度比较慢,大家也可以直接下载rpm包
• https://download.docker.com/linux/centos/7/x86_64/stable/Packages/
• 下载完,上传到linux下
• 也需要用yum安装,可以自动解决依赖关系
• yum install -y docker-ce-xxxx.rpm
systemctl start docker 启动docker
[root@harry-02 ~]# systemctl start docker
[root@harry-02 ~]# ps aux | grep docker
root       5409  3.6  2.8 526696 52984 ?        Ssl  13:45   0:00 /usr/bin/dockerd -H fd:// --containerd=/run/containerd/containerd.sock
root       5544  0.0  0.0 112724   988 pts/0    R+   13:45   0:00 grep --color=auto docker
Docker镜像管理
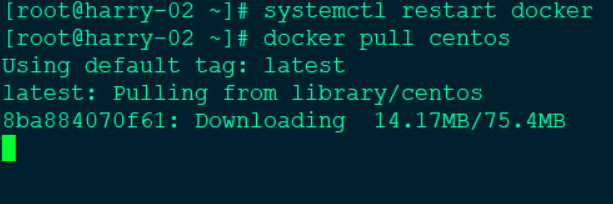
docker pull centos//可以下载centos镜像,速度很慢
配置docker加速器(参考 http://blog.csdn.net/xlemonok/article/details/71403534)
 vi /etc/docker/daemon.json//加入如下内容
{
  "registry-mirrors": ["https://dhq9bx4f.mirror.aliyuncs.com"]
}
说明:这个url为加速器地址,需要自行到阿里云申请
配置完加速器,重启docker服务,再次docker pull centos会快很多
docker images 查看本地的镜像
docker search xxx //搜索镜像,其中xxx是关键词
[root@harry-02 ~]# docker search centos
NAME                               DESCRIPTION                                     STARS               OFFICIAL            AUTOMATED
centos                             The official build of CentOS.                   5276                [OK]
ansible/centos7-ansible            Ansible on Centos7                              121                                     [OK]
docker tag centos harry_123 //给镜像打标签
docker run -itd centos //把镜像启动为容器,要把-i -t -d 放到镜像名字前面
-i表示让容器的标准输入打开
-t表示分配一个伪终端
-d表示后台启动

docker ps //查看运行的容器,加上-a选项后可以查看所有容器,包括未运行的
docker rmi centos //用来删除指定镜像, 其中后面的参数可以是tag,如果是tag时,实际上是删除该tag。当后面的参数为镜像ID时,则会彻底删除整个镜像,所有标签也会一同删除
Docker通过容器创建镜像
docker run启动容器后,可以通过下面命令进入容器
docker exec -it xxxxx bash//其中xxxxx为容器id,这个id可以用docker ps查看,最后面的bash为进入容器后我们要执行的命令,这样就可以打开一个终端
进入到该容器中,我们做一些变更,比如安装一些东西,然后针对这个容器进行创建新的镜像
在容器中执行 yum install -y net-tools(安装网络组件)然后ctrl d退出容器
[root@a28ffe1e480b /]# yum -y install net-tools
Loaded plugins: fastestmirror, ovl
Determining fastest mirrors
 * base: mirrors.aliyun.com
 * extras: mirrors.aliyun.com
 * updates: mirrors.cn99.com
base
docker commit -m "change somth" -a "somebody info" container_id new_image_name //container_id 通过docker ps -a获取,后面的new_image_name为新镜像名字
例如:
docker commit -m "install net-tools" -a "harry" 2c74d574293f centos_with_nettool
这个命令有点像svn的提交 -m 加一些改动信息,-a 指定作者相关信息 2c74d这一串为容器id,再后面为新镜像的名字
[root@harry-02 ~]# docker commit -m "install net-tools" -a "harry" a28ffe1e480b centos_with_net
sha256:2dffdc73293c935715ae883ede14cb92203897d8e8748263c04c34a5c0ec3ac2
[root@harry-02 ~]#

Docker使用模板创建镜像
下载一个模板 http://openvz.org/Download/templates/precreated
导入该镜像的命令为:
cat centos-6-x86-minimal.tar.gz|docker import - centos6
[root@harry-02 ~]# cat centos-6-x86-minimal.tar.gz | docker import - centos6
sha256:6102cc73679c9c23230e27338b1591b30cf80fea2e9536d945baa3a8dabd2547
docker images查看导入的镜像
把现有镜像,导出为一个文件:docker save -o harry-centos.tar centos_with_net
文件名
镜像名
我们还可以用该文件恢复本地镜像:
docker load --input harry-centos.tar 或者
docker load < harry-centos.tar
[root@harry-02 ~]# docker load < harry-centos.tar
b7473463b7f7: Loading layer [==================================================>]  83.71MB/83.71MB
Loaded image: centos_with_net:latest
[root@harry-02 ~]# docker images
REPOSITORY          TAG                 IMAGE ID            CREATED             SIZE
centos6             latest              6102cc73679c        About an hour ago   512MB
centos_with_net     latest              2dffdc73293c        About an hour ago   285MB
harry_123           latest              9f38484d220f        2 weeks ago         202MB
docker push image_name //可以把自己的镜像传到dockerhub官方网站上去,但前提是需要先注册一个用户
Docker容器管理
docker create -it centos6 bash //这样可以创建一个容器,但该容器并没有启动
[root@harry-02 ~]# docker create -it centos6 bash
5934aa43bd19f4a8426e6a9ceb61916125f89168a59b3a3626ea8355da7d7983
docker start container_id //启动容器后,可以使用 docker ps -a 查看到,有start 就有stop,和restart
之前我们使用的docker run 相当于先create再start
[root@harry-02 ~]# docker start 292061ee146e
[root@harry-02 ~]# docker ps -a
CONTAINER ID        IMAGE               COMMAND             CREATED             STATUS              PORTS               NAMES

[root@harry-02 ~]# docker ps -a
CONTAINER ID        IMAGE               COMMAND             CREATED             STATUS              PORTS               NAMES
292061ee146e        centos6             "bash"              5 seconds ago       Created                                 kind_poitras

[root@harry-02 ~]# docker ps
CONTAINER ID        IMAGE               COMMAND             CREATED             STATUS              PORTS               NAMES
292061ee146e        centos6             "bash"              2 minutes ago       Up 5 seconds                            kind_poitras
[root@harry-02 ~]#
docker run -it centos bash
这样进入了一个虚拟终端里面,我们可以运行一些命令,使用命令exit或者ctrl d 退出该bash,当退出后这个容器也会停止。
[root@harry-02 ~]# docker run -it centos6 bash
[root@8dec1213fb55 /]# ls
bin  boot  dev  etc  fastboot  home  lib  lost+found  media  mnt  opt  proc  root  sbin  selinux  srv  sys  tmp  usr  var
[root@8dec1213fb55 /]#
docker run -d 可以让容器在后台运行
比如:docker run -d centos bash -c "while :; do echo "123"; sleep 2; done"
[root@harry-02 ~]# docker run -d centos6 bash -c "while:; do echo "123"; sleep1; done"
81e29271fb8cb06cc95ecac6264b67b05ec5e151e5fcc581398e6abced12063c
docker run --name web -itd centos bash // --name 给容器自定义名字

docker run --rm -it centos bash -c "sleep 30" //--rm 可以让容器退出后直接删除,在这里命令执行完容器就会退出
docker logs 可以获取到容器的运行历史信息,用法如下
docker logs container_id
[root@harry-02 ~]# docker run -itd centos6 bash -c "echo 123"
18c29e6616556534cf9224f8653d1483079a2ee4e5c28c41c5086907a708fb21
[root@harry-02 ~]# docker logs 18c29e66165
123
docker attach 可以进入一个后台运行的容器,比如
docker attach container_id //但是attach命令不算好用,比如我们想要退出终端,就得exit了,这样容器也就退出了,还有一种方法
docker exec -it container_id bash //可以临时打开一个虚拟终端,并且exit后,容器依然运行着
[root@harry-02 ~]# docker images
REPOSITORY          TAG                 IMAGE ID            CREATED             SIZE
centos6             latest              6102cc73679c        2 hours ago         512MB
centos_with_net     latest              2dffdc73293c        2 hours ago         285MB
harry_123           latest              9f38484d220f        2 weeks ago         202MB
[root@harry-02 ~]# docker ps
CONTAINER ID        IMAGE               COMMAND             CREATED             STATUS              PORTS               NAMES
87888b29f162        centos6             "bash"              28 minutes ago      Up 10 minutes                           web
a28ffe1e480b        9f38484d220f        "/bin/bash"         2 hours ago         Up 2 hours                              kind_sinoussi

[root@harry-02 ~]# docker exec -it 87888b29f162 bash
[root@87888b29f162 /]#

docker rm container_id //container_id是ps的时候查看到的,这样就可以把container删除,如果是运行的容器,可以加-f
docker export container_id > file.tar // 导出容器,可以迁移到其他机器上,需要导入
cat file.tar |docker import - harry_test //这样会生成aming_test的镜像
Docker仓库管理
docker pull registry //下载registry 镜像,registy为docker官方提供的一个镜像,我们可以用它来创建本地的docker私有仓库。
docker run -d -p 5000:5000 registry //以registry镜像启动容器,-p会把容器的端口映射到宿主机上,:左边为宿主机监听端口,:右边为容器监听端口
curl 127.0.0.1:5000/v2/_catalog //可以访问它
[root@harry-02 ~]# curl 127.0.0.1:5000/v2/_catalog
{"repositories":[]}
下面我们来把其中一个镜像上传到私有仓库
docker tag centos6 192.168.31.138:5000/centos6 //标记一下tag,必须要带有私有仓库的ip:port
[root@harry-02 ~]# docker tag centos6 192.168.31.138:5000/centos6
[root@harry-02 ~]# docker images
REPOSITORY                    TAG                 IMAGE ID            CREATED             SIZE
harry_test                    latest              a6638884e17a        23 minutes ago      512MB
<none>                        <none>              69b6f25ec7fa        25 minutes ago      0B
192.168.31.138:5000/centos6   latest              6102cc73679c        2 hours ago         512MB
centos6                       latest              6102cc73679c        2 hours ago         512MB
centos_with_net               latest              2dffdc73293c        3 hours ago         285MB
harry_123                     latest              9f38484d220f        2 weeks ago         202MB
registry                      latest              f32a97de94e1        3 weeks ago         25.8MB
[root@harry-02 ~]#
docker push 192.168.31.138:5000/centos6 //把标记的镜像给推送到私有仓库
[root@harry-02 ~]# docker push 192.168.31.138:5000/centos6
The push refers to repository [192.168.31.138:5000/centos6]
Get https://192.168.31.138:5000/v2/: http: server gave HTTP response to HTTPS client
此时并不会成功,Get https://172.7.15.113:5000/v2/: http: server gave HTTP response to HTTPS client
更改配置文件,vi /etc/docker/daemon.json//更改为
{ "insecure-registries":["192.168.31.138:5000"] }
{
  "registry-mirrors": ["https://dhq9bx4f.mirror.aliyuncs.com"]
}
{ "insecure-registries":["192.168.31.138:5000"] }
systemctl restart docker
docker ps -a //查看容器已经关闭,还需要启动
docker start id //这里的id为registry容器id
[root@harry-02 ~]# docker ps -a
CONTAINER ID        IMAGE               COMMAND                  CREATED             STATUS                        PORTS               NAMES
c06361a1141a        registry            "/entrypoint.sh /etc…"   18 minutes ago      Exited (2) 20 seconds ago                         cranky_nash
292061ee146e        centos6             "bash"                   42 minutes ago      Exited (137) 10 seconds ago                       kind_poitras
[root@harry-02 ~]# docker start c06361a1141a
c06361a1141a
[root@harry-02 ~]# docker start 292061ee146e
292061ee146e
[root@harry-02 ~]#
再次push
docker push 192.168.31.138:5000/centos6
curl 127.0.0.1:5000/v2/_catalog //可以查看到推送上来的镜像
[root@harry-02 ~]# curl 127.0.0.1:5000/v2/_catalog
{"repositories":["centos6"]}
docker pull 192.168.31.138:5000/centos6 //从私有仓库中拉取镜像
Docker数据管理
1. 挂载本地的目录到容器里
docker run -tid -v /data/:/data centos6 bash //-v 用来指定挂载目录,:前面的/data/为宿主机本地目录,:后面的/data/为容器里的目录,会在容器中自动创建
[root@harry-02 ~]# docker run -itd -v /data/:/data centos6 bash
9e654c194234dd7d88d3940390a43b0c568b7a765ef125b50e318448d93cfe50

[root@harry-02 ~]# docker exec -it 9e654c1 bash
[root@9e654c194234 /]# ls -l /data/
total 280
drwxr-xr-x  7 root root     76 Mar 19 10:46 mongodb
drwxr-xr-x. 8 1001 1001    224 Mar 29 23:55 mysql
drwxr-xr-x  5 root root     80 Mar  8 21:59 redis_data
drwxr-xr-x  2 root root     44 Mar  8 10:38 redis_data2
drwxr-xr-x. 7 root root     85 Dec 25 05:37 wwwroot
drwxr-xr-x. 3 root root 221184 Nov  3 10:30 yumdata
[root@9e654c194234 /]#
更改容器中data 目录中的内容
[root@9e654c194234 /]# mkdir /data/course
[root@9e654c194234 /]# exit
[root@harry-02 ~]# ls /data/
course  mongodb  mysql  redis_data  redis_data2  wwwroot  yumdata
[root@harry-02 ~]#
2. 挂载数据卷
其实我们挂载目录的时候,可以指定容器name,如果不指定就随机定义了。比如上面我们没有指定,它就生成了一个名字为vigorous_stallman,这个名字可以使用命令 docker ps -a 查看
docker run -itd --volumes-from vigorous_stallman centos6 bash
这样,我们使用centos6镜像创建了新的容器,并且使用了 vigorous_stallman 容器的数据卷
[root@harry-02 ~]# docker run -itd --volumes-from vigorous_stallman centos6 bash
82e29214118e5692e5c1b2857d62290aa1974f41a934c4b226ba694637282238
[root@harry-02 ~]# docker exec -it 82e29214118e5692e bash
[root@82e29214118e /]# ls /data/
course  mongodb  mysql  redis_data  redis_data2  wwwroot  yumdata
[root@82e29214118e /]#
3. 定义数据卷容器
有时候,我们需要多个容器之间相互共享数据,类似于linux里面的NFS,所以就可以搭建一个专门的数据卷容器,然后其他容器直接挂载该数据卷。
首先建立数据卷容器
docker run -itd -v /data/ --name testvol centos6 bash //注意这里的/data/是容器的/data目录,并非本地的/data/目录。
然后让其他容器挂载该数据卷
docker run -itd --volumes-from testvol aming123 bash
Docker数据卷的备份与恢复

备份
mkdir /data/backup
docker run --volumes-from testvol -v /data/backup/:/backup centos tar cvf /backup/data.tar /data/
说明:首先我们需要使用testvol数据卷新开一个容器,同时我们还需要把本地的/vol_data_backup/目录挂载到该容器的/backup下,这样在容器中/backup目录里面新建的文件,我们就可以直接在/data/backup/目录中看到了。 然后再把/data/目录下面的文件打包到成data.tar文件放到/backup目录下面。
恢复
思路: 先新建一个数据卷容器,再建一个新的容器并挂载该数据卷容器,然后再把tar包解包。
新建数据卷容器:docker run -itd -v /data/ --name testvol2 centos bash
挂载数据卷新建容器,并解包:docker run --volumes-from testvol2 -v /data/backup/:/backup centos tar xf /backup/data.tar
Docker网络模式
host模式,使用docker run时使用--net=host指定
- docker使用的网络实际上和宿主机一样,在容器内看到的网卡ip是宿主机ip
container模式,使用--net=container:container_id/container_name
none模式,使用--net=none指定
bridge模式,使用--net=bridge指定默认模式,不用指定默认就是这种网络模式。
- 这种模式会为每个容器分配一个独立的Network Namespace。类似于vmware的nat网络模式。同一个宿主机上的所有容器会在同一个网段下,相互之间是可以通信的。
外部访问容器:
首先使用centos镜像新建一个容器,然后在该容器中安装nginx服务,并启动
[root@harry-02 ~]# docker images
centos_with_net               latest              2dffdc73293c        23 hours ago        285MB
harry_123                     latest              9f38484d220f        2 weeks ago         202MB
registry                      latest              f32a97de94e1        3 weeks ago         25.8MB
[root@harry-02 ~]# docker create -t centos_with_net bash
ba19ca31191ca718740b3f4ed1df2d94f58b2afe25c1f28314fa8cd7b5597f87
[root@harry-02 ~]# docker start ba19ca bash
ba19ca
[root@harry-02 ~]# docker exec -it ba19ca bash
[root@ba19ca31191c /]# yum -y install epel-release
[root@ba19ca31191c /]# yum -y install nginx
• 再把该容器导成一个新的镜像(centos-httpd),然后再使用新镜像创建容器,并指定端口映射
[root@harry-02 ~]# docker commit -m "install nginx" -a "harry" ba19ca31191c  centos_with_nginx
sha256:44ef3c08f922ae5333720722f889fcb763bb5168f8b301a8d94cbcc448cded2f
[root@harry-02 ~]# docker images
REPOSITORY                    TAG                 IMAGE ID            CREATED             SIZE
centos_with_nginx             latest              44ef3c08f922        12 seconds ago      466MB
harry_test                    latest              a6638884e17a        21 hours ago        512MB
<none>                        <none>              69b6f25ec7fa        21 hours ago        0B
192.168.31.138:5000/centos6   latest              6102cc73679c        23 hours ago        512MB
centos6                       latest              6102cc73679c        23 hours ago        512MB
centos_with_net               latest              2dffdc73293c        24 hours ago        285MB
harry_123                     latest              9f38484d220f        2 weeks ago         202MB
registry                      latest              f32a97de94e1        3 weeks ago         25.8MB
[root@harry-02 ~]#
docker run -itd -p 8080:80 centos_with_centos bash //-p 可以指定端口映射,本例中将容器的80端口映射为本地的8080端口
[root@harry-02 ~]# docker create centos_with_nginx bash
501b9236e2c06573aaf9526715b4c39d9f44db00fff648c14cb37cdd35538498
[root@harry-02 ~]# docker start 501b9236e2
501b9236e2
[root@harry-02 ~]# docker run -itd -p 8080:80 centos_with_nginx bash
4ee6f77ac7a3c1b9472558dd7dea7e587483ad5bddc9a03289a9455a9bbcfb8f
[root@harry-02 ~]#
docker exec -it container_id bash ,启动nginx
[root@harry-02 ~]# docker exec -it 4ee6f77ac7a3 bash
[root@4ee6f77ac7a3 /]# systemctl start nginx
Failed to get D-Bus connection: Operation not permitted
报错:Operation not permitted
新建的容器,启动nginx或者httpd服务的时候会报错
这是因为dbus-daemon没有启动,解决该问题可以这样做
启动容器时,要加上--privileged -e "container=docker" ,并且最后面的命令改为/usr/sbin/init
docker run -itd --privileged -e "container=docker" centos_with_nginx /usr/sbin/init
[root@harry-02 ~]# docker create centos_with_nginx bash
365831a38f3faced644b6e9604aaf1a9662ef1f859b88d55315a3485eef0a17d
[root@harry-02 ~]# docker start 365831a
365831a
[root@harry-02 ~]# docker run -itd --privileged -e "container=docker" -p 8088:80 centos_with_nginx /usr/sbin/init
93bd1375ada5f88f29001bfbbeb55f02c2cb37572c7df605aa7a78bb26d1148c
[root@harry-02 ~]# docker exec -it 93bd1375ad bash

[root@93bd1375ada5 /]# systemctl start nginx
[root@93bd1375ada5 /]# ps aux | grep nginx
root       3404  0.0  0.1 125108  2112 ?        Ss   06:58   0:00 nginx: master process /usr/sbin/nginx
nginx      3405  0.0  0.1 125496  3140 ?        S    06:58   0:00 nginx: worker process
root       3407  0.0  0.0   9088   672 pts/1    S+   06:58   0:00 grep --color=auto nginx
[root@93bd1375ada5 /]#
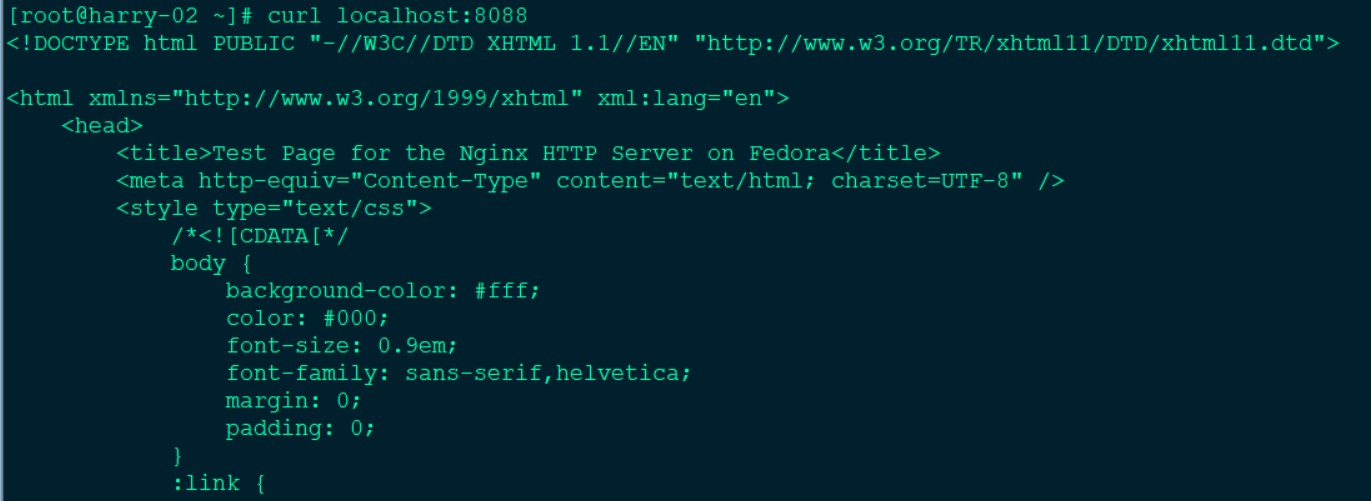
通过crul宿主机的8088端口,证明centos_with_nginx:80端口映射成功
配置桥接网络
为了使本地网络中的机器和Docker容器更方便的通信,我们经常会有将Docker容器配置到和主机同一网段的需求。这个需求其实很容易实现,我们只要将Docker容器和宿主机的网卡桥接起来,再给Docker容器配上IP就可以了。
cd /etc/sysconfig/network-scripts/; cp ifcfg-ens33 ifcfg-br0
vi ifcfg-ens33 //增加BRIDGE=br0,删除IPADDR,NETMASK,GATEWAY,DNS1
vi ifcfg-br0//修改DEVICE为br0,Type为Bridge,把ens33的网络设置设置到这里来
systemctl restart network
安装pipwork
git clone https://github.com/jpetazzo/pipework
cp pipework/pipework /usr/local/bin/
开启一个容器
docker run -itd --net=none --name aming123 centos_with_nettool bash
pipework br0 aming123 172.7.15.201/24@172.7.15.3 #201为容器的ip,@后面的ip为网关ip
docker exec -it aming123 bash #进去后ifconfig查看就可以看到新添加的ip
Dockerfile创建镜像
Dockerfile格式:
1. FROM //指定基于哪个基础镜像
格式 FROM <image> 或者 FROM <image>:<tag>, 比如
• FROM centos
• FROM centos:latest
2. MAINTAINER //指定作者信息
格式 MAINTAIN <name> ,比如
• MAINTAINER aming aming@aminglinux.com
3. RUN //镜像操作指令
• 格式为 RUN <command> 或者 RUN [“executable”, “param1”, “param2”],比如
• RUN yum install httpd
• RUN ["/bin/bash", "-c", "echo hello"]
4. CMD // 三种格式:
• CMD ["executable", "param1", "param2"]
• CMD command param1 param2
• CMD ["param1", "param2"]
• RUN和CMD看起来挺像,但是CMD用来指定容器启动时用到的命令,只能有一条。比如
• CMD ["/bin/bash", "/usr/local/nginx/sbin/nginx", "-c", "/usr/local/nginx/conf/nginx.conf"]
5. EXPOSE
• 格式为 EXPOSE <port> [<port>...] , 比如
• EXPOSE 22 80 8443
• 这个用来指定要映射出去的端口,比如容器内部我们启动了sshd和nginx,所以我们需要把22和80端口暴漏出去。这个需要配合-P(大写)来工作,也就是说在启动容器时,需要加上-P,让它自动分配。如果想指定具体的端口,也可以使用-p(小写)来指定。
6. ENV
• 格式 ENV <key> <value>, 比如
• ENV PATH /usr/local/mysql/bin:$PATH
• 它主要是为后续的RUN指令提供一个环境变量,我们也可以定义一些自定义的变量
• ENV MYSQL_version 5.6
7. ADD 格式 add <src> <dest>
• 将本地的一个文件或目录拷贝到容器的某个目录里。 其中src为Dockerfile所在目录的相对路径,它也可以是一个url。比如
• ADD <conf/vhosts> </usr/local/nginx/conf>
8. COPY
• 格式同add
• 使用方法和add一样,不同的是,它不支持url
9. ENTRYPOINT 格式类似CMD
• 容器启动时要执行的命令,它和CMD很像,也是只有一条生效,如果写多个只有最后一条有效。和CMD不同是:
• CMD 是可以被 docker run 指令覆盖的,而ENTRYPOINT不能覆盖。比如,容器名字为aming
• 我们在Dockerfile中指定如下CMD:
• CMD ["/bin/echo", "test"]
• 启动容器的命令是 docker run aming 这样会输出 test
• 假如启动容器的命令是 docker run -it aming /bin/bash 什么都不会输出
• ENTRYPOINT不会被覆盖,而且会比CMD或者docker run指定的命令要靠前执行
• ENTRYPOINT ["echo", "test"]
• docker run -it aming 123
• 则会输出 test 123 ,这相当于要执行命令 echo test 123
10. VOLUME
• 格式 VOLUME ["/data"]
• 创建一个可以从本地主机或其他容器挂载的挂载点。
• 11. USER
• 格式 USER daemon
• 指定运行容器的用户
• 12. WORKDIR
• 格式 WORKDIR /path/to/workdir
• 为后续的RUN、CMD或者ENTRYPOINT指定工作目录
Dockerfile示例-nginx
先下载nginx的配置文件
• wget http://www.apelearn.com/study_v2/.nginx_conf
vim Dockerfile //内容如下
## Set the base image to CentOS
FROM centos
# File Author / Maintainer
MAINTAINER aming aming@aminglinux.com
# Install necessary tools
RUN yum install -y pcre-devel wget net-tools gcc zlib zlib-devel make openssl-devel
# Install Nginx
ADD http://nginx.org/download/nginx-1.8.0.tar.gz .
RUN tar zxvf nginx-1.8.0.tar.gz
RUN mkdir -p /usr/local/nginx
RUN cd nginx-1.8.0 && ./configure --prefix=/usr/local/nginx && make && make install
RUN rm -fv /usr/local/nginx/conf/nginx.conf
ADD http://www.apelearn.com/study_v2/.nginx_conf  /usr/local/nginx/conf/nginx.conf
#Expose ports
EXPOSE 80
# Set the default command to execute when creating a new container
ENTRYPOINT /usr/local/nginx/sbin/nginx && tail -f /etc/passwd
docker run -itd -p 8088:80 centos_nginx bash

docker images //可以看到我们新建的镜像
docker run -itd -p 81:80 centos_nginx bash
其中 && tail -f /etc/passwd 是保证dockfile执行不会中断
Docker compose部署服务
docker compose可以方便我们快捷高效地管理容器的启动、停止、重启等操作,它类似于linux下的shell脚本,基于yaml语法,在该文件里我们可以描述应用的架构,比如用什么镜像、数据卷、网络模式、监听端口等信息。我们可以在一个compose文件中定义一个多容器的应用(比如jumpserver),然后通过该compose来启动这个应用。
安装compose方法如下
• curl -L https://github.com/docker/compose/releases/download/1.17.0-rc1/docker-compose-`uname -s`-`uname -m` > /usr/local/bin/docker-compose
• chmod 755 !$
• docker-compose version 查看版本信息
Compose区分Version 1和Version 2(Compose 1.6.0+,Docker Engine 1.10.0+)。Version 2支持更多的指令。Version 1没有声明版本默认是"version 1"。Version 1将来会被弃用。
vim docker-compose.yml
version: "2"
services:
  app1:
    image: centos_nginx
    ports:
      - "8080:80"
    networks:
      - "net1"
    volumes:
      - /data/:/data
  app2:
    image: centos_with_nettool
    networks:
      - "net2"
    volumes:
      - /data/:/data1
    entrypoint: tail -f /etc/passwd
networks:
  net1:
    driver: bridge
  net2:
    driver: bridge
docker-compose up -d 可以启动两个容器
docker-compose --help
docker-compose ps/down/stop/start/rm
关于docker-compose语法的参考文档 http://www.web3.xin/index/article/182.html