转自:https://www.cnblogs.com/skyfsm/p/7411961.html
图像拼接在实际的应用场景很广,比如无人机航拍,遥感图像等等,图像拼接是进一步做图像理解基础步骤,拼接效果的好坏直接影响接下来的工作,所以一个好的图像拼接算法非常重要。
再举一个身边的例子吧,你用你的手机对某一场景拍照,但是你没有办法一次将所有你要拍的景物全部拍下来,所以你对该场景从左往右依次拍了好几张图,来把你要拍的所有景物记录下来。那么我们能不能把这些图像拼接成一个大图呢?我们利用opencv就可以做到图像拼接的效果!
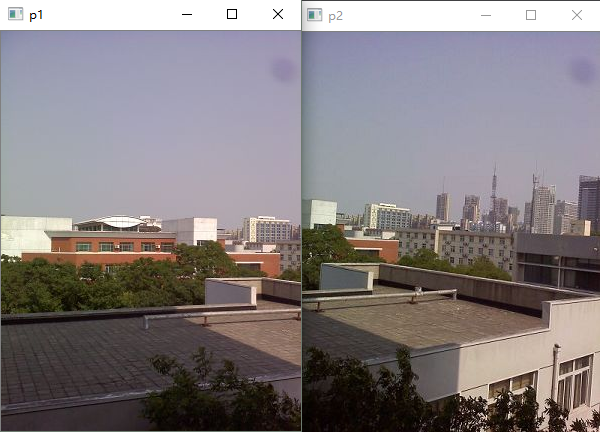
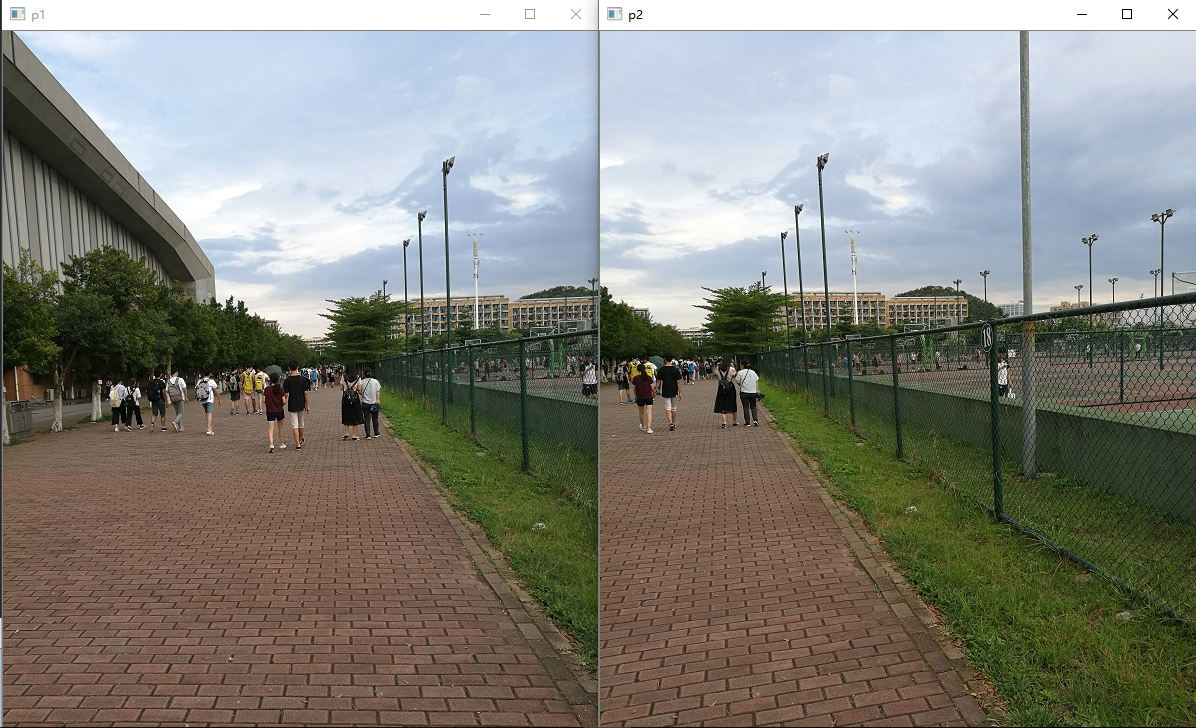
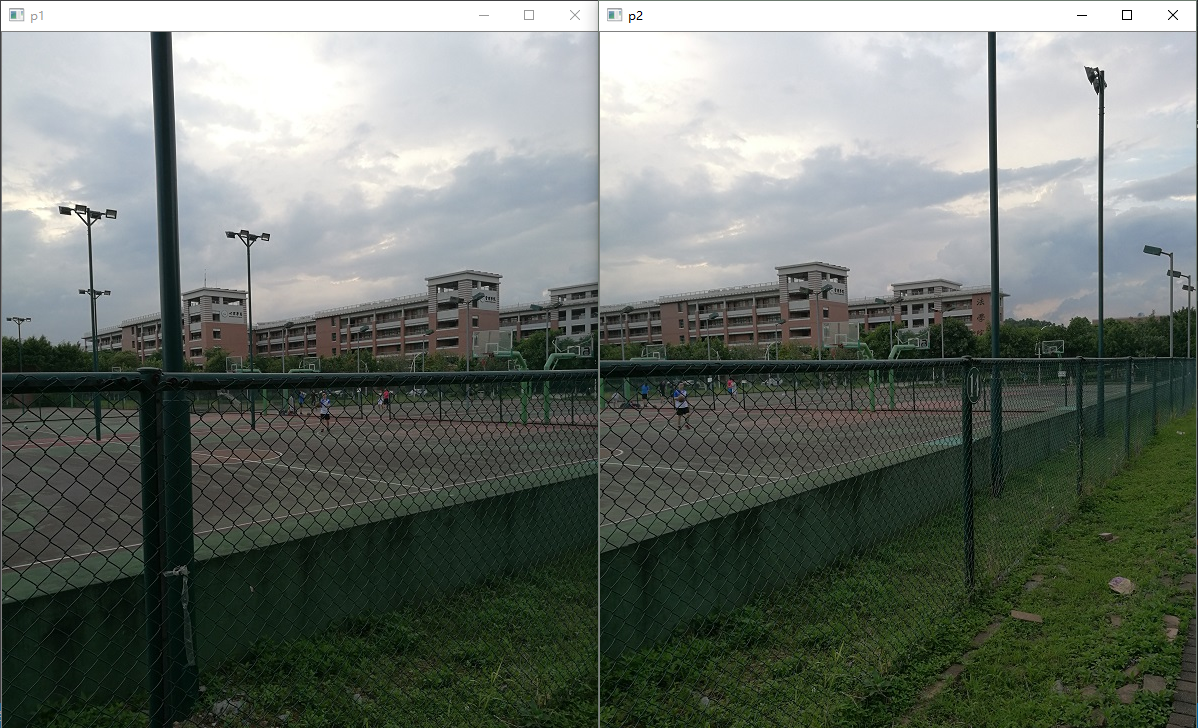
比如我们有对这两张图进行拼接。
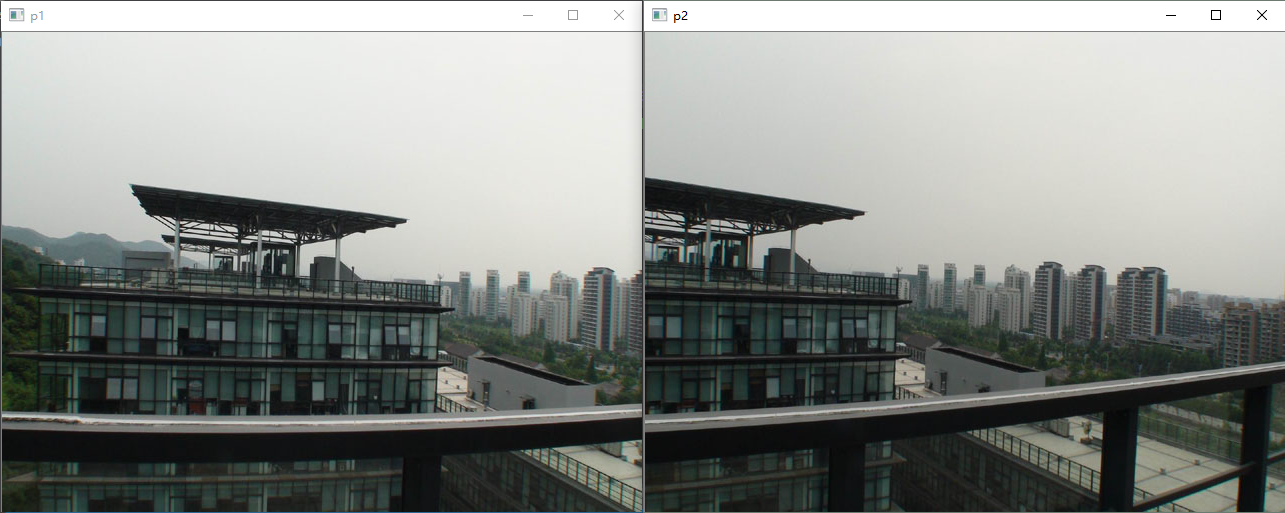
从上面两张图可以看出,这两张图有比较多的重叠部分,这也是拼接的基本要求。
那么要实现图像拼接需要那几步呢?简单来说有以下几步:
- 对每幅图进行特征点提取
- 对对特征点进行匹配
- 进行图像配准
- 把图像拷贝到另一幅图像的特定位置
- 对重叠边界进行特殊处理
好吧,那就开始正式实现图像配准。
第一步就是特征点提取。现在CV领域有很多特征点的定义,比如sift、surf、harris角点、ORB都是很有名的特征因子,都可以用来做图像拼接的工作,他们各有优势。本文将使用ORB和SURF进行图像拼接,用其他方法进行拼接也是类似的。
基于SURF的图像拼接
用SIFT算法来实现图像拼接是很常用的方法,但是因为SIFT计算量很大,所以在速度要求很高的场合下不再适用。所以,它的改进方法SURF因为在速度方面有了明显的提高(速度是SIFT的3倍),所以在图像拼接领域还是大有作为。虽说SURF精确度和稳定性不及SIFT,但是其综合能力还是优越一些。下面将详细介绍拼接的主要步骤。
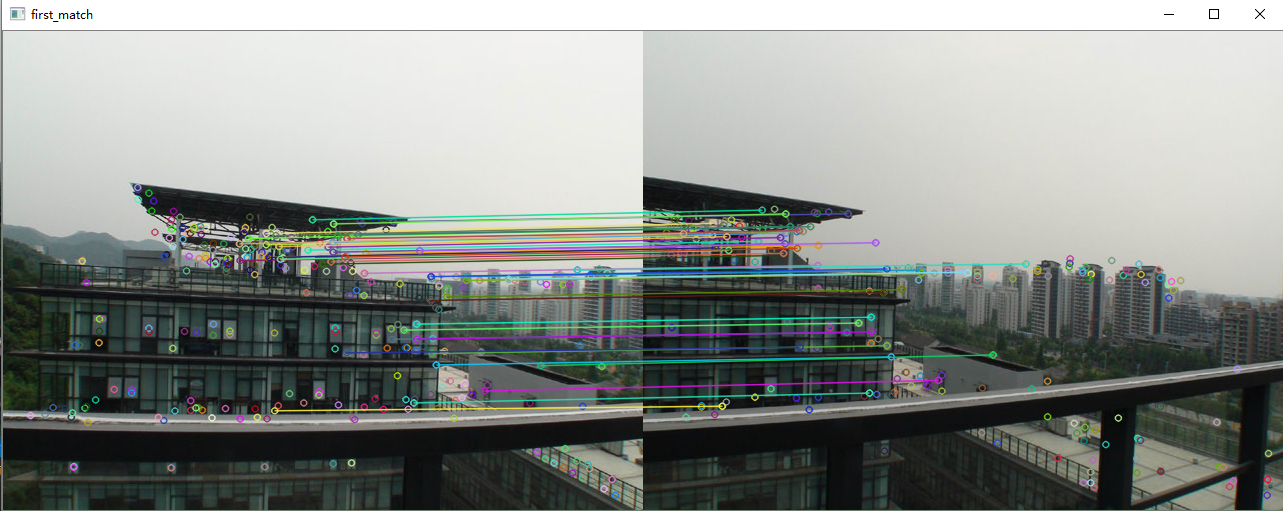
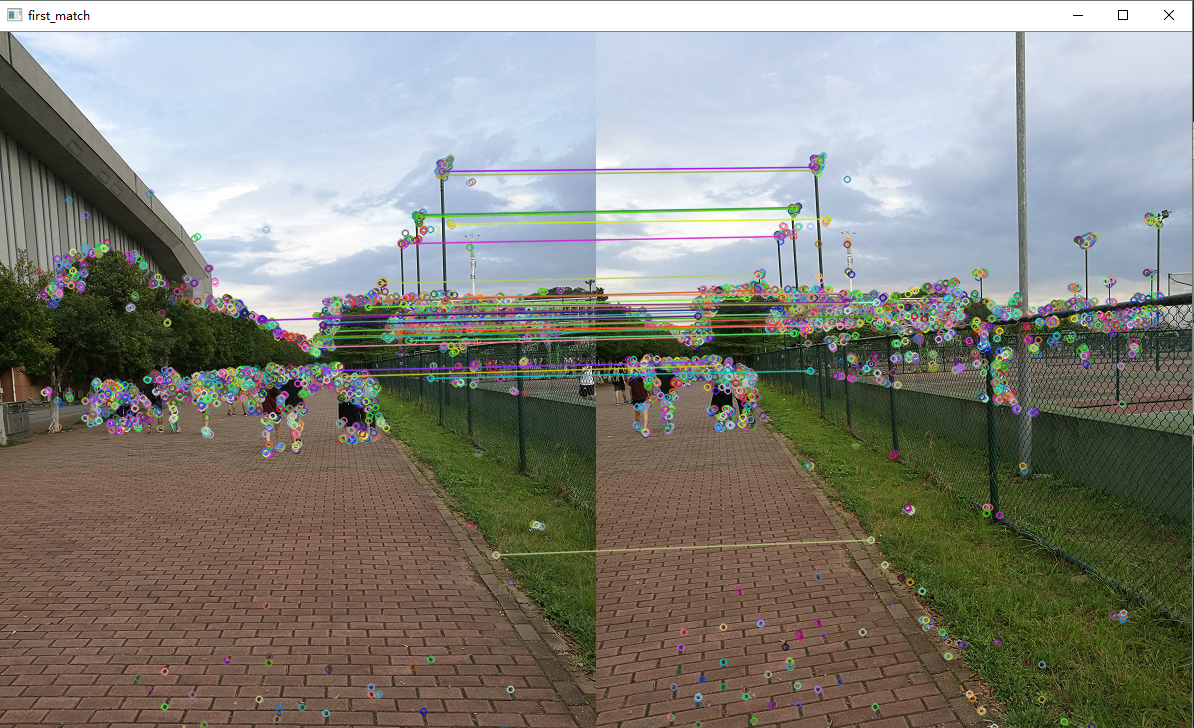
1.特征点提取和匹配
特征点提取和匹配的方法我在上一篇文章《OpenCV探索之路(二十三):特征检测和特征匹配方法汇总》中做了详细的介绍,在这里直接使用上文所总结的SURF特征提取和特征匹配的方法。
SurfFeatureDetector Detector(2000);
vector<KeyPoint> keyPoint1, keyPoint2;
Detector.detect(image1, keyPoint1);
Detector.detect(image2, keyPoint2);
SurfDescriptorExtractor Descriptor;
Mat imageDesc1, imageDesc2;
Descriptor.compute(image1, keyPoint1, imageDesc1);
Descriptor.compute(image2, keyPoint2, imageDesc2);
FlannBasedMatcher matcher;
vector<vector<DMatch> > matchePoints;
vector<DMatch> GoodMatchePoints;
vector<Mat> train_desc(1, imageDesc1);
matcher.add(train_desc);
matcher.train();
matcher.knnMatch(imageDesc2, matchePoints, 2);
cout << "total match points: " << matchePoints.size() << endl;
for (int i = 0; i < matchePoints.size(); i++)
{
if (matchePoints[i][0].distance < 0.4 * matchePoints[i][1].distance)
{
GoodMatchePoints.push_back(matchePoints[i][0]);
}
}
Mat first_match;
drawMatches(image02, keyPoint2, image01, keyPoint1, GoodMatchePoints, first_match);
imshow("first_match ", first_match);
2.图像配准
这样子我们就可以得到了两幅待拼接图的匹配点集,接下来我们进行图像的配准,即将两张图像转换为同一坐标下,这里我们需要使用findHomography函数来求得变换矩阵。但是需要注意的是,findHomography函数所要用到的点集是Point2f类型的,所有我们需要对我们刚得到的点集GoodMatchePoints再做一次处理,使其转换为Point2f类型的点集。
vector<Point2f> imagePoints1, imagePoints2;

for (int i = 0; i<GoodMatchePoints.size(); i++)
{
    imagePoints2.push_back(keyPoint2[GoodMatchePoints[i].queryIdx].pt);
    imagePoints1.push_back(keyPoint1[GoodMatchePoints[i].trainIdx].pt);
}
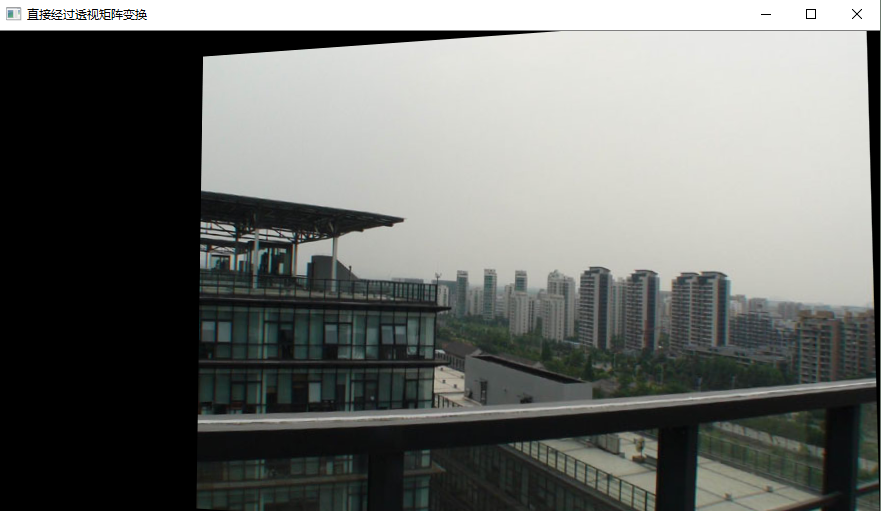
这样子,我们就可以拿着imagePoints1, imagePoints2去求变换矩阵了,并且实现图像配准。值得注意的是findHomography函数的参数中我们选泽了CV_RANSAC,这表明我们选择RANSAC算法继续筛选可靠地匹配点,这使得匹配点解更为精确。
Mat homo = findHomography(imagePoints1, imagePoints2, CV_RANSAC);
cout << "变换矩阵为:\n" << homo << endl << endl;
Mat imageTransform1, imageTransform2;
warpPerspective(image01, imageTransform1, homo, Size(MAX(corners.right_top.x, corners.right_bottom.x), image02.rows));
imshow("直接经过透视矩阵变换", imageTransform1);
imwrite("trans1.jpg", imageTransform1);
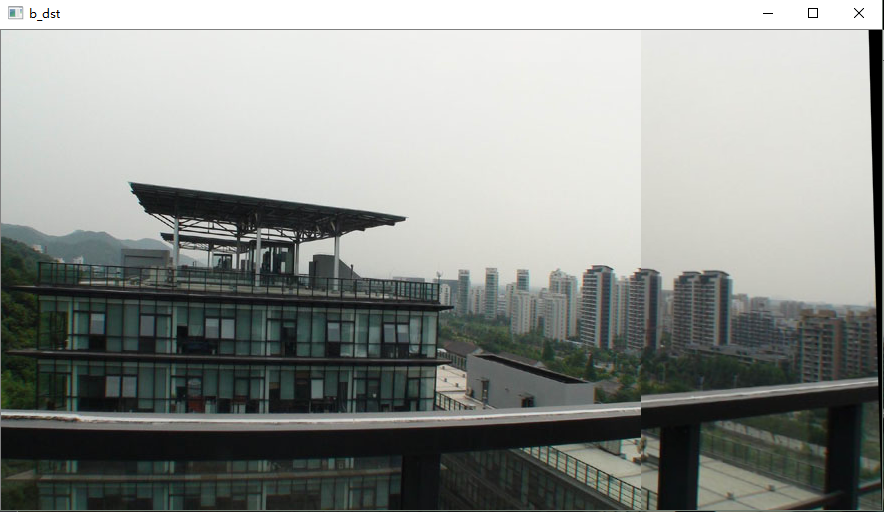
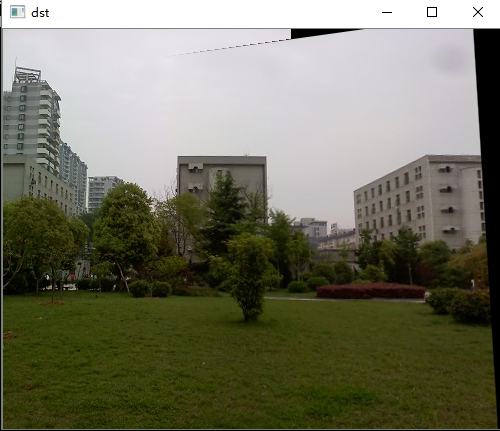
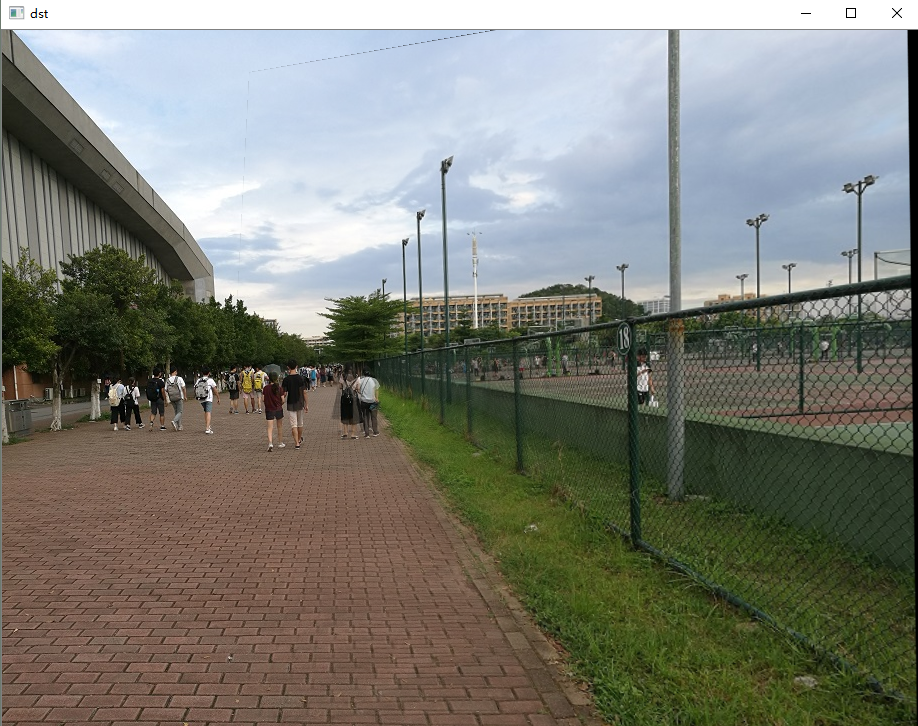
3. 图像拷贝
拷贝的思路很简单,就是将左图直接拷贝到配准图上就可以了。
int dst_width = imageTransform1.cols;
int dst_height = image02.rows;
Mat dst(dst_height, dst_width, CV_8UC3);
dst.setTo(0);
imageTransform1.copyTo(dst(Rect(0, 0, imageTransform1.cols, imageTransform1.rows)));
image02.copyTo(dst(Rect(0, 0, image02.cols, image02.rows)));
imshow("b_dst", dst);
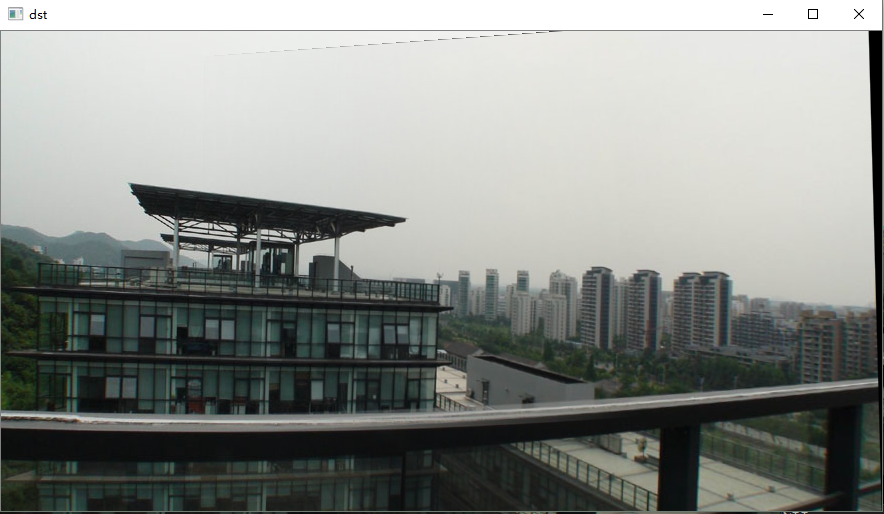
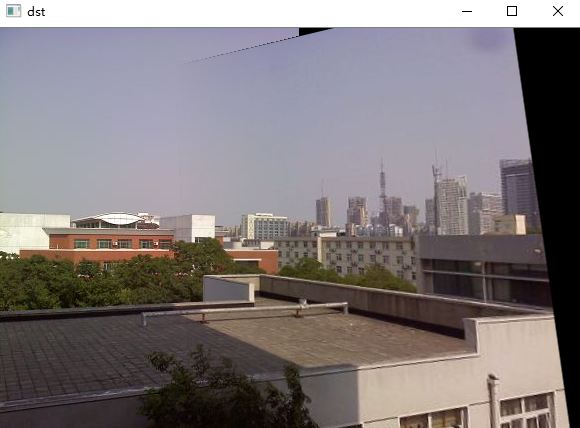
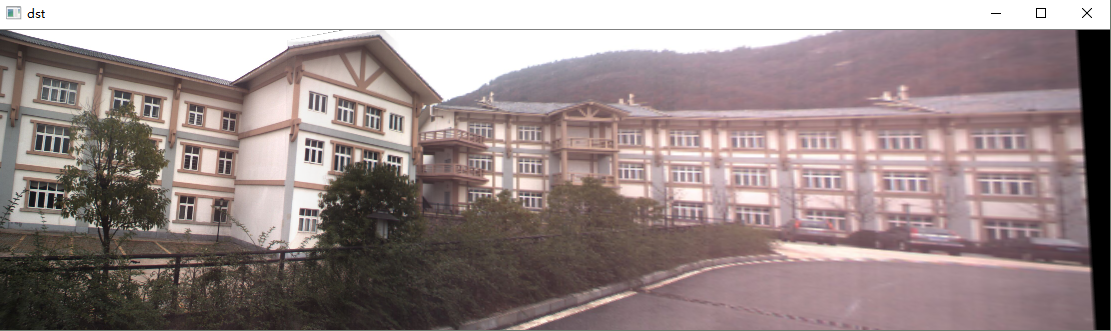
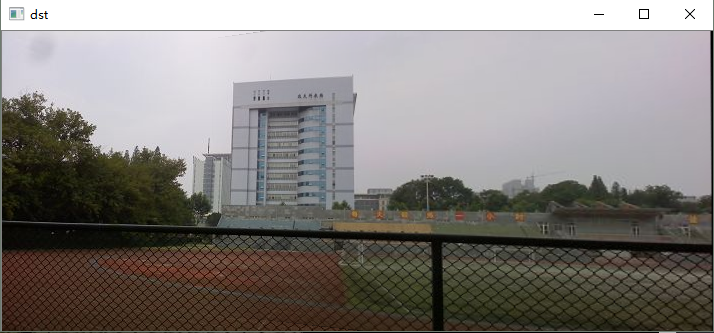
4.图像融合(去裂缝处理)
从上图可以看出,两图的拼接并不自然,原因就在于拼接图的交界处,两图因为光照色泽的原因使得两图交界处的过渡很糟糕,所以需要特定的处理解决这种不自然。这里的处理思路是加权融合,在重叠部分由前一幅图像慢慢过渡到第二幅图像,即将图像的重叠区域的像素值按一定的权值相加合成新的图像。
void OptimizeSeam(Mat& img1, Mat& trans, Mat& dst)
{
int start = MIN(corners.left_top.x, corners.left_bottom.x);
double processWidth = img1.cols - start;
int rows = dst.rows;
int cols = img1.cols;
double alpha = 1;
for (int i = 0; i < rows; i++)
{
uchar* p = img1.ptr<uchar>(i);
uchar* t = trans.ptr<uchar>(i);
uchar* d = dst.ptr<uchar>(i);
for (int j = start; j < cols; j++)
{
if (t[j * 3] == 0 && t[j * 3 + 1] == 0 && t[j * 3 + 2] == 0)
{
alpha = 1;
}
else
{
alpha = (processWidth - (j - start)) / processWidth;
}
d[j * 3] = p[j * 3] * alpha + t[j * 3] * (1 - alpha);
d[j * 3 + 1] = p[j * 3 + 1] * alpha + t[j * 3 + 1] * (1 - alpha);
d[j * 3 + 2] = p[j * 3 + 2] * alpha + t[j * 3 + 2] * (1 - alpha);
}
}
}
多尝试几张,验证拼接效果
测试一
测试二
测试三

最后给出完整的SURF算法实现的拼接代码。
#include "highgui/highgui.hpp"
#include "opencv2/nonfree/nonfree.hpp"
#include "opencv2/legacy/legacy.hpp"
#include <iostream>
using namespace cv;
using namespace std;
void OptimizeSeam(Mat& img1, Mat& trans, Mat& dst);
typedef struct
{
Point2f left_top;
Point2f left_bottom;
Point2f right_top;
Point2f right_bottom;
}four_corners_t;
four_corners_t corners;
void CalcCorners(const Mat& H, const Mat& src)
{
double v2[] = { 0, 0, 1 };
double v1[3];
Mat V2 = Mat(3, 1, CV_64FC1, v2);
Mat V1 = Mat(3, 1, CV_64FC1, v1);
V1 = H * V2;
cout << "V2: " << V2 << endl;
cout << "V1: " << V1 << endl;
corners.left_top.x = v1[0] / v1[2];
corners.left_top.y = v1[1] / v1[2];
v2[0] = 0;
v2[1] = src.rows;
v2[2] = 1;
V2 = Mat(3, 1, CV_64FC1, v2);
V1 = Mat(3, 1, CV_64FC1, v1);
V1 = H * V2;
corners.left_bottom.x = v1[0] / v1[2];
corners.left_bottom.y = v1[1] / v1[2];
v2[0] = src.cols;
v2[1] = 0;
v2[2] = 1;
V2 = Mat(3, 1, CV_64FC1, v2);
V1 = Mat(3, 1, CV_64FC1, v1);
V1 = H * V2;
corners.right_top.x = v1[0] / v1[2];
corners.right_top.y = v1[1] / v1[2];
v2[0] = src.cols;
v2[1] = src.rows;
v2[2] = 1;
V2 = Mat(3, 1, CV_64FC1, v2);
V1 = Mat(3, 1, CV_64FC1, v1);
V1 = H * V2;
corners.right_bottom.x = v1[0] / v1[2];
corners.right_bottom.y = v1[1] / v1[2];
}
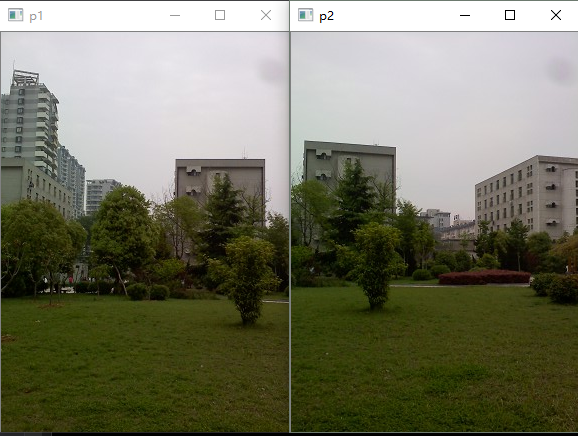
int main(int argc, char *argv[])
{
Mat image01 = imread("g5.jpg", 1);
Mat image02 = imread("g4.jpg", 1);
imshow("p2", image01);
imshow("p1", image02);
Mat image1, image2;
cvtColor(image01, image1, CV_RGB2GRAY);
cvtColor(image02, image2, CV_RGB2GRAY);
SurfFeatureDetector Detector(2000);
vector<KeyPoint> keyPoint1, keyPoint2;
Detector.detect(image1, keyPoint1);
Detector.detect(image2, keyPoint2);
SurfDescriptorExtractor Descriptor;
Mat imageDesc1, imageDesc2;
Descriptor.compute(image1, keyPoint1, imageDesc1);
Descriptor.compute(image2, keyPoint2, imageDesc2);
FlannBasedMatcher matcher;
vector<vector<DMatch> > matchePoints;
vector<DMatch> GoodMatchePoints;
vector<Mat> train_desc(1, imageDesc1);
matcher.add(train_desc);
matcher.train();
matcher.knnMatch(imageDesc2, matchePoints, 2);
cout << "total match points: " << matchePoints.size() << endl;
for (int i = 0; i < matchePoints.size(); i++)
{
if (matchePoints[i][0].distance < 0.4 * matchePoints[i][1].distance)
{
GoodMatchePoints.push_back(matchePoints[i][0]);
}
}
Mat first_match;
drawMatches(image02, keyPoint2, image01, keyPoint1, GoodMatchePoints, first_match);
imshow("first_match ", first_match);
vector<Point2f> imagePoints1, imagePoints2;
for (int i = 0; i<GoodMatchePoints.size(); i++)
{
imagePoints2.push_back(keyPoint2[GoodMatchePoints[i].queryIdx].pt);
imagePoints1.push_back(keyPoint1[GoodMatchePoints[i].trainIdx].pt);
}
Mat homo = findHomography(imagePoints1, imagePoints2, CV_RANSAC);
cout << "变换矩阵为:\n" << homo << endl << endl;
CalcCorners(homo, image01);
cout << "left_top:" << corners.left_top << endl;
cout << "left_bottom:" << corners.left_bottom << endl;
cout << "right_top:" << corners.right_top << endl;
cout << "right_bottom:" << corners.right_bottom << endl;
Mat imageTransform1, imageTransform2;
warpPerspective(image01, imageTransform1, homo, Size(MAX(corners.right_top.x, corners.right_bottom.x), image02.rows));
imshow("直接经过透视矩阵变换", imageTransform1);
imwrite("trans1.jpg", imageTransform1);
int dst_width = imageTransform1.cols;
int dst_height = image02.rows;
Mat dst(dst_height, dst_width, CV_8UC3);
dst.setTo(0);
imageTransform1.copyTo(dst(Rect(0, 0, imageTransform1.cols, imageTransform1.rows)));
image02.copyTo(dst(Rect(0, 0, image02.cols, image02.rows)));
imshow("b_dst", dst);
OptimizeSeam(image02, imageTransform1, dst);
imshow("dst", dst);
imwrite("dst.jpg", dst);
waitKey();
return 0;
}
void OptimizeSeam(Mat& img1, Mat& trans, Mat& dst)
{
int start = MIN(corners.left_top.x, corners.left_bottom.x);
double processWidth = img1.cols - start;
int rows = dst.rows;
int cols = img1.cols;
double alpha = 1;
for (int i = 0; i < rows; i++)
{
uchar* p = img1.ptr<uchar>(i);
uchar* t = trans.ptr<uchar>(i);
uchar* d = dst.ptr<uchar>(i);
for (int j = start; j < cols; j++)
{
if (t[j * 3] == 0 && t[j * 3 + 1] == 0 && t[j * 3 + 2] == 0)
{
alpha = 1;
}
else
{
alpha = (processWidth - (j - start)) / processWidth;
}
d[j * 3] = p[j * 3] * alpha + t[j * 3] * (1 - alpha);
d[j * 3 + 1] = p[j * 3 + 1] * alpha + t[j * 3 + 1] * (1 - alpha);
d[j * 3 + 2] = p[j * 3 + 2] * alpha + t[j * 3 + 2] * (1 - alpha);
}
}
}
基于ORB的图像拼接
利用ORB进行图像拼接的思路跟上面的思路基本一样,只是特征提取和特征点匹配的方式略有差异罢了。这里就不再详细介绍思路了,直接贴代码看效果。
#include "highgui/highgui.hpp"
#include "opencv2/nonfree/nonfree.hpp"
#include "opencv2/legacy/legacy.hpp"
#include <iostream>
using namespace cv;
using namespace std;
void OptimizeSeam(Mat& img1, Mat& trans, Mat& dst);
typedef struct
{
Point2f left_top;
Point2f left_bottom;
Point2f right_top;
Point2f right_bottom;
}four_corners_t;
four_corners_t corners;
void CalcCorners(const Mat& H, const Mat& src)
{
double v2[] = { 0, 0, 1 };
double v1[3];
Mat V2 = Mat(3, 1, CV_64FC1, v2);
Mat V1 = Mat(3, 1, CV_64FC1, v1);
V1 = H * V2;
cout << "V2: " << V2 << endl;
cout << "V1: " << V1 << endl;
corners.left_top.x = v1[0] / v1[2];
corners.left_top.y = v1[1] / v1[2];
v2[0] = 0;
v2[1] = src.rows;
v2[2] = 1;
V2 = Mat(3, 1, CV_64FC1, v2);
V1 = Mat(3, 1, CV_64FC1, v1);
V1 = H * V2;
corners.left_bottom.x = v1[0] / v1[2];
corners.left_bottom.y = v1[1] / v1[2];
v2[0] = src.cols;
v2[1] = 0;
v2[2] = 1;
V2 = Mat(3, 1, CV_64FC1, v2);
V1 = Mat(3, 1, CV_64FC1, v1);
V1 = H * V2;
corners.right_top.x = v1[0] / v1[2];
corners.right_top.y = v1[1] / v1[2];
v2[0] = src.cols;
v2[1] = src.rows;
v2[2] = 1;
V2 = Mat(3, 1, CV_64FC1, v2);
V1 = Mat(3, 1, CV_64FC1, v1);
V1 = H * V2;
corners.right_bottom.x = v1[0] / v1[2];
corners.right_bottom.y = v1[1] / v1[2];
}
int main(int argc, char *argv[])
{
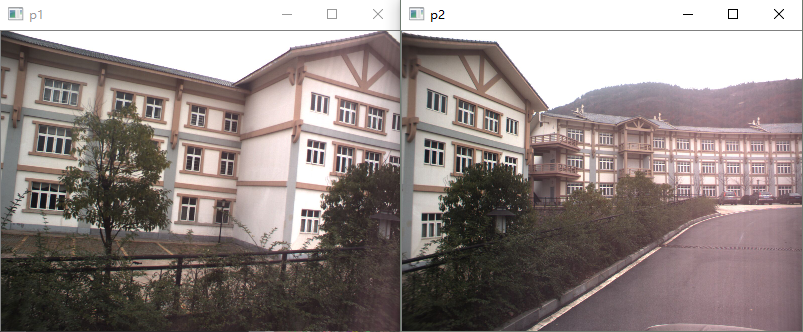
Mat image01 = imread("t1.jpg", 1);
Mat image02 = imread("t2.jpg", 1);
imshow("p2", image01);
imshow("p1", image02);
Mat image1, image2;
cvtColor(image01, image1, CV_RGB2GRAY);
cvtColor(image02, image2, CV_RGB2GRAY);
OrbFeatureDetector surfDetector(3000);
vector<KeyPoint> keyPoint1, keyPoint2;
surfDetector.detect(image1, keyPoint1);
surfDetector.detect(image2, keyPoint2);
OrbDescriptorExtractor SurfDescriptor;
Mat imageDesc1, imageDesc2;
SurfDescriptor.compute(image1, keyPoint1, imageDesc1);
SurfDescriptor.compute(image2, keyPoint2, imageDesc2);
flann::Index flannIndex(imageDesc1, flann::LshIndexParams(12, 20, 2), cvflann::FLANN_DIST_HAMMING);
vector<DMatch> GoodMatchePoints;
Mat macthIndex(imageDesc2.rows, 2, CV_32SC1), matchDistance(imageDesc2.rows, 2, CV_32FC1);
flannIndex.knnSearch(imageDesc2, macthIndex, matchDistance, 2, flann::SearchParams());
for (int i = 0; i < matchDistance.rows; i++)
{
if (matchDistance.at<float>(i, 0) < 0.4 * matchDistance.at<float>(i, 1))
{
DMatch dmatches(i, macthIndex.at<int>(i, 0), matchDistance.at<float>(i, 0));
GoodMatchePoints.push_back(dmatches);
}
}
Mat first_match;
drawMatches(image02, keyPoint2, image01, keyPoint1, GoodMatchePoints, first_match);
imshow("first_match ", first_match);
vector<Point2f> imagePoints1, imagePoints2;
for (int i = 0; i<GoodMatchePoints.size(); i++)
{
imagePoints2.push_back(keyPoint2[GoodMatchePoints[i].queryIdx].pt);
imagePoints1.push_back(keyPoint1[GoodMatchePoints[i].trainIdx].pt);
}
Mat homo = findHomography(imagePoints1, imagePoints2, CV_RANSAC);
cout << "变换矩阵为:\n" << homo << endl << endl;
CalcCorners(homo, image01);
cout << "left_top:" << corners.left_top << endl;
cout << "left_bottom:" << corners.left_bottom << endl;
cout << "right_top:" << corners.right_top << endl;
cout << "right_bottom:" << corners.right_bottom << endl;
Mat imageTransform1, imageTransform2;
warpPerspective(image01, imageTransform1, homo, Size(MAX(corners.right_top.x, corners.right_bottom.x), image02.rows));
imshow("直接经过透视矩阵变换", imageTransform1);
imwrite("trans1.jpg", imageTransform1);
int dst_width = imageTransform1.cols;
int dst_height = image02.rows;
Mat dst(dst_height, dst_width, CV_8UC3);
dst.setTo(0);
imageTransform1.copyTo(dst(Rect(0, 0, imageTransform1.cols, imageTransform1.rows)));
image02.copyTo(dst(Rect(0, 0, image02.cols, image02.rows)));
imshow("b_dst", dst);
OptimizeSeam(image02, imageTransform1, dst);
imshow("dst", dst);
imwrite("dst.jpg", dst);
waitKey();
return 0;
}
void OptimizeSeam(Mat& img1, Mat& trans, Mat& dst)
{
int start = MIN(corners.left_top.x, corners.left_bottom.x);
double processWidth = img1.cols - start;
int rows = dst.rows;
int cols = img1.cols;
double alpha = 1;
for (int i = 0; i < rows; i++)
{
uchar* p = img1.ptr<uchar>(i);
uchar* t = trans.ptr<uchar>(i);
uchar* d = dst.ptr<uchar>(i);
for (int j = start; j < cols; j++)
{
if (t[j * 3] == 0 && t[j * 3 + 1] == 0 && t[j * 3 + 2] == 0)
{
alpha = 1;
}
else
{
alpha = (processWidth - (j - start)) / processWidth;
}
d[j * 3] = p[j * 3] * alpha + t[j * 3] * (1 - alpha);
d[j * 3 + 1] = p[j * 3 + 1] * alpha + t[j * 3 + 1] * (1 - alpha);
d[j * 3 + 2] = p[j * 3 + 2] * alpha + t[j * 3 + 2] * (1 - alpha);
}
}
}
看一看拼接效果,我觉得还是不错的。

看一下这一组图片,这组图片产生了鬼影,为什么?因为两幅图中的人物走动了啊!所以要做图像拼接,尽量保证使用的是静态图片,不要加入一些动态因素干扰拼接。
opencv自带的拼接算法stitch
opencv其实自己就有实现图像拼接的算法,当然效果也是相当好的,但是因为其实现很复杂,而且代码量很庞大,其实在一些小应用下的拼接有点杀鸡用牛刀的感觉。最近在阅读sticth源码时,发现其中有几个很有意思的地方。
1.opencv stitch选择的特征检测方式
一直很好奇opencv stitch算法到底选用了哪个算法作为其特征检测方式,是ORB,SIFT还是SURF?读源码终于看到答案。
#ifdef HAVE_OPENCV_NONFREE
        stitcher.setFeaturesFinder(new detail::SurfFeaturesFinder());
#else
        stitcher.setFeaturesFinder(new detail::OrbFeaturesFinder());
#endif
在源码createDefault函数中(默认设置),第一选择是SURF,第二选择才是ORB(没有NONFREE模块才选),所以既然大牛们这么选择,必然是经过综合考虑的,所以应该SURF算法在图像拼接有着更优秀的效果。
2.opencv stitch获取匹配点的方式
以下代码是opencv stitch源码中的特征点提取部分,作者使用了两次特征点提取的思路:先对图一进行特征点提取和筛选匹配(1->2),再对图二进行特征点的提取和匹配(2->1),这跟我们平时的一次提取的思路不同,这种二次提取的思路可以保证更多的匹配点被选中,匹配点越多,findHomography求出的变换越准确。这个思路值得借鉴。
matches_info.matches.clear();
Ptr<flann::IndexParams> indexParams = new flann::KDTreeIndexParams();
Ptr<flann::SearchParams> searchParams = new flann::SearchParams();
if (features2.descriptors.depth() == CV_8U)
{
indexParams->setAlgorithm(cvflann::FLANN_INDEX_LSH);
searchParams->setAlgorithm(cvflann::FLANN_INDEX_LSH);
}
FlannBasedMatcher matcher(indexParams, searchParams);
vector< vector<DMatch> > pair_matches;
MatchesSet matches;
matcher.knnMatch(features1.descriptors, features2.descriptors, pair_matches, 2);
for (size_t i = 0; i < pair_matches.size(); ++i)
{
if (pair_matches[i].size() < 2)
continue;
const DMatch& m0 = pair_matches[i][0];
const DMatch& m1 = pair_matches[i][1];
if (m0.distance < (1.f - match_conf_) * m1.distance)
{
matches_info.matches.push_back(m0);
matches.insert(make_pair(m0.queryIdx, m0.trainIdx));
}
}
LOG("\n1->2 matches: " << matches_info.matches.size() << endl);
pair_matches.clear();
matcher.knnMatch(features2.descriptors, features1.descriptors, pair_matches, 2);
for (size_t i = 0; i < pair_matches.size(); ++i)
{
if (pair_matches[i].size() < 2)
continue;
const DMatch& m0 = pair_matches[i][0];
const DMatch& m1 = pair_matches[i][1];
if (m0.distance < (1.f - match_conf_) * m1.distance)
if (matches.find(make_pair(m0.trainIdx, m0.queryIdx)) == matches.end())
matches_info.matches.push_back(DMatch(m0.trainIdx, m0.queryIdx, m0.distance));
}
LOG("1->2 & 2->1 matches: " << matches_info.matches.size() << endl);
这里我仿照opencv源码二次提取特征点的思路对我原有拼接代码进行改写,实验证明获取的匹配点确实较一次提取要多。
SiftFeatureDetector Detector(1000);
vector<KeyPoint> keyPoint1, keyPoint2;
Detector.detect(image1, keyPoint1);
Detector.detect(image2, keyPoint2);
SiftDescriptorExtractor Descriptor;
Mat imageDesc1, imageDesc2;
Descriptor.compute(image1, keyPoint1, imageDesc1);
Descriptor.compute(image2, keyPoint2, imageDesc2);
FlannBasedMatcher matcher;
vector<vector<DMatch> > matchePoints;
vector<DMatch> GoodMatchePoints;
MatchesSet matches;
vector<Mat> train_desc(1, imageDesc1);
matcher.add(train_desc);
matcher.train();
matcher.knnMatch(imageDesc2, matchePoints, 2);
for (int i = 0; i < matchePoints.size(); i++)
{
if (matchePoints[i][0].distance < 0.4 * matchePoints[i][1].distance)
{
GoodMatchePoints.push_back(matchePoints[i][0]);
matches.insert(make_pair(matchePoints[i][0].queryIdx, matchePoints[i][0].trainIdx));
}
}
cout<<"\n1->2 matches: " << GoodMatchePoints.size() << endl;
#if 1
FlannBasedMatcher matcher2;
matchePoints.clear();
vector<Mat> train_desc2(1, imageDesc2);
matcher2.add(train_desc2);
matcher2.train();
matcher2.knnMatch(imageDesc1, matchePoints, 2);
for (int i = 0; i < matchePoints.size(); i++)
{
if (matchePoints[i][0].distance < 0.4 * matchePoints[i][1].distance)
{
if (matches.find(make_pair(matchePoints[i][0].trainIdx, matchePoints[i][0].queryIdx)) == matches.end())
{
GoodMatchePoints.push_back(DMatch(matchePoints[i][0].trainIdx, matchePoints[i][0].queryIdx, matchePoints[i][0].distance));
}
}
}
cout<<"1->2 & 2->1 matches: " << GoodMatchePoints.size() << endl;
#endif
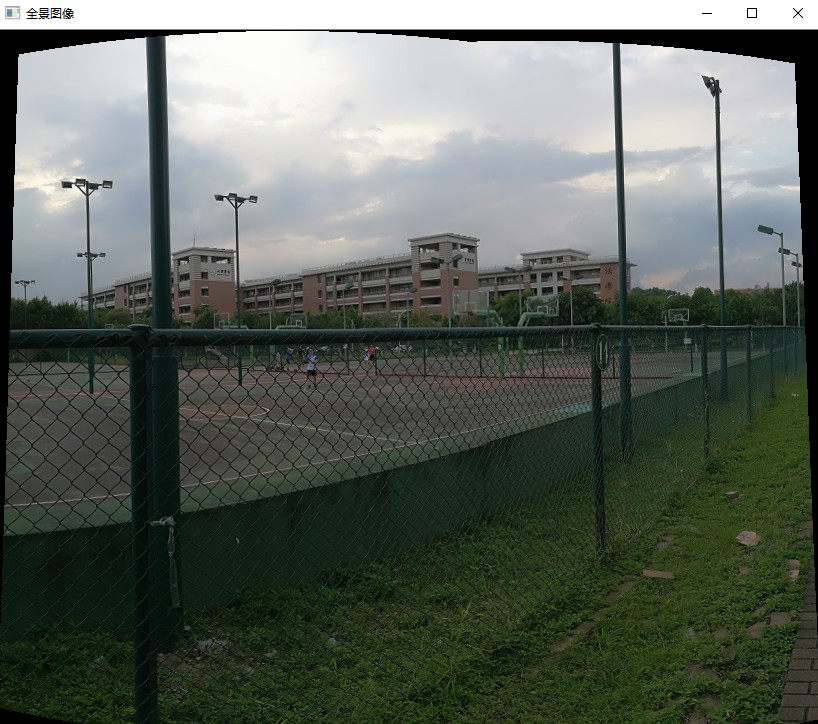
最后再看一下opencv stitch的拼接效果吧~速度虽然比较慢,但是效果还是很好的。
#include <iostream>
#include <opencv2/core/core.hpp>
#include <opencv2/highgui/highgui.hpp>
#include <opencv2/imgproc/imgproc.hpp>
#include <opencv2/stitching/stitcher.hpp>
using namespace std;
using namespace cv;
bool try_use_gpu = false;
vector<Mat> imgs;
string result_name = "dst1.jpg";
int main(int argc, char * argv[])
{
Mat img1 = imread("34.jpg");
Mat img2 = imread("35.jpg");
imshow("p1", img1);
imshow("p2", img2);
if (img1.empty() || img2.empty())
{
cout << "Can't read image" << endl;
return -1;
}
imgs.push_back(img1);
imgs.push_back(img2);
Stitcher stitcher = Stitcher::createDefault(try_use_gpu);
Mat pano;
Stitcher::Status status = stitcher.stitch(imgs, pano);
if (status != Stitcher::OK)
{
cout << "Can't stitch images, error code = " << int(status) << endl;
return -1;
}
imwrite(result_name, pano);
Mat pano2 = pano.clone();
imshow("全景图像", pano);
if (waitKey() == 27)
return 0;
}
本文内容由网友自发贡献,版权归原作者所有,本站不承担相应法律责任。如您发现有涉嫌抄袭侵权的内容,请联系:hwhale#tublm.com(使用前将#替换为@)