写博客记录一下Python 用tkinter 多进程线程写成的邮箱应用,只是一个简单的应用,尝试进程调度,并用pyinstaller打包成exe
注意:
1、平台环境win7 、Python3.6 、 pyinstaller3.3(安装方法,百度有,这里不加说明,Windows下Python3的pyinstaller会出错,解决办法,百度)
2、Windows下多进程,在if __name__=='__main__':里面去启动才不会出错
3、tkinter调用mainloop() 函数 应在主线程的最后一行,因为mainloop会进入屏幕显示循环,mainloop()之后的代码会在UI界面退出之后再执行(已经没意义了),
所以重点 :后台进程,后台线程,要在mainloop之前去启动
4、pyinstaller打包Python多进程 请加以下这行
multiprocessing.freeze_support()
5、以上注意在代码注释有
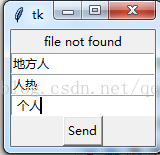
从上之下依次是label:作用是显示,发送成功,失败,以及找不到附件等信息
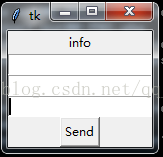
第一个Entry 是输入主题
第二个Entry是输入正文(这里随便用了entry,用Text更合适)
第三个Entry输入附件的文件位置
Button 就是发送
tkinter 进程代码(继承了threading.Thread)
from tkinter import * import multiprocessing from send_mail import send_my_mail#引入发送邮件 import threading class My_Gui(threading.Thread): """docstring for My_Gui""" def __init__(self,queue_1,queue_2,event_1): super(My_Gui,self).__init__() self.queue_1=queue_1 self.queue_2=queue_2 self.root=Tk() self.root.title="EMAIL" self.label_1=Label(self.root,text='info') self.entry_1=Entry(self.root,) self.entry_2=Entry(self.root,) self.entry_3=Entry(self.root,) #button的command调用函数需要参数时 用lambda self.button_1=Button(self.root,text='SEND',command=lambda:self.button_click(queue_1,event_1)) self.label_1.pack() self.entry_1.pack() self.entry_2.pack() self.entry_3.pack() self.button_1.pack() # self.root.mainloop() def button_click(self,queue,event_1): if not self.entry_1.get()=='': queue.put(self.entry_1.get())#获取三个输入框内容依次进入队列发送给后台进程 queue.put(self.entry_2.get()) queue.put(self.entry_3.get()) event_1.set() self.label_1['text']='sending email' #多线程等待后台进程返回消息,防止UI卡顿 def run(self): self.button_1['text']='Send' while True: if not self.queue_2.empty(): info=self.queue_2.get() if info=='succeed': self.label_1['text']='succeed' elif info=='failure': self.label_1['text']='failure' else: self.label_1['text']='file not found' def back_process(queue_1,queue_2,event_1): while True: event_1.wait() subject=queue_1.get()#后台进程获取UI进程“主题”输入框内容 body=queue_1.get()#后台进程获取UI进程“正文”输入框内容 img=queue_1.get()#附件 flage_1=send_my_mail(subject,body,img)#调用发送邮件函数 queue_2.put(flage_1)#将发送邮件函数的返回 发送给UI进程 event_1.clear() if __name__=='__main__': #多线程多进程都必须在mainloop之前去执行 multiprocessing.freeze_support() #在Windows下编译需要加这行 queue_1=multiprocessing.Queue()#用来UI进程向后台发送邮件进程发送消息 queue_2=multiprocessing.Queue()#用来后台进程向UI进程发送消息 event_1=multiprocessing.Event()#控制后台进程是否阻塞 t=multiprocessing.Process(target=back_process,args=(queue_1,queue_2,event_1)) t.daemon=True t.start()#要先于mainloop调用start 不然 进程不会启动 my_Gui=My_Gui(queue_1,queue_2,event_1)#GUI之后的代码不执行 my_Gui.daemon=True my_Gui.start()#要先于mainloop调用start 不然 线程不会启动 my_Gui.root.mainloop()#mainloop必须要在最后去执行,相当于while阻塞
发送邮件的Python文件
import smtplib,sys from email.mime.text import MIMEText from email.mime.multipart import MIMEMultipart from email.header import Header def send_my_mail(subject,body,img): form_addr="你的邮箱@163.com" my_fassword='你的邮箱密码' to_addr=["你要发送的邮箱@qq.com"] msg=MIMEMultipart() msg['From']=Header(form_addr) msg['To']=Header("你要发送的邮箱@qq.com") msg['Subject']=Header(subject,"utf-8") body=MIMEText(body,'plain','utf-8') msg.attach(body) try: att1=MIMEText(open(img,'rb').read(),'base64','utf-8') except Exception as e: return 'file not found' att1['Content-Type']='application/octet-stream' att1['Content-Disposition']='attachment;filename=%s'%img msg.attach(att1) try: smtpobj=smtplib.SMTP() smtpobj.connect('smtp.163.com') smtpobj.login(form_addr,my_fassword) smtpobj.sendmail(form_addr,to_addr,msg.as_string()) # print('succeed') return 'succeed' except Exception as e: print(str(e)) return 'failure'