文章目录
- 使用熔断器防止服务雪崩
- 概述
- Ribbon 中使用熔断器和熔断器仪表盘
- 在 pom.xml 中增加依赖
- 启动类上增加 @EnableHystrix 注解
- 在 Service 中增加 @HystrixCommand 注解
- 测试熔断器
- Feign 中使用熔断器
- 在 Service 中增加 fallback 指定类
- 创建熔断器类并实现对应的 Feign 接口
- 测试熔断器
- 使用熔断器仪表盘监控
- 概述
- 在 pom.xml 中增加依赖
- 在 Application 中增加 @EnableHystrixDashboard 注解
- 创建 hystrix.stream 的 Servlet 配置
- 测试 Hystrix Dashboard
- 附:Hystrix 说明
- Hystrix Dashboard 界面监控参数
- 什么情况下会触发 fallback 方法
- fallback 方法在什么情况下会抛出异常
- Hystrix 常用配置信息
- 超时时间(默认1000ms,单位:ms)
- 线程池核心线程数
- Queue
- 断路器
- fallback
- 其他属性配置参数
- 使用路由网关Zuul统一访问接口
- 概述
- Zuul 简介
- 创建路由网关
- Application
- application.yml
- 测试访问
- 配置网关路由失败时的回调
- 使用路由网关的服务过滤功能
- 概述
- 创建服务过滤器
- filterType
- filterOrder
- shouldFilter
- run
- 测试过滤器
使用熔断器防止服务雪崩
概述
在微服务架构中,根据业务来拆分成一个个的服务,服务与服务之间可以通过 RPC 相互调用,在 Spring Cloud 中可以用 RestTemplate + Ribbon 和 Feign 来调用。为了保证其高可用,单个服务通常会集群部署。由于网络原因或者自身的原因,服务并不能保证 100% 可用,如果单个服务出现问题,调用这个服务就会出现线程阻塞,此时若有大量的请求涌入,Servlet 容器的线程资源会被消耗完毕,导致服务瘫痪。服务与服务之间的依赖性,故障会传播,会对整个微服务系统造成灾难性的严重后果,这就是服务故障的 “雪崩” 效应。
为了解决这个问题,业界提出了熔断器模型。
Netflix 开源了 Hystrix 组件,实现了熔断器模式,Spring Cloud 对这一组件进行了整合。在微服务架构中,一个请求需要调用多个服务是非常常见的,如下图:

较底层的服务如果出现故障,会导致连锁故障。当对特定的服务的调用的不可用达到一个阀值(Hystrix 是 5 秒 20 次) 熔断器将会被打开。

熔断器打开后,为了避免连锁故障,通过 fallback 方法可以直接返回一个固定值。
Ribbon 中使用熔断器和熔断器仪表盘
在 pom.xml 中增加依赖
<dependency>
<groupId>org.springframework.cloud</groupId>
<artifactId>spring-cloud-starter-netflix-hystrix</artifactId>
</dependency>
启动类上增加 @EnableHystrix 注解
package com.funtl.hello.spring.cloud.web.admin.ribbon;

import org.springframework.boot.SpringApplication;
import org.springframework.boot.autoconfigure.SpringBootApplication;
import org.springframework.cloud.client.discovery.EnableDiscoveryClient;
import org.springframework.cloud.netflix.hystrix.EnableHystrix;

@SpringBootApplication
@EnableDiscoveryClient
@EnableHystrix
public class WebAdminRibbonApplication {
    public static void main(String[] args) {
        SpringApplication.run(WebAdminRibbonApplication.class, args);
    }
}
在 Service 中增加 @HystrixCommand 注解
在 Ribbon 调用方法上增加 @HystrixCommand 注解并指定 fallbackMethod 熔断方法
package com.funtl.hello.spring.cloud.web.admin.ribbon.service;
import com.netflix.hystrix.contrib.javanica.annotation.HystrixCommand;
import org.springframework.beans.factory.annotation.Autowired;
import org.springframework.stereotype.Service;
import org.springframework.web.client.RestTemplate;
@Service
public class AdminService {
@Autowired
private RestTemplate restTemplate;
@HystrixCommand(fallbackMethod = "getFallback")
public String sayHi(String message) {
return restTemplate.getForObject("http://HELLO-SPRING-CLOUD-SERVICE-ADMIN/hi?message=" + message, String.class);
}
public String getFallback(String message) {
return "Hi,your message is :\"" + message + "\" but request error.";
}
}
测试熔断器
此时我们关闭服务提供者,再次请求 http://localhost:8764/hi?message=HelloRibbon 浏览器会显示:
Hi,your message is :"HelloRibbon" but request error.
Feign 中使用熔断器
Feign 是自带熔断器的,但默认是关闭的。需要在配置文件中配置打开它,在配置文件增加以下代码:
feign:
  hystrix:
    enabled: true
在 Service 中增加 fallback 指定类
@FeignClient 注解中添加 fallback = AdminServiceHystrix.class
package com.funtl.hello.spring.cloud.web.admin.feign.service;

import com.funtl.hello.spring.cloud.web.admin.feign.service.hystrix.AdminServiceHystrix;
import org.springframework.cloud.openfeign.FeignClient;
import org.springframework.web.bind.annotation.RequestMapping;
import org.springframework.web.bind.annotation.RequestMethod;
import org.springframework.web.bind.annotation.RequestParam;

@FeignClient(value = "hello-spring-cloud-service-admin", fallback = AdminServiceHystrix.class)
public interface AdminService {

    @RequestMapping(value = "hi", method = RequestMethod.GET)
    public String sayHi(@RequestParam(value = "message") String message);
}
创建熔断器类并实现对应的 Feign 接口
package com.funtl.hello.spring.cloud.web.admin.feign.service.hystrix;

import com.funtl.hello.spring.cloud.web.admin.feign.service.AdminService;
import org.springframework.stereotype.Component;

@Component
public class AdminServiceHystrix implements AdminService {

    @Override
    public String sayHi(String message) {
        return "Hi,your message is :\"" + message + "\" but request error.";
    }
}
测试熔断器
此时我们关闭服务提供者,再次请求 http://localhost:8765/hi?message=HelloFeign 浏览器会显示:
Hi,your message is :"HelloFeign" but request error.
使用熔断器仪表盘监控
概述
在 Ribbon 和 Feign 项目增加 Hystrix 仪表盘功能,两个项目的改造方式相同
在 pom.xml 中增加依赖
<dependency>
    <groupId>org.springframework.cloud</groupId>
    <artifactId>spring-cloud-starter-netflix-hystrix-dashboard</artifactId>
</dependency>
在 Application 中增加 @EnableHystrixDashboard 注解
package com.funtl.hello.spring.cloud.web.admin.ribbon;

import org.springframework.boot.SpringApplication;
import org.springframework.boot.autoconfigure.SpringBootApplication;
import org.springframework.cloud.client.discovery.EnableDiscoveryClient;
import org.springframework.cloud.netflix.hystrix.EnableHystrix;
import org.springframework.cloud.netflix.hystrix.dashboard.EnableHystrixDashboard;

@SpringBootApplication
@EnableDiscoveryClient
@EnableHystrix
@EnableHystrixDashboard
public class WebAdminRibbonApplication {
    public static void main(String[] args) {
        SpringApplication.run(WebAdminRibbonApplication.class, args);
    }
}
创建 hystrix.stream 的 Servlet 配置
Spring Boot 2.x 版本开启 Hystrix Dashboard 与 Spring Boot 1.x 的方式略有不同,需要增加一个 HystrixMetricsStreamServlet 的配置,代码如下:
package com.funtl.hello.spring.cloud.web.admin.ribbon.config;
import com.netflix.hystrix.contrib.metrics.eventstream.HystrixMetricsStreamServlet;
import org.springframework.boot.web.servlet.ServletRegistrationBean;
import org.springframework.context.annotation.Bean;
import org.springframework.context.annotation.Configuration;
@Configuration
public class HystrixDashboardConfiguration {
HystrixMetricsStreamServlet streamServlet = new HystrixMetricsStreamServlet();
ServletRegistrationBean registrationBean = new ServletRegistrationBean(streamServlet);
registrationBean.setLoadOnStartup(1);
registrationBean.addUrlMappings("/hystrix.stream");
registrationBean.setName("HystrixMetricsStreamServlet");
return registrationBean;
}
测试 Hystrix Dashboard
浏览器端访问 http://localhost:8764/hystrix 界面如下:
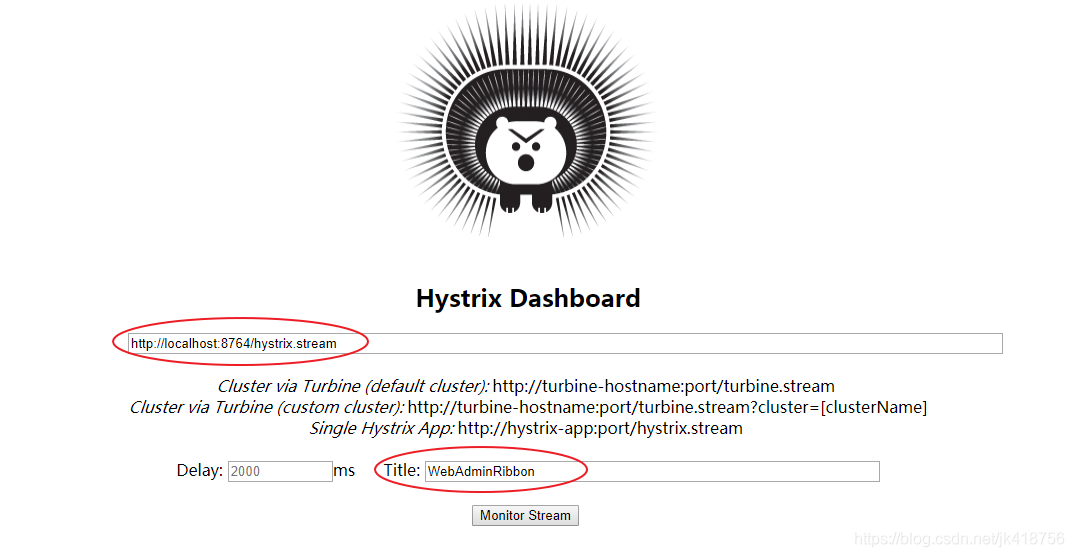
输入监控的url : http://localhost:8765/hystrix.stream
命名: WebAdminRibbon
点击 Monitor Stream,进入仪表盘界面

一直显示Loading 是一直在等待监控的消费端去调用service,如果有数据响应则监控界面就会有图形数据展示,监控实时变化。
如果显示 Unable to connect to Command Metric Stream,说明没配置上文中的ServletRegistrationBean
此时我们关闭服务提供者,再次请求 http://localhost:8765/hi?message=HelloFeign 浏览器会显示:
Hi,your message is :"HelloFeign" but request error.

附:Hystrix 说明
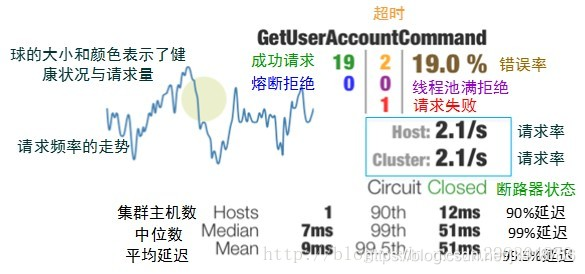
Hystrix Dashboard 界面监控参数
什么情况下会触发 fallback 方法
| 名字 | 描述 | 触发fallback |
|---|
| EMIT | 值传递 | NO |
| SUCCESS | 执行完成,没有错误 | NO |
| FAILURE | 执行抛出异常 | YES |
| TIMEOUT | 执行开始,但没有在允许的时间内完成 | YES |
| BAD_REQUEST | 执行抛出HystrixBadRequestException | NO |
| SHORT_CIRCUITED | 断路器打开,不尝试执行 | YES |
| THREAD_POOL_REJECTED | 线程池拒绝,不尝试执行 | YES |
| SEMAPHORE_REJECTED | 信号量拒绝,不尝试执行 | YES |
fallback 方法在什么情况下会抛出异常
| 名字 | 描述 | 抛异常 |
|---|
| FALLBACK_EMI | T Fallback值传递 | NO |
| FALLBACK_SUCCESS | Fallback执行完成,没有错误 | NO |
| FALLBACK_FAILURE | Fallback执行抛出出错 | YES |
| FALLBACK_REJECTED | Fallback信号量拒绝,不尝试执行 | YES |
| FALLBACK_MISSING | 没有Fallback实例 | YES |
Hystrix 常用配置信息
超时时间(默认1000ms,单位:ms)
hystrix.command.default.execution.isolation.thread.timeoutInMilliseconds:在调用方配置,被该调用方的所有方法的超时时间都是该值,优先级低于下边的指定配置
hystrix.command.HystrixCommandKey.execution.isolation.thread.timeoutInMilliseconds:在调用方配置,被该调用方的指定方法(HystrixCommandKey 方法名)的超时时间是该值
线程池核心线程数
hystrix.threadpool.default.coreSize:默认为 10
Queue
hystrix.threadpool.default.maxQueueSize:最大排队长度。默认 -1,使用 SynchronousQueue。其他值则使用 LinkedBlockingQueue。如果要从 -1 换成其他值则需重启,即该值不能动态调整,若要动态调整,需要使用到下边这个配置
hystrix.threadpool.default.queueSizeRejectionThreshold:排队线程数量阈值,默认为 5,达到时拒绝,如果配置了该选项,队列的大小是该队列
注意: 如果 maxQueueSize=-1 的话,则该选项不起作用
断路器
hystrix.command.default.circuitBreaker.requestVolumeThreshold:当在配置时间窗口内达到此数量的失败后,进行短路。默认 20 个(10s 内请求失败数量达到 20 个,断路器开)
hystrix.command.default.circuitBreaker.sleepWindowInMilliseconds:短路多久以后开始尝试是否恢复,默认 5s
hystrix.command.default.circuitBreaker.errorThresholdPercentage:出错百分比阈值,当达到此阈值后,开始短路。默认 50%
fallback
hystrix.command.default.fallback.isolation.semaphore.maxConcurrentRequests:调用线程允许请求 HystrixCommand.GetFallback() 的最大数量,默认 10。超出时将会有异常抛出,注意:该项配置对于 THREAD 隔离模式也起作用
其他属性配置参数
参数说明:https://github.com/Netflix/Hystrix/wiki/Configuration
使用路由网关Zuul统一访问接口
概述
在微服务架构中,需要几个基础的服务治理组件,包括服务注册与发现、服务消费、负载均衡、熔断器、智能路由、配置管理等,由这几个基础组件相互协作,共同组建了一个简单的微服务系统。一个简单的微服务系统如下图:
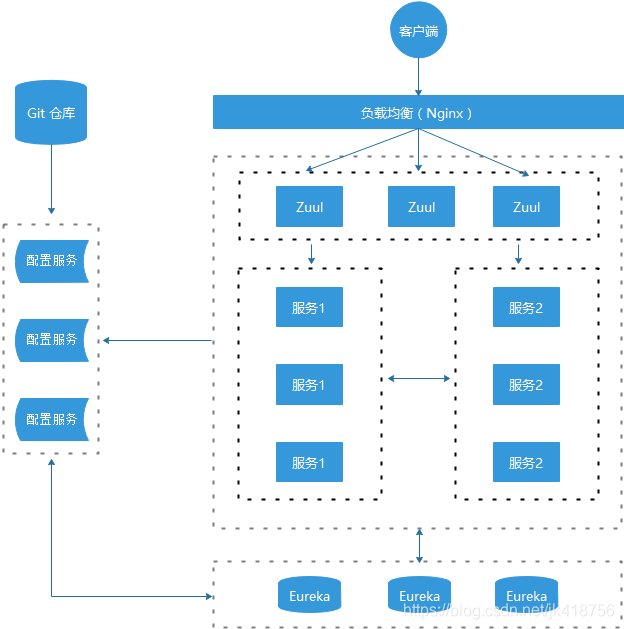
在 Spring Cloud 微服务系统中,一种常见的负载均衡方式是,客户端的请求首先经过负载均衡(Zuul、Ngnix),再到达服务网关(Zuul 集群),然后再到具体的服。服务统一注册到高可用的服务注册中心集群,服务的所有的配置文件由配置服务管理,配置服务的配置文件放在 GIT 仓库,方便开发人员随时改配置。
Zuul 简介
Zuul 的主要功能是路由转发和过滤器。路由功能是微服务的一部分,比如 /api/user 转发到到 User 服务,/api/shop 转发到到 Shop 服务。Zuul 默认和 Ribbon 结合实现了负载均衡的功能。
创建路由网关
pom.xml 文件如下:
<?xml version="1.0" encoding="UTF-8"?>
<project xmlns="http://maven.apache.org/POM/4.0.0" xmlns:xsi="http://www.w3.org/2001/XMLSchema-instance"
xsi:schemaLocation="http://maven.apache.org/POM/4.0.0 http://maven.apache.org/xsd/maven-4.0.0.xsd">
<modelVersion>4.0.0</modelVersion>
<parent>
<groupId>com.funtl</groupId>
<artifactId>hello-spring-cloud-dependencies</artifactId>
<version>1.0.0-SNAPSHOT</version>
<relativePath>../hello-spring-cloud-dependencies/pom.xml</relativePath>
</parent>
<artifactId>hello-spring-cloud-zuul</artifactId>
<packaging>jar</packaging>
<name>hello-spring-cloud-zuul</name>
<url>http://www.funtl.com</url>
<inceptionYear>2018-Now</inceptionYear>
<dependencies>
<dependency>
<groupId>org.springframework.boot</groupId>
<artifactId>spring-boot-starter-web</artifactId>
</dependency>
<dependency>
<groupId>org.springframework.boot</groupId>
<artifactId>spring-boot-starter-tomcat</artifactId>
</dependency>
<dependency>
<groupId>org.springframework.boot</groupId>
<artifactId>spring-boot-starter-actuator</artifactId>
</dependency>
<dependency>
<groupId>org.springframework.boot</groupId>
<artifactId>spring-boot-starter-test</artifactId>
<scope>test</scope>
</dependency>
<dependency>
<groupId>org.springframework.cloud</groupId>
<artifactId>spring-cloud-starter-netflix-eureka-server</artifactId>
</dependency>
<dependency>
    <groupId>org.springframework.cloud</groupId>
    <artifactId>spring-cloud-starter-netflix-zuul</artifactId>
</dependency>
</dependencies>
<build>
<plugins>
<plugin>
<groupId>org.springframework.boot</groupId>
<artifactId>spring-boot-maven-plugin</artifactId>
<configuration>
<mainClass>com.funtl.hello.spring.cloud.zuul.ZuulApplication</mainClass>
</configuration>
</plugin>
</plugins>
</build>
</project>
主要是增加了 Zuul 的依赖
<dependency>
<groupId>org.springframework.cloud</groupId>
<artifactId>spring-cloud-starter-netflix-zuul</artifactId>
</dependency>
Application
增加 @EnableZuulProxy 注解开启 Zuul 功能
package com.funtl.hello.spring.cloud.zuul;

import org.springframework.boot.SpringApplication;
import org.springframework.boot.autoconfigure.SpringBootApplication;
import org.springframework.cloud.netflix.eureka.EnableEurekaClient;
import org.springframework.cloud.netflix.zuul.EnableZuulProxy;

@SpringBootApplication
@EnableEurekaClient
@EnableZuulProxy
public class ZuulApplication {
    public static void main(String[] args) {
        SpringApplication.run(ZuulApplication.class, args);
    }
}
application.yml
设置端口号为:8769
增加 Zuul 配置
spring:
  application:
    name: hello-spring-cloud-zuul

server:
  port: 8769

eureka:
  client:
    serviceUrl:
      defaultZone: http://localhost:8761/eureka/

zuul:
  routes:
    api-a:
      path: /api/a/**
      serviceId: hello-spring-cloud-web-admin-ribbon
    api-b:
      path: /api/b/**
      serviceId: hello-spring-cloud-web-admin-feign
路由说明:
以 /api/a 开头的请求都转发给 hello-spring-cloud-web-admin-ribbon 服务
以 /api/b 开头的请求都转发给 hello-spring-cloud-web-admin-feign 服务
测试访问
依次运行 EurekaApplication、ServiceAdminApplication、WebAdminRibbonApplication、WebAdminFeignApplication、ZuulApplication
打开浏览器访问:http://localhost:8769/api/a/hi?message=HelloZuul 浏览器显示
Hi,your message is :“HelloZuul” i am from port:8763
打开浏览器访问:http://localhost:8769/api/b/hi?message=HelloZuul 浏览器显示
Hi,your message is :“HelloZuul” i am from port:8763
至此说明 Zuul 的路由功能配置成功
配置网关路由失败时的回调
package com.funtl.hello.spring.cloud.zuul.fallback;
import com.fasterxml.jackson.databind.ObjectMapper;
import org.springframework.cloud.netflix.zuul.filters.route.FallbackProvider;
import org.springframework.http.HttpHeaders;
import org.springframework.http.HttpStatus;
import org.springframework.http.MediaType;
import org.springframework.http.client.ClientHttpResponse;
import org.springframework.stereotype.Component;
import java.io.ByteArrayInputStream;
import java.io.IOException;
import java.io.InputStream;
import java.util.HashMap;
import java.util.Map;
@Component
public class WebAdminFeignFallbackProvider implements FallbackProvider {
@Override
public String getRoute() {
return "hello-spring-cloud-web-admin-feign";
}
@Override
public ClientHttpResponse fallbackResponse(String route, Throwable cause) {
return new ClientHttpResponse() {
@Override
public HttpStatus getStatusCode() throws IOException {
return HttpStatus.OK;
}
@Override
public int getRawStatusCode() throws IOException {
return HttpStatus.OK.value();
}
@Override
public String getStatusText() throws IOException {
return HttpStatus.OK.getReasonPhrase();
}
@Override
public void close() {
}
@Override
public InputStream getBody() throws IOException {
ObjectMapper objectMapper = new ObjectMapper();
Map<String, Object> map = new HashMap<>();
map.put("status", 200);
map.put("message", "无法连接,请检查您的网络");
return new ByteArrayInputStream(objectMapper.writeValueAsString(map).getBytes("UTF-8"));
}
@Override
public HttpHeaders getHeaders() {
HttpHeaders headers = new HttpHeaders();
headers.setContentType(MediaType.APPLICATION_JSON_UTF8);
return headers;
}
};
}
}
使用路由网关的服务过滤功能
概述
Zuul 不仅仅只是路由,还有很多强大的功能,本节演示一下它的服务过滤功能,比如用在安全验证方面。
创建服务过滤器
继承 ZuulFilter 类并在类上增加 @Component 注解就可以使用服务过滤功能了,非常简单方便
package com.funtl.hello.spring.cloud.zuul.filter;
import com.netflix.zuul.ZuulFilter;
import com.netflix.zuul.context.RequestContext;
import com.netflix.zuul.exception.ZuulException;
import org.slf4j.Logger;
import org.slf4j.LoggerFactory;
import org.springframework.stereotype.Component;
import javax.servlet.http.HttpServletRequest;
import java.io.IOException;
@Component
public class LoginFilter extends ZuulFilter {
private static final Logger logger = LoggerFactory.getLogger(LoginFilter.class);
@Override
public String filterType() {
return "pre";
}
@Override
public int filterOrder() {
return 0;
}
@Override
public boolean shouldFilter() {
return true;
}
@Override
public Object run() throws ZuulException {
RequestContext context = RequestContext.getCurrentContext();
HttpServletRequest request = context.getRequest();
logger.info("{} >>> {}", request.getMethod(), request.getRequestURL().toString());
String token = request.getParameter("token");
if (token == null) {
logger.warn("Token is empty");
context.setSendZuulResponse(false);
context.setResponseStatusCode(401);
try {
context.getResponse().getWriter().write("Token is empty");
} catch (IOException e) {
}
} else {
logger.info("OK");
}
return null;
}
}
filterType
返回一个字符串代表过滤器的类型,在 Zuul 中定义了四种不同生命周期的过滤器类型
pre:路由之前
routing:路由之时
post: 路由之后
error:发送错误调用
filterOrder
过滤的顺序
shouldFilter
是否需要过滤,这里是 true,需要过滤
run
过滤器的具体业务代码
测试过滤器
浏览器访问:http://localhost:8769/api/a/hi?message=HelloZuul 网页显示
Token is empty
浏览器访问:http://localhost:8769/api/b/hi?message=HelloZuul&token=123 网页显示
Hi,your message is :"HelloZuul" i am from port:8763
---------------------
作者:雨雾清影
来源:CSDN
原文:https://blog.csdn.net/jk418756/article/details/87553565
版权声明:本文为作者原创文章,转载请附上博文链接!
内容解析By:CSDN,CNBLOG博客文章一键转载插件
本文内容由网友自发贡献,版权归原作者所有,本站不承担相应法律责任。如您发现有涉嫌抄袭侵权的内容,请联系:hwhale#tublm.com(使用前将#替换为@)