在上一篇文章中我介绍了安装和结构,以及运行过程。
https://blog.csdn.net/weixin_42603009/article/details/94382945
我们进一步理解其中的数据单向、双向、组建传值、Modules等的理解。
将你新建的项目用vs或者webStorm打开。
查看package.json,找到scripts中的运行命令运行。(另外这个json中还有依赖的包)

运行后访问:http://localhost:4200/
这里面有教你如何快速创建组件,添加UI组件,添加依赖。
ng generate component xyz  ---快速创建组件
ng add @angular/material   --添加UI组件
ng add @angular/pwa      --PWA(Progressive Web App,渐进式网页应用)是一种理念,使用多种技术来增强web app的功能,可以让网站的体验变得更好,能够模拟一些原生功能,比如通知推送。在移动端利用标准化框架,让网页应用呈现和原生应用相似的体验。
ng add _____   添加依赖的,+依赖名字

了解完基础。我们开始进一步理解。
1,快速创建组件(Modules):(注意需要选择好目录)
比如:组件是父子关系是相对关系。
此外还有如下命令(他们也有各自属性,用时了解):
ng generate class my-new-class: 新建 class
ng generate component my-new-component: 新建组件
ng generate directive my-new-directive: 新建指令
ng generate enum my-new-enum: 新建枚举
ng generate module my-new-module: 新建模块
ng generate pipe my-new-pipe: 新建管道
ng generate service my-new-service: 新建服务

创建好后我们来分析下:

因此我们就可以在app.component.html中使用:

运行结果如下:

那么如果我想在mymodule1中用my-input又该如何?我们可以看到MyInputComponent也在app中申明了。换句话来所,我们模拟它的运行过程,自定给my-input建module文件。如下面过程。(推荐使用第二种)
首先到指定目录下创建:
G:\angularStu\myAngular>cd src

G:\angularStu\myAngular\src>cd APP

G:\angularStu\myAngular\src\app>CD owncomponent
// 这里可以使用mkdir创建一个目录。

G:\angularStu\myAngular\src\app\owncomponent>ng generate component my-input
CREATE src/app/owncomponent/my-input/my-input.component.html (23 bytes)
CREATE src/app/owncomponent/my-input/my-input.component.spec.ts (636 bytes)
CREATE src/app/owncomponent/my-input/my-input.component.ts (282 bytes)
CREATE src/app/owncomponent/my-input/my-input.component.css (0 bytes)
UPDATE src/app/app.module.ts (682 bytes)

// 上面方法过于麻烦。其实你还可以这样。目录也跟着创建了(推荐使用)
G:\angularStu\myAngular>ng g component components/header
CREATE src/app/components/header/header.component.html (21 bytes)
CREATE src/app/components/header/header.component.spec.ts (628 bytes)
CREATE src/app/components/header/header.component.ts (275 bytes)
CREATE src/app/components/header/header.component.css (0 bytes)
UPDATE src/app/app.module.ts (770 bytes)

G:\angularStu\myAngular>
如何创建:

对hmtl经行编写:
<p>my-input works!</p>
<input type="text" placeholder="请输入姓名">

运行结果:
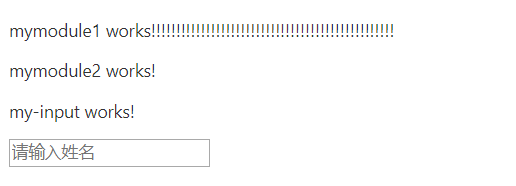
放在app.component.html中也是可以的。
<div>
<app-mymodule1></app-mymodule1>
  <app-mymodule2></app-mymodule2>
  <app-my-input></app-my-input>
</div>
运行结果:

这里特别再强调一点。如上我早my-app中要用到FormsModule组件。我们必须取它所在module中sheng’ming声明。再app.module.ts中是不会有用的。
到此组件创建和引用,以及外部组件引用的细节都知道了。
2,路由:页面的跳转。
路由:路由就是根据不同url地址。动态的让根组件挂载其他组件来实现一个单页面应用。
1,创建组件,并在app-routing.module.ts添加路由:
import { NgModule } from '@angular/core';
import { Routes, RouterModule } from '@angular/router';
import {AppComponent} from './app.component';
import {AdminComponent} from './components/admin/admin.component';
import {HomeComponent} from './components/home/home.component';
import {NewsComponent} from './components/news/news.component';

// 自定义路由
const routes: Routes = [
  //不要写成‘/admin’
  {path: 'admin', component: AdminComponent},
  {path: 'home', component: HomeComponent},
  {path: 'news', component: NewsComponent},
  // 默认路由
  {
    path: '',
    redirectTo: '/home',
    pathMatch: 'full'
  },
];

@NgModule({
  imports: [RouterModule.forRoot(routes)],
  exports: [RouterModule]
})
export class AppRoutingModule { }
路由跳转方式:
<style>

</style>
<div>根组件</div>
<div>
   <!--两种方式,一个静态,一个动态,效果一样。这里要加/-->
  <!--  routerLinkActive="active" 是实现选中-->
  <a [routerLink]="['/news']" routerLinkActive="active">去到news</a><br>
  <a routerLink="/admin" routerLinkActive="active">去到admin</a>
<router-outlet></router-outlet>
访问结果:

那么跳转如何传值呢?
首先我们新建一个newsDetail看靠如上配置路由。实现有news到newsDetail传值。
1.get方式传值:[queryParams]="data"的方式。
news组件中:
<p>news works!</p><br><br><br>
<a [routerLink]="['/newsDetails']" [queryParams]="data">跳转到newsDetails</a>
<!--下面的也是可以的-->
<!--<a routerLink="/newsDetails" [queryParams]="data">跳转到newsDetails</a>-->
<--推荐使用下面这种-->
<!--<a [routerLink]="['/newsDetails', data]">跳转到newsDetails</a>-->
import { Component, OnInit } from '@angular/core';

@Component({
  selector: 'app-news',
  templateUrl: './news.component.html',
  styleUrls: ['./news.component.css']
})
export class NewsComponent implements OnInit {
  public data: any = {
    zhouyi: '真帅',
  }
  constructor() { }

  ngOnInit(): void {
  }

}
点击结果:

newDetails界面获取值:
import { Component, OnInit } from '@angular/core';
// 1.引入ActivatedRoute
import {ActivatedRoute} from '@angular/router';

@Component({
  selector: 'app-news-details',
  templateUrl: './news-details.component.html',
  styleUrls: ['./news-details.component.css']
})
export class NewsDetailsComponent implements OnInit {
  constructor(
    public route: ActivatedRoute
  ) { }

  ngOnInit(): void {
   // 2.获取方式。和我们的http请求是类似的。
    this.route.queryParams.subscribe((data) => {
      console.log(data);
    });
    // 如果第三种是params获取
    // this.route.params.subscribe((data) => {
    //   console.log(data);
    // });
  }
}
2.js方法中跳转。
新建一个adminLogin组件。同上路由配置等。
admin组件:
<p>admin works!</p>
<br><br><br>
<button (click)="goToAdminDetails()">跳转到adminDetail</button>
import { Component, OnInit } from '@angular/core';
// 1.引入Router get传值用NavigationExtras
import {Router, NavigationExtras} from '@angular/router';

@Component({
  selector: 'app-admin',
  templateUrl: './admin.component.html',
  styleUrls: ['./admin.component.css']
})
export class AdminComponent implements OnInit {

  public data: any = [1, 2, 3];
  // 2.构造(先写构造)
  constructor(public router: Router) { }

  ngOnInit(): void {
  }

  goToAdminDetails(): void {
    // 3.路由跳转
    // this.router.navigate(['/adminLogin/', this.data]);
    // get方式跳转.这个参数格式很严格。如下。
    // 当然不引入NavigationExtras也是可以的。
    // 比如
    // let queryParams= {
    //  queryParams: {'aid': 123}
    // };
    let queryParams: NavigationExtras = {
      queryParams: {'aid': 123}
    };
    this.router.navigate(['/adminLogin'], queryParams);
  }
}
结果:

重点父子路由(嵌套路由)的理解:
最简单的父子路由以CSDN举例:点击1,对应的2出现,2对应的3出现。也就是在1控制2,2控制3典型父子路由。

具体看如下图:

附上命令:
ng g component components/home
ng g component components/home/welcomeHome
ng g component components/home/systemSet
ng g component components/news
ng g component components/news/newslist
ng g component components/news/newsfast
结果:

这里我需要特意说明两点:
1、当前组件指定挂载组件位置:通过它根据需要挂载到位置。
<router-outlet></router-outlet>
2、全局样式最好放在styles.css下。
3,dom操作
首先,我回忆下原生js的操作。
// 我们用的是document操作,
// 比如:获取dom id = "tmpId" 也可以用class获取。
var dom = document.getElementById('tmpId');
dom.setAttribute('title','titleName'); // 各种属性都可以这么设置
dom.style.color='red';
dom.getAttribute('title'); // 结果为titleName
// 为<div id ="fileId"></div> 插入html
var str = ‘<span>’ + nihao + '</span>';
dom.innerHTML = str; // innerTEXT也是可以的。看你需求
// 另外我们获取的dom结构类似如下。这个就需要你有类似经验。

在angular中的dom操作 (ViewChild)。
1,首先给要获取的结点取名。形式: #name
consoleDom是用来获取结构的
<div #mymoudule>
  <p>mymodule1 works!!!!!!!!!!!!!!!!!!!!!!!!!!!!!!!!!!!!!!!!!!!!!!!!!</p>
  <p (click)="consoleDom()">test</p>
</div>
2,业务逻辑处理(对应的ts):
import {Component, ElementRef, OnInit, ViewChild} from '@angular/core';

@Component({
  selector: 'app-mymodule1',
  templateUrl: './mymodule1.component.html',
  styleUrls: ['./mymodule1.component.css']
})
export class Mymodule1Component implements OnInit {

  // 通过装饰器@ViewChild获取dom结点。 两种写法都可以推荐第一种。取出dom给了mydom
  @ViewChild('mymoudule') mydom: ElementRef;
  // @ViewChild('mymoudule') mydom: any;
  constructor() { }

  ngOnInit(): void {
  }

  consoleDom() {
    console.log(this.mydom);
  }
}
结果如下:

ViewChild的另一个更大的用处。父子组件通过ViewChild调用子组件。
<app-header #header></app-header>
<div #mymoudule>
  <p>mymodule1 works!!!!!!!!!!!!!!!!!!!!!!!!!!!!!!!!!!!!!!!!!!!!!!!!!</p>
  <p (click)="consoleDom()">test</p>
</div>
import { Component, OnInit } from '@angular/core';

@Component({
  selector: 'app-header',
  templateUrl: './header.component.html',
  styleUrls: ['./header.component.css']
})
export class HeaderComponent implements OnInit {

  constructor() { }

  ngOnInit(): void {
  }
  run() {
    console.log('我是子组件,该方法在父组件被调用');
  }
}
import {Component, ElementRef, OnInit, ViewChild} from '@angular/core';

@Component({
  selector: 'app-mymodule1',
  templateUrl: './mymodule1.component.html',
  styleUrls: ['./mymodule1.component.css']
})
export class Mymodule1Component implements OnInit {

  // 通过装饰器@ViewChild获取dom结点。 两种写法都可以推荐第一种。
  // 取出dom给了mydom
  @ViewChild('mymoudule') mydom: ElementRef;
  // 获取子组件
  @ViewChild('header') myheader: ElementRef; // 得到了子组件所有
  // @ViewChild('mymoudule') mydom: any;
  constructor() { }

  ngOnInit(): void {
  }

  consoleDom() {
    console.log(this.mydom);
    // 调用子组件的方法
    this.myheader.run();
  }

}
4,angular中css动画
侧边栏的实现:
G:\angularStu\myAngular>ng g component components/asidetranstion
CREATE src/app/components/asidetranstion/asidetranstion.component.html (29 bytes)
CREATE src/app/components/asidetranstion/asidetranstion.component.spec.ts (684 bytes)
CREATE src/app/components/asidetranstion/asidetranstion.component.ts (307 bytes)
CREATE src/app/components/asidetranstion/asidetranstion.component.css (0 bytes)
UPDATE src/app/app.module.ts (895 bytes)
<!-- * * * * * * * * * * * * * * * * * * * * * * * * * * * * * * * -->
<!-- * * * * * * * * * * * The content below * * * * * * * * * * * -->
<!-- * * * * * * * * * * is only a placeholder * * * * * * * * * * -->
<!-- * * * * * * * * * * and can be replaced. * * * * * * * * * * * -->
<!-- * * * * * * * * * * * * * * * * * * * * * * * * * * * * * * * -->
<!-- * * * * * * * * * Delete the template below * * * * * * * * * * -->
<!-- * * * * * * * to get started with your project! * * * * * * * * -->
<!-- * * * * * * * * * * * * * * * * * * * * * * * * * * * * * * * -->

<style>

</style>
app.component.html
<div id="appID">
  <app-asidetranstion></app-asidetranstion>
</div>
<router-outlet></router-outlet>
asidetranstion.component.html:
<div id="content">


  主要内容
  <button (click)="showAside()">展示侧边栏</button>
  <button (click)="display()">展示侧边栏</button>
</div>
<aside #asideContent id="asideContent" style="width: 200px;height: 100%;position: absolute;right: 0px;top: 0px;background: red;transform: translate(100%,0);transition: all 2s">

  这是侧边栏
</aside>
asidetranstion.component.ts:
import {Component, ElementRef, OnInit, ViewChild} from '@angular/core';

@Component({
  selector: 'app-asidetranstion',
  templateUrl: './asidetranstion.component.html',
  styleUrls: ['./asidetranstion.component.css']
})
export class AsidetranstionComponent implements OnInit {

  @ViewChild('asideContent') myAside: ElementRef;
  constructor() { }

  ngOnInit(): void {
  }

  showAside() {
   // this.myAside.style.transform = 'transform(0,0)';
    document.getElementById('asideContent').style.transform = 'translate(0,0)';
  }
  display() {
    document.getElementById('asideContent').style.transform = 'translate(100%,0)';
  }
}
styles.css:
/* You can add global styles to this file, and also import other style files */
body{
  width: 100%;
  overflow-x: hidden;
}
5,父子组件通信(比较简单一笔带过)
1,父组件给子组件传值—@input: 不仅可以把数据传过去,还可以把自己的方法以及整个父组件传给子组件。
举个栗子:
父组件(父子):
// data代表值,也可以是方法。方法不能()表示直接执行。不带调用则执行。
<app-header [data]="data"></app-header>
子组件接收:
@input data:any; // ts中 就可以用了
2,父组件获取子组件值(前面已经讲了@ViewChild): 不仅可以把数据传过去,还可以把自己的方法以及整个父组件传给子组件。 也可以用:Output 和EvenEmitter
子组件实例化(子父):
// 配合使用 string指定类型
@Output() private outer: new EvenEmitter<string>();

// 在方法中将要给父组件的值发送出去
this.outer.emit('子组件的值传给父组件');
父组件接收:
<app-header (outer)="Menthod($event)"></app-header>
非父子组件的通信:推荐用service或者loaclstorage(推荐前者)
6,rxjs异步数据流遍程
它的强大体现在将一切数据,包装为数据流。它比promise更为强大。
异步遍程排序:回调函数,事件监听/发布订阅,Promise,Rxjs。
回调函数实现:
1,首先我们创建一个service:
G:\angularStu\myAngular>ng g service service/request
CREATE src/app/service/request.service.spec.ts (362 bytes)
CREATE src/app/service/request.service.ts (136 bytes)
2,在service方法中定义自己的方法:
import { Injectable } from '@angular/core';

@Injectable({
  providedIn: 'root'
})
export class RequestService {

  constructor() { }
  // t同步方法
  getData() {
    return '获取数据';
  }
  // 异步方法
  getCallbackData() {
    setTimeout(() => {
      return '异步方法';
    }, 1000);
  }
  // 异步方法,回调函数实现获取异步值
  getCallbackData111(cd) {
    setTimeout(() => {
      return cd('异步方法');
    }, 1000);
  }
}
3,在哪里用你就在哪里的constructor中说明引入。即可用。
import {Component, ElementRef, OnInit, ViewChild} from '@angular/core';
import {RequestService} from '../../service/request.service';
@Component({
selector: 'app-asidetranstion',
templateUrl: './asidetranstion.component.html',
styleUrls: ['./asidetranstion.component.css']
})
export class AsidetranstionComponent implements OnInit {
@ViewChild('asideContent') myAside: ElementRef;
constructor(
public request: RequestService
) { }
ngOnInit(): void {
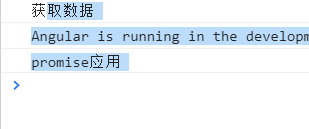
console.log(this.request.getData());
// 异步不能获取到,为undefined
console.log(this.request.getCallbackData());
// 异步回调实现
this.request.getCallbackData111((data) => {
console.log(data);
});
}
showAside() {
// this.myAside.style.transform = 'transform(0,0)';
document.getElementById('asideContent').style.transform = 'translate(0,0)';
}
display() {
document.getElementById('asideContent').style.transform = 'translate(100%,0)';
}
}
结果如下:(这也跟缓存的原理有点类似)

2,promise实现(位置和上面一样,这是ES中自带的方式):
const promiseData = this.request.getPromiseData().then((data) =>{
    console.log(data)
  })
getPromiseData() {
    return new Promise((res => {
      setTimeout(() => {
        res('promise应用');
      });
    }));
  }
结果:
3。Rxjs实现异步(和promise很类似,结果省略):但是他可以取消订阅.unsubscribe()规定没返回就撤销。
  const promiseData = this.request.getObservableData().subscribe((data) =>{
    console.log(data);
  });
 getObservableData() {
    return new Observable((observe) => {
      setTimeout(() => {
        observe.next('observe调用数据');
      });
    });
  }
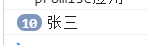
Rxjs还可以多次执行。比如一个请求每隔几秒发送一次。
异步请求封装定时器
getObservableData() {
    return new Observable((observe) => {
      // 每隔一秒出发一次
      setInterval(() => {
        const name = '张三';
        observe.next(name);
      }, 1000);
    });
  }
结果:
3,管道对map,filter的应用。
如果你懂java流操作,讲一下就会。
filter是对数据操作过滤;map是对数据进行操作改变:
 const promiseData = this.request.getObservableData().pipe(filter(value => {
    if (value % 2 == 0) {
      return true;
    }
  }), map(value => {
  // 比如在这里将对象转为json
    return  value*value;
  })).subscribe((data) =>{
    console.log(data);
  });
结果:

7,数据请求
通常我们会将请求封装都一个地方。
但无非是如下过程:
前提需要在app.module.ts引入模块支持。

get请求如下:
import {Component, ElementRef, OnInit, ViewChild} from '@angular/core';
import {RequestService} from '../../service/request.service';
// 引入HttpClient
import { HttpClient} from '@angular/common/http';

@Component({
  selector: 'app-asidetranstion',
  templateUrl: './asidetranstion.component.html',
  styleUrls: ['./asidetranstion.component.css']
})
export class AsidetranstionComponent implements OnInit {
  @ViewChild('asideContent') myAside: ElementRef;
  constructor(
    public request: RequestService,
    // 申明
    public http: HttpClient
  ) { }
  ngOnInit(): void {}

  httpRequest() {
    this.http.get('localhost:8080/test').subscribe((res: any) => {
      console.log(res);
    });
  }
 }
post如下(需要设置请求数据,header):
import {Component, ElementRef, OnInit, ViewChild} from '@angular/core';
import {RequestService} from '../../service/request.service';
// 引入HttpClient,HttpHeaders头组件
import { HttpClient, HttpHeaders} from '@angular/common/http';

@Component({
  selector: 'app-asidetranstion',
  templateUrl: './asidetranstion.component.html',
  styleUrls: ['./asidetranstion.component.css']
})
export class AsidetranstionComponent implements OnInit {
  @ViewChild('asideContent') myAside: ElementRef;
  constructor(
    public request: RequestService,
    // 申明
    public http: HttpClient,
    public header: HttpHeaders
  ) { }
  ngOnInit(): void {}

  httpRequest() {
    const header = {
      headers: new HttpHeaders({'Content-Type': 'application/json'})
    }
    this.http.post('localhost:8080/test', {'data':'数据'}, header).subscribe((res: any) => {
      console.log(res);
    });
  }
 }
jsonp(解决跨域请求的一种方式):
需要在app.module.ts引入模块支持;
import {HttpClientModule, HttpClientJsonpModule} from '@angular/common/http';
import {Component, ElementRef, OnInit, ViewChild} from '@angular/core';
import {RequestService} from '../../service/request.service';
// 引入HttpClient,HttpHeaders
import { HttpClient, HttpHeaders} from '@angular/common/http';

@Component({
  selector: 'app-asidetranstion',
  templateUrl: './asidetranstion.component.html',
  styleUrls: ['./asidetranstion.component.css']
})
export class AsidetranstionComponent implements OnInit {
  @ViewChild('asideContent') myAside: ElementRef;
  constructor(
    public request: RequestService,
    // 申明
    public http: HttpClient,
    public header: HttpHeaders
  ) { }
  ngOnInit(): void {}

  httpRequest() {
    const header = {
      headers: new HttpHeaders({'Content-Type': 'application/json'})
    }
    // jsonp请求后台必须支持jsonp请求
    this.http.jsonp('localhost:8080/test', 'callback').subscribe((res: any) => {
      console.log(res);
    });
  }
 }
使用第三方详情请见:https://blog.csdn.net/weixin_42603009/article/details/91477222