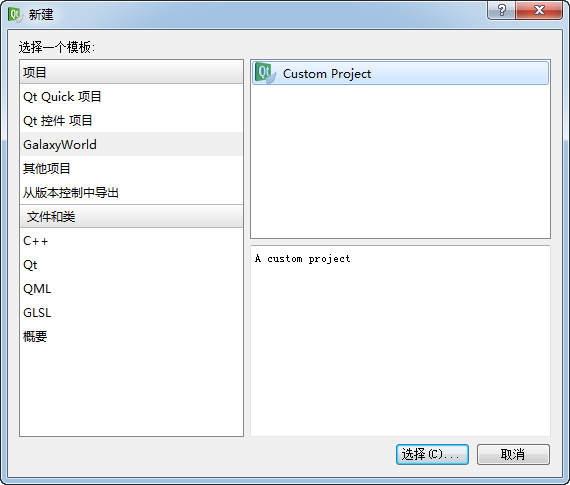
Qt Creator 中,新的工程类型将出现在“文件 -> 新建”菜单项中;我们可以通过打开的选择工程类型的对话框来找到所需要的工程:
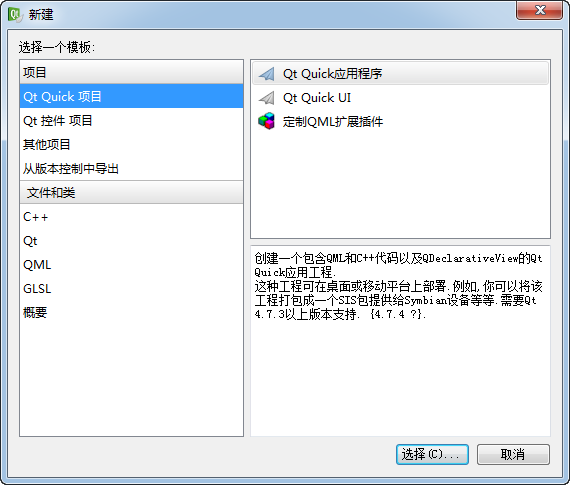
在本章中,我们将学习如何向上面所示的对话框中添加新的工程类型。
Core::IWizard接口
Qt Creator 提供了Core::IWizard接口,用于实现添加新的工程类型。该接口在 src/plugins/coreplugin/dialogs/iwizard.h 中声明:
class CORE_EXPORT IWizard
    : public QObject
{
    Q_OBJECT
public:
    enum WizardKind {
        FileWizard = 0x01,
        ClassWizard = 0x02,
        ProjectWizard = 0x04
    };
    Q_DECLARE_FLAGS(WizardKinds, WizardKind)

    IWizard(QObject *parent = 0) : QObject(parent) {}
    virtual ~IWizard() {}

    virtual WizardKind kind() const = 0;
    virtual QIcon icon() const = 0;
    virtual QString description() const = 0;
    virtual QString displayName() const = 0;
    virtual QString id() const = 0;

    virtual QString category() const = 0;
    virtual QString displayCategory() const = 0;

    virtual void runWizard(const QString &path, QWidget *parent) = 0;

    // Utility to find all registered wizards
    static QList allWizards();
    // Utility to find all registered wizards of a certain kind
    static QList wizardsOfKind(WizardKind kind);
};
可以看出,Qt Creator 支持一下类型的向导:
Core::IWizard就是实现以上向导所必须实现的接口。
简单实现Core::IWizard
下面,我们自己实现IWizard接口,来添加一个新的工程类型“Custom Project”,目的是让我们的新的工程类型能够显示在“新建工程”对话框中。
实现Core::IWizard接口
首先,新建一个类CustomProjectWizard,实现Core::IWizard:
#ifndef CUSTOMPROJECTWIZARD_H
#define CUSTOMPROJECTWIZARD_H

#include <coreplugin/dialogs/iwizard.h>

class QIcon;
class QString;
class QWidget;

class CustomProjectWizard : public Core::IWizard
{
public:
    CustomProjectWizard() { }
    ~CustomProjectWizard() { }

    Core::IWizard::WizardKind kind() const;
    QIcon icon() const;
    QString description() const;
    QString displayName() const;
    QString id() const;

    QString category() const;
    QString displayCategory() const;

    void runWizard(const QString &path, QWidget *parent);
};

#endif // CUSTOMPROJECTWIZARD_H
本文福利,莬费领取Qt开发学习资料包、技术视频,内容包括(C++语言基础,Qt编程入门,QT信号与槽机制,QT界面开发-图像绘制,QT网络,QT数据库编程,QT项目实战,QT嵌入式开发,Quick模块等等)↓↓↓↓↓↓见下面↓↓文章底部点击莬费领取↓↓
下面,我们将讨论每一个函数的实现。
函数kind()用于告诉 Qt Creator,我们实现的IWizard接口是哪种类型的。它的合法值就是前面所说的IWizard::WizardKind枚举。在我们的例子中,我们返回ProjectWizard:
Core::IWizard::WizardKind CustomProjectWizard::kind() const
{
    return IWizard::ProjectWizard;
}
函数icon()返回一个图标,这个图标代表该工程,将会出现在新建对话框列表的左侧。在我们的例子中,我们直接返回 Qt Creator 的图标:
QIcon CustomProjectWizard::icon() const
{
    return qApp->windowIcon();
}
函数description()、displayName()、category()、displayCategory()和id()用于返回我们提供的新的工程类型的元数据,比如显示的名字、分类等。其中,以 display 开头的几个函数则用于在界面上显示的字符串,因此我们需要将其用tr()函数返回。
QString CustomProjectWizard::description() const
{
    return "A custom project";
}

QString CustomProjectWizard::displayName() const
{
    return tr("Custom Project");
}

QString CustomProjectWizard::id() const
{
    return "CustomProjectID";
}

QString CustomProjectWizard::category() const
{
    return "GalaxyWorld";
}

QString CustomProjectWizard::displayCategory() const
{
    return tr("GalaxyWorld");
}
当用户选择了“CustomProject”分类的时候,runWizard()函数将被调用。这个函数必须显示一个对话框,或者一个QWizard对象,用于向用户询问创建新的工程、文件或者类所必须的那些信息。在我们的示例中,这个函数仅仅显示一个对话框:
void CustomProjectWizard::runWizard(const QString &path, QWidget *parent)
{
    Q_UNUSED(path);
    Q_UNUSED(parent);

    QMessageBox::information(parent, "Custom Wizard Dialog", "Hi there!");
}
提供插件
至此我们已经完成自定义工程所需要的代码,下面就需要和前面一样,提供一个插件的封装:
bool CustomProjectWizardPlugin::initialize(const QStringList& args, QString *errMsg)
{
    Q_UNUSED(args);
    Q_UNUSED(errMsg);

    addAutoReleasedObject(new CustomProjectWizard);

    return true;
}

预定义的IWizard实现:Core::BaseFileWizard
Qt Creator 已经提供了一个默认的IWizard接口的实现,也就是Core::BaseFileWizard类。这个类提供了
IWizard接口的所有函数的默认实现,并且增加了自己特有的虚函数。为了利用这个类,我们需要继承它,并且重写其中的一个或多个函数。
Core::GeneratedFile和Core::GeneratedFiles
通常说,一个新的向导(IWizard的实现)能够提供用户多种提示,并且最终生成一个或者多个文件。Core::GeneratedFile类帮助我们对将要生成的文件进行抽象。很快,我们就可以了解到,在Core::BaseFileWizard的子类中,我们可以为每一个自动生成的文件创建Core::GeneratedFile类的实例。Core::GeneratedFile在 coreplugin/basefilewizard.h 中声明:
class CORE_EXPORT GeneratedFile
{
public:
    enum Attribute { // Open this file in editor
                     OpenEditorAttribute = 0x01,
                     // Open project
                     OpenProjectAttribute = 0x02,
                     /* File is generated by external scripts, do not write out,
                      * see BaseFileWizard::writeFiles() */
                     CustomGeneratorAttribute = 0x4
                   };
    Q_DECLARE_FLAGS(Attributes, Attribute)

    GeneratedFile();
    explicit GeneratedFile(const QString &path);
    GeneratedFile(const GeneratedFile &);
    GeneratedFile &operator=(const GeneratedFile &);
    ~GeneratedFile();

    // Full path of the file should be created, or the suggested file name
    QString path() const;
    void setPath(const QString &p);

    // Contents of the file (UTF8)
    QString contents() const;
    void setContents(const QString &c);

    QByteArray binaryContents() const;
    void setBinaryContents(const QByteArray &c);

    // Defaults to false (Text file).
    bool isBinary() const;
    void setBinary(bool b);

    // Id of editor to open the file with
    QString editorId() const;
    void setEditorId(const QString &k);

    bool write(QString *errorMessage) const;

    Attributes attributes() const;
    void setAttributes(Attributes a);

private:
    QSharedDataPointer m_d;
};

typedef QList GeneratedFiles;
需要由Core::BaseFileWizard子类生成的文件由Core::GeneratedFile类对象表示。这个类包含了需要生成的文件的三个关键属性:
- 文件名(及绝对路径)
- 用于编辑文件所需要的编辑器类型,合法值为:CppEditor::Constants::CPPEDITOR_KINDGenericProjectManager::Constants::PROJECT_KINDGit::Constants:: GIT_COMMAND_LOG_EDITOR_KINDGit::Constants:: C_GIT_COMMAND_LOG_EDITOR
- 文件内容
假设我们需要生成如下内容的 C++ 文件:
#include <iostream>

int main()
{
    cout << "Hello World\n";

    return 0;
}
我们按照下述代码使用Core::GeneratedFile:
#include <coreplugin/basefilewizard.h>
#include <cppeditor/cppeditorconstants.h>

Core::GeneratedFile genFile("C:/Path/To/Source.cpp");
genFile.setEditorId(CppEditor::Constants::CPPEDITOR_ID);
genFile.setContents(
                     "#include <iostream>\n"
                     "\n"
                     "int main()\n"
                     "{\n"
                     "    cout << \"Hello World\n\";\n"
                     "    \n"
                     "    return 0;\n"
                     "}"
                    );
genFile.write(NULL);
Item Model 类向导
假设我们希望提供一个新的类向导,来帮助我们自动生成一个数据项模型的文件。这个文件将基于如下几个数据:
- 模型类名称;
- 父类名称(可以是QAbstractItemModel、QAbstractListModel或者QAbstractTableModel中的一个);
- 头文件名;
- 源代码文件名。
下面,我们就来为 Qt Creator 提供这个“数据项模型”类向导。
第一步:设计类向导界面
首先,我们需要使用 Qt Designer 设计一个简单的界面,目的是向用户搜集我们上面提到的所需要的各个数据:
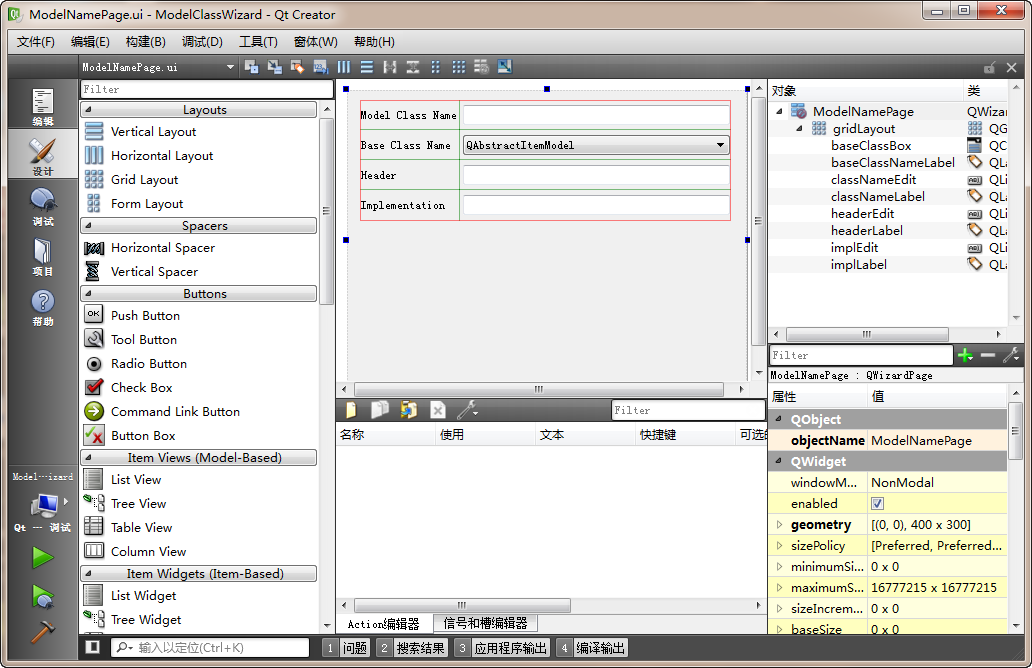
这个界面被命名为 ModelNamePage.ui。
第二步:实现类向导页面
现在,我们将这个 UI 界面导入 Qt 类,从而可以获取到界面数据。首先,我们需要设计一个结构体,来保存所需数据:
struct ModelClassParameters
{
    QString className;
    QString headerFile;
    QString sourceFile;
    QString baseClass;
    QString path;
};
下一步,我们声明表示向导页的类,用于将前面我们做出的 UI 类加载进来,以便用户能够使用我们设计的界面来输入需要的内容:
#ifndef MODELNAMEPAGE_H
#define MODELNAMEPAGE_H

#include <QWizardPage>

struct ModelClassParameters
{
    QString className;
    QString headerFile;
    QString sourceFile;
    QString baseClass;
    QString path;
};

namespace Ui {
class ModelNamePage;
}

class ModelNamePage : public QWizardPage
{
    Q_OBJECT

public:
    explicit ModelNamePage(QWidget *parent = 0);
    ~ModelNamePage();

    void setPath(const QString& path);
    ModelClassParameters parameters() const;

private slots:
    void onClassNameChange(const QString & name);

private:
    Ui::ModelNamePage *ui;
    QString path;
};

#endif // MODELNAMEPAGE_H
构造函数和析构函数都是很简单的:
ModelNamePage::ModelNamePage(QWidget *parent) :
    QWizardPage(parent),
    ui(new Ui::ModelNamePage)
{
    ui->setupUi(this);
}

ModelNamePage::~ModelNamePage()
{
    delete ui;
}
函数setPath()用于将文件路径存储下来:
void ModelNamePage::setPath(const QString& path)
{
    this->path = path;
}
槽函数onClassNameChange()根据用户填写的类名,自动生成对应的头文件和源代码文件的名字:
void ModelNamePage::onClassNameChange(const QString &name)
{
    ui->headerEdit->setText(name + ".h");
    ui->implEdit->setText(name + ".cpp");
}
最后, 函数parameters()用于返回ModelClassParameters实例,实际就是返回用户填写的数据:
ModelClassParameters ModelNamePage::parameters() const
{
    ModelClassParameters params;
    params.className = ui->classNameEdit->text();
    params.headerFile = ui->headerEdit->text();
    params.sourceFile = ui->implEdit->text();
    params.baseClass = ui->baseClassBox->currentText();
    params.path = path;
    return params;
}
Core::BaseFileWizard
类Core::BaseFileWizard在 coreplugin/basefilewizard.h 文件中声明:
class CORE_EXPORT BaseFileWizard : public IWizard
{
Q_DISABLE_COPY(BaseFileWizard)
Q_OBJECT
public:
virtual ~BaseFileWizard();
// IWizard
virtual WizardKind kind() const;
virtual QIcon icon() const;
virtual QString description() const;
virtual QString displayName() const;
virtual QString id() const;
virtual QString category() const;
virtual QString displayCategory() const;
virtual void runWizard(const QString &path, QWidget *parent);
// Build a file name, adding the extension unless baseName already has one
static QString buildFileName(const QString &path,
const QString &baseName,
const QString &extension);
// Sets some standard options on a QWizard
static void setupWizard(QWizard *);
// Read "shortTitle" dynamic property of the pageId
// and apply it as the title of corresponding progress item
static void applyExtensionPageShortTitle(Utils::Wizard *wizard, int pageId);
protected:
typedef QList WizardPageList;
explicit BaseFileWizard(const BaseFileWizardParameters ¶meters,
QObject *parent = 0);
// Overwrite to create the wizard dialog on the parent, adding
// the extension pages.
virtual QWizard *createWizardDialog(QWidget *parent,
const QString &defaultPath,
const WizardPageList &extensionPages) const = 0;
// Overwrite to query the parameters from the dialog and generate the files.
virtual GeneratedFiles generateFiles(const QWizard *w,
QString *errorMessage) const = 0;
/* Physically write files. Re-implement (calling the base implementation)
* to create files with CustomGeneratorAttribute set. */
virtual bool writeFiles(const GeneratedFiles &files, QString *errorMessage);
/* Overwrite to perform steps to be done after files are actually created.
* The default implementation opens editors with the newly generated files. */
virtual bool postGenerateFiles(const QWizard *w,
const GeneratedFiles &l,
QString *errorMessage);
// Utility that returns the preferred suffix for a mime type
static QString preferredSuffix(const QString &mimeType);
// Utility that performs an overwrite check on a set of files. It checks if
// the file exists, can be overwritten at all and prompts the user.
enum OverwriteResult { OverwriteOk, OverwriteError, OverwriteCanceled };
OverwriteResult promptOverwrite(const QStringList &files,
QString *errorMessage) const;
// Utility to open the editors for the files whose attribute is set accordingly.
static bool postGenerateOpenEditors(const GeneratedFiles &l,
QString *errorMessage = 0);
private:
BaseFileWizardPrivate *m_d;
};
BaseFileWizard类实现了IWizard接口,并且增加了几个新的函数:
- createWizardDialog– 该函数必须被子类重写,用于提供一个供runWizard()函数显示的向导,其中parent参数应当作为该函数返回的QWizard的父类defaultPath参数应当作为生成的文件的默认路径extensionPages参数列出了应该被向导默认显示的所有页面
- generateFiles– 该函数在用户点击了向导的“完成”按钮之后自动调用,该函数的实现必须按要求创建Core::GeneratedFile类的实例
- postGenerateFiles– 该函数在generateFiles()返回之后被调用,子类可以通过覆盖该函数,做你需要做的任何事情
下面,我们使用BaseFileWizard来实现我们自己的向导:
#ifndef MODELCLASSWIZARD_H
#define MODELCLASSWIZARD_H
#include <coreplugin/basefilewizard.h>
#include <QMap>
class ModelClassWizard : public Core::BaseFileWizard
{
Q_OBJECT
public:
ModelClassWizard(const Core::BaseFileWizardParameters ¶meters,
QObject *parent = 0);
~ModelClassWizard();
QWizard *createWizardDialog(QWidget *parent,
const QString &defaultPath,
const WizardPageList &extensionPages) const;
Core::GeneratedFiles generateFiles(const QWizard *w,
QString *errorMessage) const;
private:
QString readFile(const QString& fileName,
const QMap& replacementMap) const;
};
#endif // MODELCLASSWIZARD_H
我们的构造函数和析构函数很简单:
ModelClassWizard::ModelClassWizard(const Core::BaseFileWizardParameters ¶meters,
QObject *parent)
: Core::BaseFileWizard(parameters, parent)
{
}
ModelClassWizard::~ModelClassWizard()
{
}
函数createWizardDialog()创建一个很简单的QWizard,将我们前面写好的ModelNamePage作为其第一个页面,后面则添加其他默认页面:
QWizard* ModelClassWizard::createWizardDialog(QWidget *parent,
                                              const QString &defaultPath,
                                              const WizardPageList &extensionPages) const
{
    // Create a wizard
    QWizard* wizard = new QWizard(parent);
    wizard->setWindowTitle("Model Class Wizard");
    // Make our page as first page
    ModelNamePage* page = new ModelNamePage(wizard);
    int pageId = wizard->addPage(page);
    wizard->setProperty("_PageId_", pageId);
    page->setPath(defaultPath);
    // Now add the remaining pages
    foreach (QWizardPage *p, extensionPages) {
        wizard->addPage(p);
    }
    return wizard;
}
函数readFile()读取文件,将其内容以字符串的形式返回。在返回字符串之前,函数需要使用第二个参数提供的替换字符表修正这个字符串:
QString ModelClassWizard::readFile(const QString& fileName,
                                   const QMap& replacementMap) const
{
    QFile file(fileName);
    file.open(QFile::ReadOnly);
    QString retStr = file.readAll();
    QMap::const_iterator it = replacementMap.begin();
    QMap::const_iterator end = replacementMap.end();
    while(it != end) {
        retStr.replace(it.key(), it.value());
        ++it;
    }
    return retStr;
}
这个函数将会实现这么一个功能:假设我们有一个文件 sample.txt:
#ifndef {{UPPER_CLASS_NAME}}_H
#define {{UPPER_CLASS_NAME}}_H

#include <{{BASE_CLASS_NAME}}>

struct {{CLASS_NAME}}Data;

class {{CLASS_NAME}} : public {{BASE_CLASS_NAME}}
{
    Q_OBJECT

public:
    {{CLASS_NAME}}(QObject* parent=0);
    ~{{CLASS_NAME}}();

    int rowCount(const QModelIndex& parent) const;
    QVariant data(const QModelIndex& index, int role) const;

private:
    {{CLASS_NAME}}Data* d;
};

#endif // {{UPPER_CLASS_NAME}}_H
其中的 {{xyz}} 作为一种占位符。如果我们有如下代码片段:
QMap replacementMap;
replacementMap["{{UPPER_CLASS_NAME}}"] = "LIST_MODEL";
replacementMap["{{BASE_CLASS_NAME}}"] = "QAbstractListModel";
replacementMap["{{CLASS_NAME}}"] = "ListModel";

QString contents = readFile("Sample.txt", replacementTable);
那么,执行过后 contents 字符串的内容应该是:
#ifndef LIST_MODEL_H
#define LIST_MODEL_H

#include <QAbstractListModel>

struct ListModelData;

class ListModel : public QAbstractListModel
{
    Q_OBJECT

public:
    ListModel(QObject* parent=0);
    ~ListModel();

    int rowCount(const QModelIndex& parent) const;
    QVariant data(const QModelIndex& index, int role) const;

private:
    ListModelData* d;
};

#endif // LIST_MODEL_H
看起来很神奇吗?我们的实际策略与此类似:提供这种模板文件,然后使用用户输入的信息替换其中的占位符,来生成相应的文件。
下面,我们来看看函数generateFiles()的实现。这个函数创建了两个Core::GeneratedFile对象,并且在返回之前赋予了正确的数据:
Core::GeneratedFiles ModelClassWizard::generateFiles(const QWizard *w,
                                                     QString *errorMessage) const
{
    Q_UNUSED(errorMessage);
    Core::GeneratedFiles ret;
    int pageId = w->property("_PageId_").toInt();
    ModelNamePage* page = qobject_cast(w->page(pageId));
    if(!page) {
        return ret;
    }
    ModelClassParameters params = page->parameters();
    QMap replacementMap;
    replacementMap["{{UPPER_CLASS_NAME}}"] = params.className.toUpper();
    replacementMap["{{BASE_CLASS_NAME}}"] = params.baseClass;
    replacementMap["{{CLASS_NAME}}"] = params.className;
    replacementMap["{{CLASS_HEADER}}"] = QFileInfo(params.headerFile).fileName();
    Core::GeneratedFile headerFile(params.path + "/" + params.headerFile);
    headerFile.setEditorId(CppEditor::Constants::CPPEDITOR_ID);
    Core::GeneratedFile sourceFile(params.path + "/" + params.sourceFile);
    sourceFile.setEditorId(CppEditor::Constants::CPPEDITOR_ID);
    if(params.baseClass == "QAbstractItemModel") {
        headerFile.setContents(readFile(":/ModelClassWizard/ItemModelHeader",
                                        replacementMap));
        sourceFile.setContents(readFile(":/ModelClassWizard/ItemModelSource",
                                        replacementMap));
    } else if(params.baseClass == "QAbstractTableModel") {
        headerFile.setContents(readFile(":/ModelClassWizard/TableModelHeader",
                                        replacementMap));
        sourceFile.setContents(readFile(":/ModelClassWizard/TableModelSource",
                                        replacementMap));
    } else if(params.baseClass == "QAbstractListModel") {
        headerFile.setContents(readFile(":/ModelClassWizard/ListModelHeader",
                                        replacementMap));
        sourceFile.setContents(readFile(":/ModelClassWizard/ListModelSource",
                                        replacementMap));
    }
    ret << headerFile << sourceFile;
    return ret;
}
实现插件
同前面一样,我们的插件实现类也只是替换掉initialize()函数的内容:
bool CustomProjectWizardPlugin::initialize(const QStringList& args, QString *errMsg)
{
    Q_UNUSED(args);
    Q_UNUSED(errMsg);

    Core::BaseFileWizardParameters params;
    params.setKind(Core::IWizard::ClassWizard);
    params.setIcon(qApp->windowIcon());
    params.setDescription("Generates an item-model class");
    params.setDisplayName("Item Model");
    params.setCategory("GalaxyWorld");
    params.setDisplayCategory(tr("GalaxyWorld"));

    addAutoReleasedObject(new ModelClassWizard(params, this));

    return true;
}
最后来测试一下我们的插件。
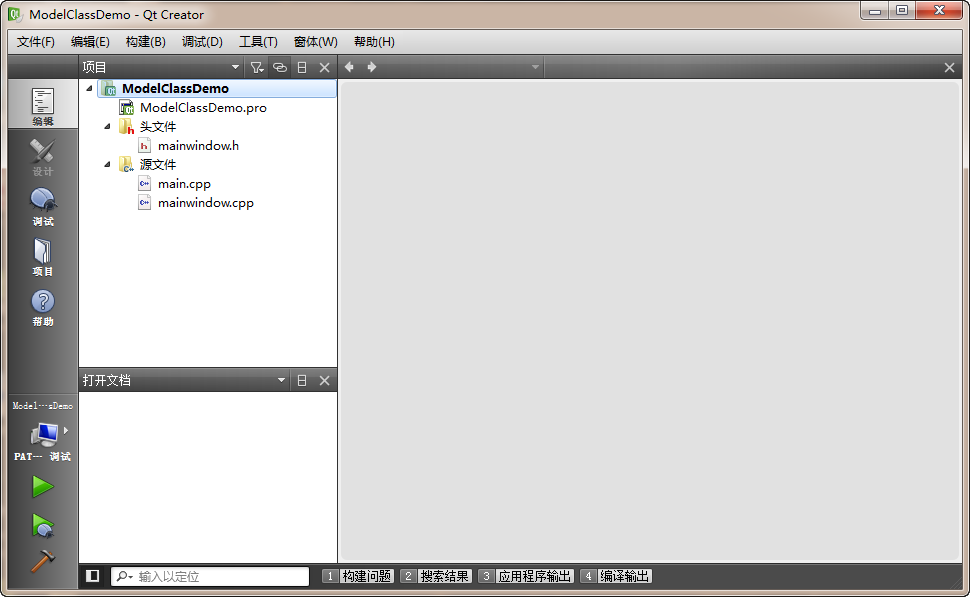
因为我们的向导是文件类型的,所以需要首先打开一个工程:

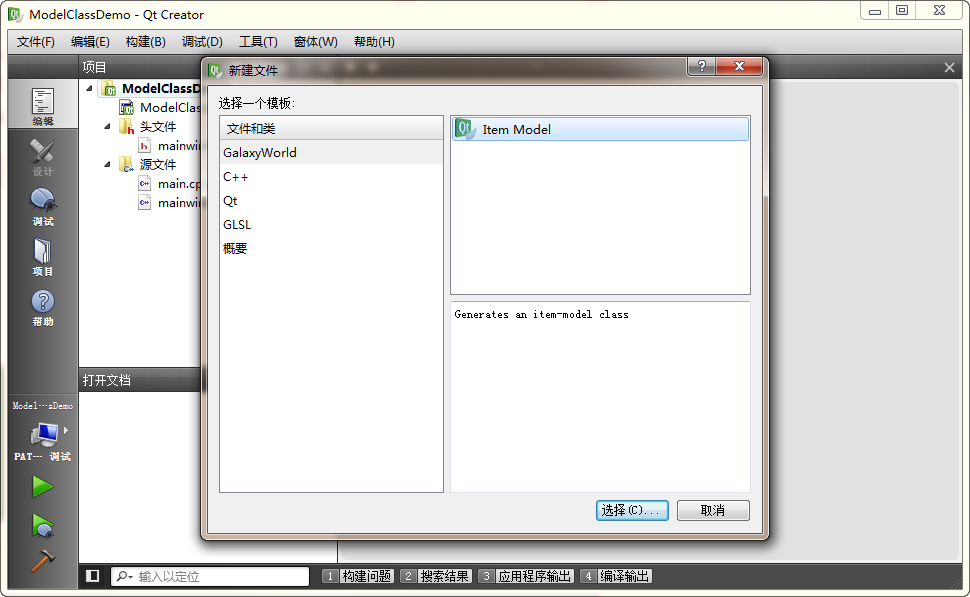
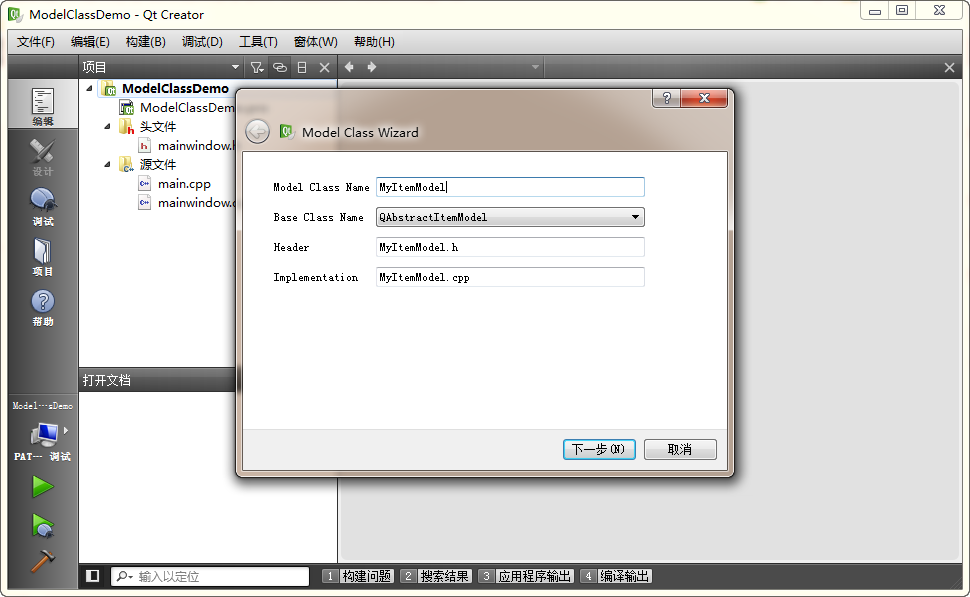
然后在工程名字上面点右键,添加新文件,可以看到我们的插件提供的文件类型:

点击下方的“选择...”按钮,弹出我们设计的用户输入界面,填入 MyItemModel,可以看到下面的 Header 和 Implementation 都会自动修改:
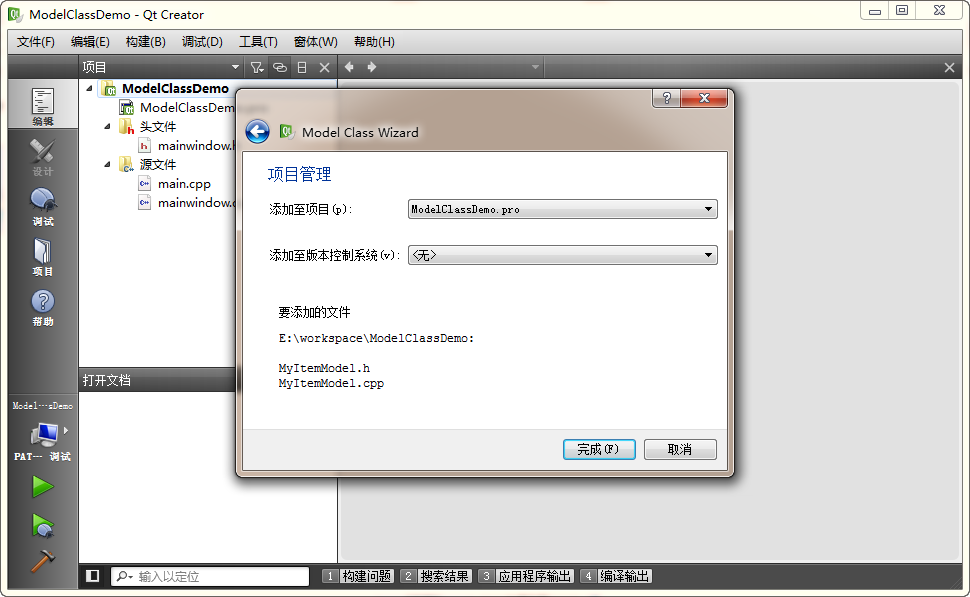
点击“下一步”,看看新的界面。这个页面就是系统默认添加的,还记得我们写的函数中最后那个循环吗?注意默认路径,Qt Creator 已经帮我们写好了:

点击完成,就可以看到,我们的文件已经生成好了!
结语
这是我们 《Qt Creator 插件开发》的最后一个章节。从我们以往的内容可以看出,Qt Creator 的插件开发并不是那么高不可攀,唯一的问题在于文档:Qt Creator 插件开发的文档一直写的不清不楚。虽然最新版本已经改善了很多,但是就学习而言,还是远远不够的。希望本文也能起到抛砖引玉的作用,最好能够让大家一起加入到 Qt Creator 的开发活动中来,一起完善这个 IDE。
感谢大家一直以来的支持!
本文福利,莬费领取Qt开发学习资料包、技术视频,内容包括(C++语言基础,Qt编程入门,QT信号与槽机制,QT界面开发-图像绘制,QT网络,QT数据库编程,QT项目实战,QT嵌入式开发,Quick模块等等)↓↓↓↓↓↓见下面↓↓文章底部点击莬费领取↓↓