量化简介
量化是指以低于浮点精度的位宽执行计算和存储张量的技术。量化模型以降低的精度而不是全精度(浮点)值对张量执行部分或全部运算。这允许更紧凑的模型表示以及在许多硬件平台上使用高性能矢量化操作。与典型的 FP32 模型相比,PyTorch 支持 INT8 量化,从而使模型大小减少 4 倍,内存带宽要求减少 4 倍。与 FP32 计算相比,对 INT8 计算的硬件支持通常快 2 到 4 倍。量化主要是一种加速推理的技术,量化运算符仅支持前向传递。
PyTorch 支持多种量化深度学习模型的方法。大多数情况下,模型在 FP32 中训练,然后模型转换为 INT8。此外,PyTorch 还支持量化感知训练,它使用假量化模块对前向和后向传递中的量化误差进行建模。请注意,整个计算都是以浮点形式进行的。在量化感知训练结束时,PyTorch 提供转换函数,将训练后的模型转换为较低精度。
在较低级别,PyTorch 提供了一种表示量化张量并使用它们执行操作的方法。它们可用于直接构建以较低精度执行全部或部分计算的模型。提供了更高级别的 API,其中包含将 FP32 模型转换为较低精度的典型工作流程,并且精度损失最小。
量化 API 总结
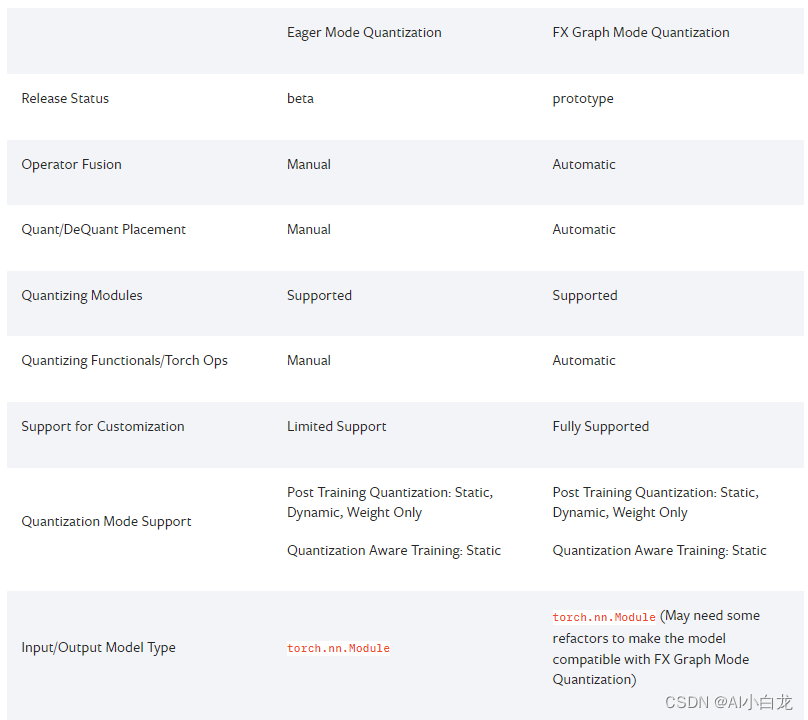
PyTorch 提供两种不同的量化模式:Eager 模式量化和 FX Graph 模式量化。
Eager 模式量化是测试版功能。用户需要进行融合并手动指定量化和反量化发生的位置,而且它仅支持模块而不支持函数。
FX 图形模式量化是 PyTorch 中的一个新的自动量化框架,目前它是一个原型功能。它通过添加对泛函的支持和自动化量化过程来改进 Eager 模式量化,尽管人们可能需要重构模型以使模型与 FX 图形模式量化兼容(通过 进行符号追踪)torch.fx。请注意,FX 图形模式量化预计不适用于任意模型,因为该模型可能无法符号追踪,我们会将其集成到 torchvision 等域库中,并且用户将能够使用 FX 量化与支持的域库中的模型类似的模型图模式量化。对于任意模型,我们将提供一般指南,但要真正使其发挥作用,用户可能需要熟悉torch.fx,特别是如何使模型具有符号可追溯性。
我们鼓励量化的新用户首先尝试 FX 图形模式量化,如果不起作用,用户可以尝试遵循使用 FX 图形模式量化的指南或回退到 eager 模式量化。
下表比较了 Eager 模式量化和 FX Graph 模式量化之间的差异:
支持三种类型的量化:
-
动态量化(通过以浮点形式读取/存储的激活进行量化的权重并进行量化以进行计算)
-
静态量化(权重量化、激活量化、训练后需要校准)
-
静态量化感知训练(权重量化、激活量化、训练期间建模的量化数值)
请参阅我们的PyTorch 量化简介博客文章,以更全面地概述这些量化类型之间的权衡。
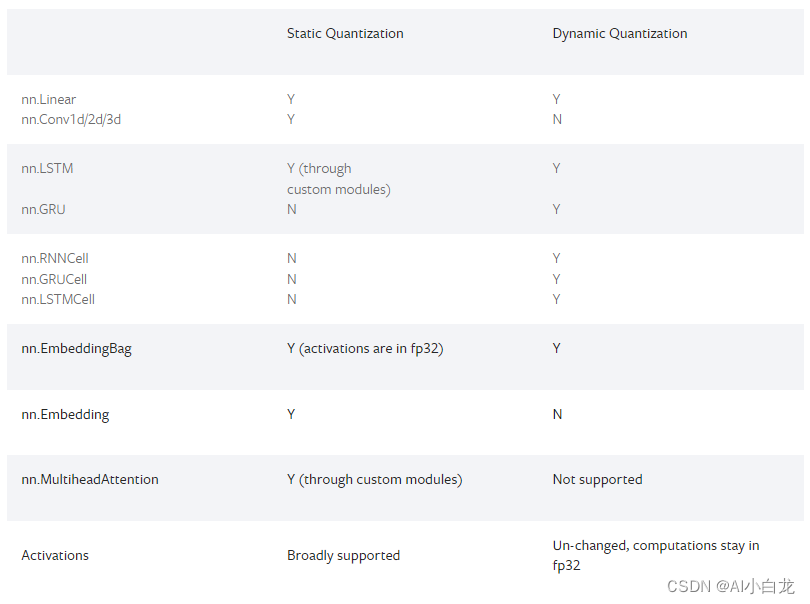
动态和静态量化之间的运算符覆盖范围有所不同,如下表所示。请注意,对于 FX 量化,还支持相应的泛函。
Eager Mode 量化
有关量化流程的一般介绍,包括不同类型的量化,请查看一般量化流程。
训练后动态量化
这是最简单的量化应用形式,其中权重提前量化,但激活在推理过程中动态量化。这用于模型执行时间主要由从内存加载权重而不是计算矩阵乘法的情况。对于小批量的 LSTM 和 Transformer 类型模型来说确实如此。
# original model
# all tensors and computations are in floating point
previous_layer_fp32 -- linear_fp32 -- activation_fp32 -- next_layer_fp32
                 /
linear_weight_fp32

# dynamically quantized model
# linear and LSTM weights are in int8
previous_layer_fp32 -- linear_int8_w_fp32_inp -- activation_fp32 -- next_layer_fp32
                     /
   linear_weight_int8
动态量化 PTDQ API 示例:
import torch

# define a floating point model
class M(torch.nn.Module):
    def __init__(self):
        super().__init__()
        self.fc = torch.nn.Linear(4, 4)

    def forward(self, x):
        x = self.fc(x)
        return x

# create a model instance
model_fp32 = M()
# create a quantized model instance
model_int8 = torch.ao.quantization.quantize_dynamic(
    model_fp32,  # the original model
    {torch.nn.Linear},  # a set of layers to dynamically quantize
    dtype=torch.qint8)  # the target dtype for quantized weights

# run the model
input_fp32 = torch.randn(4, 4, 4, 4)
res = model_int8(input_fp32)
训练后静态量化
训练后静态量化(PTQ static)量化模型的权重和激活。它尽可能将激活融合到前面的层中。它需要使用代表性数据集进行校准,以确定激活的最佳量化参数。当内存带宽和计算节省都很重要且 CNN 是典型用例时,通常会使用训练后静态量化。
# original model
# all tensors and computations are in floating point
previous_layer_fp32 -- linear_fp32 -- activation_fp32 -- next_layer_fp32
                    /
    linear_weight_fp32

# statically quantized model
# weights and activations are in int8
previous_layer_int8 -- linear_with_activation_int8 -- next_layer_int8
                    /
  linear_weight_int8
静态量化 PTSQ API 示例:
import torch

# define a floating point model where some layers could be statically quantized
class M(torch.nn.Module):
    def __init__(self):
        super().__init__()
        # QuantStub converts tensors from floating point to quantized
        self.quant = torch.ao.quantization.QuantStub()
        self.conv = torch.nn.Conv2d(1, 1, 1)
        self.relu = torch.nn.ReLU()
        # DeQuantStub converts tensors from quantized to floating point
        self.dequant = torch.ao.quantization.DeQuantStub()

    def forward(self, x):
        # manually specify where tensors will be converted from floating
        # point to quantized in the quantized model
        x = self.quant(x)
        x = self.conv(x)
        x = self.relu(x)
        # manually specify where tensors will be converted from quantized
        # to floating point in the quantized model
        x = self.dequant(x)
        return x

# create a model instance
model_fp32 = M()

# model must be set to eval mode for static quantization logic to work
model_fp32.eval()

# attach a global qconfig, which contains information about what kind
# of observers to attach. Use 'x86' for server inference and 'qnnpack'
# for mobile inference. Other quantization configurations such as selecting
# symmetric or asymmetric quantization and MinMax or L2Norm calibration techniques
# can be specified here.
# Note: the old 'fbgemm' is still available but 'x86' is the recommended default
# for server inference.
# model_fp32.qconfig = torch.ao.quantization.get_default_qconfig('fbgemm')
model_fp32.qconfig = torch.ao.quantization.get_default_qconfig('x86')

# Fuse the activations to preceding layers, where applicable.
# This needs to be done manually depending on the model architecture.
# Common fusions include `conv + relu` and `conv + batchnorm + relu`
model_fp32_fused = torch.ao.quantization.fuse_modules(model_fp32, [['conv', 'relu']])

# Prepare the model for static quantization. This inserts observers in
# the model that will observe activation tensors during calibration.
model_fp32_prepared = torch.ao.quantization.prepare(model_fp32_fused)

# calibrate the prepared model to determine quantization parameters for activations
# in a real world setting, the calibration would be done with a representative dataset
input_fp32 = torch.randn(4, 1, 4, 4)
model_fp32_prepared(input_fp32)

# Convert the observed model to a quantized model. This does several things:
# quantizes the weights, computes and stores the scale and bias value to be
# used with each activation tensor, and replaces key operators with quantized
# implementations.
model_int8 = torch.ao.quantization.convert(model_fp32_prepared)

# run the model, relevant calculations will happen in int8
res = model_int8(input_fp32)
静态量化的量化感知训练
量化感知训练 (QAT) 对训练过程中的量化效果进行建模,与其他量化方法相比,具有更高的准确性。我们可以对静态、动态或仅权值量化进行 QAT。在训练期间,所有计算均以浮点形式完成,fake_quant 模块通过钳位和舍入对量化效果进行建模,以模拟 INT8 的效果。模型转换后,权重和激活被量化,并且激活尽可能融合到前一层中。它通常与 CNN 一起使用,并且与静态量化相比具有更高的精度。
# original model
# all tensors and computations are in floating point
previous_layer_fp32 -- linear_fp32 -- activation_fp32 -- next_layer_fp32
                      /
    linear_weight_fp32

# model with fake_quants for modeling quantization numerics during training
previous_layer_fp32 -- fq -- linear_fp32 -- activation_fp32 -- fq -- next_layer_fp32
                           /
   linear_weight_fp32 -- fq

# quantized model
# weights and activations are in int8
previous_layer_int8 -- linear_with_activation_int8 -- next_layer_int8
                     /
   linear_weight_int8
QAT API 示例:
import torch

# define a floating point model where some layers could benefit from QAT
class M(torch.nn.Module):
    def __init__(self):
        super().__init__()
        # QuantStub converts tensors from floating point to quantized
        self.quant = torch.ao.quantization.QuantStub()
        self.conv = torch.nn.Conv2d(1, 1, 1)
        self.bn = torch.nn.BatchNorm2d(1)
        self.relu = torch.nn.ReLU()
        # DeQuantStub converts tensors from quantized to floating point
        self.dequant = torch.ao.quantization.DeQuantStub()

    def forward(self, x):
        x = self.quant(x)
        x = self.conv(x)
        x = self.bn(x)
        x = self.relu(x)
        x = self.dequant(x)
        return x

# create a model instance
model_fp32 = M()

# model must be set to eval for fusion to work
model_fp32.eval()

# attach a global qconfig, which contains information about what kind
# of observers to attach. Use 'x86' for server inference and 'qnnpack'
# for mobile inference. Other quantization configurations such as selecting
# symmetric or asymmetric quantization and MinMax or L2Norm calibration techniques
# can be specified here.
# Note: the old 'fbgemm' is still available but 'x86' is the recommended default
# for server inference.
# model_fp32.qconfig = torch.ao.quantization.get_default_qconfig('fbgemm')
model_fp32.qconfig = torch.ao.quantization.get_default_qat_qconfig('x86')

# fuse the activations to preceding layers, where applicable
# this needs to be done manually depending on the model architecture
model_fp32_fused = torch.ao.quantization.fuse_modules(model_fp32,
    [['conv', 'bn', 'relu']])

# Prepare the model for QAT. This inserts observers and fake_quants in
# the model needs to be set to train for QAT logic to work
# the model that will observe weight and activation tensors during calibration.
model_fp32_prepared = torch.ao.quantization.prepare_qat(model_fp32_fused.train())

# run the training loop (not shown)
training_loop(model_fp32_prepared)

# Convert the observed model to a quantized model. This does several things:
# quantizes the weights, computes and stores the scale and bias value to be
# used with each activation tensor, fuses modules where appropriate,
# and replaces key operators with quantized implementations.
model_fp32_prepared.eval()
model_int8 = torch.ao.quantization.convert(model_fp32_prepared)

# run the model, relevant calculations will happen in int8
res = model_int8(input_fp32)
静态量化的模型准备
目前有必要在 Eager 模式量化之前对模型定义进行一些修改。这是因为当前量化是逐个模块进行的。具体来说,对于所有量化技术,用户需要:
-
将任何需要输出重新量化(因此具有附加参数)的操作从泛函转换为模块形式(例如,使用torch.nn.ReLU代替torch.nn.functional.relu)。
-
.qconfig通过在子模块上分配属性或指定 来指定模型的哪些部分需要量化 qconfig_mapping。例如,设置意味着该 图层不会被量化,设置 意味着将使用的量化设置而不是全局 qconfig。model.conv1.qconfig = Nonemodel.convmodel.linear1.qconfig = custom_qconfigmodel.linear1custom_qconfig
对于量化激活的静态量化技术,用户还需要执行以下操作:
-
指定激活的量化和反量化位置。这是使用 QuantStub和 DeQuantStub模块完成的。
-
用于FloatFunctional将需要特殊处理量化的张量运算包装到模块中。例如,诸如add和cat之类的操作需要特殊处理来确定输出量化参数。
-
熔断模块:将操作/模块组合成单个模块以获得更高的精度和性能。这是使用 fuse_modules()API 完成的,它接收要融合的模块列表。我们目前支持以下融合:[Conv, Relu]、[Conv, BatchNorm]、[Conv, BatchNorm, Relu]、[Linear, Relu]