JDK8学习笔记
学习视频地址:https://www.bilibili.com/video/BV1k64y1R7sA
操作代码:https://gitee.com/rederic/study-jdk8.git
一、JDK8新特性
1. Lambda表达式
2. 接口的增强
3. 函数式接口
4. 方法引用
5. Stream API
6. Optional
7. 新时间日期API
二、Lambda表达式
1. 需求分析
创建一个新的线程,指定线程要执行的任务
    public static void main(String[] args) {
        new Thread(new Runnable() {
            @Override
            public void run() {
                System.out.println("当前线程名:"+Thread.currentThread().getName());
            }
        }).start();
        System.out.println("主线程名字:"+ Thread.currentThread().getName());
    }
代码分析:
- Thread类需要一个Runnable接口作为参数,其中的抽象方法run是用来指定线程任务内容的核心
- 为了指定run方法体,不得不需要Runnable的的实现类
- 为了省区定义一个Runnable的实现类,不得不使用匿名内部类
- 必须覆盖重写抽象的run方法,所有的方法名称,方法参数,方法返回值都不得不重写一遍,而且不能出错。
- 而实际上,我们只在乎方法体中的代码
2. Lambda表达式初体验
Lambda表达式是一个匿名函数,可以理解为一段可以传递的代码
new Thread(()->{System.out.println("Lambda线程名字:"+ Thread.currentThread().getName());}).start();
Lambda表达式的有点:简化了匿名内部类的使用,语法更加简单。
匿名内部类语法冗余,体验了Lambda表达式和,发现Lambda表达式是简化匿名内部类的一种方式。
3. Lambda表达式语法规则
lambda省去了面向对象的条条框框,Lambda的标注格式由3部分组成
(String[] args) ->{
	代码体
}
格式说明:
- (参数类型、参数名称):参数列表
- (代码体):方法体
- ->:分割参数列表和方法体
3.1 无参无返回值的Lambda
定义一个接口
public interface UserService {
    public void show();
}
然后创建主方法使用
public static void main(String[] args) {
    goShow(new UserService() {
        @Override
        public void show() {
            System.out.println("show方法执行了:"+ Thread.currentThread().getName());
        }
    });
    goShow(() ->{
        System.out.println("Lambda的show方法执行了:"+Thread.currentThread().getName());
    });
}

public static void goShow(UserService userService){
    userService.show();
}
输出:
方法名为:main
Lambda表达式方法名字:main
3.2 有参有返回值的Lambda
创建Person对象
@Data
@NoArgsConstructor
@AllArgsConstructor
public class Person {
    private String name;

    private Integer age;

    private Integer height;
}
在List集合中保存多个Person对象,然后根据这些对象做age排序操作
 public static void main(String[] args) {
     List<Person> list = Arrays.asList(
         new Person("周杰伦",27,175),
         new Person("周星驰",32,157),
         new Person("周公瑾",182,188),
         new Person("周恩来",82,177)
     );

     Collections.sort(list, new Comparator<Person>() {
         @Override
         public int compare(Person o1, Person o2) {
             return o1.getAge() - o2.getAge();
         }
     });
     for (Person p: list){
         System.out.println( p .toString());
     }
     System.out.println("----------------------------");
     Collections.sort(list,(Person o1,Person o2)->{
         return o2.getAge() - o1.getAge();
     });
     for (Person p: list){
         System.out.println("lambda====" + p .toString());
     }
 }
我们发现sort方法的第二个参数是一个Comparator接口的匿名内部类,且执行的方法有参数和返回值的表达式
输出结果
Person(name=周杰伦, age=27, height=175)
Person(name=周星驰, age=32, height=157)
Person(name=周恩来, age=82, height=177)
Person(name=周公瑾, age=182, height=188)
----------------------------
lambda====Person(name=周公瑾, age=182, height=188)
lambda====Person(name=周恩来, age=82, height=177)
lambda====Person(name=周星驰, age=32, height=157)
lambda====Person(name=周杰伦, age=27, height=175)
4. @FunctionalInterface注解
/**
 * @FunctionalInterface
 * 这是一个标志注解,被该注解修饰的接口只能声明一个抽象方法
 */

@FunctionalInterface
public interface UserService {
    public void show();
}
5. Lambda表达式的原理
匿名内部类会在编译的时候产生一个class文件
Lambda表达式在程序运行的 时候会形成一个类
- 在类中新增了一个方法,这个方法的方法体就是Lambda表达式中的代码
- 还会形成一个匿名内部类,实现接口,重写抽象方法
- 在接口中重写方法会调用新生成的方法
6. Lambda表达式省略写法
在lambda表达式的标准写法基础上,可以使用省略写法的规则为:
- 小括号内的参数类型可以省略
- 如果小括号内有且仅有一个参数,则小括号可以省略
- 如果大括号内有且仅有一个语句,则可以同时省略大括号,return关键字以及分号。
public static void main(String[] args) {
    goOrderShow((String name) ->{
        System.out.println(name);
        return name+"666";
    });
    goStudyShow((String name ,Integer age) ->{
        System.out.println(name + age);
        return  name + age +"777";
    });
    System.out.println("Lambda简化写法");
    goOrderShow(name -> name+"6666");
    goStudyShow((name ,age) -> name + age + "7777");
}

public static void goOrderShow(OrderService orderService){
    orderService.show("张三");
}

public static void goStudyShow(StudentService studentService){
    studentService.show("李四",32);
}
7. Lambda表达式的使用前提
Lambda表达式的语法是非常简洁的,但是Lambda表达式不是随便使用的,必须满足两个条件
- 方法的参数或者局部变量类型必须为接口才能使用Lambda
- 接口中有且仅有一个抽象方法(@FunctionalInterface)
8. Lambda和匿名内部类的对比
- 所需类型不一样
- 匿名内部类的类型可以是类、抽象类、接口
- Lambda表达式需要的类型必须是接口
- 抽象方法的数量不一样
- 匿名内部类所需的接口中的抽象方法的数量是随意的
- Lambda表达式所需的接口中只能有一个抽象方法
- 实现原理不一样
- 匿名内部类再编译后形成一个class
- Lambda表达式是在程序运行的时候动态生成class
三、 接口中新增的方法
1. 新增方法
在JDK8针对接口做了增强,在JDK8之前
interface 接口名{
    静态常量;
    抽象方法;
}
JDK8之后
interface 接口名{
    静态常量;
    抽象方法;
    静态方法;
    默认方法;
}
2. 默认方法
2.1为什么增加默认方法
在JDK8以前接口中只有抽象方法和静态常量,会存在一下问题
如果接口中有新增抽象方法,那么实现类必须抽象这个抽象方法,非常不利与接口扩展
2.2 接口默认方法的格式
接口默认方法的语法格式是
interface 接口名{
    修饰符 default 返回值类型 方法名{
        方法体;
    }
}
2.3 接口中默认方法的使用
接口中的默认方法有两种使用方式
- 实现类直接调用接口的默认方法
- 实现类重写接口的方法
3. 静态方法
JDK8中为接口新增了静态方法,作用也是为了接口的扩展
3.1 语法规则
interface 接口名{
    修饰符 static 返回值类型 方法名字{
        方法体;
    }
}
3.2 静态方法的使用
public class Demo01Interface {
    public static void main(String[] args) {
        B b = new B();
        System.out.println(b.test1());
        System.out.println(b.test2());
        System.out.println(A.test3());
    }
}

interface A{
    String test1();

    public default String test2(){
        return "接口新增了默认方法,可以被实现类重写,必须实例化调用";
    }

    public static String test3(){
        return "接口新增了静态方法,不能被实现类重写,类名.方法名调用";
    }
}

class B implements A{

    @Override
    public String test1() {
        return "接口抽象方法";
    }
}
接口中的静态方法在实现类中是不能被重写的。调用只能通过接口类型来实现:接口名.静态方法();
4. 两者的区别
- 默认方法通过实例调用,静态方法通过接口名调用
- 默认方法可以被继承,实现类可以直接调用接口默认方法,也可以重写接口默认方法
- 静态方法不能被继承,实现类不能重写接口的静态方法,只能通过接口名调用
四、 函数式接口
1. 函数式接口的由来
我们知道使用Lambda表达式的前提是需要有函数式接口,而Lambda表达式使用时不关心接口名字、抽象方法名。只关心抽象方法的参数列表和返回值类型。因此为了让我们使用Lambda表达式更加的方便,JDK中提供了大量常用的函数式接口。
2. 函数式接口介绍
在JDK中帮我们提供的有函数式接口,主要是在Java.util.function包中
2.1 Supplier
无参有返回值的接口,对于Lambda表达式需要提供一个返回数据的类型。
@FunctionalInterface
public interface Supplier<T> {

    /**
     * Gets a result.
     *
     * @return a result
     */
    T get();
}
使用
    public static void main(String[] args) {
        fun1(()->{
            int[] arr = {7,3,5,12,42,1};
//            int max = 0;
//            for (int i : arr){
//                if(i>max){
//                    max = i;
//                }
//            }
//            return max ;
            Arrays.sort(arr);
            return arr[arr.length -1];
        });
    }
    public static void fun1 (Supplier<Integer> supplier){
        //get方法是一个无参有返回值的抽象方法
        Integer max = supplier.get();
        System.out.println("Max ====="+ max);
    }
2.2 Consumer
有参数无返回值的接口,前面介绍的Supplier是接口用来生产数据的,而Consumer是用来消费数据的。使用的时候需要指定一个泛型来定义参数类型
@FunctionalInterface
public interface Consumer<T> {
    void accept(T var1);
}
使用
public class ConsumerTest {
    public static void main(String[] args) {
        fun1(a-> a+=12);
    }

    public static void fun1 (Consumer<Integer> consumer){
        int a = 32;
        System.out.println(a);
        consumer.accept(a);
        System.out.println(a);
    }
}
默认方法:andThen
如果一个方法的参数和返回值全部是Consumer类型,那么就可以实现效果,消费一个数据的时候,首先做一个操作,然后再做一个操作,实现组合,而这个方法就是Consumer接口中的default方法andThen方法
 default Consumer<T> andThen(Consumer<? super T> var1) {
     Objects.requireNonNull(var1);
     return (var2) -> {
         this.accept(var2);
         var1.accept(var2);
     };
 }
具体操作
public class ConsumerAndThenTest {
    public static void main(String[] args) {
        func(msg ->{
            System.out.println("转换为小写》》》》》"+msg.toLowerCase(Locale.ROOT));
        },msg2 ->{
            System.out.println("转换为大写》》》》》"+msg2.toUpperCase(Locale.ROOT));
        });
    }

    public static void func (Consumer<String> c1,Consumer<String> c2){
//        c1.accept("ZhangSan");
//        c2.accept("ZhangSan");
//        c1.andThen(c2).accept("ZhangSan");
        c2.andThen(c1).accept("ZhangSan");
    }
}
2.3 Function
有参有返回值的接口,Function接口是根据一个类型的数据得到另一个类型的数据,前者称为前置i套件,后者成为后置条件,有参数有返回值
@FunctionalInterface
public interface Function<T, R> {
    /**
     * Applies this function to the given argument.
     *
     * @param t the function argument
     * @return the function result
     */
    R apply(T t);
}
使用:传入一个字符串返回一个数字
public class FunctionTest {

    public static void main(String[] args) {
        int a = func(msg -> Integer.parseInt(msg));
        System.out.println(a);
    }

    public static Integer func(Function<String,Integer> fun){

        return fun.apply("322");
    }
}
默认方法:andThen,也是进行组合操作
public class FunctionAndThenTest {

    public static void main(String[] args) {
        Integer result = func(msg -> Integer.parseInt(msg),msg2-> msg2*10);
        System.out.println(result);
    }

    public static Integer func (Function<String,Integer> f1,Function<Integer,Integer> f2){
//        int a = f1.apply("32");
//        int b = f2.apply(a);
//        return b;
        return f1.andThen(f2).apply("54");
    }
}
默认的compose方法的作用顺序和andThen刚好相反
而静态方法identity则是,输入什么参数就返回什么参数
2.4 Predicate
有参且返回值为Boolean的接口
@FunctionalInterface
public interface Predicate<T> {

    /**
     * Evaluates this predicate on the given argument.
     *
     * @param t the input argument
     * @return {@code true} if the input argument matches the predicate,
     * otherwise {@code false}
     */
    boolean test(T t);
}
使用
public class PrediacateTest {

    public static void main(String[] args) {
        Boolean result = func(msg -> msg.length()>3);
        System.out.println(result);
    }

    public static Boolean func(Predicate<String> p){
        return p.test("Hellow");
    }
}
默认方法
and、or、negate、isEquals
五、 方法引用
1. 为什么要用方法引用
1.1 Lambda表达式冗余
在使用Lambda表达式的时候也会出现代码冗余的情况
public class FunRefTest01 {

    public static void main(String[] args) {
        fun(msg ->{
            int sum = 0;
            for (int i : msg) {
                sum+=i;
            }
            System.out.println("求和为:"+sum);
        });
    }

    public static void getTotal (int[] arr){
        int sum = 0;
        for (int i : arr) {
            sum+=i;
        }
        System.out.println("外部求和为:"+sum);
    }

    public static void fun(Consumer<int[]> c1){
        int[] arr = {1,1,3,23,4,52,3};
        c1.accept(arr);
    }
}
1.2 解决方案
因为在Lambda表达式中要执行的代码和我们另一个方法中的代码是一样的,这是就没有必要重写一份逻辑了,这是我们可以“引用”重复的代码
public class FunRefTest01 {

    public static void main(String[] args) {
        fun(FunRefTest01::getTotal);
    }

    public static void getTotal (int[] arr){
        int sum = 0;
        for (int i : arr) {
            sum+=i;
        }
        System.out.println("外部求和为:"+sum);
    }

    public static void fun(Consumer<int[]> c1){
        int[] arr = {1,1,3,23,4,52,3};
        c1.accept(arr);
    }
}
方法引用是JDK8的新语法
2. 方法引用的格式
符号表示::
符号说明:双冒号为方法引用运算符,而它所在的表达式被称为方法引用
应用场景:如果Lambda表达式所要实现的方案,已经有其他方法存在相同的方案,那么则可以使用方法引用。
常见的引用方式:
方法引用在JDK8中使用是相当灵活的,有以下几种形式:
- instanceName::methodName 对象名::方法名
- ClassName::staticMethodName 类名::静态方法
- ClassName::methodName 类名::普通方法
- ClassName::new 类名::new 调用的构造器
- TypeName[]::new String[]::new 调用数组的构造器
2.1对象名字::方法名
这是最常见的一种用法。如果一个类中的已经存在了一个成员方法,则可以通过对象名引用成员方法
public class FunRefTest02 {
    public static void main(String[] args) {
        Date date = new Date();
        Supplier<Long> supplier = () ->{
            return date.getTime();
        };
        System.out.println("时间输出:"+supplier.get());
        Supplier<Long> supplier1 = date::getTime;
        System.out.println("引用时间数据:"+ supplier1.get());
    }
}
2.2 类名::静态方法
也是比较常用的方式:
public class FunRefTest03 {
    public static void main(String[] args) {
        Supplier<Long> supplier = () ->{
           return System.currentTimeMillis();
        };
        System.out.println(supplier.get());
        Supplier<Long> supplier1 = System::currentTimeMillis;
        System.out.println(supplier1.get());
    }
}
2.3 类名::引用实例方法
java面向对象中,类名只能调用静态方法,类名引用实例方法是有前提的,实际上是用第一个参数作为方法的调用者
public class FunRefTest04 {
    public static void main(String[] args) {
        Function<String,Integer> function = (str) ->{
          return str.length();
        };
        System.out.println("简化写法");
        Function<String,Integer> function1 = str -> str.length();
        System.out.println(function.apply("Hello"));
        System.out.println(function1.apply("Hello"));
        System.out.println("引用");
        Function<String,Integer> function2 = String::length;
        System.out.println(function2.apply("Hello"));
    }
}
2.4 类名::new构造器
由于构造器的名称和类名完全一致,所以构造器引用使用::new的格式使用
public class FunRefTest05 {
    public static void main(String[] args) {
        Supplier<Person> supplier = ()-> new Person();
        System.out.println(supplier.get().toString());
        Supplier<Person> supplier1 = Person::new;
        System.out.println(supplier1.get().toString());
    }
}
2.5 数组::构造器
public class FunRefTest06 {
    public static void main(String[] args) {
        Function<Integer,String[]> function = len -> new String[len];
        System.out.println(function.apply(3).length);
        Function<Integer,String[]> function1 = String[]::new;
        System.out.println(function1.apply(4).length);
    }
}
小结:方法引用是对Lambda表达式符合特定情况下的一种缩写方式,它使得我们的Lambda表达式更加的精简,可以理解为Lambda表达式的缩写形式,不过要注意的是方法引用只能引用已经存在的方法。
六、Stream API
1. 集合处理数据的弊端
当我们在需要对集合中的元素进行操作的时候,除了必需的添加、删除、获取外最典型的操作就是遍历集合
public class StreamTest01 {
    public static void main(String[] args) {
        List<String> list = Arrays.asList("张三","张三丰","刘德华","周星驰");
        //获取所有姓张的
        List<String> list1 = new ArrayList<>();
        for (String s : list) {
            if(s.contains("张"))
                list1.add(s);
        }
        //获取字符小于三的
        List<String> list2 = new ArrayList<>();
        for (String s : list1) {
            if(s.length()<3)
                list2.add(s);
        }
        //打印出最终结果集
        for (String s : list2) {
            System.out.println(s);
        }
    }
}
stream的解决方案
public class StreamTest02 {
    public static void main(String[] args) {
        List<String> list = Arrays.asList("张三","张三丰","刘德华","周星驰");
        //获取所有姓张的
        //获取字符小于三的
        //打印出最终结果集
        list.stream()
                .filter(s -> s.contains("张"))
                .filter(s -> s.length()<3)
                .forEach(System.out::println);
    }
}
2. Stream流式思想概述
Stream流式思想类似于工厂车间的“生产流水线”,Stream流不是一种数据结构,不保存数据,而是对数据进行加工处理。Stream可以看作是流水线上的多个工序,让一个原材料加工成一个商品。
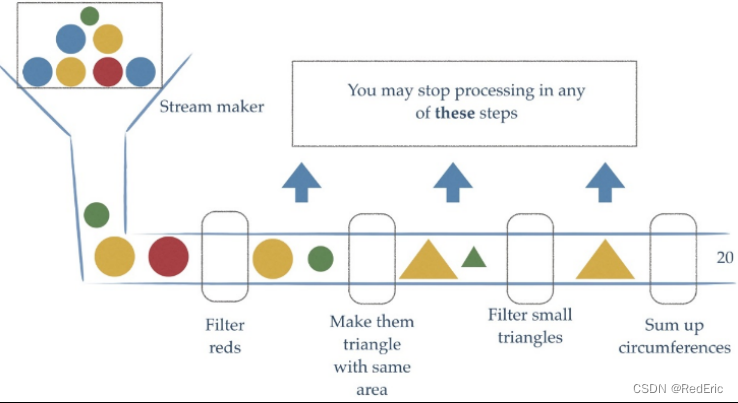
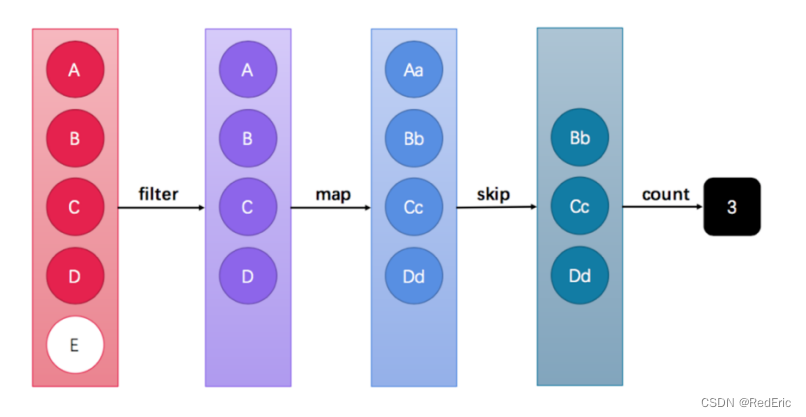
StreamAPI可以让我们快速完成许多复杂的操作,如筛选、切片、映射、查找、去重、统计、匹配和归约。
3. Stream流的获取方式
3.1 根据Collection获取
首先java.util.Collection接口中加入了default方法stream,也就是说Collection接口下的所有实现都可以通过stream方法获取Stream流
public class StreamTest03 {
    public static void main(String[] args) {
        List<String> list1 = new ArrayList<>();
        list1.stream();
        List<String> list2 = new LinkedList<>();
        list2.stream();
        Set<String> set = new HashSet<>();
        set.stream();
        Vector vector = new Vector();
        vector.stream();
    }
}
Map接口没有实现Collection接口,可以通过Map获取对应的key和value的集合
public class StreamTest04 {
    public static void main(String[] args) {
        Map<String,Object> map = new HashMap<>();
        map.keySet().stream();
        map.values().stream();
        map.entrySet().stream();
    }
}
3.2 通过Stream的of方法
在实际开发中我们不可避免的还是会操作到数据中的数据,由于数组对象不可能添加默认方法,所以Stream接口中提供了静态方法of
public class StreamTest05 {
    public static void main(String[] args) {
        Stream<String> stringStream = Stream.of("1","2","3","4");
        String[] arr1 = {"aa","bb","cc","dd"};
        Stream<String> stream = Stream.of(arr1);
        stream.forEach(System.out::println);
        Integer[] arr2 = {1,2,3,4};
        Stream<Integer> stream1 = Stream.of(arr2);
        stream1.forEach(System.out::println);
        //注意: 基本数据类型的数组是不行的
        int[] arr3 = {1,2,3,4};
        Stream.of(arr3).forEach(System.out::println);
    }
}
4. Stream常用方法介绍
Stream流模型的操作很丰富,这里介绍
一些常用的API,这些方法可以被分成两种:
| 方法名 |
方法作用 |
返回值类型 |
方法种类 |
| count |
统计个数 |
long |
终结 |
| forEach |
注意处理 |
void |
终结 |
| filter |
过滤 |
Stream |
函数拼接 |
| limit |
取用前几个 |
Stream |
函数拼接 |
| skip |
跳过前几个 |
Stream |
函数拼接 |
| map |
映射 |
Stream |
函数拼接 |
| concat |
组合 |
Stream |
函数拼接 |
| match |
匹配 |
boolean |
终结 |
终结方法: 返回值类型不再是Stream类型,不再支持链式调用
非中介方法: 返回值类型仍然是Stream类型的方法,支持链式调用
Stream注意事项(重要)
- Stream只能操作一次
- Stream方法返回的是最新的流
- Stream不调用中介方法,中间的操作是不会执行的
4.1 forEach
forEach用来遍历流中的数据的
void forEach(Consumer<? super T> action);
该方法接受一个Consumer接口,会将每一个流元素交给瀚书处理
public class StreamTest06ForEach {
    public static void main(String[] args) {
        Stream.of("1","2","3","4")
                .forEach(System.out::println);
    }
}
4.2 count
Stream流中的count方法用来统计其中元素个数的
long count();
该方法会返回一个long值,代表元素的个数
public class StreamTest07Count {
    public static void main(String[] args) {
        long count = Stream.of("1", "2", "3", "4")
                .count();
        System.out.println(count);
    }
}
4.3 filter
filter方法的做哦那个是用来过滤数据的。返回符合条件的数据
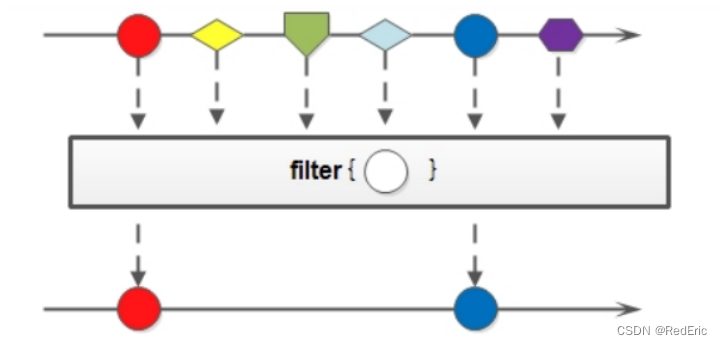
可以通过filter方法将一个流转换成另一个子集流
Stream<T> filter(Predicate<? super T> predicate);
该接口接收一个Predicate函数接口作为筛选条件
public class StreamTest08Filter {
    public static void main(String[] args) {
        Stream.of("a1","a2","a3","b2","b3","c2")
                .filter(e->e.contains("a"))
                .forEach(System.out::println);
    }
}
输出
a1
a2
a3
4.4 limit
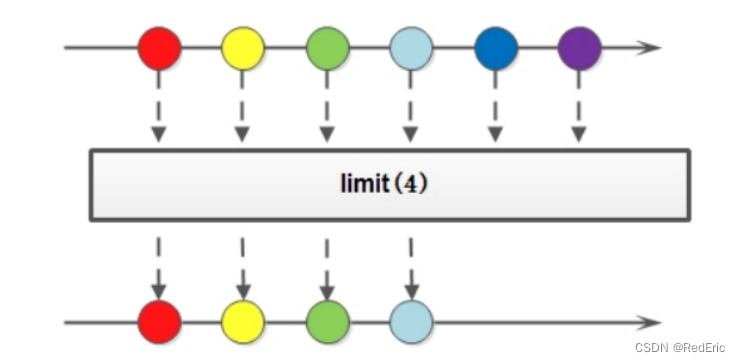
limit方法可以对流进行截取处理,截取前n个数据
Stream<T> limit(long maxSize);
参数是一个long类型的值,如果集合当前长度大于参数就进行截取,否则不操作
public class StreamTest09Limit {
    public static void main(String[] args) {
        Stream.of("a1","a2","a3","b2","b3","c2")
                .limit(111)
                .forEach(System.out::println);
    }
}
4.5 skip
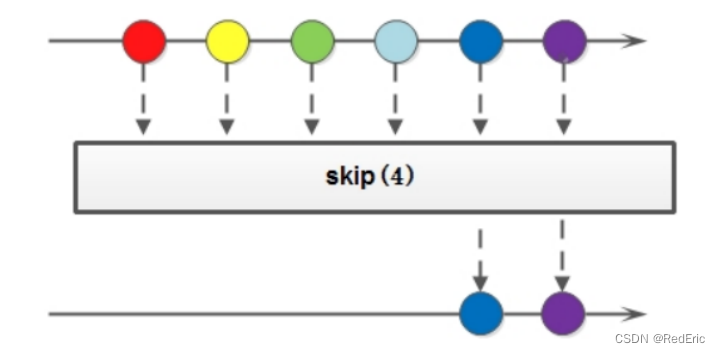
如果希望跳过前几个元素,可以使用skip方法获取一个截取之后的流
Stream<T> skip(long n);
public class StreamTest09Skip {
    public static void main(String[] args) {
        Stream.of("a1","a2","a3","b2","b3","c2")
                .skip(2)
                .forEach(System.out::println);
    }
}
4.6 map
如果我们需要将流中的元素映射到另一个流中,可以使用map方法:
<R> Stream<R> map(Function<? super T, ? extends R> mapper);
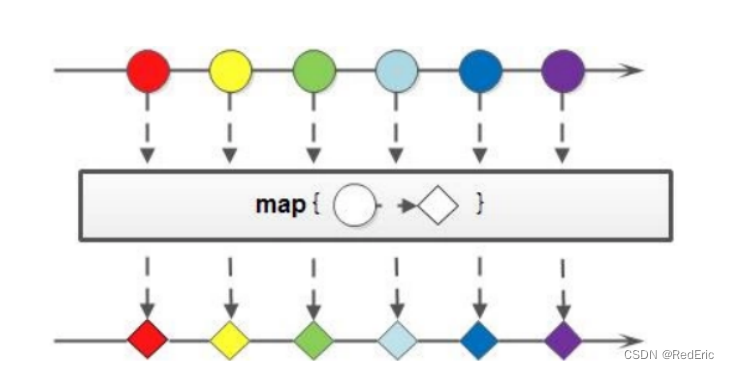
该接口需要一个Function函数式接口参数,可以将当前流中的T类型数据转换成另一种R类型的数据
4.7 sorted
如果需要将数据排序,可以使用sorted方法
    Stream<T> sorted();
    Stream<T> sorted(Comparator<? super T> comparator);
默认是增序排序
public class StreamTest12Sorted {
    public static void main(String[] args) {
        Stream.of("6","2","7","5","7","8")
//                .map(e-> Integer.parseInt(e))
                .map(Integer::parseInt)
//                .sorted()//默认增序
                .sorted(((o1, o2) -> o2-o1))
                .forEach(System.out::println);
    }
}
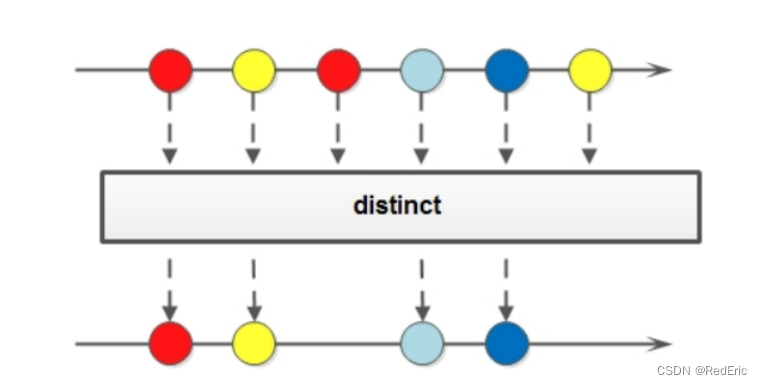
4.8 distinct
如果需要去掉重复的数,可以使用distinct方法:
Stream<T> distinct();
使用
public class StreamTest13Distinct {
    public static void main(String[] args) {
        Stream.of("a1","a2","a1","a3","a4","a2")
                .distinct()
                .forEach(System.out::println);

        Stream.of(
                new Person("张三",18,12),
                new Person("李四",23,11),
                new Person("张三",18,12),
                new Person("王五",12,13)
        ).distinct().forEach(System.out::println);
    }
}
Stream流中的distinct方法对于基本数据类型是可以直接去重的,但是对于自定义类型,我们是需要重写hashCode和equals方法来移除重复的元素。
4.9 match
如果需要判断数据是否匹配指定的条件,可以使用match相关的方法
    boolean anyMatch(Predicate<? super T> predicate);//元素是否有任意一个满足条件
    boolean allMatch(Predicate<? super T> predicate);//元素是否都满足条件
    boolean noneMatch(Predicate<? super T> predicate);//元素是否都不满足条件
使用
public class StreamTest14Match {
    public static void main(String[] args) {
        Boolean result = Stream.of("1", "2", "3", "4", "5")
                .map(Integer::parseInt)
//                .allMatch(s -> s > 0);
//                .allMatch(s -> s > 3);
//                .anyMatch(s -> s > 3);
                .noneMatch(s -> s > 10);
        System.out.println(result);
    }
}
注意match是一个终结方法
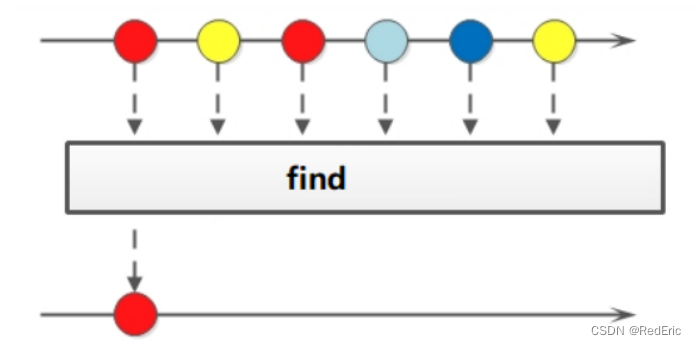
4.10 find
如果我们需要找到某些数据,可以使用find方法来实现
    Optional<T> findFirst();//就是找第一个元素
    Optional<T> findAny();
使用
public class StreamTest15Find {
    public static void main(String[] args) {
        Optional<String> first = Stream.of("2", "21", "1", "3", "4", "3", "9", "22")
                .findFirst();
        System.out.println(first.get());
        Optional<String> any = Stream.of("2", "21", "1", "3", "4", "3", "9", "22")
                .findAny();
        System.out.println(any.get());
    }
}
输出结果
2
2
可以看到findFirst和findAny结果都一样,大家有没有注意到对“names”这个集合做流化处理使用的是“stream”,这是串行流。如果我们的“names”是有序的,那findAny的任意一个都是第一个了
使用并行流
public class StreamTest15Find {
    public static void main(String[] args) {
        Optional<String> first = Stream.of("2", "21", "1", "3", "4", "3", "9", "22")
                .findFirst();
        System.out.println(first.get());
        Optional<String> any = Stream.of("2", "21", "1", "3", "4", "3", "9", "22")
                .findAny();
        System.out.println(any.get());
        System.out.println("并行流测试");
        for (int i=0;i<10;i++){
            List<String> list = Arrays.asList("2", "21", "1", "82", "4", "3", "9", "22");
            Optional<String> nio = list.parallelStream().findAny();
            System.out.println(nio.get());
        }
    }
}
输出结果
2
2
并行流测试
3
3
4
3
1
3
3
3
3
3
并行流效率更快
4.11 max和min
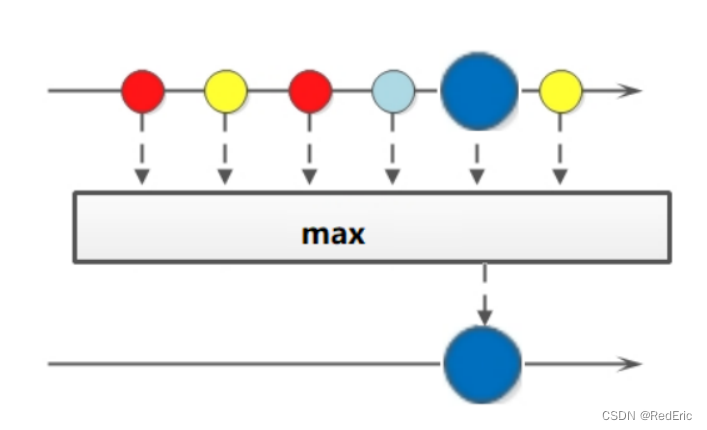
如果我们想要获取最大值和最小值,那么可以使用max和min方法
    Optional<T> min(Comparator<? super T> comparator);
    Optional<T> max(Comparator<? super T> comparator);
使用
public class StreamTest15MaxMin {
    public static void main(String[] args) {
        Optional<Integer> max = Stream.of("2", "21", "1", "3", "4", "3", "9", "22")
                .map(Integer::parseInt)
                .max((o1, o2) -> o1-o2);
        System.out.println(max.get());
        Optional<Integer> min = Stream.of("2", "21", "1", "3", "4", "3", "9", "22")
                .map(Integer::parseInt)
                .min((o1, o2) -> o1-o2);
        System.out.println(min.get());
    }
}
4.12 reduce方法

T reduce(T identity, BinaryOperator<T> accumulator);
如果需要把所有数据归纳得到一个数据,可以使用reduce方法
public class StreamTest17Reduce {
    public static void main(String[] args) {
        Integer max = Stream.of("2", "21", "1", "3", "4", "3", "9", "22")
                .map(Integer::parseInt)
                .reduce(0,(x,y)->x>y?x:y);
        Integer sum = Stream.of("2", "21", "1", "3", "4", "3", "9", "22")
                .map(Integer::parseInt)
                .reduce(0,(x,y)->x+y);
        System.out.println(max);
        System.out.println(sum);
    }
}
4.13 map和reduce的组合
在实际开发中我们经常会将map和reduce一块使用
public class StreamTest18MapReduce {
    public static void main(String[] args) {
       Integer sumAge = Stream.of(
                new Person("张三",18,12),
                new Person("李四",23,11),
                new Person("张三",18,12),
                new Person("王五",12,13)
        ).map(Person::getAge)
//                .reduce(0,(x,y)->x+y);
//                .reduce(0,Integer::sum);
                .reduce(0,Math::max);
        System.out.println(sumAge);
    }
}
4.14 mapToInt
如果需要将Stream中的Integer类型转换为int类型,可以使用mapToInt来实现
IntStream mapToInt(ToIntFunction<? super T> mapper);
使用
public class StreamTest19MapToInt {
    public static void main(String[] args) {
//        Integer占用的内存比int大很多,在Stream流操作中会自动装修和拆箱操作
//        为了提高代码效率,可以把流转换未IntStream,再操作
       Stream.of("2", "21", "1", "3", "4", "3", "9", "22")
                .mapToInt(Integer::parseInt)
                .forEach(System.out::println);
    }
}
4.15 concat
如果有两个流,希望合并成一个流,那么可以使用concat方法
    public static <T> Stream<T> concat(Stream<? extends T> a, Stream<? extends T> b) {
        Objects.requireNonNull(a);
        Objects.requireNonNull(b);

        @SuppressWarnings("unchecked")
        Spliterator<T> split = new Streams.ConcatSpliterator.OfRef<>(
                (Spliterator<T>) a.spliterator(), (Spliterator<T>) b.spliterator());
        Stream<T> stream = StreamSupport.stream(split, a.isParallel() || b.isParallel());
        return stream.onClose(Streams.composedClose(a, b));
    }
使用
public class StreamTest20Concat {
    public static void main(String[] args) {
      Stream<String> stream1 = Stream.of("2", "21", "1", "3", "4", "3", "9", "22");
      Stream<String> stream2 = Stream.of("aa", "bb", "cc", "dd", "ee", "ff", "dd", "gg");
      Stream.concat(stream1,stream2).forEach(System.out::println);
    }
}
4.16 综合案例
定义两个集合,然后在集合中存储多个用户名称,然后完成如下的操作
- 第一个队伍只保留姓名长度为3的成员
- 第一个队伍筛选之后只要前3个人
- 第二个队伍只要姓张的成员
- 第二个队伍不要前两个人
- 合并两个队伍
- 根据姓名创建Person对象
- 打印整个队伍的Person信息
public class StreamTest21Example {
    public static void main(String[] args) {
        List<String> list1 = Arrays.asList("宋江","及时雨","李逵","黑旋风","豹子头","林冲","花和尚","鲁智深","智多星","吴用","鼓上搔","时迁");
        List<String> list2 = Arrays.asList("周星驰","张三丰","周润发","张启灵","刘德华","张起山","姚明","王中网","张三","刘备","张飞");
        Stream<String> stream1 =  list1.stream()
                .filter(s -> s.length()==3)
                .limit(3);
        Stream<String> stream2 =  list2.stream()
                .filter(s -> s.contains("张"))
                .skip(2);
        Stream.concat(stream1,stream2)
                .map(Person::new)
                .forEach(System.out::println);
    }
}
输出
Person(name=及时雨, age=null, height=null)
Person(name=黑旋风, age=null, height=null)
Person(name=豹子头, age=null, height=null)
Person(name=张起山, age=null, height=null)
Person(name=张三, age=null, height=null)
Person(name=张飞, age=null, height=null)
5. Stream结果集收集
5.1 收集到集合中
    //收集到集合中
    @Test
    public void test1(){
        List<String> list = Stream.of("aa", "bb", "cc", "dd", "aa").collect(Collectors.toList());
        System.out.println(list);
        //收集到set集合中
        Set<String> set = Stream.of("aa", "bb", "cc", "dd", "aa").collect(Collectors.toSet());
        System.out.println(set);
        //收集到ArrayList
        ArrayList<String> arrayList = Stream.of("aa", "bb", "cc", "dd", "aa")
//                .collect(Collectors.toCollection(() -> new ArrayList<>()));
                .collect(Collectors.toCollection(ArrayList::new));
        System.out.println(arrayList);
        //收集到HashSet中
        HashSet<String> hashSet = Stream.of("aa", "bb", "cc", "dd", "aa")
                .collect(Collectors.toCollection(HashSet::new));
        System.out.println(hashSet);
    }
5.2 收集到数组中
Stream中提供了toArray方法将结构放到一个数组中,返回值类型是Object[],如果我们要指定返回类型,那么可以使用另一个重载的toArray(IntFunction f)方法
    //收集到数组中
    @Test
    public void test2(){
        Object[] objects = Stream.of("aa", "bb", "cc", "dd", "aa").toArray();
        System.out.println(Arrays.toString(objects));
        //指定类型
        String[] strings = Stream.of("aa", "bb", "cc", "dd", "aa").toArray(String[]::new);
        System.out.println(strings);
    }
5.3 对流中的数据做聚合运算
当我们使用Stream流处理数据后,可以像数据库的聚合函数一样对某个字段进行操作,比如获取最大值,最小值,求和,平均值,统计数量
 	@Test
    public void test3(){
        Optional<Person> maxAge = Stream.of(
                new Person("张三", 18),
                new Person("李四", 21),
                new Person("王五", 12),
                new Person("赵六", 88),
                new Person("张三", 77)
        ).collect(Collectors.maxBy((p1, p2) -> p1.getAge() - p2.getAge()));
        System.out.println("最大年龄:"+maxAge.get());

        Optional<Person> minAge = Stream.of(
                new Person("张三", 18),
                new Person("李四", 21),
                new Person("王五", 12),
                new Person("赵六", 88),
                new Person("张三", 77)
        ).collect(Collectors.minBy((p1, p2) -> p1.getAge() - p2.getAge()));
        System.out.println("最小年龄:"+minAge.get());

        Integer sumAge = Stream.of(
                new Person("张三", 18),
                new Person("李四", 21),
                new Person("王五", 12),
                new Person("赵六", 88),
                new Person("张三", 77)
        ).collect(Collectors.summingInt(Person::getAge));
        System.out.println("年龄总和:"+sumAge);

        Double avgAge = Stream.of(
                new Person("张三", 18),
                new Person("李四", 21),
                new Person("王五", 12),
                new Person("赵六", 88),
                new Person("张三", 77)
        ).collect(Collectors.averagingInt(Person::getAge));
        System.out.println("平均年龄:"+ avgAge);

        Long count = Stream.of(
                new Person("张三", 18),
                new Person("李四", 21),
                new Person("王五", 12),
                new Person("赵六", 88),
                new Person("张三", 77)
        ).collect(Collectors.counting());
        System.out.println("总条数:"+count);
    }
5.4 对流中的数据进行分组操作
当我们使用Stream流处理数据后,可以根据某个属性将数据分组
 @Test
    public void test4(){
        System.out.println("一般分组=================");
        Map<String, List<Person>> map = Stream.of(
                new Person("张三", 18),
                new Person("李四", 21),
                new Person("张三", 12),
                new Person("李四", 88),
                new Person("张三", 77)
        ).collect(Collectors.groupingBy(Person::getName));

        map.forEach((k,v)->{
            System.out.println("k="+k+",v="+v);
        });
        System.out.println("条件分组=================");
        //根据年龄分组小于18未成年大于18成年
        Map<String, List<Person>> map2 = Stream.of(
                new Person("张三", 18),
                new Person("李四", 21),
                new Person("张三", 12),
                new Person("李四", 88),
                new Person("张三", 77)
        ).collect(Collectors.groupingBy((s) -> s.getAge() >= 18 ? "成年" : "未成年"));
        map2.forEach((k,v)->{
            System.out.println("k2="+k+",v2="+v);
        });
        System.out.println("多级分组=================");
        Map<String, Map<String, List<Person>>> map3 = Stream.of(
                new Person("张三", 18),
                new Person("李四", 21),
                new Person("张三", 12),
                new Person("李四", 18),
                new Person("张三", 77)
        ).collect(Collectors.groupingBy(Person::getName, Collectors.groupingBy((p) -> p.getAge() >= 18 ? "成年" : "未成年")));
        map3.forEach((k,v)->{
            System.out.println("k="+k);
            v.forEach((k2,v2)->{
                System.out.println("\t子k="+k2+"v="+v2);
            });
        });
    }
输出结果
一般分组=================
k=李四,v=[Person(name=李四, age=21, height=null), Person(name=李四, age=88, height=null)]
k=张三,v=[Person(name=张三, age=18, height=null), Person(name=张三, age=12, height=null), Person(name=张三, age=77, height=null)]
条件分组=================
k2=未成年,v2=[Person(name=张三, age=12, height=null)]
k2=成年,v2=[Person(name=张三, age=18, height=null), Person(name=李四, age=21, height=null), Person(name=李四, age=88, height=null), Person(name=张三, age=77, height=null)]
多级分组=================
k=李四
	子k=成年v=[Person(name=李四, age=21, height=null), Person(name=李四, age=18, height=null)]
k=张三
	子k=未成年v=[Person(name=张三, age=12, height=null)]
	子k=成年v=[Person(name=张三, age=18, height=null), Person(name=张三, age=77, height=null)]
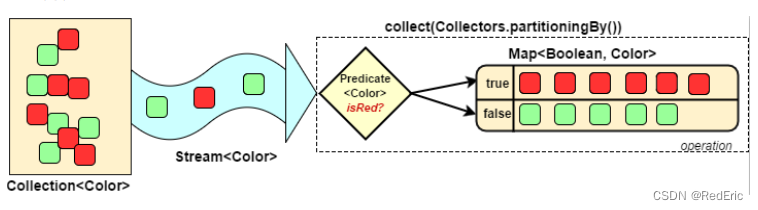
5.5 对流中的数据做分区操作
Collectors.partitioningBy会根据值是否为true,把集合中的数据分割为两个列表,一个true列表,一个false列表
    @Test
    public void test5(){
        Map<Boolean, List<Person>> collect = Stream.of(
                new Person("张三", 18),
                new Person("李四", 21),
                new Person("张三", 12),
                new Person("李四", 18),
                new Person("张三", 77)
        ).collect(Collectors.partitioningBy(p-> p.getAge() >= 18));
        collect.forEach((k,v)->{
            System.out.println("k="+k+",v="+v);
        });
    }
输出结果
k=false,v=[Person(name=张三, age=12, height=null)]
k=true,v=[Person(name=张三, age=18, height=null), Person(name=李四, age=21, height=null), Person(name=李四, age=18, height=null), Person(name=张三, age=77, height=null)]
5.6 对流中的数据做拼接
Colector.joining会根据指定的连接符,将所有的元素连接成一个字符串
 	@Test
    public void test6(){
        String collect = Stream.of(
                new Person("张三", 18),
                new Person("李四", 21),
                new Person("张三", 12),
                new Person("李四", 18),
                new Person("张三", 77)
        ).map(Person::getName)
                .collect(Collectors.joining(""));
        System.out.println(collect);
        String collect2 = Stream.of(
                new Person("张三", 18),
                new Person("李四", 21),
                new Person("张三", 12),
                new Person("李四", 18),
                new Person("张三", 77)
        ).map(Person::getName)
                .collect(Collectors.joining(",","####","!!!!"));
        System.out.println(collect2);
    }
输出
张三李四张三李四张三
####张三,李四,张三,李四,张三!!!!
6. 并行Stream流
6.1 串行Stream流
我们前面使用的Stream流都是穿行的,也就是在一个线程上面执行
    @Test
    public void test01(){
        Stream.of(1,2,3,4,5,6).forEach(s->{
            System.out.println("线程名:"+Thread.currentThread()+"值:"+s);
        });
    }
输出:
线程名:Thread[main,5,main]值:1
线程名:Thread[main,5,main]值:2
线程名:Thread[main,5,main]值:3
线程名:Thread[main,5,main]值:4
线程名:Thread[main,5,main]值:5
线程名:Thread[main,5,main]值:6
6.2 并行流
parrallelStream是一个并行执行的流,它通过默认的ForkJoinPool,可以提高多线程任务的速度。
获取并行流
我们可以通过两种方式来获取并行流
- 通过List接口的parallelStream方法
- 通过已有串行流的parallel方法转换为并行流
    @Test
    public void test02(){
        //1. 通过list的方法
        List<Integer> list = Arrays.asList(1,2,3,4,5,6);
        Stream<Integer> parallelStream1 = list.parallelStream();
        //2. 通过流parrlel方法
        Stream<Integer> parallelStream2 = Stream.of(1, 2, 3, 4, 5, 6).parallel();
    }
并行流操作
    @Test
    public void test03(){
        Stream.of(1, 2, 3, 4, 5, 6).parallel()
        .forEach(s->{
            System.out.println("线程:"+Thread.currentThread()+",值:"+s);
        });
    }
输出
线程:Thread[main,5,main],值:4
线程:Thread[main,5,main],值:1
线程:Thread[main,5,main],值:3
线程:Thread[main,5,main],值:5
线程:Thread[ForkJoinPool.commonPool-worker-1,5,main],值:2
线程:Thread[ForkJoinPool.commonPool-worker-2,5,main],值:6
6.3 并行流和串行流对比
通过for循环,串行流,并行流来对5亿个数字求和。来看消耗时间
public class Test03 {

    private static long time = 500000000l;
//    private static long time = 500l;

    private long start;

    @Before
    public void before(){
        start = new Date().getTime();
    }

    @After
    public void after(){
        long end = new Date().getTime();
        System.out.println("消耗时间===="+(end - start));
    }

    /**
     * for循环
     * 消耗时间====202
     */
    @Test
    public void test01(){
        long sum = 0;
        for(int i=0;i<time;i++){
            sum +=i;
        }
    }

    /**
     * 串行流
     * 消耗时间====303
     */
    @Test
    public void test02(){
        LongStream.range(1, time).reduce(0,Long::sum);
    }

    /**
     * 串行流
     * 消耗时间====132
     */
    @Test
    public void test03(){
        LongStream.range(1, time).parallel().reduce(0,Long::sum);
    }
}
通过案例可以看到parallelStream的效率是最高的。
Stream并行处理的过程会分而治之,也就是将一个大的任务切分成了多个小任务,这表示每个人物都是一个线程操作
6.4 线程安全问题
在多线程的处理下,肯定会出现数据安全问题。如下:
 	@Test
    public void test01(){
        List<Integer> list = new ArrayList<>();
        for(int i=0;i<1000;i++){
            list.add(i);
        }
        System.out.println("原集合大小"+list.size());
        List<Integer> newList = new ArrayList<>();
        for(int i=0;i<list.size();i++){
            newList.add(i);
        }
        System.out.println("新集合大小"+newList.size());

        List<Integer> parallelList = new ArrayList<>();
        list.stream().parallel().forEach(parallelList::add);
        System.out.println("并行集合大小"+parallelList.size());
    }
结果
原集合大小1000
新集合大小1000
并行集合大小983
或者
原集合大小1000
新集合大小1000

java.lang.ArrayIndexOutOfBoundsException
	at sun.reflect.NativeConstructorAccessorImpl.newInstance0(Native Method)
	at sun.reflect.NativeConstructorAccessorImpl.newInstance(NativeConstructorAccessorImpl.java:62)
	...
Caused by: java.lang.ArrayIndexOutOfBoundsException: 549
解决方法:
- 加同步锁
- 使用线程安全的容器
- 使用Stream中的toArray/collect操作
	/**
     * 加锁的方式
     */
    @Test
    public void test02(){
        Object obj = new Object();
        List list = new ArrayList();
        IntStream.range(0,1000).parallel().forEach(s->{
            synchronized (obj){
                list.add(s);
            }
        });
        System.out.println(list.size());
    }
    /**
     * 使用线程安全的容器
     */
    @Test
    public void test03(){
        Vector vector = new Vector();
        IntStream.range(0,1000).parallel().forEach(s->{
            vector.add(s);
        });
        System.out.println(vector.size());
        //或者把不安全的容器包装成线程安全的容器
        List list = Collections.synchronizedList(new ArrayList<>());
        IntStream.range(0,1000).parallel().forEach(s->{
            list.add(s);
        });
        System.out.println(list.size());
    }
    /**
     * 还可以用Stream的toArray方法或者collect方法来操作
     */
    @Test
    public void test04(){
        List<Integer> collect = IntStream.range(0, 1000)
                .parallel()
                .boxed()
                .collect(Collectors.toList());
        System.out.println(collect.size());
    }
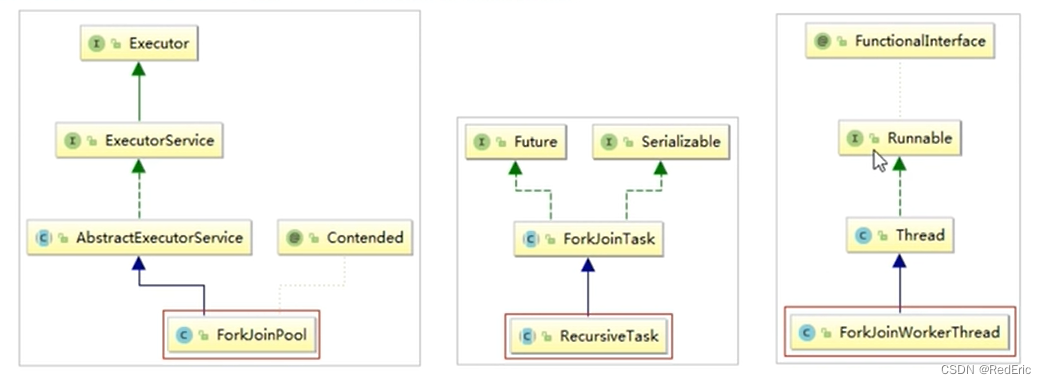
7. Fork/Join框架
parralelStream使用的是Fork/Join框架,Fork/Join框架自JDK7引入。Fork/Join框架可以将一个大任务拆分成为很多的小任务来异步执行
Fork/Join框架主要包含三个模块
- 线程池:ForkJoinPool
- 任务对象:ForkJoinTask
- 执行任务的线程:ForkJoinWorkerThread
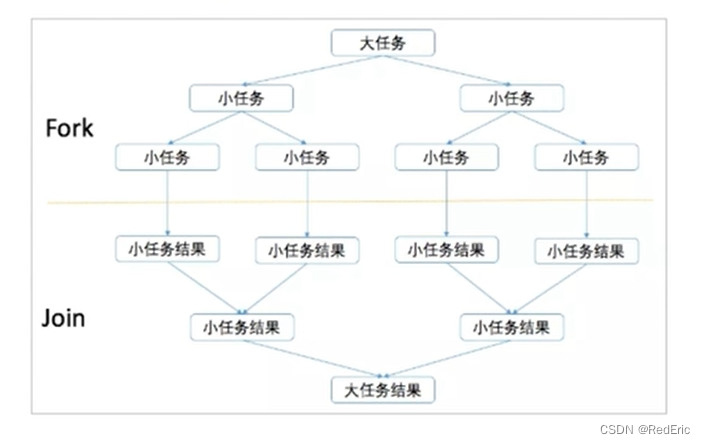
7.1 Fork/Join原理-分治法
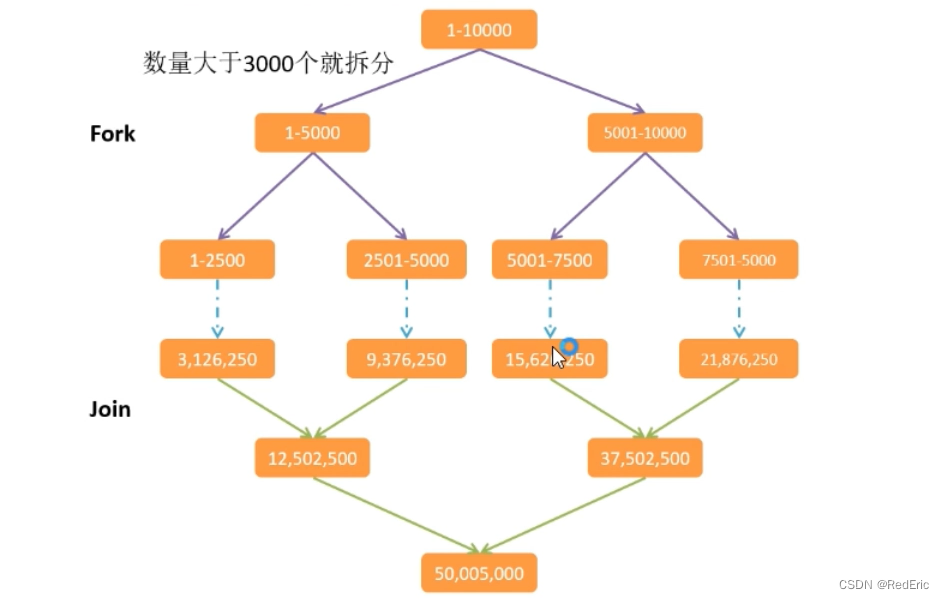
ForkJoinPoll主要使用分治法来解决问题。典型的应用比如快速排序算法。ForkJoinPool需要使用相对较少的线程来处理大量的任务。比如要对1000万个数据进行排序,那么会将这个任务分割成两个500万的排序任务和一个针对这两组500万数据的合并任务。以此类推,对于500万的数据也会做出同样的分割处理。到最后会设置一个阈值来规定当数据规模达到多少时,停止这样的分割处理。比如,当元素的数量小于10时,会停止分割。转而使用插入排序对他们进行排序,那么到最后,所有的任务加起来会有大概2000000+个。问题的关键在于,对于一个任务而言,只有当它所有的子任务完成之后,他才能够被执行。
7.2 Fork/Join工作窃取法
Fork/Join最核心的地方就是利用了现代硬件设备的多核,在一个操作会有空闲的cpu,那么如何利用好这个空闲的cpu就成了提升性能的关键。而这里我们要提到的工作窃取算法就是整个Fork/Join框架的核心理念。Fork/Join工作窃取算法是指讴歌线程从其他队列里窃取任务来执行。
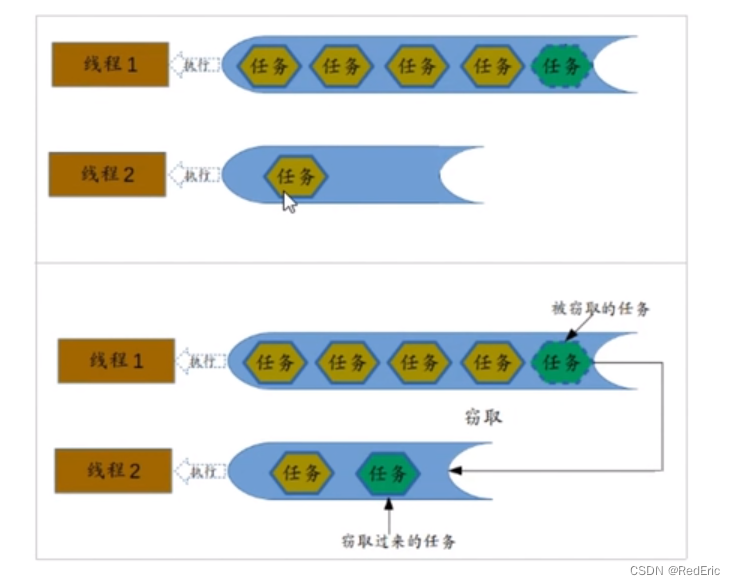
那么为什么需要使用工作窃取算法呢?加入我们需要做一个比较大的任务,我们可以把这个任务分割成若干互不依赖的子任务,为了减少线程的竞争。于是把这些子任务分别放到不同的队列中。并为每个队列创建一个单独的线程来执行队列里的任务,线程和队列一一对应。比如A线程负责处理队列里的任务,但是有的线程会先把自己队列里的任务干完,而其他线程对应的队列里还有任务等待处理。干完活的线程与其等待着,不如去帮助其他线程干活,于是它就去其他线程的队列里窃取一个任务来执行,而在这时他们会访问同一个队列,所以为了减少窃取任务线程和被窃取线程之间的 竞争,通常会使用双端队列。被窃取线程永远会从双端队列的头部拿任务执行,而窃取任务的线程永远从双端队列的尾部拿任务执行。
工作窃取算法的优点在于充分利用线程进行并行计算,并减少了线程之间的竞争,其缺点是在某些情况下还是会存在竞争,比如双端队列只有一个任务时,并且消耗了更多的系统资源。比如新建了多个线程和多个双端队列。
上文中已经提到了在java8中引入了自动并行化的概念,它能够让一部分java代码自动地以并行的方式执行,也就是我们使用了ForkJoinPool的ParallelStream。
对于ForkJoin通用线程池的线程数量,通常使用默认值就可以了,即运行时计算机的处理器数量,可以通过设置系统属性:java.util.concurrent.ForkJoinPool.common.parallelism-N(N为线程数量),来调整ForkJoinPool的线程数量,可以尝试调成不同的参数来观察每次的输出结果。
7.3 Fork/Join案例
需求:使用Fork/Join计算1-10000的和,当一个任务的计算数量大于3000的时候就拆分任务。数量小于3000的时候就计算
public class Test05ForkJoin {
    public static void main(String[] args) {
        ForkJoinPool pool = new ForkJoinPool();
        SumRecursiveTask sumRecursiveTask = new SumRecursiveTask(0, 10000);
        Long invoke = pool.invoke(sumRecursiveTask);
        System.out.println("result>>>"+invoke);
    }
}

class SumRecursiveTask extends RecursiveTask<Long>{

    //定义一个拆分的临界值
    private static final long THREADHOLD = 3000l;

    private final long start;
    private final long end;

    public SumRecursiveTask(long start, long end) {
        this.start = start;
        this.end = end;
    }

    @Override
    protected Long compute() {
        long length = end -start;
        if(length <= THREADHOLD){
            //任务不用拆分 计算求和
            System.out.println("求和计算");
            long sum = 0;
            for(long i=start ;i<=end ;i++){
                sum +=i;
            }
            System.out.println("sum="+sum);
            long reduce = LongStream.range(start, end+1).reduce(0, Long::sum);
            System.out.println("reduce计算结果为:"+reduce+"开始:"+start+",结束:"+end);
            System.out.println("sum计算结果为:"+sum+"开始:"+start+",结束:"+end);
            return reduce;
        }else{
            System.out.println("任务拆分");
            long half = (end + start)/2;
            System.out.println("任务一:开始:"+start+",结束:"+half);
            System.out.println("任务二:开始:"+(half)+",结束:"+end);
            SumRecursiveTask left = new SumRecursiveTask(start, half);
            SumRecursiveTask right = new SumRecursiveTask(half + 1, end);
            right.compute();
            return  left.compute() + right.compute();
        }
    }
}
注意reduce结束位置
输出结果:
任务拆分
任务一:开始:0,结束:5000
任务二:开始:5000,结束:10000
任务拆分
任务一:开始:5001,结束:7500
任务二:开始:7500,结束:10000
求和计算
sum=21876250
reduce计算结果为:21876250开始:7501,结束:10000
sum计算结果为:21876250开始:7501,结束:10000
求和计算
sum=15626250
reduce计算结果为:15626250开始:5001,结束:7500
sum计算结果为:15626250开始:5001,结束:7500
求和计算
sum=21876250
reduce计算结果为:21876250开始:7501,结束:10000
sum计算结果为:21876250开始:7501,结束:10000
任务拆分
任务一:开始:0,结束:2500
任务二:开始:2500,结束:5000
求和计算
sum=9376250
reduce计算结果为:9376250开始:2501,结束:5000
sum计算结果为:9376250开始:2501,结束:5000
求和计算
sum=3126250
reduce计算结果为:3126250开始:0,结束:2500
sum计算结果为:3126250开始:0,结束:2500
求和计算
sum=9376250
reduce计算结果为:9376250开始:2501,结束:5000
sum计算结果为:9376250开始:2501,结束:5000
任务拆分
任务一:开始:5001,结束:7500
任务二:开始:7500,结束:10000
求和计算
sum=21876250
reduce计算结果为:21876250开始:7501,结束:10000
sum计算结果为:21876250开始:7501,结束:10000
求和计算
sum=15626250
reduce计算结果为:15626250开始:5001,结束:7500
sum计算结果为:15626250开始:5001,结束:7500
求和计算
sum=21876250
reduce计算结果为:21876250开始:7501,结束:10000
sum计算结果为:21876250开始:7501,结束:10000
result>>>50005000
七、Optional
Optional主要用来解决空指针异常
1. 以前对于null的处理
    @Test
    public void test01(){
//        String name = "张三";
        String name = null;
        if(name != null){
            System.out.println(name);
        }else {
            System.out.println("是空值");
        }
    }
2. Optional类
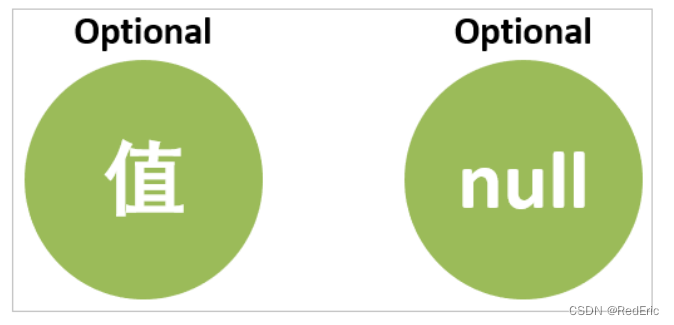
Optional类是一个没有子类的工具类,Optional是一个可以为null的容器对象,他的主要作用就是为了避免Null检查,防止NullpointerException
3. Optional的基本使用
Optional的创建方式
    //Optional的创建方式
    @Test
    public void test02(){
        //第一种方法 通过of方法。of方法不支持null
        Optional.of("张三");
        //Optional.of(null);
        //第二种方法 通过ofNullable 支持null
        Optional.ofNullable("张三");
        Optional.ofNullable(null);
        //第三种方法 empty 直接创建一个空的Optional对象
        Optional.empty();
    }
4. Optional的常用方法
    @Test
    public void test03(){
        Optional<String> op1 = Optional.of("张三");
        Optional<String> op2 = Optional.empty();
        System.out.println(op1.get());
//        System.out.println(op2.get());

        if(op1.isPresent()){
            System.out.println(op1.get());
        }
        if(op2.isPresent()){
            System.out.println(op2.get());
        }else{
            System.out.println("是空值");
        }

        String s3 = op1.orElse("李四");
        System.out.println("s3="+s3);
        String s4 = op2.orElse("空值");
        System.out.println("s4="+s4);

        String s5 = op2.orElseGet(() -> {
            return "空数据";
        });
        System.out.println("s5="+s5);

        //如果存在值就做什么操作
        op1.ifPresent(s-> {
            System.out.println("有数据存在");
        });
    }
例子
    /**
     * 自定义一个方法,将Person对象中的name转换为大写,并返回
     */
    @Test
    public void test05(){
        Person p = new Person();
        String op1 = getNameOptinal(Optional.of(p));
        String oldp1 = getName(p);
        System.out.println("Oldop1->result="+oldp1);
        System.out.println("op1->result="+op1);
        p.setName("zhangsan");
        String oldp2 = getNameOptinal(Optional.of(p));
        String op2 = getNameOptinal(Optional.of(p));
        System.out.println("Oldop2->result="+oldp2);
        System.out.println("op2->result="+op2);
    }

    public String getNameOptinal(Optional<Person> person){
        if(person.isPresent()){
            String msg = person.map(Person::getName)
                    .map(String::toUpperCase)
                    .orElse("是空值");
            return msg;
        }else{
            return null;
        }
    }

    public String getName(Person person){
        if(person!=null){
            String name = person.getName();
            if(name !=null){
                return name.toUpperCase(Locale.ROOT);
            }else{
                return null;
            }
        }else{
            return null;
        }
    }
输出
Oldop1->result=null
op1->result=是空值
Oldop2->result=ZHANGSAN
op2->result=ZHANGSAN
八、新时间日期API
1. 旧版日期时间的问题
在旧版本JDK对于日期和时间的这块是非常差的
    public void test01(){
        //1. 设计不合理
        Date now = new Date();
        System.out.println(now);

        Date data2 = new Date(2022,07,22);
        System.out.println(data2);
        //2. 时间格式化和解析操作是线程不安全的
        SimpleDateFormat sdf = new SimpleDateFormat("yyyy-MM-dd");
        System.out.println("sdf.format(now) = " + sdf.format(now));
        for(int i=0;i<50;i++){
            new Thread(()->{
//                System.out.println(sdf.format(now));
                try {
                    System.out.println(sdf.parse("2022-03-03"));
                } catch (ParseException e) {
                    e.printStackTrace();
                }
            }).start();
        }
    }
- 设计不合理,在java.util和java.sql的包中都有日期类,java.util.Date同时包含日期和时间,而java.sql.Date只包含日期。此外用于格式化和解析的类在java.text包下
- 非线程安全问题,java.util.Date是非线程安全的,所有的日期类都是可变的,这是java日期类最大的问题之一。
- 时区处理麻烦,日期类并不提供国际化,没有时区支持。
2. 新日期时间API介绍
JDK8增加了一套全新的时间日期API,这套API设计合理,是线程安全的。新的日期时间API位于java.time包中,下面是一些关键类:
- LocalDate:表示日期,包含年于日,格式为2022-07-22
- LocalTime:表示时间,包含时分秒,格式为17:38:54.132333444
- LocalDateTime:表示日期时间,包含年月日时分秒,格式为2022-07-22 17:38:54.132333444
- DateTimeFormatter:日期时间格式化类。
- Instant:时间戳,表示一个特定的时间瞬间。
- Duration:用于计算两个时间(LocalTime,时分秒)的距离
- Period:用于计算两个日期(LocalDate,年月日)的距离
- ZonedDateTime:包含时区的时间
java中使用的历法是ISO 8601日历系统,它是世界民用历法,也就是我们所说的公里。平年有365天,闰年366天。此外java8还提供了4套其他历法,分别是:
- ThaiBuddhistDate:泰国佛教历
- MinguoDate:中华民国历
- JapaneseDate:日本历
- HijrahDate:伊斯兰历
2.1 日期时间的常见操作
LocalDate、LocalTime、LocalDateTime的操作
    /**
     * JDK8 时间日期操作
     */
    @Test
    public void test02(){
        LocalDate nowDate = LocalDate.now();
        System.out.println("nowDate = " + nowDate);
        LocalDate localDate = LocalDate.of(2022, 05, 05);
        System.out.println("localDate = " + localDate);

        LocalTime nowTime = LocalTime.now();
        System.out.println("nowTime = " + nowTime);
        LocalTime localTime = LocalTime.of(5, 5, 5);
        System.out.println("localTime = " + localTime);

        LocalDateTime now = LocalDateTime.now();
        System.out.println("now = " + now);
        LocalDateTime localDateTime = LocalDateTime.of(2022, 2, 2, 2, 2, 2);
        System.out.println("localDateTime = " + localDateTime);

        System.out.println("now.getYear() = " + now.getYear());
        System.out.println("now.getMonth() = " +now.getMonth());
        System.out.println("now.getDayOfMonth() = " + now.getDayOfMonth());
        System.out.println("now.getHour() = " + now.getHour());
        System.out.println("now.getMinute() = " + now.getMinute());
        System.out.println("now.getSecond() = " + now.getSecond());
    }
2.2 时间日期的修改和比较
    /**
     * 日期时间的修改
     */
    @Test
    public void test03(){
        LocalDateTime now = LocalDateTime.now();
        System.out.println("now = " + now);
        //修改日期时间 对日期时间的修改,对已经存在的LocalDate对象创建了他的模板,并不会修改原来的信息
        LocalDateTime localDateTime = now.withYear(2010);
        System.out.println("修改年份 = " + localDateTime);
        System.out.println("修改小时 = " + now.withHour(1));
        System.out.println("修改月份 = " + now.withMonth(1));
        System.out.println("修改日期 = " + now.withDayOfMonth(1));
        //日期加上指定时间
        System.out.println("now.plusYears(2) = " + now.plusYears(2));
        System.out.println("now.plusMonths(2) = " + now.plusMonths(2));
        System.out.println("now.plusDays(2) = " + now.plusDays(2));
        //日期减去指定时间
        System.out.println("now.minusYears(2) = " + now.minusYears(2));
        System.out.println("now.minusMonths(2) = " + now.minusMonths(2));
        System.out.println("now.minusDays(2) = " + now.minusDays(2));
    }
	//时间日期比较
    @Test
    public void test04(){
        LocalDateTime now = LocalDateTime.now();
        LocalDateTime old = LocalDateTime.of(2010, 1, 1, 1, 1, 1);
        System.out.println("now.isBefore(old) = " + now.isBefore(old));
        System.out.println("now.isAfter(old) = " + now.isAfter(old));
        System.out.println("now.isEqual(old) = " + now.isEqual(old));
    }
2.3 格式化和解析操作
在JDK8中我们可以通过java.time.format.DateTimeFormatter类可以进行日期的解析和格式化操作
    /**
     * 日期时间格式化
     */
    @Test
    public void test05(){
        LocalDateTime now = LocalDateTime.now();
        //系统默认的格式 2022-07-22T18:10:31.852
        DateTimeFormatter isoDateTime = DateTimeFormatter.ISO_DATE_TIME;
        //将时间日期转换为字符串
        String formatstr = isoDateTime.format(now);
        System.out.println("isoDateTime.format(now) = " + formatstr);
        //通过ofPattern方法指定特定的格式
        DateTimeFormatter dateTimeFormatter = DateTimeFormatter.ofPattern("yyyy-MM-dd HH:mm:ss");
        System.out.println("dateTimeFormatter.format(now) = " + dateTimeFormatter.format(now));

        //将字符串解析为一个时间日期类型
        LocalDateTime parse = LocalDateTime.parse("2010-10-10 10:10:10", dateTimeFormatter);
        System.out.println(parse);
    }
2.4 Instant类
在JDK8中给我们新增了一个Instant类(时间戳/时间线)内部保存了从1970年1月1日00:00:00以来的秒和纳秒
    /**
     * instant时间戳
     */
    @Test
    public void test06() throws InterruptedException {
        Instant now = Instant.now();
        System.out.println("Instant.now() = " + now);
        now.getNano();
        Thread.sleep(5);
        Instant now1 = Instant.now();
        System.out.println("Instant.now1() = " + now1);
        System.out.println("系统耗时"+ (now1.getNano()-now.getNano()));
    }
2.5 计算日期时间差
JDK8中提供了两个工具类Duration/Period:计算时间日期差
- Duration: 用来计算两个时间的差(LocalTime)
- Period: 用来计算两个日期的差(LocalDate)
   /**
     * 计算时间日期的差
     */
    @Test
    public void test07(){
        LocalTime now = LocalTime.now();
        LocalTime time = LocalTime.of(2, 2, 2);
        System.out.println("now = " + now);
        System.out.println("time = " + time);
        Duration between = Duration.between(time, now);
        System.out.println(between.toDays());
        System.out.println(between.toHours());
        System.out.println(between.toMillis());
        System.out.println(between.toNanos());

        LocalDate now1 = LocalDate.now();
        LocalDate date = LocalDate.of(2020, 1, 1);
        Period betweenDate = Period.between(date, now1);
        System.out.println("betweenDate.getYears() = " + betweenDate.getYears());
        System.out.println("betweenDate.getMonths() = " + betweenDate.getMonths());
        System.out.println("betweenDate.getDays() = " + betweenDate.getDays());
    }
2.6 时间校正器
有时候我们可能需要做出如下调整:将日期调整到下个月的第一天等操作。这时我们通过时间校正器效果可能会更好
- TemporalAdjuster:时间校正器
- TemporalAdjusters:通过该类的静态方法提供了大量的常用TemporalAdjuster的实现
    @Test
    public void test08(){
        LocalDateTime now = LocalDateTime.now();
        TemporalAdjuster adjuster = (temporal)->{
            LocalDateTime localDateTime = (LocalDateTime) temporal;
            System.out.println(localDateTime);
            LocalDateTime nextMonthDay = localDateTime.plusMonths(1).withDayOfMonth(1);
            System.out.println(nextMonthDay);
            return nextMonthDay;
        };
        adjuster.adjustInto(now);
        // 我们可以通过TemporalAdjusters 来实现 // LocalDateTime nextMonth = now.with(adJuster);
        LocalDateTime next = now.with(TemporalAdjusters.firstDayOfNextMonth());
        System.out.println("next = " + next);
    }
2.7 时间日期的时区
Java8中加入了对时区的支持,LocalDate、LocalTime、LocalDateTime是不带时区的,带时区的日期时间类分别为:ZonedDate、ZonedTime、ZonedDateTime。
其中每个时区都对应着ID,ID的格式为“区域/城市”。例如Asia/Shanghai等。
ZonedId:该类中包含了所有的时区信息
    /**
     * 时区操作
     */
    @Test
    public void test09(){
//        ZoneId.getAvailableZoneIds().stream().forEach(System.out::println);
        //获取当前时间 中国使用的是东八区的时区,比标准时间早八个小时
        LocalDateTime now = LocalDateTime.now();
        System.out.println("now = " + now);
        //获取标准时间
        ZonedDateTime bz = ZonedDateTime.now(Clock.systemUTC());
        System.out.println("bz = " + bz);
        //使用计算机默认的时区,创建日期时间
        ZonedDateTime now1 = ZonedDateTime.now();
        System.out.println("now1 = " + now1);
        //使用指定时区创建日期时间
        ZonedDateTime now2 = ZonedDateTime.now(ZoneId.of("America/Marigot"));
        System.out.println("now2 = " + now2);
    }
JDK新的日期时间API的优势:
- 新版时间日期API中,日期和时间对象是不可变的,操作日期不会影响原来的值,而是生成一个新的实例
- 提供不同的两种方式,有效的区分了任何机器的操作
- TemporalAdjuster可以更精确的操作日期,还可以自定义日期调整器
- 线程安全
LocalDate date = LocalDate.of(2020, 1, 1);
Period betweenDate = Period.between(date, now1);
System.out.println("betweenDate.getYears() = " + betweenDate.getYears());
System.out.println("betweenDate.getMonths() = " + betweenDate.getMonths());
System.out.println("betweenDate.getDays() = " + betweenDate.getDays());
}
#### 2.6 时间校正器

有时候我们可能需要做出如下调整:将日期调整到下个月的第一天等操作。这时我们通过时间校正器效果可能会更好

- TemporalAdjuster:时间校正器
- TemporalAdjusters:通过该类的静态方法提供了大量的常用TemporalAdjuster的实现

```java
    @Test
    public void test08(){
        LocalDateTime now = LocalDateTime.now();
        TemporalAdjuster adjuster = (temporal)->{
            LocalDateTime localDateTime = (LocalDateTime) temporal;
            System.out.println(localDateTime);
            LocalDateTime nextMonthDay = localDateTime.plusMonths(1).withDayOfMonth(1);
            System.out.println(nextMonthDay);
            return nextMonthDay;
        };
        adjuster.adjustInto(now);
        // 我们可以通过TemporalAdjusters 来实现 // LocalDateTime nextMonth = now.with(adJuster);
        LocalDateTime next = now.with(TemporalAdjusters.firstDayOfNextMonth());
        System.out.println("next = " + next);
    }
2.7 时间日期的时区
Java8中加入了对时区的支持,LocalDate、LocalTime、LocalDateTime是不带时区的,带时区的日期时间类分别为:ZonedDate、ZonedTime、ZonedDateTime。
其中每个时区都对应着ID,ID的格式为“区域/城市”。例如Asia/Shanghai等。
ZonedId:该类中包含了所有的时区信息
    /**
     * 时区操作
     */
    @Test
    public void test09(){
//        ZoneId.getAvailableZoneIds().stream().forEach(System.out::println);
        //获取当前时间 中国使用的是东八区的时区,比标准时间早八个小时
        LocalDateTime now = LocalDateTime.now();
        System.out.println("now = " + now);
        //获取标准时间
        ZonedDateTime bz = ZonedDateTime.now(Clock.systemUTC());
        System.out.println("bz = " + bz);
        //使用计算机默认的时区,创建日期时间
        ZonedDateTime now1 = ZonedDateTime.now();
        System.out.println("now1 = " + now1);
        //使用指定时区创建日期时间
        ZonedDateTime now2 = ZonedDateTime.now(ZoneId.of("America/Marigot"));
        System.out.println("now2 = " + now2);
    }
JDK新的日期时间API的优势:
- 新版时间日期API中,日期和时间对象是不可变的,操作日期不会影响原来的值,而是生成一个新的实例
- 提供不同的两种方式,有效的区分了任何机器的操作
- TemporalAdjuster可以更精确的操作日期,还可以自定义日期调整器
- 线程安全