官方文档:https://docs.ceph.com/en/pacific/
1、虚拟机规划:
| 主机名 |
IP |
角色 |
| ceph1 |
192.168.150.120 |
cephadm,mon,mgr,osd |
| ceph2 |
192.168.150.121 |
mon,mgr,osd |
| ceph3 |
192.168.150.121 |
mon,mgr,rosd |
2、ceph版本:
ceph16.2.4
3、虚拟机操作系统:
centos8
4、初始化工作(三台机器同时操作):
4、1 关闭防火墙:
$ systemctl stop firewalld && systemctl disable firewalld
4、2 关闭SELinux:
$ setenforce 0 && sed -i 's/SELINUX=enforcing/SELINUX=disabled/g' /etc/selinux/config
4、3 设置时间同步:
$ cat /etc/chrony.conf
# Use public servers from the pool.ntp.org project.
# Please consider joining the pool (http://www.pool.ntp.org/join.html).
# pool 2.centos.pool.ntp.org iburst
server ntp.aliyun.com iburst
# Record the rate at which the system clock gains/losses time.
driftfile /var/lib/chrony/drift

# Allow the system clock to be stepped in the first three updates
# if its offset is larger than 1 second.
makestep 1.0 3

# Enable kernel synchronization of the real-time clock (RTC).
rtcsync

# Enable hardware timestamping on all interfaces that support it.
#hwtimestamp *

# Increase the minimum number of selectable sources required to adjust
# the system clock.
#minsources 2

# Allow NTP client access from local network.
#allow 192.168.0.0/16

# Serve time even if not synchronized to a time source.
#local stratum 10

# Specify file containing keys for NTP authentication.
keyfile /etc/chrony.keys

# Get TAI-UTC offset and leap seconds from the system tz database.
leapsectz right/UTC

# Specify directory for log files.
logdir /var/log/chrony

# Select which information is logged.
#log measurements statistics tracking
重启服务:
$ systemctl restart chronyd
$ systemctl enable chronyd
4、4 配置epel源:
CentOS Linux 8 已经停止更新维护,因此需要修改YUM源:
$ cd /etc/yum.repos.d/
sed -i 's/mirrorlist/#mirrorlist/g' /etc/yum.repos.d/CentOS-*
sed -i 's|#baseurl=http://mirror.centos.org|baseurl=http://vault.centos.org|g' /etc/yum.repos.d/CentOS-*
生成缓存:
$ yum makecache
$ yum update -y
配置epel源:
$ dnf install epel-release -y
4、5 设置主机名:
$ hostnamectl set-hostname hostname
4、6 修改域名解析文件:
$ cat /etc/hosts
127.0.0.1   localhost localhost.localdomain localhost4 localhost4.localdomain4
::1         localhost localhost.localdomain localhost6 localhost6.localdomain6
192.168.150.120 ceph1
192.168.150.121 ceph2
192.168.150.122 ceph3
4、7 配置ceph镜像源:
$ vi /etc/yum.repos.d/ceph.repo

# 添加如下内容:
[Ceph]
name=Ceph packages for $basearch
baseurl=https://download.ceph.com/rpm-16.2.4/el8/$basearch
enabled=1
gpgcheck=0
type=rpm-md
gpgkey=https://download.ceph.com/keys/release.asc
priority=1

[Ceph-noarch]
name=Ceph noarch packages
baseurl=https://download.ceph.com/rpm-16.2.4/el8/noarch
enabled=1
gpgcheck=0
type=rpm-md
gpgkey=https://download.ceph.com/keys/release.asc
priority=1

[ceph-source]
name=Ceph source packages
baseurl=https://download.ceph.com/rpm-16.2.4/el8/SRPMS
enabled=1
gpgcheck=0
type=rpm-md
gpgkey=https://download.ceph.com/keys/release.asc
priority=1
生成缓存:
$ yum makecache
安装ceph:
$ yum install ceph -y
验证ceph是否安装成功:
$ ceph -v
ceph version 16.2.4 (3cbe25cde3cfa028984618ad32de9edc4c1eaed0) pacific (stable)
5、安装docker(三台机器同时操作):
官方文档:https://docs.docker.com/engine/install/centos/
5、1 安装需要的软件包
$ yum install -y yum-utils
5、2 设置stable镜像仓库:
$ yum-config-manager --add-repo https://mirrors.aliyun.com/docker-ce/linux/centos/docker-ce.repo
5、3 生成缓存:
$ yum makecache
5、4 安装DOCKER CE:
$ yum install docker-ce docker-ce-cli containerd.io docker-compose-plugin
5、5 配置阿里云镜像加速:
$ mkdir -p /etc/docker
$ tee /etc/docker/daemon.json <<-'EOF'
{
	"registry-mirrors": ["https://fxt824bw.mirror.aliyuncs.com"]
}
EOF
5、6 验证docker是否安装:
$ docker -v
Docker version 20.10.18, build b40c2f6
5、7 启动docker:
$ systemctl start docker
6、安装cephadm(ceph2节点操作)部署集群:
6、1 安装cephadm:
$ yum install cephadm -y
6、2 引导新群集:
$ cephadm bootstrap --mon-ip ceph1的IP

# 执行结果:
Verifying podman|docker is present...
Verifying lvm2 is present...
Verifying time synchronization is in place...
Unit chronyd.service is enabled and running
Repeating the final host check...
podman|docker (/usr/bin/docker) is present
systemctl is present
lvcreate is present
Unit chronyd.service is enabled and running
Host looks OK
Cluster fsid: 09feacf4-4f13-11ed-a401-000c29d6f8f4
Verifying IP 192.168.150.120 port 3300 ...
Verifying IP 192.168.150.120 port 6789 ...
Mon IP 192.168.150.120 is in CIDR network 192.168.150.0/24
- internal network (--cluster-network) has not been provided, OSD replication will default to the public_network
Pulling container image docker.io/ceph/ceph:v16...
Ceph version: ceph version 16.2.5 (0883bdea7337b95e4b611c768c0279868462204a) pacific (stable)
Extracting ceph user uid/gid from container image...
Creating initial keys...
Creating initial monmap...
Creating mon...
Waiting for mon to start...
Waiting for mon...
mon is available
Assimilating anything we can from ceph.conf...
Generating new minimal ceph.conf...
Restarting the monitor...
Setting mon public_network to 192.168.150.0/24
Wrote config to /etc/ceph/ceph.conf
Wrote keyring to /etc/ceph/ceph.client.admin.keyring
Creating mgr...
Verifying port 9283 ...
Waiting for mgr to start...
Waiting for mgr...
mgr not available, waiting (1/15)...
mgr not available, waiting (2/15)...
mgr not available, waiting (3/15)...
mgr not available, waiting (4/15)...
mgr is available
Enabling cephadm module...
Waiting for the mgr to restart...
Waiting for mgr epoch 5...
mgr epoch 5 is available
Setting orchestrator backend to cephadm...
Generating ssh key...
Wrote public SSH key to /etc/ceph/ceph.pub
Adding key to root@localhost authorized_keys...
Adding host ceph1...
Deploying mon service with default placement...
Deploying mgr service with default placement...
Deploying crash service with default placement...
Enabling mgr prometheus module...
Deploying prometheus service with default placement...
Deploying grafana service with default placement...
Deploying node-exporter service with default placement...
Deploying alertmanager service with default placement...
Enabling the dashboard module...
Waiting for the mgr to restart...
Waiting for mgr epoch 13...
mgr epoch 13 is available
Generating a dashboard self-signed certificate...
Creating initial admin user...
Fetching dashboard port number...
Ceph Dashboard is now available at:

             URL: https://ceph1:8443/
            User: admin
        Password: mo5ahyp1wx

You can access the Ceph CLI with:

        sudo /usr/sbin/cephadm shell --fsid 09feacf4-4f13-11ed-a401-000c29d6f8f4 -c /etc/ceph/ceph.conf -k /etc/ceph/ceph.client.admin.keyring

Please consider enabling telemetry to help improve Ceph:

        ceph telemetry on

For more information see:

        https://docs.ceph.com/docs/pacific/mgr/telemetry/

Bootstrap complete.
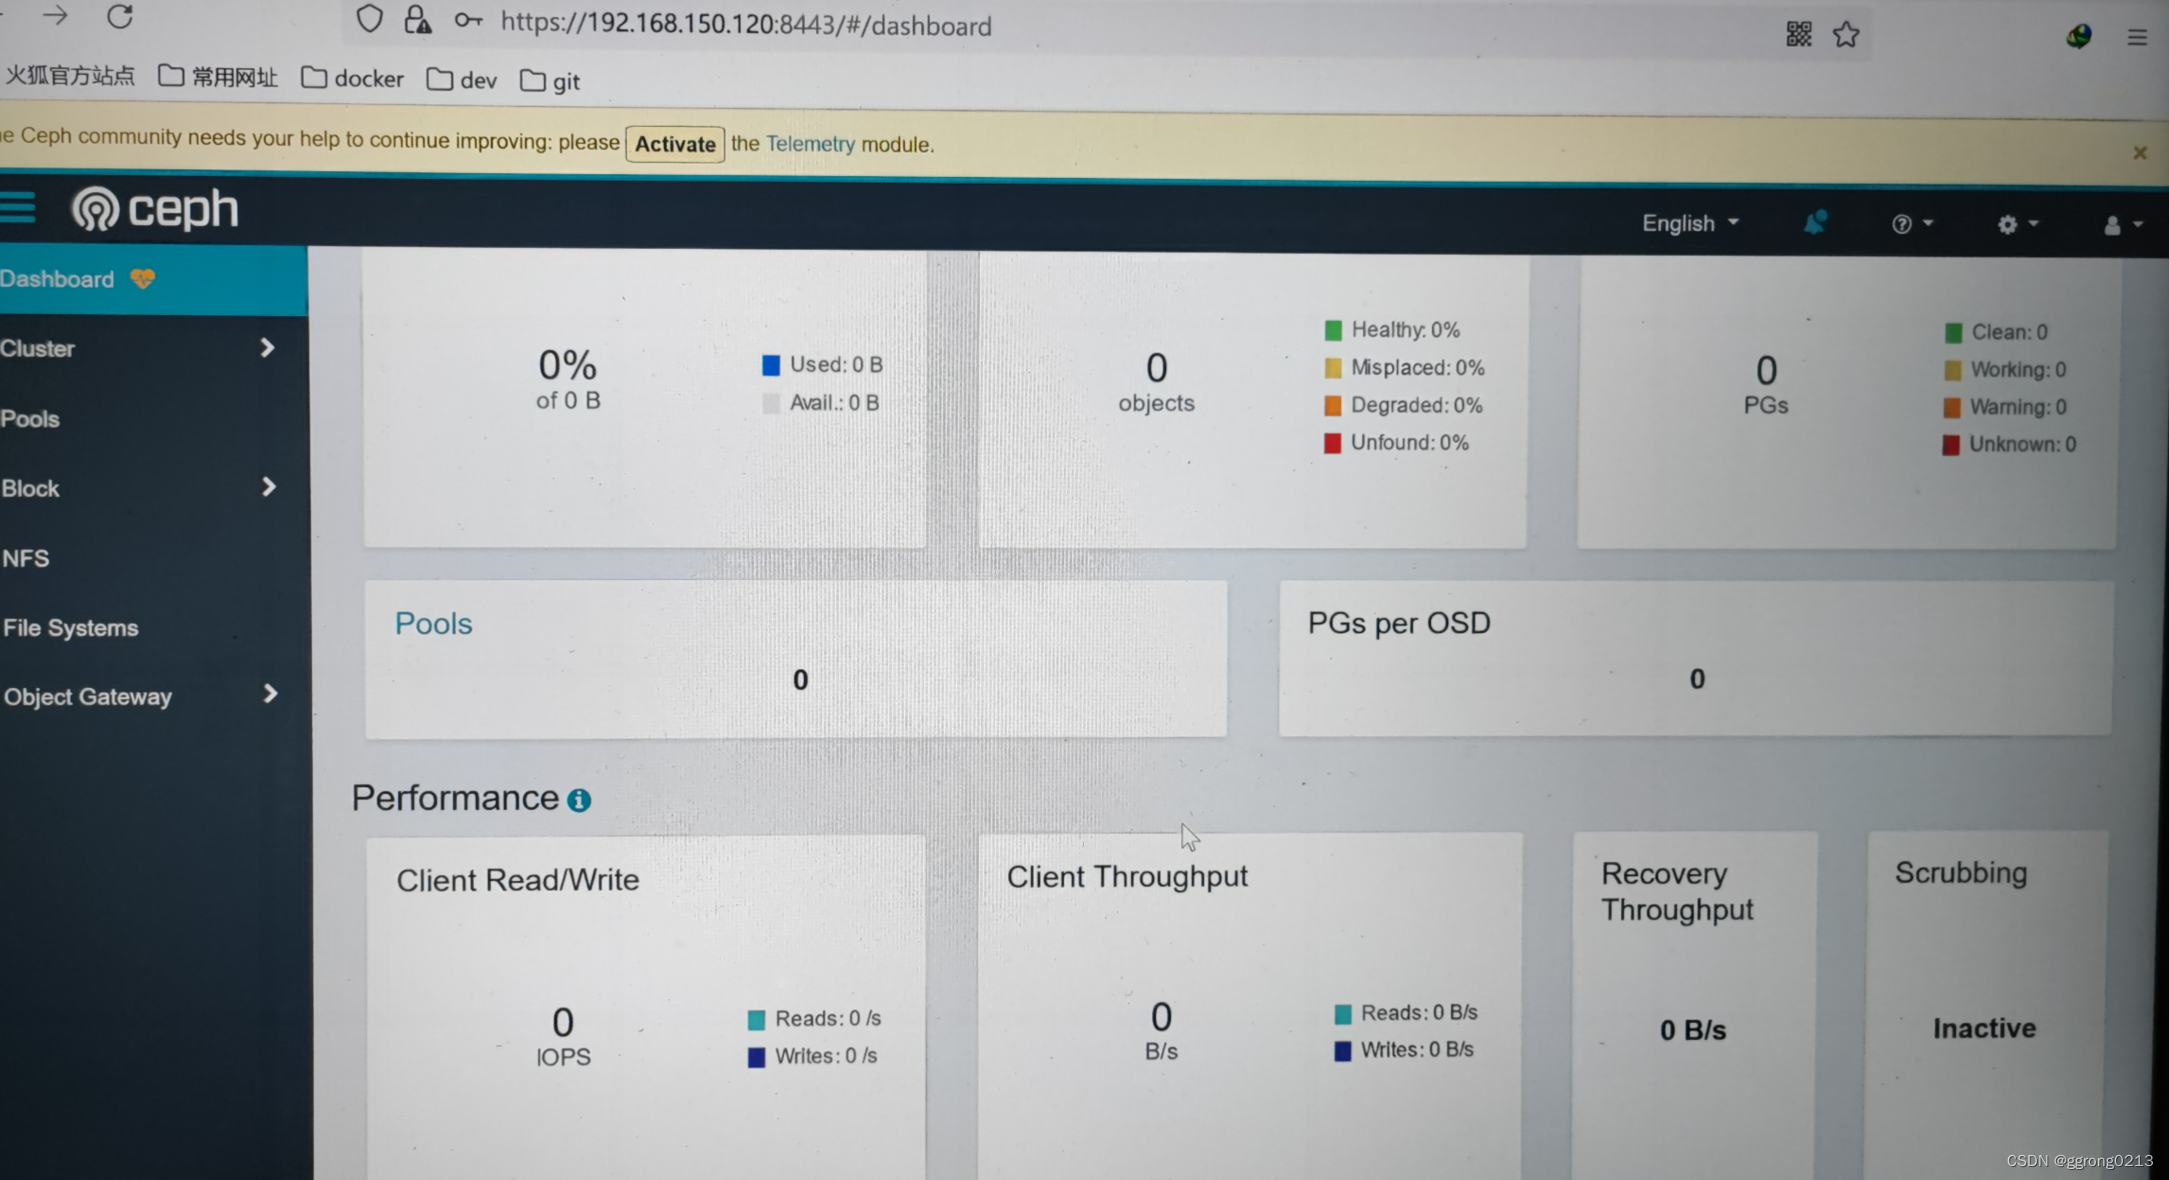
通过URL可以访问到可视化界面,输入用户名和密码即可进入界面:
6、3 其他主机加入集群:
启用 CEPH CLI:
$ cephadm shell
安装集群公共SSH密钥:
$ ceph cephadm get-pub-key > ~/ceph.pub
$ ssh-copy-id -f -i /etc/ceph/ceph.pub root@ceph2
$ ssh-copy-id -f -i /etc/ceph/ceph.pub root@ceph3
新主机加入集群:
$ ceph orch host add ceph2
$ ceph orch host add ceph3
等待一段时间(可能需要等待的时间比较久,新加入的主机需要拉取需要的镜像和启动容器实例),查看集群状态:
$ ceph -s
  cluster:
    id:     09feacf4-4f13-11ed-a401-000c29d6f8f4
    health: HEALTH_WARN
            OSD count 0 < osd_pool_default_size 3

  services:
    mon: 3 daemons, quorum ceph1,ceph2,ceph3 (age 90s)
    mgr: ceph1.sqfwyo(active, since 22m), standbys: ceph2.mwhuqa
    osd: 0 osds: 0 up, 0 in

  data:
    pools:   0 pools, 0 pgs
    objects: 0 objects, 0 B
    usage:   0 B used, 0 B / 0 B avail
    pgs:
可以看到新主机加入到集群中的时候会自动扩展mon和mgr节点。
6、4 部署OSD:
查看磁盘分区:
$ lsblk
NAME        MAJ:MIN RM  SIZE RO TYPE MOUNTPOINT
sr0          11:0    1 10.1G  0 rom
nvme0n1     259:0    0   20G  0 disk
|-nvme0n1p1 259:1    0    1G  0 part
`-nvme0n1p2 259:2    0   19G  0 part
  |-cl-root 253:0    0   17G  0 lvm  /var/lib/ceph/crash
  `-cl-swap 253:1    0    2G  0 lvm  [SWAP]
nvme0n2     259:3    0   10G  0 disk
nvme0n3     259:4    0   10G  0 disk
nvme0n4     259:5    0   10G  0 disk
将集群中所有的空闲磁盘分区全部部署到集群中:
$ ceph orch daemon add osd ceph1:/dev/nvme0n2
Created osd(s) 0 on host 'ceph1'
$ ceph orch daemon add osd ceph1:/dev/nvme0n3
Created osd(s) 1 on host 'ceph1'
$ ceph orch daemon add osd ceph1:/dev/nvme0n4
Created osd(s) 2 on host 'ceph1'
$ ceph orch daemon add osd ceph2:/dev/nvme0n2
Created osd(s) 3 on host 'ceph2'
$ ceph orch daemon add osd ceph2:/dev/nvme0n3
Created osd(s) 4 on host 'ceph2'
$ ceph orch daemon add osd ceph2:/dev/nvme0n4
Created osd(s) 5 on host 'ceph2'
$ ceph orch daemon add osd ceph3:/dev/nvme0n2
Created osd(s) 6 on host 'ceph3'
$ ceph orch daemon add osd ceph3:/dev/nvme0n3
Created osd(s) 7 on host 'ceph3'
$ ceph orch daemon add osd ceph3:/dev/nvme0n4
Created osd(s) 8 on host 'ceph3'
查看集群状态:
$ ceph -s
  cluster:
    id:     09feacf4-4f13-11ed-a401-000c29d6f8f4
    health: HEALTH_OK

  services:
    mon: 3 daemons, quorum ceph1,ceph2,ceph3 (age 23m)
    mgr: ceph2.mwhuqa(active, since 13m), standbys: ceph1.sqfwyo
    osd: 9 osds: 9 up (since 7m), 9 in (since 8m)

  data:
    pools:   1 pools, 1 pgs
    objects: 0 objects, 0 B
    usage:   48 MiB used, 90 GiB / 90 GiB avail
    pgs:     1 active+clean

[ceph: root@ceph1 ~]# ceph -s
  cluster:
    id:     09feacf4-4f13-11ed-a401-000c29d6f8f4
    health: HEALTH_OK

  services:
    mon: 3 daemons, quorum ceph1,ceph2,ceph3 (age 30m)
    mgr: ceph2.mwhuqa(active, since 12h), standbys: ceph1.sqfwyo
    osd: 9 osds: 9 up (since 12h), 9 in (since 12h)

  data:
    pools:   1 pools, 1 pgs
    objects: 0 objects, 0 B
    usage:   48 MiB used, 90 GiB / 90 GiB avail
    pgs:     1 active+clean
7、可视化界面验证查看集群:

至此,cephadm快速部署ceph集群已经完成。后续可以进行一些块存储和对象存储等。