基础概念
01、微服务架构
微服务架构师一种架构模式,它提倡将单一应用程序划分成一组小的服务,服务之间互相协调、互相配合,为用户提供最终价值。每个服务运行在其独立的进程中,服务与服务间采用轻量级的通信机制互相协作(通常是基于HTTP协议的Restful API)。 每个服务都围绕着具体业务进行构建,并且能够被独立的部署到生产环境、类生产环境等。另外,应当尽量避免统一的、集中式的服务管理机制,对具体一个服务而言,应根据业务上下文,选择合适的语言、工具对其进行构建。
02、SpringCloud
SpringCloud=分布式微服务架构的一站式解决方案,是多种微服务架构落地技术的集合体,速成微服务全家桶

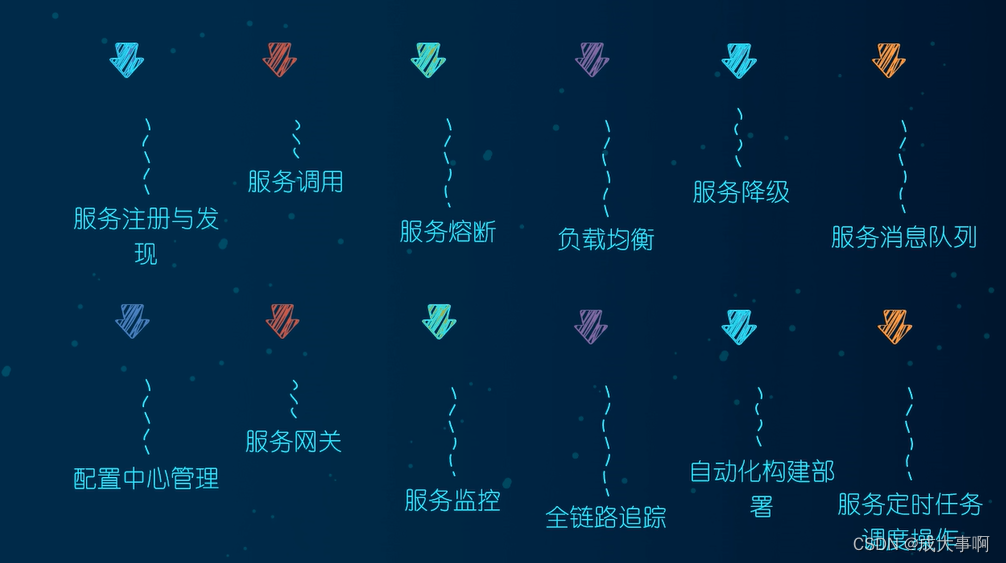
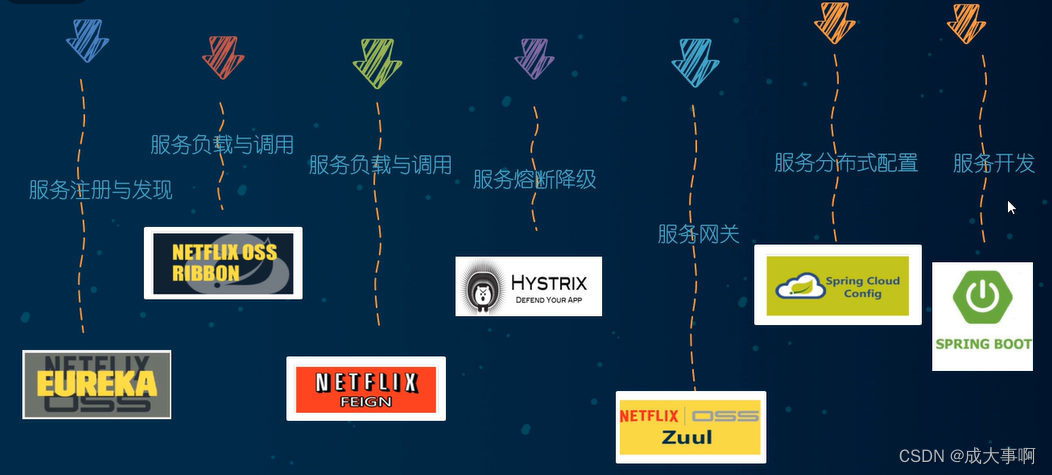
03、SpringCloud 技术栈
具体实现用到的技术
04、boot和cloud的版本选型
Spring Cloud采用了英国伦敦地铁站的名称来命名,并由地铁站名称字母A-Z依次类推的形式来发布迭代版本
SpringCloud是一个由许多子项目组成的综合项目,各子项目有不同的发布节奏。为了管理SpringCloud与各子项目的版本依赖关系,发布了一个清单,其中包括了某个SpringCloud版本对应的子项目版本。为了避免SpringCloud版本号与子项目版本号混淆,SpringCloud版本采用了名称而非版本号的命名,这些版本的名字采用了伦敦地铁站的名字,根据字母表的顺序来对应版本时间顺序。例如Angel是第一个版本, Brixton是第二个版本。当SpringCloud的发布内容积累到临界点或者一个重大BUG被解决后,会发布一个“service releases"版本,简称SRX版本,比如Greenwich.SR2就是SpringCloud发布的Greenwich版本的第2个SRX版本。
cloud Hoxton.SR1
boot 2.2.2.RELEASE
cloud alibaba 2.1.0.RELEASE
java java8
Maven 3.5及以上
Mysql 5.7及以上
05、cloud 组件停更说明
停更不停用
- 被动修复bugs
- 不再接受合并请求
- 不再发布新版本
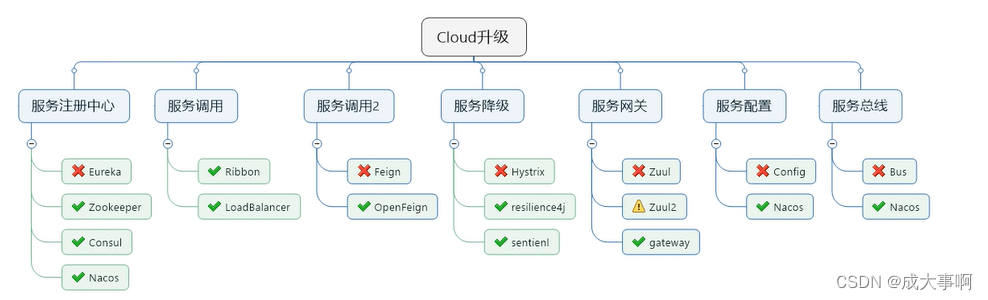
cloud升级
-
服务注册中心
- Eureka停用
- 可以使用zookeeper作为服务注册中心
- consul
- Nacos
-
服务调用
- Ribbon准备停更,
- 代替为LoadBalance
-
服务调用2
-
服务降级
-
Hystrix停更,改为resilence4j
-
或者阿里巴巴的Sentienl
-
服务网关
-
服务配置
-
服务总线
环境搭建
- New Project
- 聚合总父工程名字
- Maven选版本
- 工程名字
- 字符编码
- 注解生效激活
- java 编码版本选8
- File Type 过滤
01、新建maven父工程
在pom文件里添加
    <properties>
        <project.build.sourceEncoding>UTF-8</project.build.sourceEncoding>
        <maven.compiler.source>1.8</maven.compiler.source>
        <maven.compiler.target>1.8</maven.compiler.target>
        <junit.version>4.12</junit.version>
        <log4j.version>1.2.17</log4j.version>
        <lombok.version>1.16.18</lombok.version>
        <mysql.version>5.1.47</mysql.version>
        <druid.version>1.1.16</druid.version>
        <mybatis.spring.boot.version>1.3.0</mybatis.spring.boot.version>
    </properties>

    <!-- 1、只是声明依赖,并不实际引入,子项目按需声明使用的依赖 -->
    <!-- 2、子项目可以继承父项目的 version 和 scope -->
    <!-- 3、子项目若指定了 version 和 scope,以子项目为准 -->
    <dependencyManagement>
        <dependencies>
            <!--spring boot 2.2.2-->
            <dependency>
                <groupId>org.springframework.boot</groupId>
                <artifactId>spring-boot-dependencies</artifactId>
                <version>2.2.2.RELEASE</version>
                <type>pom</type>
                <scope>import</scope>
            </dependency>
            <!--spring cloud Hoxton.SR1-->
            <dependency>
                <groupId>org.springframework.cloud</groupId>
                <artifactId>spring-cloud-dependencies</artifactId>
                <version>Hoxton.SR1</version>
                <type>pom</type>
                <scope>import</scope>
            </dependency>
            <!--spring cloud alibaba 2.1.0.RELEASE-->
            <dependency>
                <groupId>com.alibaba.cloud</groupId>
                <artifactId>spring-cloud-alibaba-dependencies</artifactId>
                <version>2.1.0.RELEASE</version>
                <type>pom</type>
                <scope>import</scope>
            </dependency>

            <dependency>
                <groupId>mysql</groupId>
                <artifactId>mysql-connector-java</artifactId>
                <version>${mysql.version}</version>
            </dependency>
            <dependency>
                <groupId>com.alibaba</groupId>
                <artifactId>druid</artifactId>
                <version>${druid.version}</version>
            </dependency>
            <dependency>
                <groupId>org.mybatis.spring.boot</groupId>
                <artifactId>mybatis-spring-boot-starter</artifactId>
                <version>${mybatis.spring.boot.version}</version>
            </dependency>
            <dependency>
                <groupId>junit</groupId>
                <artifactId>junit</artifactId>
                <version>${junit.version}</version>
            </dependency>
            <dependency>
                <groupId>log4j</groupId>
                <artifactId>log4j</artifactId>
                <version>${log4j.version}</version>
            </dependency>
            <dependency>
                <groupId>org.projectlombok</groupId>
                <artifactId>lombok</artifactId>
                <version>${lombok.version}</version>
                <optional>true</optional>
            </dependency>
        </dependencies>
    </dependencyManagement>

    <build>
        <plugins>
            <plugin>
                <groupId>org.springframework.boot</groupId>
                <artifactId>spring-boot-maven-plugin</artifactId>
                <configuration>
                    <fork>true</fork>
                    <addResources>true</addResources>
                </configuration>
            </plugin>
        </plugins>
    </build>
dependencyManagement
Maven 使用dependencyManagement元素来提供了一种管理依赖版本号的方式。
通常会在一个组织或者项目的最顶层的父pom中看到。
使用pom.xml 中的dependencyManagement元素能让所有在子项目中引用一个依赖而不用显式的列出版本号。
Maven 会沿着父子层次向上走,直到找到一个拥有dependencyManagement元素的项目,然后它就会使用这个dependencyManagement元素中指定的版本号。
这样做的好处就是:如果有多个子项目都引用同一样依赖,则可以避免在每个使用的子项目里都声明一个版本号,这样当想升级或切换到另一个版本时,只需要在
顶层父容器里更新,而不需要一个一个子项目的修改﹔另外如果某个子项目需要另外的一个版本,只需要声明version就可。
dependencyManagement里只是声明依赖,并不实现引入,因此子项目需要显示的声明需要用的依赖。
02、创建子模块
1、子模块名字
cloud_provider_payment8001
2、pom依赖
 <dependencies>
        <dependency>
            <groupId>org.springframework.boot</groupId>
            <artifactId>spring-boot-starter-web</artifactId>
        </dependency>
        <dependency>
            <groupId>org.springframework.boot</groupId>
            <artifactId>spring-boot-starter-actuator</artifactId>
        </dependency>
        <dependency>
            <groupId>org.mybatis.spring.boot</groupId>
            <artifactId>mybatis-spring-boot-starter</artifactId>
        </dependency>
        <dependency>
            <groupId>com.alibaba</groupId>
            <artifactId>druid-spring-boot-starter</artifactId>
            <version>1.1.10</version>
        </dependency>
        <dependency>
            <groupId>mysql</groupId>
            <artifactId>mysql-connector-java</artifactId>
        </dependency>
        <dependency>
            <groupId>org.springframework.boot</groupId>
            <artifactId>spring-boot-starter-jdbc</artifactId>
        </dependency>
        <dependency>
            <groupId>org.springframework.boot</groupId>
            <artifactId>spring-boot-devtools</artifactId>
            <scope>runtime</scope>
            <optional>true</optional>
        </dependency>
        <dependency>
            <groupId>org.projectlombok</groupId>
            <artifactId>lombok</artifactId>
            <optional>true</optional>
        </dependency>
    </dependencies>
3、创建application.yml
server:
  port: 8001
spring:
  application:
    name: cloud-payment-service
  datasource:
    type: com.alibaba.druid.pool.DruidDataSource                            #当前数据源操作类型
    driver-class-name: com.mysql.jdbc.Driver                            #mysql驱动
    url: jdbc:mysql://localhost:3306/db2022?useUnicode=true&characterEncoding=utf-8&useSSL=false&serverTimezone=GMT%2B8
    username: root
    password: mysql729
mybatis:
  mapper-locations: classpath:mapper/*.xml
  type-aliases-package: com.example.springcloud.pojo                # 所有的entity(pojo)别名类所在包
4、主启动类
@SpringBootApplication
public class PaymentMain8001 {
    public static void main(String[] args) {
        SpringApplication.run(PaymentMain8001.class, args);
    }
}
5、业务类
1、sql
CREATE TABLE `payment`
(
    `id`     bigint(20) NOT NULL AUTO_INCREMENT COMMENT '主键',
    `serial` varchar(200) CHARACTER SET utf8 COLLATE utf8_general_ci DEFAULT NULL COMMENT '支付流水号',
    PRIMARY KEY (`id`) USING BTREE
) ENGINE = InnoDB CHARACTER SET = utf8 COLLATE = utf8_general_ci COMMENT = '支付表' ROW_FORMAT = Dynamic;

INSERT INTO `payment`
VALUES (31, '尚硅谷111');
INSERT INTO `payment`
VALUES (32, 'atguigu002');
INSERT INTO `payment`
VALUES (34, 'atguigu002');
INSERT INTO `payment`
VALUES (35, 'atguigu002');
2、实体类
@Data
@AllArgsConstructor
@NoArgsConstructor
public class Payment implements Serializable {
    private Long id;
    private String serial;
}
3、通用返回类
@Data
@NoArgsConstructor
@AllArgsConstructor
public class CommonResult<T>{
    private Integer code;
    private String message;
    private T data;

    public CommonResult(Integer code,String message){
        this(code,message,null);
    }
}
4、dao层
@Mapper
public interface PaymentDao {
    /**
     * 插入操作
     * @param payment  实体
     * @return 受影响的行数
     */
    int create(Payment payment);

    /**
     * 通过id查订单
     * @param id  订单id
     * @return  订单
     */
    Payment getPaymentById(@Param("id") Long id);
}
5、mapper 配置文件类
在resource下,创建mapper/PaymentMapper.xml
<?xml version="1.0" encoding="UTF-8"?>
<!DOCTYPE mapper PUBLIC "-//mybatis.org//DTD Mapper 3.0//EN" "http://mybatis.org/dtd/mybatis-3-mapper.dtd">
<mapper namespace="com.example.springcloud.dao.PaymentDao">
    <resultMap id="BaseResultMap" type="com.example.springcloud.pojo.Payment">
        <id column="id" property="id" jdbcType="BIGINT"/>
        <id column="serial" property="serial" jdbcType="VARCHAR"/>
    </resultMap>

    <insert id="create" parameterType="Payment" useGeneratedKeys="true" keyProperty="id">
        insert into payment(serial) values (#{serial})
    </insert>

    <select id="getPaymentById" parameterType="Long" resultMap="BaseResultMap">
        select * from payment where id = #{id}
    </select>

</mapper>
6、写service和serviceImpl
service
public interface PaymentService {
    /**
     * 插入操作
     * @param payment  实体
     * @return 受影响的行数
     */
    int create(Payment payment);

    /**
     * 通过id查订单
     * @param id  订单id
     * @return  订单
     */
    Payment getPaymentById(@Param("id") Long id);
}
serviceImpl
@Service
public class PaymentServiceImpl implements PaymentService {

    @Resource
    private PaymentDao paymentDao;

    @Override
    public int create(Payment payment) {
        return paymentDao.create(payment);
    }

    @Override
    public Payment getPaymentById(Long id) {
        return paymentDao.getPaymentById(id);
    }
}
7、controller
@Slf4j
@RestController
@RequiredArgsConstructor(onConstructor_ = @Autowired)
@RequestMapping("/payment")
public class PaymentController {
    private final PaymentService paymentService;

    @PostMapping("/create")
    public CommonResult create(Payment payment){
        int result = paymentService.create(payment);
        log.info("****插入结果*****:"+result);
        if(result > 0){
            return new CommonResult(200,"插入数据库成功",result);
        }
        return new CommonResult(444,"插入数据库失败",result);
    }

    @PostMapping("/get/{id}")
    public CommonResult getPaymentById(@PathVariable("id") Long id){
        Payment payment = paymentService.getPaymentById(id);
        log.info("****查询结果*****:"+payment);
        if(payment != null){
            return new CommonResult(200,"查询成功",payment);
        }
        return new CommonResult(444,"没有对应的记录,查询id"+id);
    }

}
03、热部署
1.Adding devtools to your project
        <dependency>
            <groupId>org.springframework.boot</groupId>
            <artifactId>spring-boot-devtools</artifactId>
            <scope>runtime</scope>
            <optional>true</optional>
        </dependency>
2.Adding plugin to your pom.xml
父类总工程
    <build>
        <plugins>
            <plugin>
                <groupId>org.springframework.boot</groupId>
                <artifactId>spring-boot-maven-plugin</artifactId>
                <configuration>
                    <fork>true</fork>
                    <addResources>true</addResources>
                </configuration>
            </plugin>
        </plugins>
    </build>
3.Enabling automatic build
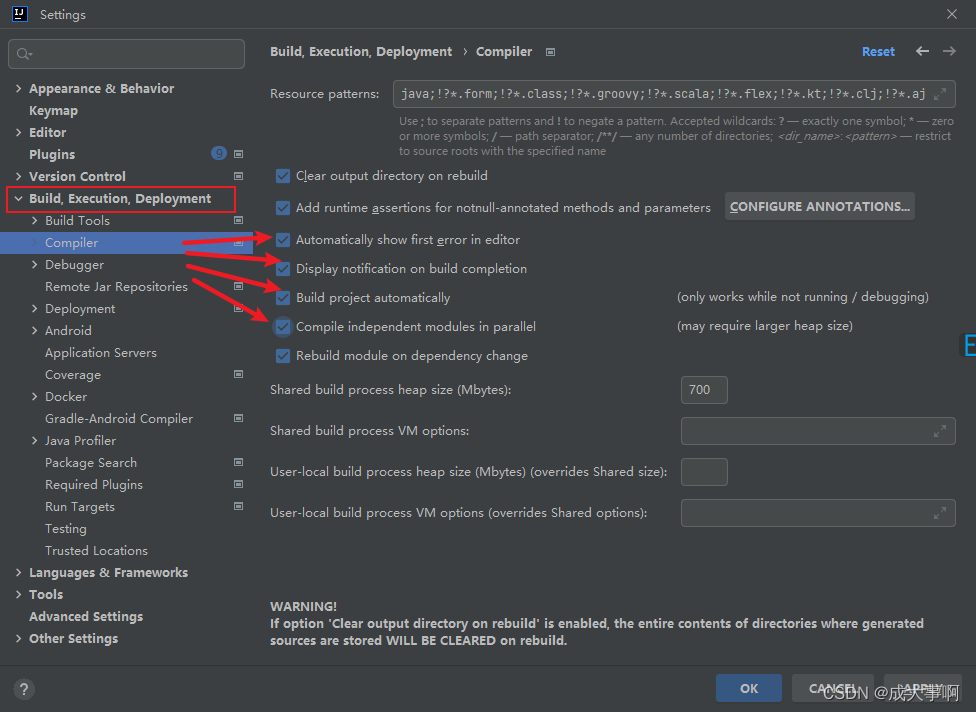
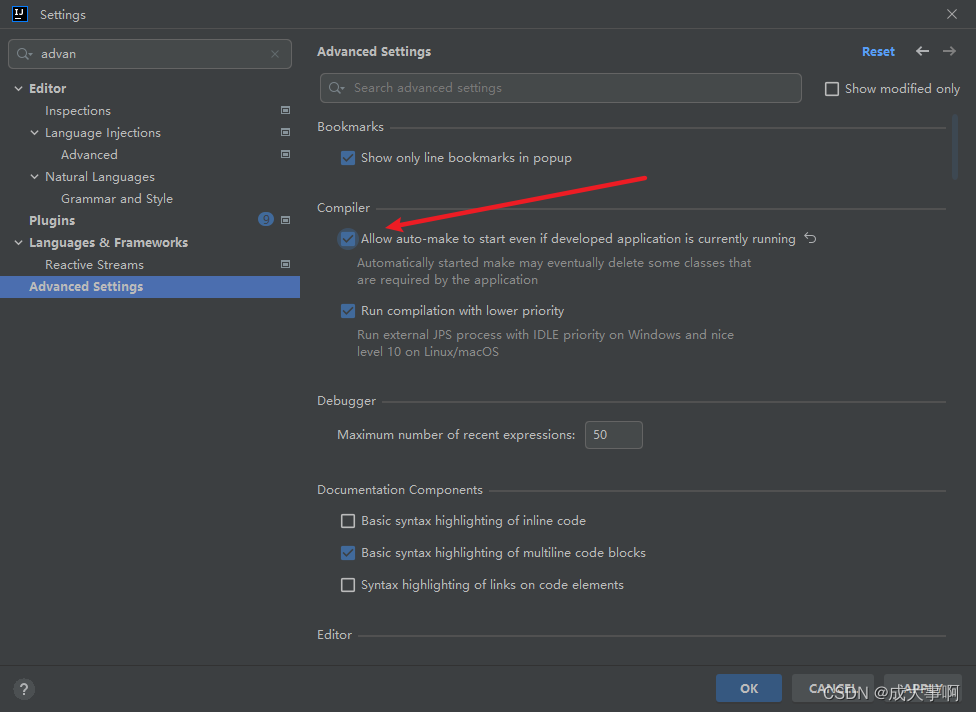
4.Updae the value of
在settings里将此勾选
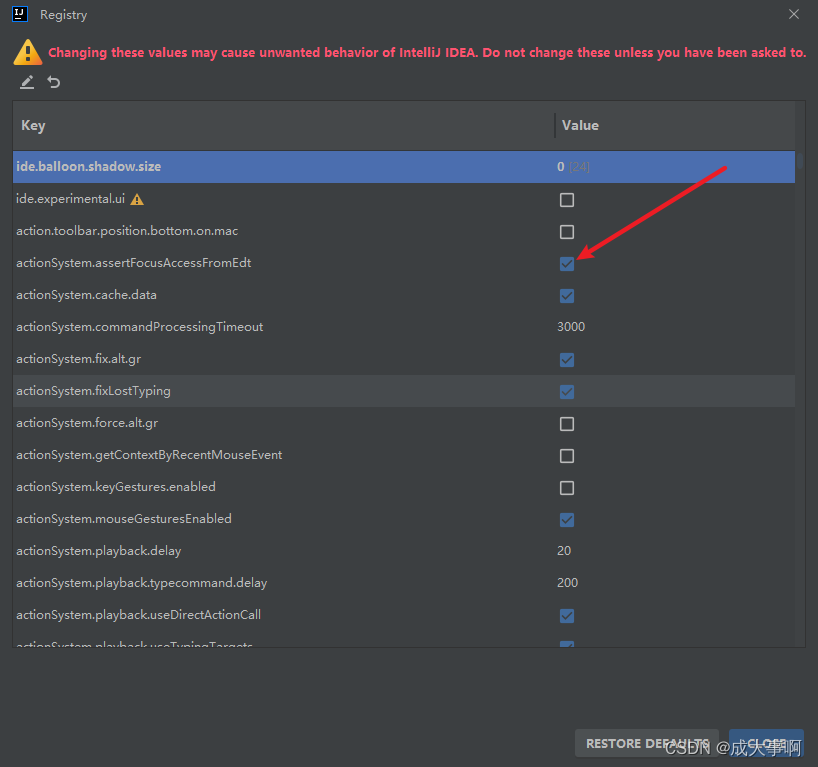
按ctrl+shift+alt+/ 选择register
将此勾选
5.重启idea
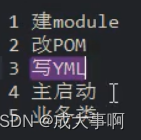
04、order模块
1.pom
<dependencies>
        <dependency>
            <groupId>org.springframework.boot</groupId>
            <artifactId>spring-boot-starter-web</artifactId>
        </dependency>
        <dependency>
            <groupId>org.springframework.boot</groupId>
            <artifactId>spring-boot-starter-actuator</artifactId>
        </dependency>
        <dependency>
            <groupId>org.springframework.boot</groupId>
            <artifactId>spring-boot-devtools</artifactId>
            <scope>runtime</scope>
            <optional>true</optional>
        </dependency>
        <dependency>
            <groupId>org.projectlombok</groupId>
            <artifactId>lombok</artifactId>
            <optional>true</optional>
        </dependency>
        <dependency>
            <groupId>org.springframework.boot</groupId>
            <artifactId>spring-boot-starter-test</artifactId>
            <scope>test</scope>
        </dependency>
    </dependencies>
2.yml配置文件
server:
  port: 80
3.主启动类
@SpringBootApplication
public class OrderMain80 {
    public static void main(String[] args) {
        SpringApplication.run(OrderMain80.class,args);
    }
}
4.复制paymant模块的实体类(pojo)
5.写controller层
因为这里是消费者类,主要是消费,那么就没有service和dao,需要调用pay模块的方法
并且这里还没有微服务的远程调用,那么如果要调用另外一个模块,则需要使用基本的api调用
使用RestTemplate调用pay模块
RestTemplate提供了多种便捷访问远程Http服务的方法,是一种简单便捷的访问restful服务模板类,是Spring提供的用于访问Rest服务的客户端模板工具集
使用:
使用restTemplate访问restful接口非常的简单粗暴无脑。(url, requestMap, ResponseBean.class)这三个参数分别代表REST请求地址、请求参数、HTTP响应转成
被转换成的对象类型。
@Slf4j
@RestController
public class OrderController {
    public static final String PAYMENT_URL = "http://localhost:8001";

    @Resource
    private RestTemplate restTemplate;

    @GetMapping("/consumer/payment/create")
    public CommonResult<Payment> create(Payment payment){
        return restTemplate.postForObject(PAYMENT_URL+"/payment/create",payment, CommonResult.class);
    }

    @GetMapping("/consumer/payment/get/{id}")
    public CommonResult<Payment> getPayment(@PathVariable("id") Long id){
        return restTemplate.getForObject(PAYMENT_URL+"/payment/get/"+id, CommonResult.class);
    }

}
05、重构
新建一个模块,将重复的代码抽取到一个公共的模块中
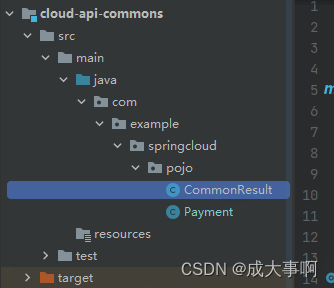
1.创建commons模块
2.抽取公共的pom
 <dependencies>
        <dependency>
            <groupId>org.springframework.boot</groupId>
            <artifactId>spring-boot-devtools</artifactId>
            <scope>runtime</scope>
            <optional>true</optional>
        </dependency>

        <dependency>
            <groupId>org.projectlombok</groupId>
            <artifactId>lombok</artifactId>
            <optional>true</optional>
        </dependency>
        <dependency>
            <groupId>cn.hutool</groupId>
            <artifactId>hutool-all</artifactId>
            <version>5.7.22</version>
        </dependency>
    </dependencies>
3.pojo类放入到commons中
4.使用maven,将commons打包(install)
其他模块删除pojo,引入commons
        <dependency>
            <groupId>org.example</groupId>
            <artifactId>cloud-api-commons</artifactId>
            <version>1.0-SNAPSHOT</version>
        </dependency>
Spring Cloud组件总结
| 组件 |
简介 |
分类 |
官网 |
笔记 |
备注 |
| Eureka |
Eureka is the Netflix Service Discovery Server and Client. |
服务注册中心 |
link |
link |
eureka中文解释:int.(因找到某物,尤指问题的答案而高兴)我发现了,我找到了 |
| Zookeeper |
ZooKeeper is a centralized service for maintaining configuration information, naming, providing distributed synchronization, and providing group services. |
服务注册中心 |
link |
link |
zookeeper中文解释:n.动物园管理员 |
| Consul |
Consul is a service mesh solution providing a full featured control plane with service discovery, configuration, and segmentation functionality. |
服务注册中心 |
link |
link |
consul中文解释:n.领事 |
| Ribbon |
Ribbon is a client-side load balancer that gives you a lot of control over the behavior of HTTP and TCP clients. |
服务调用 |
link |
link |
ribbon中文解释:n.(用于捆绑或装饰的)带子;丝带;带状物; |
| OpenFeign |
Feign is a declarative web service client. It makes writing web service clients easier. |
服务调用 |
link |
link |
feign中文意思:v.假装,装作,佯装(有某种感觉或生病、疲倦等) |
| Hystrix |
Netflix has created a library called Hystrix that implements the circuit breaker pattern. |
服务降级 |
link |
link |
hystrix中文意思:n.豪猪属;猬草属;豪猪;豪猪亚属 |
| GateWay |
Spring Cloud Gateway aims to provide a simple, yet effective way to route to APIs and provide cross cutting concerns to them such as: security, monitoring/metrics, and resiliency. |
服务网关 |
link |
link |
gateway中文意思:n.网关;途径;门道;手段 |
| Config |
Spring Cloud Config provides server-side and client-side support for externalized configuration in a distributed system. |
服务配置 |
link |
link |
- |
| Bus |
Spring Cloud Bus links nodes of a distributed system with a lightweight message broker. |
服务总线 |
link |
link |
- |
| Stream |
Spring Cloud Stream is a framework for building message-driven microservice applications. |
消息队列 |
link |
link |
- |
| Sleuth |
Spring Cloud Sleuth implements a distributed tracing solution for Spring Cloud. |
服务跟踪 |
link |
link |
sleuth中文意思:n.侦探 |
| Nacos |
Nacos致力于帮助您发现、配置和管理微服务。 |
服务注册中心、服务配置、服务总线 |
link |
link |
NAme + COnfiguration + Service |
| Sentinel |
Sentinel是面向分布式服务架构的流量控制组件,主要以流量为切入点,从流量控制、熔断降级、系统自适应保护等多个维度来帮助您保障微服务的稳定性。 |
服务降级 |
link |
link |
sentinel中文意思:n.哨兵 |
| Seata |
Seata 是一款开源的分布式事务解决方案,致力于在微服务架构下提供高性能和简单易用的分布式事务服务。 |
分布式事务 |
link |
link |
- |