一、原理:
这项任务的目标是编写一个图像过滤功能,并使用它来创建混合图像,使用Oliva,Torralba和Schyns 的SIGGRAPH 2006 论文的简化版本。 混合图像是静态图像,其在解释中随观看距离而变化。基本思想是高频率在可用时倾向于支配感知,但是,在远处,只能看到信号的低频(平滑)部分。通过将一个图像的高频部分与另一个图像的低频部分混合,您可以获得混合图像,从而在不同距离处产生不同的解释。
二、目的:
对不同图像分别进行高通和低通滤波,融合图片。
三、步骤:
图像过滤。图像过滤(或卷积)是一种基本的图像处理工具。您将编写自己的函数以从头开始实现图像过滤。更具体地说,您将实现 在OpenCV库中my_imfilter()模仿该filter2D函数。如上所述student.py,您的过滤算法必须
(1)支持灰度和彩色图像
(2)支持任意形状的滤镜,只要两个尺寸都是奇数(例如7x9滤镜但不是4x5滤镜)
(3)用零填充输入图像或反射图像内容和
(4)返回与输入图像具有相同分辨率的滤波图像。
混合图像。混合图像是一个图像的低通滤波版本和第二图像的高通滤波版本的总和。有一个自由参数,其可被调谐为每个图像对,其控制多少高频到从所述第一图像和多少低频到所述第二图像中离开除去。这被称为“截止频率”。在论文中,建议使用两个截止频率(每个图像调整一个),你也可以自由尝试。在起始码中,通过改变用于构造混合图像的Gausian滤波器的标准偏差来控制截止频率。您将create_hybrid_image()根据入门代码实现student.py。你的功能会打电话my_imfilter() 创建低频和高频图像,然后将它们组合成混合图像。
四、环境配置:
Windows:
CPU: Intel® Core™ i7-6700HQ CPU @ 2.60GHz
Cache: L1:256KB
L2:1.0MB,
L3:6.0MB
开发环境:python 3.10
五、具体操作:
1. 利用滤波函数操作图像
my_imfilter()实现
1.	def my_imfilter1(image, filter):
2.	    """
3.	    Your function should meet the requirements laid out on the project webpage.
4.	    Apply a filter to an image. Return the filtered image.
5.	    Inputs:
6.	    - image -> numpy nd-array of dim (m, n, c)
7.	    - filter -> numpy nd-array of odd dim (k, l)
8.	    Returns
9.	    - filtered_image -> numpy nd-array of dim (m, n, c)
10.	    Errors if:
11.	    - filter has any even dimension -> raise an Exception with a suitable error message.
12.	    """
13.	    filter_reshape = filter.reshape(-1,1)
14.	    filter_size = filter.size
15.	    filter_size_sqrt = round(math.sqrt(filter_size))
16.	    filter_size_floor = math.floor(filter_size_sqrt/2)
17.	    filtered_image = np.zeros(image.shape)
18.	    image_padding = np.zeros([image.shape[0] + 2 * filter_size_floor,
19.	         image.shape[1] + 2 * filter_size_floor, image.shape[2]])
20.	    image_padding[filter_size_floor:image_padding.shape[0]-filter_size_floor,
21.	         filter_size_floor:image_padding.shape[1]-filter_size_floor] = image
22.	    for i in range(image.shape[0]):
23.	        for j in range(image.shape[1]):
24.	            convolute_image = image_padding[i:i+filter_size_sqrt, j:j+filter_size_sqrt]
25.	            reshape_image = np.reshape(convolute_image[0:filter_size_sqrt,
26.	                 0:filter_size_sqrt], (filter_size,3))
27.	            filtered_image[i,j] = sum(np.multiply(reshape_image, filter_reshape))
28.	    return filtered_image
2. 生成高低通分量滤除图片,图像融合
gen_hybrid_image()实现
1.	def gen_hybrid_image(image1, image2, cutoff_frequency):
2.	    """
3.	     Inputs:
4.	     - image1 -> The image from which to take the low frequencies.
5.	     - image2 -> The image from which to take the high frequencies.
6.	     - cutoff_frequency -> The standard deviation, in pixels, of the Gaussian
7.	                           blur that will remove high frequencies.
8.
9.	     Task:
10.	     - Use my_imfilter to create 'low_frequencies' and 'high_frequencies'.
11.	     - Combine them to create 'hybrid_image'.
12.	    """
13.
14.	    assert image1.shape[0] == image2.shape[0]
15.	    assert image1.shape[1] == image2.shape[1]
16.	    assert image1.shape[2] == image2.shape[2]
17.
18.	    # Steps: (1) Remove the high frequencies from image1 by blurring it.
19.	    #  The amount of blur that works best will vary
20.	    #  with different image pairs generate a 1x(2k+1) gaussian kernel with mean=0 and sigma = s,
21.	    # see https://stackoverflow.com/questions/17190649/how-to-obtain-a-gaussian-filter-in-python
22.	    s, k = cutoff_frequency, cutoff_frequency * 2
23.	    probs = np.asarray([exp(-z * z / (2 * s * s)) / sqrt(2 * pi * s * s) for z in range(-k, k + 1)], dtype=np.float32)
24.	    kernel = np.outer(probs, probs)
25.	    large_1d_blur_filter = kernel.reshape(-1,1)
26.
27.	    # Your code here:
28.	    large_blur_image1 = my_imfilter1(image1, large_1d_blur_filter)
29.	    low_frequencies = large_blur_image1
30.
31.	    # (2) Remove the low frequencies from image2. The easiest way to do this is to
32.	    #     subtract a blurred version of image2 from the original version of image2.
33.	    #     This will give you an image centered at zero with negative values.
34.	    # Your code here #
35.	    large_blur_image2 = my_imfilter1(image2, large_1d_blur_filter)
36.	    # large_blur_image2 = my_imfilter(large_blur_image2, large_1d_blur_filter.T)
37.	    high_frequencies = image2 - large_blur_image2  # Replace with your implementation
38.
39.	    # (3) Combine the high frequencies and low frequencies
40.	    # Your code here #
41.	    hybrid_image = low_frequencies + high_frequencies  # Replace with your implementation
42.
43.	    # (4) At this point, you need to be aware that values larger than 1.0
44.	    # or less than 0.0 may cause issues in the functions in Python for saving
45.	    # images to disk. These are called in proj1_part2 after the call to
46.	    # gen_hybrid_image().
47.	    # One option is to clip (also called clamp) all values below 0.0 to 0.0,
48.	    # and all values larger than 1.0 to 1.0.
49.	    for i in range(hybrid_image.shape[0]):
50.	        for j in range(hybrid_image.shape[1]):
51.	            for k in range(hybrid_image.shape[2]):
52.	                if hybrid_image[i,j,k] > 1.0:
53.	                    hybrid_image[i,j,k] = 1.0
54.	                if hybrid_image[i,j,k] < 0.0:
55.	                    hybrid_image[i,j,k] = 0.0
56.	    return low_frequencies, high_frequencies, hybrid_image
3. 主函数
防止存储失败做了一些判断
1.	# Project Image Filtering and Hybrid Images - Generate Hybrid Image
2.	# Based on previous and current work
3.	# by James Hays for CSCI 1430 @ Brown and
4.	# CS 4495/6476 @ Georgia Tech
5.	import numpy as np
6.	import matplotlib
7.	import matplotlib.pyplot as plt
8.	from helpers import vis_hybrid_image, load_image, save_image, my_imfilter, gen_hybrid_image, gen_hybrid_image_cv
9.
10.	# Before trying to construct hybrid images, it is suggested that you
11.	# implement my_imfilter in helpers.py and then debug it using proj1_part1.py
12.
13.	# Debugging tip: You can split your python code and print in between
14.	# to check if the current states of variables are expected.
15.
16.	## Setup
17.	# Read images and convert to floating point format
18.	image1 = load_image('../data/bird.bmp')
19.	image2 = load_image('../data/plane.bmp')
20.
21.	# display the dog and cat images
22.	# plt.figure(figsize=(3,3)); plt.imshow((image1*255).astype(np.uint8));#
23.	# plt.figure(figsize=(3,3)); plt.imshow((image2*255).astype(np.uint8));
24.
25.	# For your write up, there are several additional test cases in 'data'.
26.	# Feel free to make your own, too (you'll need to align the images in a
27.	# photo editor such as Photoshop).
28.	# The hybrid images will differ depending on which image you
29.	# assign as image1 (which will provide the low frequencies) and which image
30.	# you asign as image2 (which will provide the high frequencies)
31.
32.	## Hybrid Image Construction ##
33.	# cutoff_frequency is the standard deviation, in pixels, of the Gaussian#
34.	# blur that will remove high frequencies. You may tune this per image pair
35.	# to achieve better results.
36.	cutoff_frequency = 7
37.	low_frequencies, high_frequencies, hybrid_image = gen_hybrid_image_cv(image1, image2, cutoff_frequency)
38.
39.	## Visualize and save outputs ##
40.	plt.figure(); plt.imshow((low_frequencies*255).astype(np.uint8));
41.	plt.figure(); plt.imshow(((high_frequencies+0.5)*255).astype(np.uint8));
42.	vis = vis_hybrid_image(hybrid_image)
43.	plt.figure(figsize=(20, 20)); plt.imshow(vis);
44.	high_frequencies_plus = high_frequencies+0.5
45.
46.	for i in range(high_frequencies_plus.shape[0]):
47.	        for j in range(high_frequencies_plus.shape[1]):
48.	            for k in range(high_frequencies_plus.shape[2]):
49.	                if high_frequencies_plus[i,j,k] > 1.0:
50.	                    high_frequencies_plus[i,j,k] = 1.0
51.	                if high_frequencies_plus[i,j,k] < 0.0:
52.	                    high_frequencies_plus[i,j,k] = 0.0
53.
54.	save_image('../results/low_frequencies.jpg', low_frequencies)
55.	save_image('../results/high_frequencies.jpg', high_frequencies_plus)
56.	save_image('../results/hybrid_image.jpg', hybrid_image)
57.	save_image('../results/hybrid_image_scales.jpg', vis)
六、实验数据及结果分析
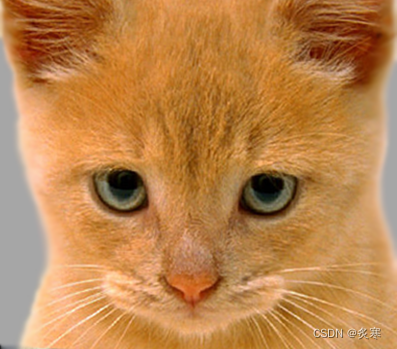
两个原始图像如下所示:

1. 自己实现的滤波函数my_imfilter()
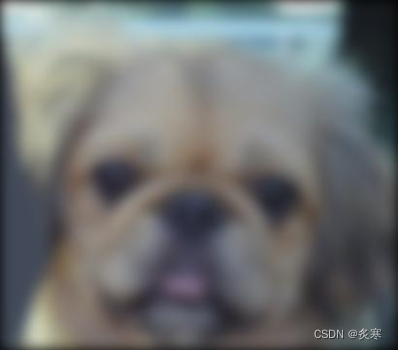
这些图像的低通(模糊)和高通版本如下所示:
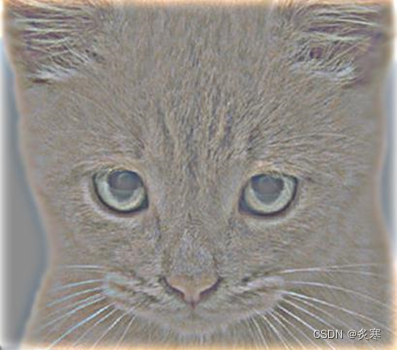
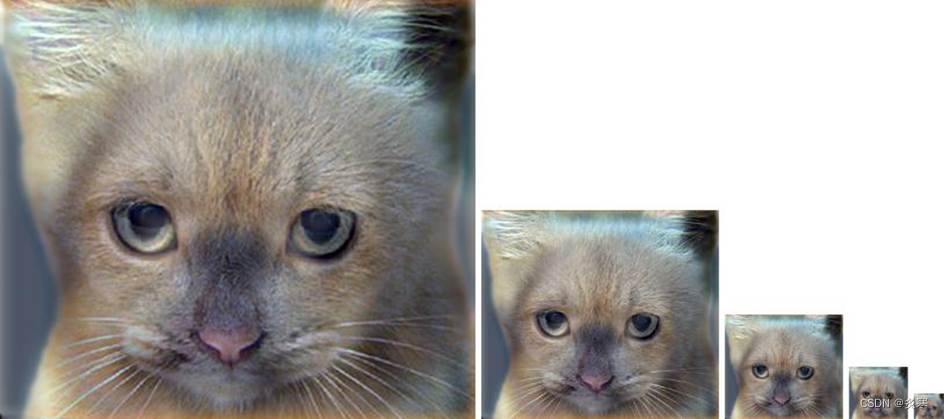
高频图像实际上是零均值,负值,因此通过添加0.5可视化。在得到的可视化中,亮值为正,暗值为负。可视化效果的有用方法是逐步对混合图像进行下采样,如下所示: