在Spring中,那些组成应用程序的主体及由Spring IoC容器所管理的对象,被称之为bean。简单地讲,bean就是由IoC容器初始化、装配及管理的对象,除此之外,bean就与应用程序中的其他对象没有什么区别了。而bean的定义以及bean相互间的依赖关系将通过配置元数据来描述。
Spring中的bean默认都是单例的,对于Web应用来说,Web容器对于每个用户请求都创建一个单独的Sevlet线程来处理请求,引入Spring框架之后,每个Action都是单例的,那么对于Spring托管的单例Service Bean,Spring的单例是基于BeanFactory也就是Spring容器的,单例Bean在此容器内只有一个,Java的单例是基于JVM,每个JVM内只有一个实例。
1、bean的作用域
创建一个bean定义,其实质是用该bean定义对应的类来创建真正实例的“配方”。把bean定义看成一个配方很有意义,它与class很类似,只根据一张“处方”就可以创建多个实例。不仅可以控制注入到对象中的各种依赖和配置值,还可以控制该对象的作用域。这样可以灵活选择所建对象的作用域,而不必在Java Class级定义作用域。Spring Framework支持五种作用域,分别阐述如下表。
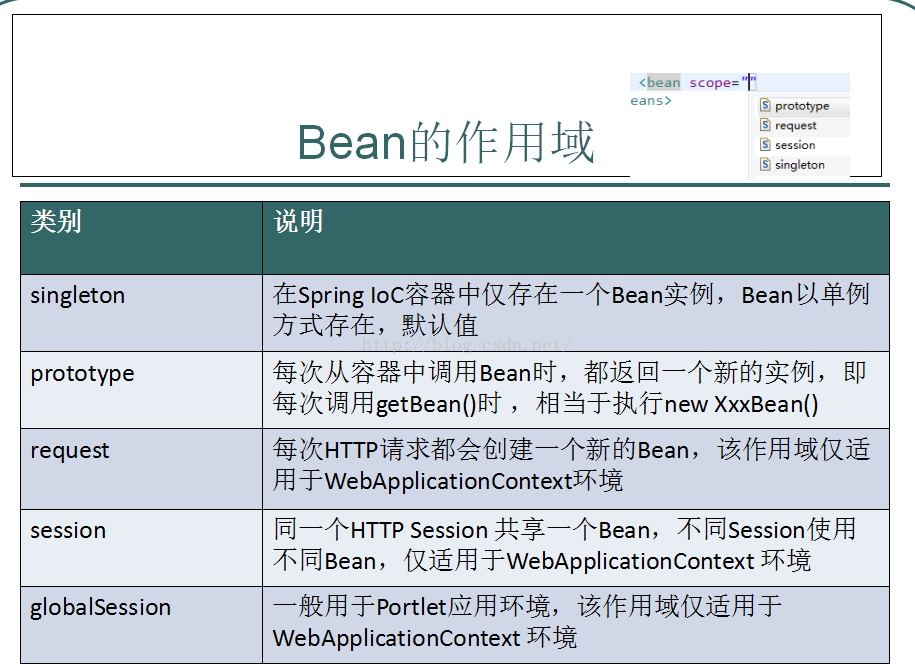
五种作用域中,request、session和global session三种作用域仅在基于web的应用中使用(不必关心你所采用的是什么web应用框架),只能用在基于web的Spring ApplicationContext环境。
(1)当一个bean的作用域为Singleton,那么Spring IoC容器中只会存在一个共享的bean实例,并且所有对bean的请求,只要id与该bean定义相匹配,则只会返回bean的同一实例。Singleton是单例类型,就是在创建起容器时就同时自动创建了一个bean的对象,不管你是否使用,他都存在了,每次获取到的对象都是同一个对象。注意,Singleton作用域是Spring中的缺省作用域。要在XML中将bean定义成singleton,可以这样配置:
<bean id="ServiceImpl" class="cn.csdn.service.ServiceImpl" scope="singleton">
(2)当一个bean的作用域为Prototype,表示一个bean定义对应多个对象实例。Prototype作用域的bean会导致在每次对该bean请求(将其注入到另一个bean中,或者以程序的方式调用容器的getBean()方法)时都会创建一个新的bean实例。Prototype是原型类型,它在我们创建容器的时候并没有实例化,而是当我们获取bean的时候才会去创建一个对象,而且我们每次获取到的对象都不是同一个对象。根据经验,对有状态的bean应该使用prototype作用域,而对无状态的bean则应该使用singleton作用域。在XML中将bean定义成prototype,可以这样配置:
<bean id="account" class="com.foo.DefaultAccount" scope="prototype"/>
<bean id="account" class="com.foo.DefaultAccount" singleton="false"/>
(3)当一个bean的作用域为Request,表示在一次HTTP请求中,一个bean定义对应一个实例;即每个HTTP请求都会有各自的bean实例,它们依据某个bean定义创建而成。该作用域仅在基于web的Spring ApplicationContext情形下有效。考虑下面bean定义:
<bean id="loginAction" class=com.foo.LoginAction" scope="request"/>
针对每次HTTP请求,Spring容器会根据loginAction bean的定义创建一个全新的LoginAction bean实例,且该loginAction bean实例仅在当前HTTP request内有效,因此可以根据需要放心的更改所建实例的内部状态,而其他请求中根据loginAction bean定义创建的实例,将不会看到这些特定于某个请求的状态变化。当处理请求结束,request作用域的bean实例将被销毁。
(4)当一个bean的作用域为Session,表示在一个HTTP Session中,一个bean定义对应一个实例。该作用域仅在基于web的Spring ApplicationContext情形下有效。考虑下面bean定义:
<bean id="userPreferences" class="com.foo.UserPreferences" scope="session"/>
针对某个HTTP Session,Spring容器会根据userPreferences bean定义创建一个全新的userPreferences bean实例,且该userPreferences bean仅在当前HTTP Session内有效。与request作用域一样,可以根据需要放心的更改所创建实例的内部状态,而别的HTTP Session中根据userPreferences创建的实例,将不会看到这些特定于某个HTTP Session的状态变化。当HTTP Session最终被废弃的时候,在该HTTP Session作用域内的bean也会被废弃掉。
(5)当一个bean的作用域为Global Session,表示在一个全局的HTTP Session中,一个bean定义对应一个实例。典型情况下,仅在使用portlet context的时候有效。该作用域仅在基于web的Spring ApplicationContext情形下有效。考虑下面bean定义:
<bean id="user" class="com.foo.Preferences "scope="globalSession"/>
global session作用域类似于标准的HTTP Session作用域,不过仅仅在基于portlet的web应用中才有意义。Portlet规范定义了全局Session的概念,它被所有构成某个portlet web应用的各种不同的portlet所共享。在global session作用域中定义的bean被限定于全局portlet Session的生命周期范围内。
2、bean的生命周期
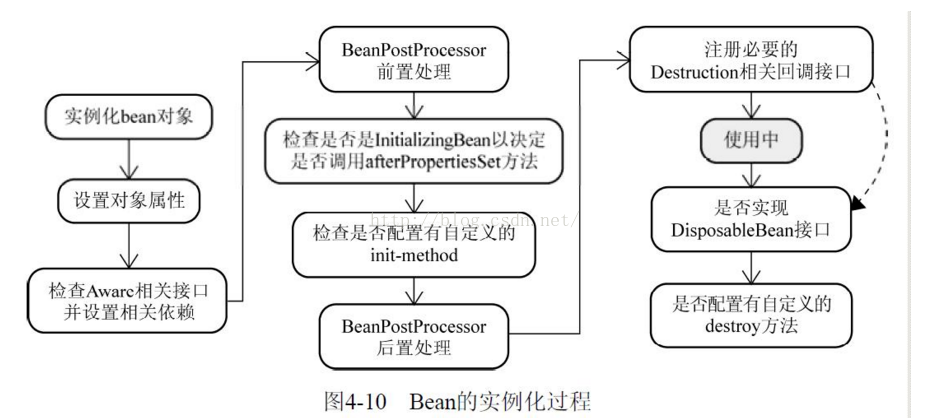
Spring中Bean的实例化过程:
Bean的生命周期:
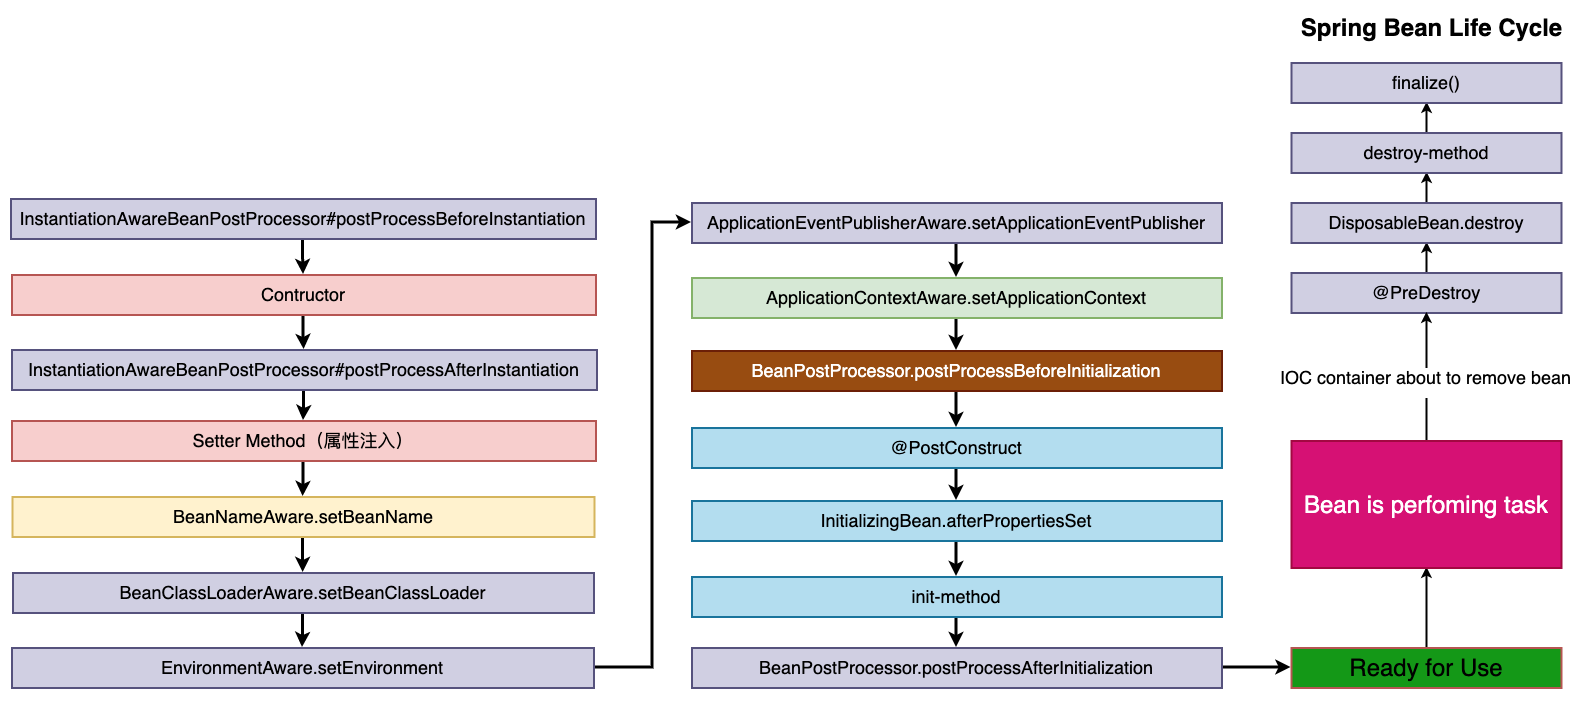
Bean实例生命周期的执行过程如下:
-
Spring对bean进行实例化,默认bean是单例;
-
Spring对bean进行依赖注入;
-
如果bean实现了BeanNameAware接口,Spring将bean的名称传给setBeanName()方法;
-
如果bean实现了BeanFactoryAware接口,Spring将调用setBeanFactory()方法,将BeanFactory实例传进来;
-
如果bean实现了ApplicationContextAware接口,它的setApplicationContext()方法将被调用,将应用上下文的引用传入到bean中;
-
如果bean实现了BeanPostProcessor接口,它的postProcessBeforeInitialization()方法将被调用;
-
如果bean中有方法添加了@PostConstruct注解,那么该方法将被调用;
-
如果bean实现了InitializingBean接口,spring将调用它的afterPropertiesSet()接口方法,类似的如果bean使用了init-method属性声明了初始化方法,该方法也会被调用;
-
如果在xml文件中通过<bean>标签的init-method元素指定了初始化方法,那么该方法将被调用;
-
如果bean实现了BeanPostProcessor接口,它的postProcessAfterInitialization()接口方法将被调用;
-
此时bean已经准备就绪,可以被应用程序使用了,他们将一直驻留在应用上下文中,直到该应用上下文被销毁;
-
如果bean中有方法添加了@PreDestroy注解,那么该方法将被调用;
-
若bean实现了DisposableBean接口,spring将调用它的distroy()接口方法。同样的,如果bean使用了destroy-method属性声明了销毁方法,则该方法被调用;
这里特别说明一下Aware接口,Spring的依赖注入最大亮点就是所有的Bean对Spring容器的存在是没有意识的。但是在实际项目中,我们有时不可避免的要用到Spring容器本身提供的资源,这时候要让 Bean主动意识到Spring容器的存在,才能调用Spring所提供的资源,这就是Spring的Aware接口,Aware接口是个标记接口,标记这一类接口是用来“感知”属性的,Aware的众多子接口则是表征了具体要“感知”什么属性。例如BeanNameAware接口用于“感知”自己的名称,ApplicationContextAware接口用于“感知”自己所处的上下文。其实Spring的Aware接口是Spring设计为框架内部使用的,在大多数情况下,我们不需要使用任何Aware接口,除非我们真的需要它们,实现了这些接口会使应用层代码耦合到Spring框架代码中。
其实很多时候我们并不会真的去实现上面所描述的那些接口,那么下面我们就除去那些接口,针对bean的单例和非单例来描述下bean的生命周期:
2.1 单例管理的对象
当scope="singleton",即默认情况下,会在启动容器时(即实例化容器时)时实例化。但我们可以指定Bean节点的lazy-init="true"来延迟初始化bean,这时候,只有在第一次获取bean时才会初始化bean,即第一次请求该bean时才初始化。如下配置:
<bean id="serviceImpl" class="cn.csdn.service.ServiceImpl" lazy-init="true"/>
如果想对所有的默认单例bean都应用延迟初始化,可以在根节点beans设置default-lazy-init属性为true,如下所示:
<beans default-lazy-init="true">
默认情况下,Spring在读取xml文件的时候,就会创建对象。在创建对象的时候先调用构造器,然后调用init-method属性值中所指定的方法。对象在被销毁的时候,会调用destroy-method属性值中所指定的方法(例如调用Container.destroy()方法的时候)。写一个测试类,代码如下:
public class LifeBean {
	private String name;

    public LifeBean(){
        System.out.println("LifeBean()构造函数");
    }
    public String getName() {
        return name;
    }

    public void setName(String name) {
        System.out.println("setName()");
        this.name = name;
    }

    public void init(){
        System.out.println("this is init of lifeBean");
    }

    public void destory(){
        System.out.println("this is destory of lifeBean " + this);
    }
}
life.xml配置如下:
<bean id="life_singleton" class="com.bean.LifeBean" scope="singleton"
			init-method="init" destroy-method="destory" lazy-init="true"/>
测试代码如下:
public class LifeTest {
	@Test
	public void test() {
		AbstractApplicationContext container =
		new ClassPathXmlApplicationContext("life.xml");
		LifeBean life1 = (LifeBean)container.getBean("life");
		System.out.println(life1);
		container.close();
	}
}
运行结果如下:
LifeBean()构造函数
this is init of lifeBean
com.bean.LifeBean@573f2bb1
……
this is destory of lifeBean com.bean.LifeBean@573f2bb1
2.2 非单例管理的对象
当scope="prototype"时,容器也会延迟初始化bean,Spring读取xml文件的时候,并不会立刻创建对象,而是在第一次请求该bean时才初始化(如调用getBean方法时)。在第一次请求每一个prototype的bean时,Spring容器都会调用其构造器创建这个对象,然后调用init-method属性值中所指定的方法。对象销毁的时候,Spring容器不会帮我们调用任何方法,因为是非单例,这个类型的对象有很多个,Spring容器一旦把这个对象交给你之后,就不再管理这个对象了。
为了测试prototype bean的生命周期life.xml配置如下:
<bean id="life_prototype" class="com.bean.LifeBean" scope="prototype" init-method="init" destroy-method="destory"/>
测试程序如下:
public class LifeTest {
	@Test
	public void test() {
		AbstractApplicationContext container = new ClassPathXmlApplicationContext("life.xml");
		LifeBean life1 = (LifeBean)container.getBean("life_singleton");
		System.out.println(life1);

		LifeBean life3 = (LifeBean)container.getBean("life_prototype");
		System.out.println(life3);
		container.close();
	}
}
运行结果如下:
LifeBean()构造函数
this is init of lifeBean
com.bean.LifeBean@573f2bb1
LifeBean()构造函数
this is init of lifeBean
com.bean.LifeBean@5ae9a829
……
this is destory of lifeBean com.bean.LifeBean@573f2bb1
可以发现,对于作用域为prototype的bean,其destroy方法并没有被调用。如果bean的scope设为prototype时,当容器关闭时,destroy方法不会被调用。对于prototype作用域的bean,有一点非常重要,那就是Spring不能对一个prototype bean的整个生命周期负责:容器在初始化、配置、装饰或者是装配完一个prototype实例后,将它交给客户端,随后就对该prototype实例不闻不问了。不管何种作用域,容器都会调用所有对象的初始化生命周期回调方法。但对prototype而言,任何配置好的析构生命周期回调方法都将不会被调用。清除prototype作用域的对象并释放任何prototype bean所持有的昂贵资源,都是客户端代码的职责(让Spring容器释放被prototype作用域bean占用资源的一种可行方式是,通过使用bean的后置处理器,该处理器持有要被清除的bean的引用)。谈及prototype作用域的bean时,在某些方面你可以将Spring容器的角色看作是Java new操作的替代者,任何迟于该时间点的生命周期事宜都得交由客户端来处理。
Spring容器可以管理singleton作用域下bean的生命周期,在此作用域下,Spring能够精确地知道bean何时被创建,何时初始化完成,以及何时被销毁。而对于prototype作用域的bean,Spring只负责创建,当容器创建了bean的实例后,bean的实例就交给了客户端的代码管理,Spring容器将不再跟踪其生命周期,并且不会管理那些被配置成prototype作用域的bean的生命周期。
2.3 引申
在学习Spring IoC过程中发现,每次产生ApplicationContext工厂的方式是:
ApplicationContext applicationContext = new ClassPathXmlApplicationContext("applicationContext.xml");
这样产生ApplicationContext就有一个弊端,每次访问加载bean的时候都会产生这个工厂,所以这里需要解决这个问题。
ApplicationContext是一个接口,它继承自BeanFactory接口,除了包含BeanFactory的所有功能之外,在国际化支持、资源访问(如URL和文件)、事件传播等方面进行了良好的支持。
解决问题的方法很简单,在web容器启动的时候将ApplicationContext转移到ServletContext中,因为在web应用中所有的Servlet都共享一个ServletContext对象。那么我们就可以利用ServletContextListener去监听ServletContext事件,当web应用启动的是时候,我们就将ApplicationContext装载到ServletContext中。 Spring容器底层已经为我们想到了这一点,在spring-web-xxx-release.jar包中有一个已经实现了ServletContextListener接口的类ContextLoader,其源码如下:
public class ContextLoaderListener extends ContextLoader implements ServletContextListener {
	private ContextLoader contextLoader;

	public ContextLoaderListener() {

	}

	public ContextLoaderListener(WebApplicationContext context) {
		super(context);
	}

	public void contextInitialized(ServletContextEvent event) {
		this.contextLoader = createContextLoader();
		if (this.contextLoader == null) {
			this.contextLoader = this;
		}
		this.contextLoader.initWebApplicationContext(event.getServletContext());
	}

	@Deprecated
	protected ContextLoader createContextLoader() {
		return null;
	}

	@Deprecated
	public ContextLoader getContextLoader() {
		return this.contextLoader;
	}

	public void contextDestroyed(ServletContextEvent event) {
		if (this.contextLoader != null) {
		this.contextLoader.closeWebApplicationContext(event.getServletContext());
		}
		ContextCleanupListener.cleanupAttributes(event.getServletContext());
	}
}
这里就监听到了servletContext的创建过程, 那么 这个类又是如何将applicationContext装入到serveletContext容器中的呢?
this.contextLoader.initWebApplicationContext(event.getServletContext())方法的具体实现中:
public WebApplicationContext initWebApplicationContext(ServletContext servletContext) {
if (servletContext.getAttribute(WebApplicationContext.ROOT_WEB_APPLICATION_CONTEXT_ATTRIBUTE) != null) {
throw new IllegalStateException(
"Cannot initialize context because there is already a root application context present - " +
"check whether you have multiple ContextLoader* definitions in your web.xml!");
}
Log logger = LogFactory.getLog(ContextLoader.class);
servletContext.log("Initializing Spring root WebApplicationContext");
if (logger.isInfoEnabled()) {
logger.info("Root WebApplicationContext: initialization started");
}
long startTime = System.currentTimeMillis();
try {
if (this.context == null) {
this.context = createWebApplicationContext(servletContext);
}
if (this.context instanceof ConfigurableWebApplicationContext) {
ConfigurableWebApplicationContext cwac = (ConfigurableWebApplicationContext) this.context;
if (!cwac.isActive()) {
if (cwac.getParent() == null) {
ApplicationContext parent = loadParentContext(servletContext);
cwac.setParent(parent);
}
configureAndRefreshWebApplicationContext(cwac, servletContext);
}
}
servletContext.setAttribute(WebApplicationContext.ROOT_WEB_APPLICATION_CONTEXT_ATTRIBUTE, this.context);
ClassLoader ccl = Thread.currentThread().getContextClassLoader();
if (ccl == ContextLoader.class.getClassLoader()) {
currentContext = this.context;
}
else if (ccl != null) {
currentContextPerThread.put(ccl, this.context);
}
if (logger.isDebugEnabled()) {
logger.debug("Published root WebApplicationContext as ServletContext attribute with name [" +
WebApplicationContext.ROOT_WEB_APPLICATION_CONTEXT_ATTRIBUTE + "]");
}
if (logger.isInfoEnabled()) {
long elapsedTime = System.currentTimeMillis() - startTime;
logger.info("Root WebApplicationContext: initialization completed in " + elapsedTime + " ms");
}
return this.context;
}
catch (RuntimeException ex) {
logger.error("Context initialization failed", ex);
servletContext.setAttribute(WebApplicationContext.ROOT_WEB_APPLICATION_CONTEXT_ATTRIBUTE, ex);
throw ex;
}
catch (Error err) {
logger.error("Context initialization failed", err);
servletContext.setAttribute(WebApplicationContext.ROOT_WEB_APPLICATION_CONTEXT_ATTRIBUTE, err);
throw err;
}
}
这里的重点是servletContext.setAttribute(WebApplicationContext.ROOT_WEB_APPLICATION_CONTEXT_ATTRIBUTE, this.context),用key:WebApplicationContext.ROOT_WEB_APPLICATION_CONTEXT_ATTRIBUTE value: this.context的形式将applicationContext装载到servletContext中了。另外从上面的一些注释我们可以看出: WEB-INF/applicationContext.xml, 如果我们项目中的配置文件不是这么一个路径的话 那么我们使用ContextLoaderListener 就会出问题, 所以我们还需要在web.xml中配置我们的applicationContext.xml配置文件的路径。
<listener>
	<listener-class>org.springframework.web.context.ContextLoaderListener</listener-class>
</listener>

<context-param>
	<param-name>contextConfigLocation</param-name>
	<param-value>classpath:applicationContext.xml</param-value>
</context-param>
剩下的就是在项目中开始使用 servletContext中装载的applicationContext对象了: 那么这里又有一个问题,装载时的key是 WebApplicationContext.ROOT_WEB_APPLICATION_CONTEXT_ATTRIBUTE,我们在代码中真的要使用这个吗? 其实Spring为我们提供了一个工具类WebApplicationContextUtils,接着我们先看下如何使用,然后再去看下这个工具类的源码:
WebApplicationContext applicationContext = WebApplicationContextUtils.getWebApplicationContext(request.getServletContext());
接着来看下这个工具类的源码:
public static WebApplicationContext getWebApplicationContext(ServletContext sc) {
	return getWebApplicationContext(sc, WebApplicationContext.ROOT_WEB_APPLICATION_CONTEXT_ATTRIBUTE);
}
这里就能很直观清晰地看到 通过key值直接获取到装载到servletContext中的 applicationContext对象了。
ContextLoaderListener监听器的作用就是启动Web容器时,自动装配ApplicationContext的配置信息,因为它实现了ServletContextListener这个接口,在web.xml配置这个监听器,启动容器时,就会默认执行它实现的方法。在ContextLoaderListener中关联了ContextLoader这个类,整个加载配置过程由ContextLoader来完成。
本文内容由网友自发贡献,版权归原作者所有,本站不承担相应法律责任。如您发现有涉嫌抄袭侵权的内容,请联系:hwhale#tublm.com(使用前将#替换为@)