一、SpringBoot概述
SpringBoot是一个JavaWeb应用程序的开发框架,该框架通过应用约定大于配置的核心思想,默认进行了很多设置以简化开发,从而避免了传统Spring应用开发的复杂配置过程。
优点:
- 快速入门Spring开发
- 开箱即用,提供大量默认配置简化开发
- 提供一系列大型项目通用的非功能性功能(例如嵌入式服务器,安全性,指标,运行状况检查和外部化配置)。
- 没有冗余代码和复杂配置
一个简单地示例程序
接下来通过一个最基本的helloworld程序来体现SpringBoot框架的便捷性。
环境:jdk1.8 / Maven 3.6.2/ SpringBoot 2.3.4
开发工具:IDEA
- 创建一个新项目

- 填写项目信息

- 选择初始化的组件(根据所需选择,这里我们只选Web组件中的Spring Web)
- 填写项目名和路径
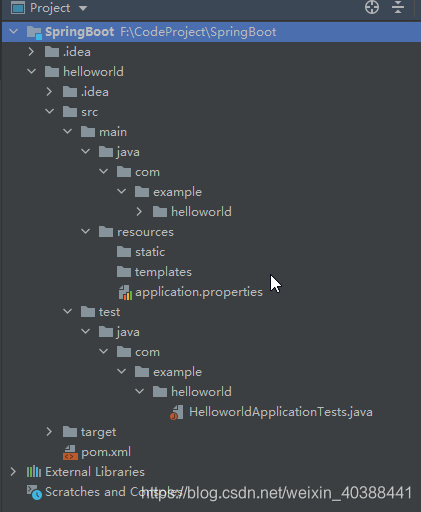
至此,便生成了一个最简单的SpringBoot应用程序。
查看pom.xml,可发现默认包含四个依赖,作用已经在文件中注释。
<?xml version="1.0" encoding="UTF-8"?>
<project xmlns="http://maven.apache.org/POM/4.0.0" xmlns:xsi="http://www.w3.org/2001/XMLSchema-instance"
         xsi:schemaLocation="http://maven.apache.org/POM/4.0.0 https://maven.apache.org/xsd/maven-4.0.0.xsd">
    <modelVersion>4.0.0</modelVersion>
    <parent>
        <groupId>org.springframework.boot</groupId>
        <artifactId>spring-boot-starter-parent</artifactId>
        <version>2.3.4.RELEASE</version>
        <relativePath/> <!-- lookup parent from repository -->
    </parent>
    <groupId>com.lee</groupId>
    <artifactId>springboot-02</artifactId>
    <version>0.0.1-SNAPSHOT</version>
    <name>springboot-02</name>
    <description>Demo project for Spring Boot</description>

    <properties>
        <java.version>1.8</java.version>
    </properties>

    <dependencies>
        <!--web启动器-->
        <dependency>
            <groupId>org.springframework.boot</groupId>
            <artifactId>spring-boot-starter-web</artifactId>
        </dependency>
        <!--测试插件-->
        <dependency>
            <groupId>org.springframework.boot</groupId>
            <artifactId>spring-boot-starter-test</artifactId>
            <scope>test</scope>
            <!--剔除依赖-->
            <exclusions>
                <exclusion>
                    <groupId>org.junit.vintage</groupId>
                    <artifactId>junit-vintage-engine</artifactId>
                </exclusion>
            </exclusions>
        </dependency>
    </dependencies>

    <!--maven插件管理依赖-->
    <build>
        <plugins>
            <plugin>
                <groupId>org.springframework.boot</groupId>
                <artifactId>spring-boot-maven-plugin</artifactId>
            </plugin>
        </plugins>
    </build>

</project>
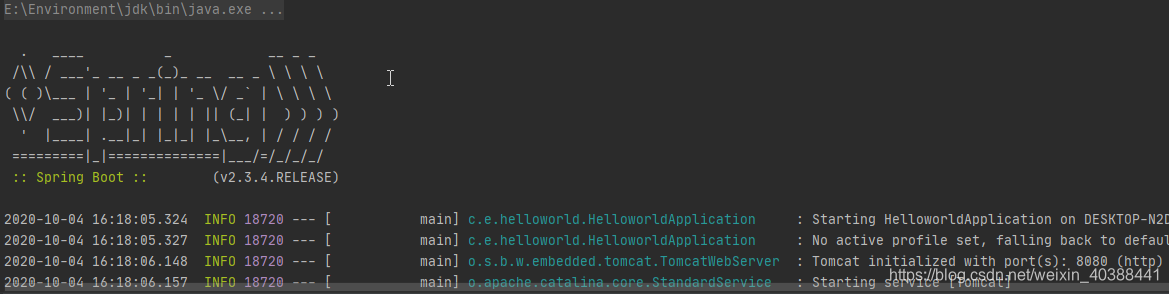
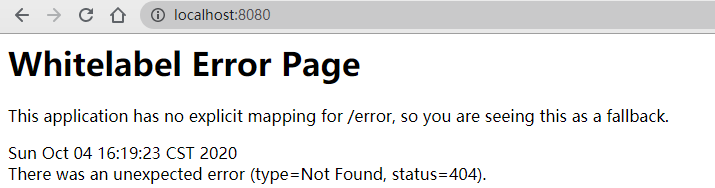
在main文件的子包下存在一个程序类,这是程序运行的主类,类似于main方法,因此不可删除(但可以修改,自定义主启动类)。运行该主类,就开启了一个web服务,访问localhost:8080,可以进入SpringBoot的默认页。
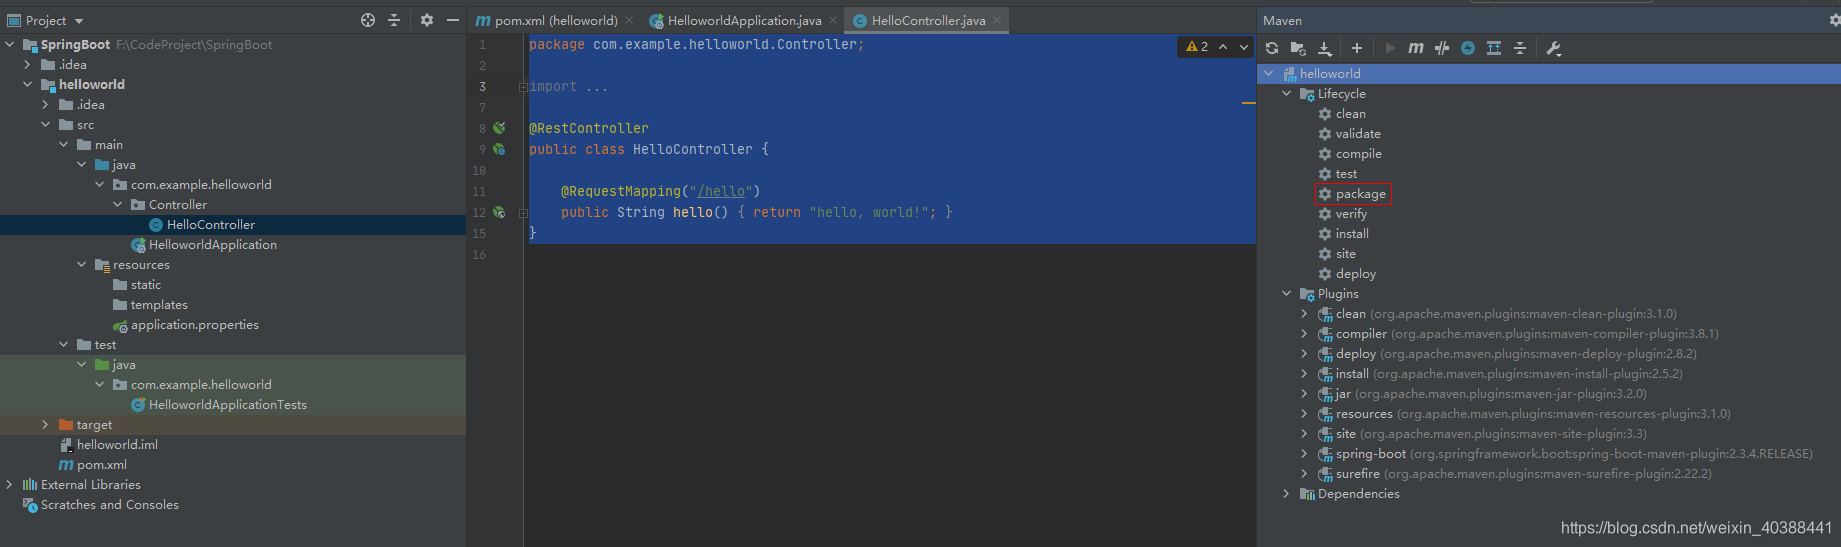
为了进一步展示这个框架的便利性,我们在主程序的同级目录下新建一个定义一个视图控制器(Controller)。
package com.example.helloworld.Controller;

import org.springframework.stereotype.Component;
import org.springframework.stereotype.Controller;
import org.springframework.web.bind.annotation.RequestMapping;
import org.springframework.web.bind.annotation.RestController;

@RestController
public class HelloController {

    @RequestMapping("/hello")
    public String hello(){
        return "hello, world!";
    }
}
此时运行主类开启Web服务,访问localhost:8080/hello,得到如下界面:

由此可以看出,SpringBoot框架极大的简化了Web应用程序的复杂性。
注:采用Maven的package也可以将项目打包成一个jar包,并通过java -jar命令来运行服务。
执行后发现target文件夹下出现了一个jar包,在命令行界面下采用-jar命令运行服务
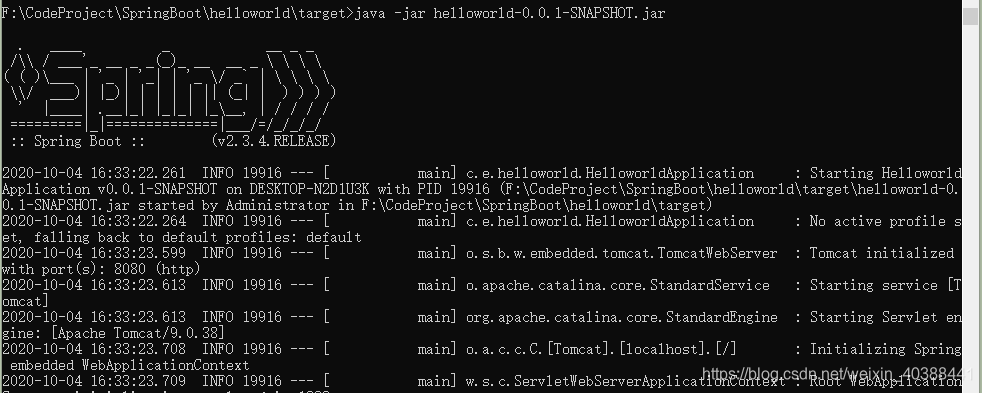
结果同样可以访问localhost:8080。
二、运行原理剖析
接下来我们将探讨SpringBoot的运行原理,主要分为以下几个层面:
- SpringBoot的核心运行原理
- SpringBoot的初始化构造流程
- SpringBoot的
run方法运行流程
1、核心运行原理
Pom.xml
上一节中我们已经给出了SpringBoot的一般化配置,从配置中可以发现项目依赖于一个父项目org.springframework.boot,这主要用于管理项目的资源过滤及相关插件。
<parent>
        <groupId>org.springframework.boot</groupId>
        <artifactId>spring-boot-starter-parent</artifactId>
        <version>2.3.4.RELEASE</version>
        <relativePath/> <!-- lookup parent from repository -->
    </parent>
查看该父项目,发现除了资源及插件管理外,其同样依赖一个父项目spring-boot-dependencies。
<parent>
    <groupId>org.springframework.boot</groupId>
    <artifactId>spring-boot-dependencies</artifactId>
    <version>2.3.4.RELEASE</version>
  </parent>
进一步查看该父项目,发现定义了众多的依赖包(下图是部分文件代码),这其实就是SpringBoot里的版本控制中心,在这里管理了所有的依赖版本。

正是因为继承了此依赖,使得我们在项目中导入依赖时不需要配置版本号,但如果导入的依赖包未被管理则需要手动配置版本。
spring-boot-starters是SpringBoot以预定义的方式继承了其他应用的starter集合,由于本文主要针对Web应用,因此这里在pom文件中引入了spring-boot-starters-web来支持web应用场景(加载相关依赖,配置相应的初始化参数,对第三方软件进行集成等)。
主启动类
接下来我们进一步分析SpringBoot自动生成的主启动类。
package com.example.helloworld;

import org.springframework.boot.SpringApplication;
import org.springframework.boot.autoconfigure.SpringBootApplication;

@SpringBootApplication
public class HelloworldApplication {
	//程序入口,必不可缺,实际上也是一个组件(controller)
	public static void main(String[] args) {
		SpringApplication.run(HelloworldApplication.class, args);
	}
}
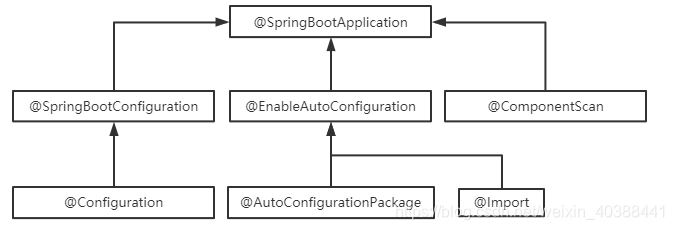
可以发现程序比较简单,但问题的关键在于注解@SpringBootApplication,进入该注解实现。
package org.springframework.boot.autoconfigure;

import java.lang.annotation.Documented;
import java.lang.annotation.ElementType;
import java.lang.annotation.Inherited;
import java.lang.annotation.Retention;
import java.lang.annotation.RetentionPolicy;
import java.lang.annotation.Target;
import org.springframework.beans.factory.support.BeanNameGenerator;
import org.springframework.boot.SpringBootConfiguration;
import org.springframework.boot.context.TypeExcludeFilter;
import org.springframework.context.annotation.ComponentScan;
import org.springframework.context.annotation.Configuration;
import org.springframework.context.annotation.FilterType;
import org.springframework.context.annotation.ComponentScan.Filter;
import org.springframework.core.annotation.AliasFor;

@Target({ElementType.TYPE})
@Retention(RetentionPolicy.RUNTIME)
@Documented
@Inherited
@SpringBootConfiguration
@EnableAutoConfiguration
@ComponentScan(
    excludeFilters = {@Filter(
    type = FilterType.CUSTOM,
    classes = {TypeExcludeFilter.class}
), @Filter(
    type = FilterType.CUSTOM,
    classes = {AutoConfigurationExcludeFilter.class}
)}
)
public @interface SpringBootApplication {
    @AliasFor(
        annotation = EnableAutoConfiguration.class
    )
    /*
    /.../
    */
}
除了基础注解和元注解外,我们逐一分析该接口的注解。
注:SpringBoot中大量使用了@AliasFor注解,该注解用于桥接到其他注解,使用它的原因是因为当前注解定义的属性在其他注解已经定义过,使用@AliasFor在当前注解中重新定义以减少用户使用多注解带来的麻烦,因此后续讨论将忽略该注解的存在。
- 首先是
@SpringBootConfiguration,查看该注解:
package org.springframework.boot;

import java.lang.annotation.Documented;
import java.lang.annotation.ElementType;
import java.lang.annotation.Retention;
import java.lang.annotation.RetentionPolicy;
import java.lang.annotation.Target;
import org.springframework.context.annotation.Configuration;
import org.springframework.core.annotation.AliasFor;

@Target({ElementType.TYPE})
@Retention(RetentionPolicy.RUNTIME)
@Documented
@Configuration
public @interface SpringBootConfiguration {
    @AliasFor(
        annotation = Configuration.class
    )
    boolean proxyBeanMethods() default true;
}
可以发现该注解本身采用了@Configuration注解,进入这个注解发现其是一个Component组件,这说明启动类本身也是Spring的一个组件,用来负责启动应用,而这里的@Configuration注解可以视为用于替代原来Spring中的xml配置文件。
这个注解在Spring中很常见,用于自动扫描并加载符合条件的组件或者bean,将这个bean的定义加载到IOC容器中。
- 最后是
@EnableAutoConfiguration注解
该注解用于开启自动配置,由于Spring无法自动配置@Configuration注解的类,因此SpringBoot根据约定自动管理该注解标注的类,于是便诞生出@EnableAutoConfiguration注解。当使用@SpringBootApplication注解时,该注解会自动生效。接下来我们进一步查看该注解的具体实现。
package org.springframework.boot.autoconfigure;

@Target({ElementType.TYPE})
@Retention(RetentionPolicy.RUNTIME)
@Documented
@Inherited
@AutoConfigurationPackage
@Import({AutoConfigurationImportSelector.class})
public @interface EnableAutoConfiguration {
    String ENABLED_OVERRIDE_PROPERTY = "spring.boot.enableautoconfiguration";

    Class<?>[] exclude() default {};

    String[] excludeName() default {};
}
需要关注的元素有:
@AutoConfigurationPackage:将该注解修饰的类所在的包作为自动配置Package进行管理。底层实现时使用@import注解向容器中导入了一个Registrar.class组件,该组件的作用的是将主启动类的所在包及子包里的所有组件扫描到Spring容器。
ENABLED_OVERRIDE_PROPERTY:定义的一个常量,用于覆盖开启/关闭自动配置的功能。
exclude():根据类排除指定的自动配置
excludeName():根据类名排除指定的自动配置
注:上面exclude()和excludeName()都用于排除冗余配置项,可显示在类上配置如下(Xxx表示不同的配置项名):
@SpringBootApplication(exclude = XxxAutoConfiguration.class)或@EnableAutoConfiguration(exclude = XxxAutoConfiguration.class)
@Import({AutoConfigurationImportSelector.class})(关键):
该注解是实现自动配置的核心,这里采用了@import注解导入了一个ImportSelector接口的实现类AutoConfigurationImportSelector,该接口决定可以进入哪些@Configuration。针对于AutoConfigurationImportSelector,其核心功能流程图如下所示:
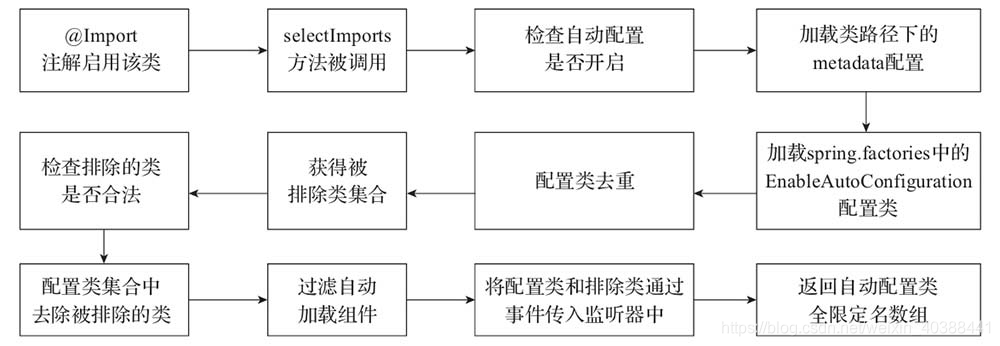
我们结合源码来体会上述过程。
public class AutoConfigurationImportSelector implements DeferredImportSelector, BeanClassLoaderAware, ResourceLoaderAware, BeanFactoryAware, EnvironmentAware, Ordered {
    private static final AutoConfigurationImportSelector.AutoConfigurationEntry EMPTY_ENTRY = new AutoConfigurationImportSelector.AutoConfigurationEntry();
    private static final String[] NO_IMPORTS = new String[0];
    private static final Log logger = LogFactory.getLog(AutoConfigurationImportSelector.class);
    private static final String PROPERTY_NAME_AUTOCONFIGURE_EXCLUDE = "spring.autoconfigure.exclude";
    private ConfigurableListableBeanFactory beanFactory;
    private Environment environment;
    private ClassLoader beanClassLoader;
    private ResourceLoader resourceLoader;
    private AutoConfigurationImportSelector.ConfigurationClassFilter configurationClassFilter;

    public AutoConfigurationImportSelector() {
    }

    public String[] selectImports(AnnotationMetadata annotationMetadata) {
    	//检查自动配置功能是否开启,默认为开启
        if (!this.isEnabled(annotationMetadata)) {
            return NO_IMPORTS;
        } else {
        	//加载并封装自动配置的元信息,配置文件为类路径中的META-INF目录下的
            AutoConfigurationImportSelector.AutoConfigurationEntry autoConfigurationEntry = this.getAutoConfigurationEntry(annotationMetadata);
            //返回符合条件的配置类的全限定名数组
            return StringUtils.toStringArray(autoConfigurationEntry.getConfigurations());
        }
    }

    public Predicate<String> getExclusionFilter() {
        return this::shouldExclude;
    }

    private boolean shouldExclude(String configurationClassName) {
        return this.getConfigurationClassFilter().filter(Collections.singletonList(configurationClassName)).isEmpty();
    }

    protected AutoConfigurationImportSelector.AutoConfigurationEntry getAutoConfigurationEntry(AnnotationMetadata annotationMetadata) {
        if (!this.isEnabled(annotationMetadata)) {
            return EMPTY_ENTRY;
        } else {
            AnnotationAttributes attributes = this.getAttributes(annotationMetadata);
            //通过SpringFactoriesLoader类中提供的方法加载类路径中META-INF目录下spring.factories文件中针对EnableAutoConfiguration的注册配置类
            List<String> configurations = this.getCandidateConfigurations(annotationMetadata, attributes);
            //对获得的注册配置类集合进行去重处理,,防止多个项目引入相同的配置类
            configurations = this.removeDuplicates(configurations);
            //获取排除的类集合
            Set<String> exclusions = this.getExclusions(annotationMetadata, attributes);
            //检查被排除类是否可实例化,是否被自动注册配置所使用,不符合条件则抛出异常
            this.checkExcludedClasses(configurations, exclusions);
            //从自动配置类中去除被排除的类
            configurations.removeAll(exclusions);
            //检查配置类的注解是否符合spring.factories文件中AutoConfigurationImportFilter指定的注解检查条件
            configurations = this.getConfigurationClassFilter().filter(configurations);
            //将筛选完成的配置类和排查的配置类构建为事件类并传入监听器,监听器的配置在spring.factories文件中,通过AutoConfigurationImportListener指定
            this.fireAutoConfigurationImportEvents(configurations, exclusions);
            return new AutoConfigurationImportSelector.AutoConfigurationEntry(configurations, exclusions);
        }
    }
    /*
    其他方法实现...
    */
}
从代码中可以看出获取配置的关键在于getCandidateConfigurations方法,该方法调用了SpringFactoriesLoader类中loadFactoryNames()的静态方法,代码如下:
private static Map<String, List<String>> loadSpringFactories(@Nullable ClassLoader classLoader) {
		//获取classLoader,实际上得到的是针对EnableAutoConfiguration的注册配置类本身
        MultiValueMap<String, String> result = (MultiValueMap)cache.get(classLoader);
        if (result != null) {
            return result;
        } else {
            try {
            	//获取一个资源META-INF/spring.factories
                Enumeration<URL> urls = classLoader != null ? classLoader.getResources("META-INF/spring.factories") : ClassLoader.getSystemResources("META-INF/spring.factories");
                LinkedMultiValueMap result = new LinkedMultiValueMap();

				//将读取到的资源遍历,并封装为一个Properties
                while(urls.hasMoreElements()) {
                    URL url = (URL)urls.nextElement();
                    UrlResource resource = new UrlResource(url);
                    Properties properties = PropertiesLoaderUtils.loadProperties(resource);
                    Iterator var6 = properties.entrySet().iterator();

                    while(var6.hasNext()) {
                        Entry<?, ?> entry = (Entry)var6.next();
                        String factoryTypeName = ((String)entry.getKey()).trim();
                        String[] var9 = StringUtils.commaDelimitedListToStringArray((String)entry.getValue());
                        int var10 = var9.length;

                        for(int var11 = 0; var11 < var10; ++var11) {
                            String factoryImplementationName = var9[var11];
                            result.add(factoryTypeName, factoryImplementationName.trim());
                        }
                    }
                }

                cache.put(classLoader, result);
                return result;
            } catch (IOException var13) {
                throw new IllegalArgumentException("Unable to load factories from location [META-INF/spring.factories]", var13);
            }
        }
    }
如果在spring-boot-autoconfigure包下查看spring.factories文件,会发现许多自动配置的文件,这便是自动配置的根源所在。
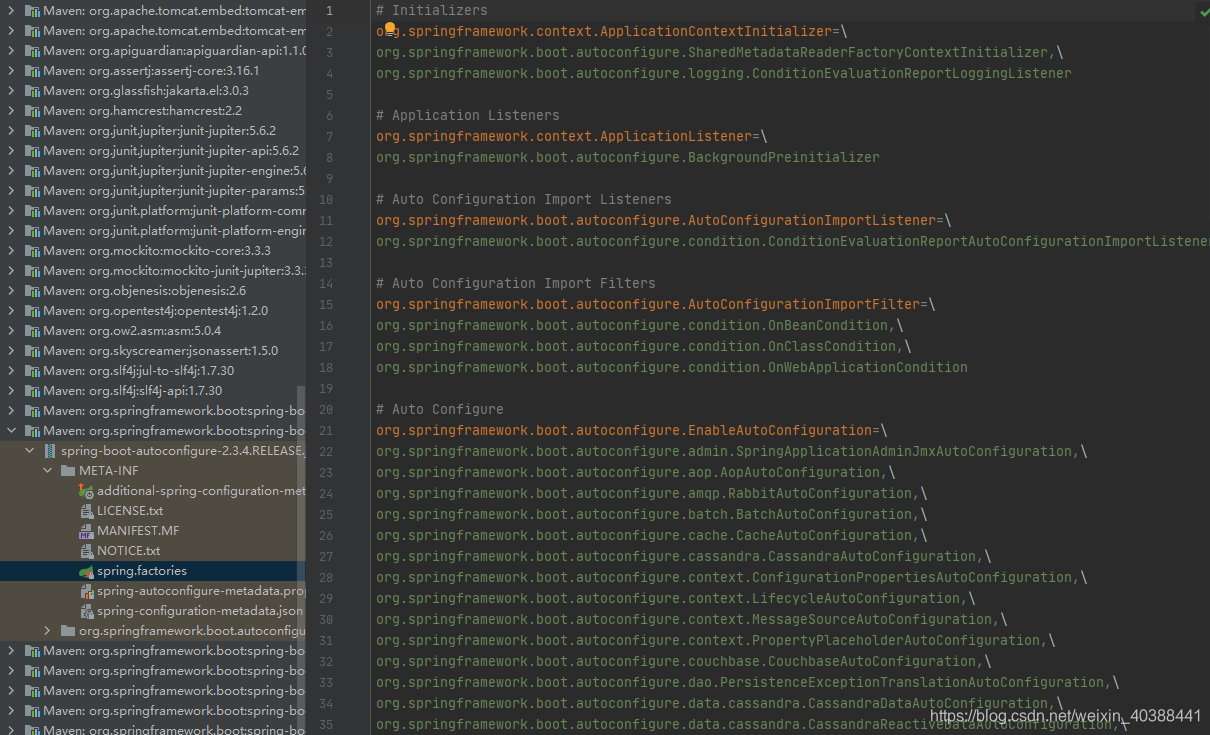
小结:
SpringBoot在启动的时候从类路径下的META-INF/spring.factories中获取EnableAutoConfiguration指定的值,并将这些值作为自动配置类导入容器,自动配置类便会生效进行自动配置的工作,它会给容器中导入非常多的自动配置类 (xxxAutoConfiguration),简单来说就是给容器中导入这个场景需要的所有组件,并配置好这些组件,免去了我们手动编写配置注入功能组件等的工作。
2、构造流程分析
回到主启动类,可以发现主函数调用了SpringApplication的run方法,该方法进行SpringApplication类的实例化操作,在针对该对象调用另一个run方法来完成整个项目的初始化和启动。本节主要简单介绍第一个部分——实例化SpringApplication类。
实例化的流程如下图所示:
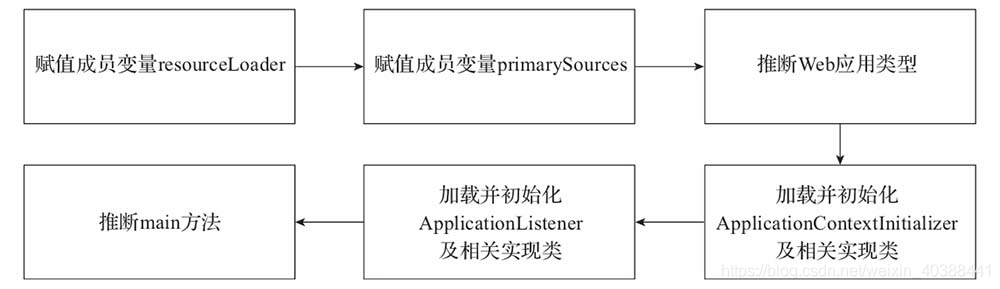
我们结合源码来进行理解,下面的代码是SpringApplication的两个构造函数:
 public SpringApplication(Class<?>... primarySources) {
        this((ResourceLoader)null, primarySources);
    }

    public SpringApplication(ResourceLoader resourceLoader, Class<?>... primarySources) {
    	//对一些成员变量进行初始化
        this.sources = new LinkedHashSet();
        this.bannerMode = Mode.CONSOLE;
        this.logStartupInfo = true;
        this.addCommandLineProperties = true;
        this.addConversionService = true;
        this.headless = true;
        this.registerShutdownHook = true;
        this.additionalProfiles = new HashSet();
        this.isCustomEnvironment = false;
        this.lazyInitialization = false;
        //传入的参数赋值给两个成员变量
        this.resourceLoader = resourceLoader;
        Assert.notNull(primarySources, "PrimarySources must not be null");
        this.primarySources = new LinkedHashSet(Arrays.asList(primarySources));
        //推断Web应用类型
        this.webApplicationType = WebApplicationType.deduceFromClasspath();
        //加载并初始化ApplicationContextInitializer及相关实现类
        this.setInitializers(this.getSpringFactoriesInstances(ApplicationContextInitializer.class));
        //加载并初始化ApplicationListener及相关实现类
        this.setListeners(this.getSpringFactoriesInstances(ApplicationListener.class));
        //推断main方法Class类
        this.mainApplicationClass = this.deduceMainApplicationClass();
    }
-
ResourceLoader为资源加载的接口
-
primarySources为可变参数,默认传入SpringBoot的入口类,如果作为项目的引导类,需要满足被@EnableAutoConfiguration或其组合注解标注。
(各方法实现细节待补充)
3、运行流程分析
本节将对SpringApplication所调用的run方法进行简单介绍,该方法的核心操作流程如下:
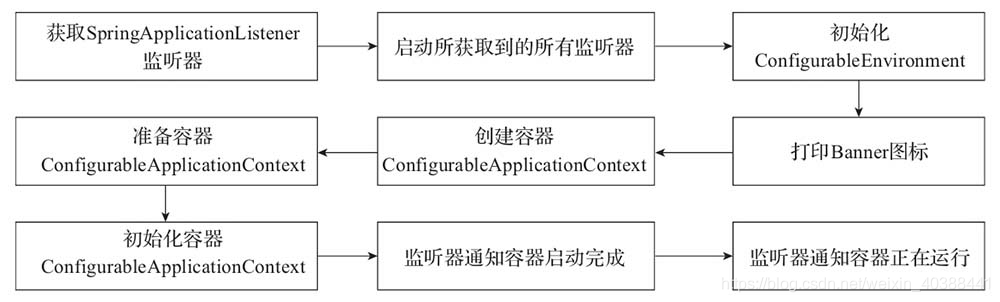
总的来说过程分为四步:
- 获取监听器和参数配置
- 打印Banner信息
- 创建并初始化容器
- 监听器发送通知
结合源码来理解一下:
public ConfigurableApplicationContext run(String... args) {
		//创建StopWatch对象,用于统计run方法启动时长
        StopWatch stopWatch = new StopWatch();
        //启动统计
        stopWatch.start();
        ConfigurableApplicationContext context = null;
        Collection<SpringBootExceptionReporter> exceptionReporters = new ArrayList();
        //配置headless属性
        this.configureHeadlessProperty();
        //获取SpringApplicationRunListeners 数组,该数组封装于SpringApplicationRunListeners 对象的listeners中
        SpringApplicationRunListeners listeners = this.getRunListeners(args);
        //启动监听,遍历SpringApplicationRunListeners 数组每个元素,并执行
        listeners.starting();

        Collection exceptionReporters;
        try {
        	/*配置环境参数*/
        	//创建ApplicationArguments对象
            ApplicationArguments applicationArguments = new DefaultApplicationArguments(args);
            //加载属性配置,包括所有的配置属性,例如application.properties中和外部的属性配置
            ConfigurableEnvironment environment = this.prepareEnvironment(listeners, applicationArguments);
            this.configureIgnoreBeanInfo(environment);
            //打印Banner
            Banner printedBanner = this.printBanner(environment);
            //创建容器
            context = this.createApplicationContext();
            //异常报告器
            exceptionReporters = this.getSpringFactoriesInstances(SpringBootExceptionReporter.class, new Class[]{ConfigurableApplicationContext.class}, context);
            //准备容器,组件对象之间进行关联
            this.prepareContext(context, environment, listeners, applicationArguments, printedBanner);
            //初始化容器
            this.refreshContext(context);
            //初始化操作之后执行,默认实现为空
            this.afterRefresh(context, applicationArguments);
            //停止时长统计
            stopWatch.stop();
            //打印启动日志
            if (this.logStartupInfo) {
                (new StartupInfoLogger(this.mainApplicationClass)).logStarted(this.getApplicationLog(), stopWatch);
            }

			//通知监听器,容器启动完成
            listeners.started(context);
            //调用applicationRunner和CommandLineRunner的运行方法
            this.callRunners(context, applicationArguments);
        } catch (Throwable var10) {
			//异常处理
            this.handleRunFailure(context, var10, exceptionReporters, listeners);
            throw new IllegalStateException(var10);
        }

        try {
        	//通知监听器,容器正在运行
            listeners.running(context);
            return context;
        } catch (Throwable var9) {
            this.handleRunFailure(context, var9, exceptionReporters, (SpringApplicationRunListeners)null);
            throw new IllegalStateException(var9);
        }
    }
本章完整流程图可查看SpringBoot实现流程
三、配置与使用
本章主要讨论SpringBoot中配置文件的使用,以及配置文件具体怎样在自动配置中发挥作用。
1、配置文件
SpringBoot使用一个全局的配置文件,配置文件名称是固定的,有以下两种形式(推荐使用yaml):
-
application.properties:语法结构 key=value
-
application.yaml(.yml):语法结构 key:空格 value
配置文件的作用是修改SpringBoot自动配置的默认值。
1)YAML
YAML是一种以数据为中心的标记语言,这种标记语言形式简洁,但语法要求十分严格,一个示例如下:
server:
	port: 8080
注:
1)空格不能省略
2)通过缩进来表达层级关系
3)属性和值的大小写敏感
4)字面量直接写在引号空格后,默认不加单或双引号。如果加上双引号,则不会转义符号串里的特殊字符;但单引号会转义特殊字符,将其变为普通字符输出。
常用表示:
person:
  name: lee
  age: 22
  happy: true
  birth: 2020/2/02
  maps: {k1: v1,k2: v2}
行内写法类似maps
 list:
    - code
    - girl
    - music
    - life
行内写法list: [code,girl,music,life]
server:
	port: 8080
2)注入配置文件
yaml配置文件可以给实体类直接注入匹配值,避免了传统的对bean属性采用@Value()注解显示注入属性值。下面通过一个简单地案例展示yaml的便捷之处。
创建实体类Dog和Person
package com.lee.Dao;

import lombok.AllArgsConstructor;
import lombok.Data;
import lombok.NoArgsConstructor;
import lombok.ToString;
import org.springframework.stereotype.Component;

@NoArgsConstructor
@AllArgsConstructor
@Data
@ToString
@Component//注册bean
public class Dog {
    private String name;
    private int age;
}
package com.lee.Dao;

import lombok.AllArgsConstructor;
import lombok.Data;
import lombok.NoArgsConstructor;
import lombok.ToString;
import org.springframework.boot.context.properties.ConfigurationProperties;
import org.springframework.stereotype.Component;

import java.util.Date;
import java.util.List;
import java.util.Map;

@NoArgsConstructor
@AllArgsConstructor
@Data
@ToString
@Component//注册bean
@ConfigurationProperties(prefix = "person")
public class Person {
    private String name;
    private int age;
    private boolean happy;
    private Date birth;
    private Map<String, Object> maps;
    private List<Object> list;
    private Dog dog;
}
这里采用了lombok插件以简化代码。
为了给Person注入属性值,编写application.yaml文件如下:
person:
  name: lee
  age: 22
  happy: true
  birth: 2020/2/02
  maps: {k1: v1,k2: v2}
  list:
    - code
    - girl
    - music
    - life
  dog:
    name: 黑虎
    age: 22
最后简单地通过@ConfigurationProperties(prefix = "person")注解给Person类注入属性值,该注解将配置文件中配置的每一个属性映射到该组件,并告诉SpringBoot将本类中所有属性和配置文件中相关配置进行绑定,这里的prefix = "person"指定了yaml文件中的配置名。
package com.lee;

@SpringBootTest
class Springboot01ApplicationTests {

    @Autowired//自动注入bean
    private Person person;
    @Test
    void contextLoads() {
        System.out.println(person);
    }
}
通过测试类输出一个person实例,输出结果如下,成功注入。
Person(name=lee, age=22, happy=true, birth=Sun Feb 02 00:00:00 CST 2020, maps={k1=v1, k2=v2}, list=[code, girl, music, life], dog=Dog(name=黑虎, age=22))
注:这里配置文件的key值必须和类中属性名相同,否则会注入失败,结果为null。
与application.properties文件对比
application.properties属性值注入需要采用以下方式,比较繁琐。
@PropertySource(value = "classpath:person.properties")
@Component //注册bean
public class Person {
	@Value("${name}")
	private String name;
	......
}
采用这两种方式的对比如下:
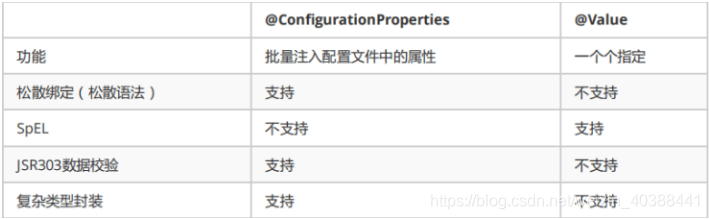
1、@ConfigurationProperties只需要写一次即可 , @Value则需要每个字段都添加
2、松散绑定:即yml中写的last-name和lastName是一样的, - 后面跟
着的字母默认是大写的。
3、JSR303数据校验:可以在字段是增加一层过滤器验证,这可以保证数据的合法性
有许多种校验注解,例如:
@NotNull(message="名字不能为空")@Max(value=120,message="年龄最大不能查过120")@Email(message="邮箱格式错误")
可以规则可以去查看使用文档,我们也可以自定义自己的数据校验规则。
4、复杂类型封装:yml中可以封装对象,而@value就不支持
3)多环境切换
profile是Spring对不同环境提供不同配置功能的支持,可以通过激活不同的环境版本,实现快速切换环境。
例如:application-test.properties 代表测试环境配置; application-dev.properties 代表开发环境配置,要使用环境切换,可在application.properties主配置文件显示选择所需的配置环境,例如选择开发环境:
spring.profiles.active=dev
也需要定义多个环境配置,但无需创建多个配置文件,通过在同一个文件中定义,并采用特定的关键字选取所需的配置环境即可,示例如下:
server:
  port: 8081
#选择要激活的环境块
spring:
  profiles:
    active: prod

---
server:
  port: 8082
spring:
  profiles: dev #所配置的环境名

---
server:
  port: 8083
spring:
  profiles: prod
4)配置文件优先级
Springboot 启动会扫描以下位置的application.properties或者application.yaml文件作为Springboot的默认配置文件:
优先级1:项目路径下的config文件夹配置文件
优先级2:项目路径下配置文件
优先级3:资源路径下的config文件夹配置文件
优先级4:资源路径下配置文件
2、自动配置原理
本节将分析META-INF/spring.factories中的配置类如何自动进行配置,配置文件所设置的属性与其有何联系。
首先介绍一个特殊注解@Conditional,该注解可根据是否满足指定的条件来决定是否进行Bean的实例化及装配,其存在很多衍生注解,例如
-
@ConditionalOnBean:在容器中有指定Bean的条件下
-
@ConditionalOnClass:在classpath类路径下有指定的类的条件下
-
@ConditionalOnProperty:在指定的属性有指定值的条件下
-
@ConditionalOnWebApplication:在项目是一个Web项目的条件下
- …
接下来我们以HttpEncodingAutoConfiguration(Http编码自动配置)为例解释自动配置原理,类的源码如下:
//指定该类作为配置项来进行实例化操作
@Configuration(
    proxyBeanMethods = false
)
//启动指定类的ConfigurationProperties功能;
//开启属性注入,将配置文件中对应的值和ServerProperties绑定起来;
//并把ServerProperties加入到ioc容器中
@EnableConfigurationProperties({ServerProperties.class})
//判断当前应用是否是web应用,如果是,当前配置类生效
@ConditionalOnWebApplication(
    type = Type.SERVLET
)
//判断当前项目有没有这个类CharacterEncodingFilter;SpringMVC中进行乱码解决的过滤器;只有该参数存在,才会被实例化
@ConditionalOnClass({CharacterEncodingFilter.class})

//指定配置文件内spring.http.encoding对应的值,如果是enable才会进行实例化,默认spring.http.encoding.enabled=true的;
@ConditionalOnProperty(
    prefix = "server.servlet.encoding",
    value = {"enabled"},
    matchIfMissing = true
)
public class HttpEncodingAutoConfiguration {

    private final Encoding properties;

	//只有一个有参构造器的情况下,参数的值就会从容器中拿到
    public HttpEncodingAutoConfiguration(ServerProperties properties) {
        this.properties = properties.getServlet().getEncoding();
    }

	//给容器中添加一个组件,这个组件的某些值需要从properties中获取
    @Bean
    @ConditionalOnMissingBean//判断容器没有这个组件,没有才会实例化
    public CharacterEncodingFilter characterEncodingFilter() {
        CharacterEncodingFilter filter = new OrderedCharacterEncodingFilter();
        filter.setEncoding(this.properties.getCharset().name());
        filter.setForceRequestEncoding(this.properties.shouldForce(org.springframework.boot.web.servlet.server.Encoding.Type.REQUEST));
        filter.setForceResponseEncoding(this.properties.shouldForce(org.springframework.boot.web.servlet.server.Encoding.Type.RESPONSE));
        return filter;
    }

    @Bean
    public HttpEncodingAutoConfiguration.LocaleCharsetMappingsCustomizer localeCharsetMappingsCustomizer() {
        return new HttpEncodingAutoConfiguration.LocaleCharsetMappingsCustomizer(this.properties);
    }

    static class LocaleCharsetMappingsCustomizer implements WebServerFactoryCustomizer<ConfigurableServletWebServerFactory>, Ordered {
        private final Encoding properties;

        LocaleCharsetMappingsCustomizer(Encoding properties) {
            this.properties = properties;
        }

        public void customize(ConfigurableServletWebServerFactory factory) {
            if (this.properties.getMapping() != null) {
                factory.setLocaleCharsetMappings(this.properties.getMapping());
            }

        }

        public int getOrder() {
            return 0;
        }
    }
}
这里ServerProperties类的属性值对应着application.yaml(或.properties)中的配置,通过@ConfigurationProperties(prefix="server")注解实现的属性注入。
小结:从上面来看,自动配置类是否生效由该配置类中的条件注解决定,那么
- 一但配置类生效,这个配置类就会给容器中添加各种组件;
- 所添加组件的属性是从对应的
properties类中获取的,这些类里面的每一个属性都和配置文件相绑定;
- 所有在配置文件中能配置的属性都是在
XxxProperties类中封装着;
- 配置文件能配置什么就可以参照某个功能对应的这个属性类;
注:自动配置类生效信息可通过启用debug=true属性来让控制台打印自动配置报告。
四、趣味练习:自定义starter
要求:自定义一个starter并在项目中测试。
Tips:
- 官方starter命名形式一般为:
spring-boot-starter-xxx
- 自定义命名形式一般为:
xxx-spring-boot-starter
步骤一:创建starter
<?xml version="1.0" encoding="UTF-8"?>
<project xmlns="http://maven.apache.org/POM/4.0.0"
         xmlns:xsi="http://www.w3.org/2001/XMLSchema-instance"
         xsi:schemaLocation="http://maven.apache.org/POM/4.0.0 http://maven.apache.org/xsd/maven-4.0.0.xsd">
    <modelVersion>4.0.0</modelVersion>

    <groupId>org.example</groupId>
    <artifactId>lee-spring-boot-starter</artifactId>
    <version>1.0-SNAPSHOT</version>

    <dependencies>
        <dependency>
            <groupId>org.example</groupId>
            <artifactId>lee-spring-boot-starter</artifactId>
            <version>1.0-SNAPSHOT</version>
        </dependency>
    </dependencies>

</project>
- 将autoconfigure项目下多余文件删除,pom中只留一个spring-boot-starter,这是所有启动器的基本配置

pom.xml
<?xml version="1.0" encoding="UTF-8"?>
<project xmlns="http://maven.apache.org/POM/4.0.0" xmlns:xsi="http://www.w3.org/2001/XMLSchema-instance"
	xsi:schemaLocation="http://maven.apache.org/POM/4.0.0 https://maven.apache.org/xsd/maven-4.0.0.xsd">
	<modelVersion>4.0.0</modelVersion>
	<parent>
		<groupId>org.springframework.boot</groupId>
		<artifactId>spring-boot-starter-parent</artifactId>
		<version>2.3.4.RELEASE</version>
		<relativePath/> <!-- lookup parent from repository -->
	</parent>
	<groupId>com.lee</groupId>
	<artifactId>lee-spring-boot-starter-autoconfigure</artifactId>
	<version>0.0.1-SNAPSHOT</version>
	<name>lee-spring-boot-starter-autoconfigure</name>
	<description>Demo project for Spring Boot</description>

	<properties>
		<java.version>1.8</java.version>
	</properties>

	<dependencies>
		<dependency>
			<groupId>org.springframework.boot</groupId>
			<artifactId>spring-boot-starter</artifactId>
		</dependency>
		<dependency>
			<groupId>org.springframework.boot</groupId>
			<artifactId>spring-boot-configuration-processor</artifactId>
		</dependency>
	</dependencies>
	<build>
		<plugins>
			<plugin>
				<groupId>org.springframework.boot</groupId>
				<artifactId>spring-boot-maven-plugin</artifactId>
				<configuration>
					<excludes>
						<exclude>
							<groupId>org.springframework.boot</groupId>
							<artifactId>spring-boot-configuration-processor</artifactId>
						</exclude>
					</excludes>
				</configuration>
			</plugin>
		</plugins>
	</build>
</project>
上面的spring-boot-maven-plugin是自定义配置所必备的,在项目编译时会使用到该jar包。build中的插件是为了防止重打包时发生错误。
package com.lee;

public class HelloService {

    HelloProperties helloProperties;

    public HelloProperties getHelloProperties(){
        return helloProperties;
    }

    public void setHelloProperties(HelloProperties helloProperties) {
        this.helloProperties = helloProperties;
    }

    public String sayHello(String name){
        return helloProperties.getPrefix() + name + helloProperties.getSuffix();
    }
}
package com.lee;

import org.springframework.boot.context.properties.ConfigurationProperties;

@ConfigurationProperties(prefix = "lee.hello")
public class HelloProperties {

    private String prefix;
    private String suffix;

    public String getPrefix() {
        return prefix;
    }

    public void setPrefix(String prefix) {
        this.prefix = prefix;
    }

    public String getSuffix() {
        return suffix;
    }

    public void setSuffix(String suffix) {
        this.suffix = suffix;
    }
}
package com.lee;

import org.springframework.beans.factory.annotation.Autowired;
import org.springframework.boot.autoconfigure.condition.ConditionalOnWebApplication;
import org.springframework.boot.context.properties.EnableConfigurationProperties;
import org.springframework.context.annotation.Configuration;

@Configuration
@ConditionalOnWebApplication
@EnableConfigurationProperties(HelloProperties.class)
public class HelloServiceAutoConfiguration {

    @Autowired
    HelloProperties helloProperties;

    public HelloService helloService(){
        HelloService service = new HelloService();
        service.setHelloProperties(helloProperties);
        return service;
    }
}
- 在resources下编写一个自己的
META-INF\spring.factories
# Auto Configure
org.springframework.boot.autoconfigure.EnableAutoConfiguration=\
  com.lee.HelloServiceAutoConfiguration
- 编写完成后安装到maven仓库中(注意install顺序)

步骤二:测试
<dependency>
            <groupId>com.lee</groupId>
            <artifactId>lee-spring-boot-starter</artifactId>
            <version>1.0-SNAPSHOT</version>
        </dependency>
package com.example;
@RestController public class HelloController {
	@Autowired
	HelloService helloService;
	@RequestMapping("/hello")
	public String hello(){
		return helloService.sayHello("zxc");
	}
}
lee:
	hello:
		prefix: prefix
lee:
	hello:
		suffix: suffix
- 启动项目访问localhost:8080/hello,成功得出结果!

