【Python黑帽子】proxy.py脚本

2023-05-16

#coding=utf-8
import sys
import socket
import threading

#ACSII
HEX_FILTER=''.join([(len(repr(chr(i)))==3) and chr(i) or '.' for i in range(256)])

def hexdump(src,length=16,show=True):
    if isinstance(src,bytes):
        src=src.decode()
    result=list()
    for i in range(0,len(src),length):
        word=str(src[i:i+length])

        printable=word.translate(HEX_FILTER)
        
        hexa=' '.join([f'{ord(c):02X}' for c in word])
        hexwidth=length*3
        result.append(f'{i:04x} {hexa:<{hexwidth}}  {printable}')
    if show:
        for line in result:
            print(line)
    else:
        return result

def revicve_from(connection):
    buffer=b''
    connection.settimeout(5)
    try:
        while True:
            data=connection.recv(4096)
            if not data:
                break
            buffer+=data
    except Exception as e:
        pass
    return buffer

def request_handler(buffer):
    #perform packet modication
    return bytes(buffer)

def respone_handler(buffer):
    #perform packet modication
    return bytes(buffer)

def proxy_handler(client_socket,remote_host,remote_port,recive_first):
    remote_socket=socket.socket(socket.AF_INET,socket.SOCK_STREAM)
    remote_socket.connect((remote_host,remote_port))

    if recive_first:
        remote_buffer=revicve_from(remote_socket)
        hexdump(remote_buffer)
    remote_buffer=respone_handler(remote_buffer)
    if len(remote_buffer):
        print("[<==] Send %d bytes to localhost." %len(remote_buffer))
        client_socket.send(remote_buffer)
    while True:
        local_buffer=revicve_from(client_socket)
        if len(local_buffer):
            line="[==>]Recive %d bytes from localhost." %len(local_buffer)
            print(line)
            hexdump(local_buffer)

            local_buffer=request_handler(local_buffer)
            remote_socket.send(local_buffer)
            print("[==>]Send to remote.")

        remote_buffer=revicve_from(remote_socket)
        if len(remote_buffer):
            print("[==>]Recive %d bytes from remote ." %len(remote_buffer))
            hexdump(remote_buffer)

            remote_buffer=respone_handler(remote_buffer)
            client_socket.send(remote_buffer)
        
        if not len(local_buffer) or not len(remote_buffer):
            client_socket.close()
            remote_socket.close()
            print("[*] no more data. Closing connection.")
            break

def server_loop(local_host,local_port,remote_host,remote_port,recive_first):
    server=socket.socket(socket.AF_INET,socket.SOCK_STREAM)
    try:
        server.bind((local_host,local_port))
    except Exception as e:
        print("problem  on bind: %e" % e)

        print("[!!]Failed to listen on %s:%d" %(local_host,local_port))
        print("[!!]Check for other listening sockets or correct permissions.")
        sys.exit(0)
    print("[*] Listening on %s:%d" %(local_host,local_port))
    server.listen(5)

    while True:
        client_sockt,addr=server.accept()
        #print out the local connection information
        line=">Recived incoming connection from %s:%d" %(addr[0],addr[1])
        print(line)

        proxy_thread=threading.Thread(target=proxy_handler,args=(client_sockt,remote_host,remote_port,recive_first))

        proxy_thread.start()

def main():
    if len(sys.argv[1:])!=5:
        print("usage: ./proxy.py [localhost] [localport]",end=' ')
        print("[remotehost] [remoteport] [recive_first]")
        print("Example:./proxy.py 127.0.0.1 8888 10.0.2.15 5555 True")
        sys.exit(0)
    local_host=sys.argv[1]
    local_port=int(sys.argv[2])
    remote_host=sys.argv[3]
    remote_port=int(sys.argv[4])
    recive_first=sys.argv[5]

    if "True" in recive_first:
        recive_first=True
    else:
        recive_first=False
    server_loop(local_host,local_port,remote_host,remote_port,recive_first)


if __name__=="__main__":
    main()

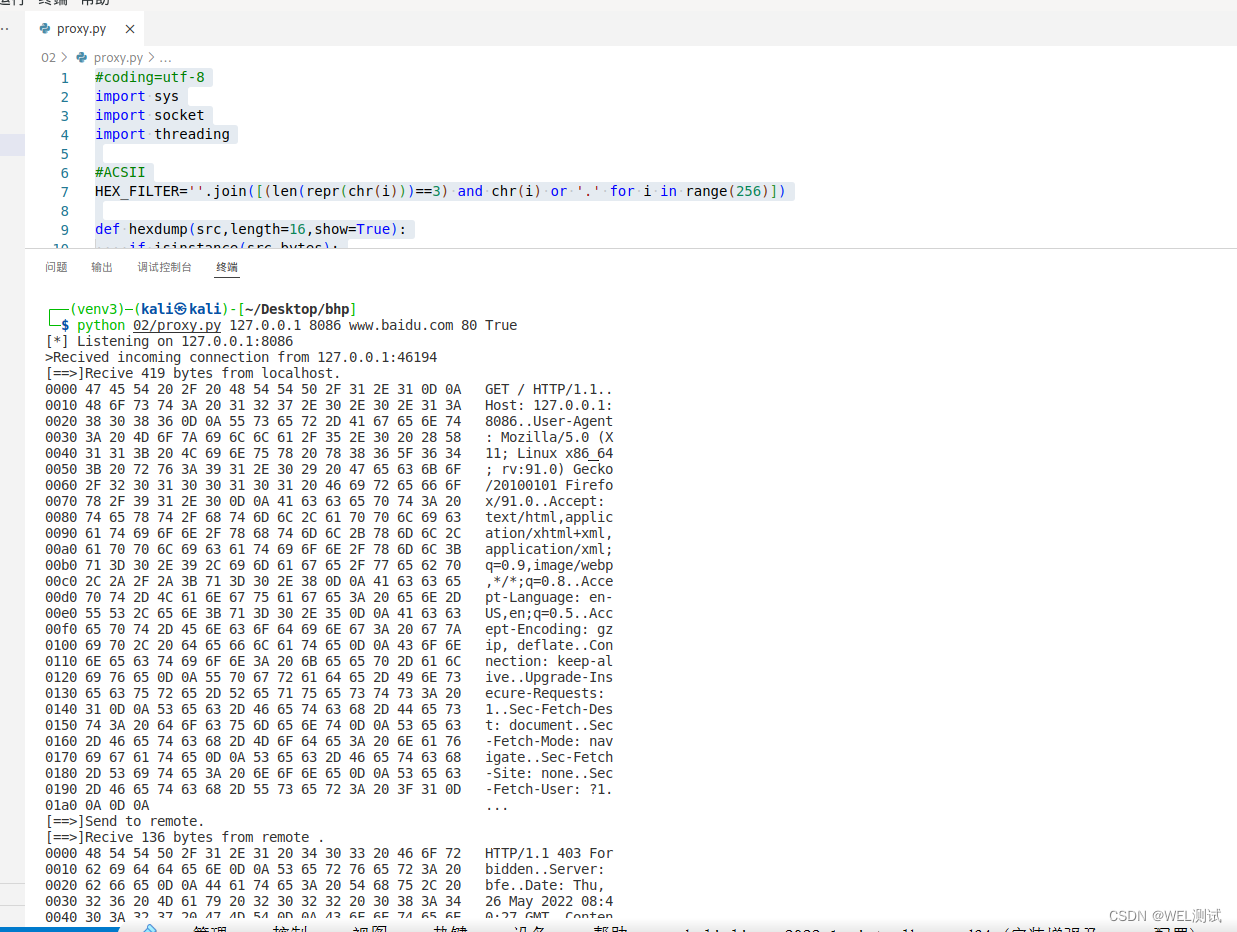
以百度为例:python 02/proxy.py 127.0.0.1 8086 www.baidu.com 80 True
在浏览器输入:https://127.0.0.1:8086
在这里插入图片描述

本文内容由网友自发贡献,版权归原作者所有,本站不承担相应法律责任。如您发现有涉嫌抄袭侵权的内容,请联系:hwhale#tublm.com(使用前将#替换为@)

【Python黑帽子】proxy.py脚本 的相关文章

随机推荐

  • Android中包含List成员变量的Parcel以及Parcel嵌套写法示例

    这个Scean类实现了Parcelable接口 xff0c 同时其内部的成员变量List lt SubScean gt subSceanList 中的SubScean类也实现了Parcelable接口 public class Scean
  • 第一节:详细透彻解读Git与SVN的区别(集中式VS分布式)

    Git是目前世界上最先进的分布式版本控制系统 xff0c 其实 Git 跟 SVN一样有自己的集中式版本库或服务器 xff0c 但是Git 更倾向于被使用于分布式模式 xff0c 也就是每个开发人员从中心版本库 服务器上chect out代
  • Android 9.0 SecureElementService 初始化流程分析

    1 相关名词解释 NFC Near Field Communication xff0c 近场通信 xff0c 一种基于13 56 MHz 的短距离通信技术 NFCC NFC Controller xff0c NFC 控制器 xff0c 负责
  • 【Linux】生产者消费者模型 - 详解

    目录 一 生产者消费者模型概念 1 为何要使用生产者消费者模型 2 生产者消费者之间的关系 3 生产者消费者模型的优点 二 基于阻塞队列的生产消费模型 1 在阻塞队列中的三种关系 2 BlockingQueue hpp 阻塞队列类 3 Lo
  • word 批量设置图片大小

    word批量修改图片大小 固定长宽篇 方法一 xff1a 这部分要说的是把word中的所有图片修改成固定的并且相同的长和宽 xff01 1 打开word xff0c 工具 xff0d 宏 xff0d 宏 xff08 或者直接按Alt 43
  • 深度学习之 人脸识别(1) 人脸预处理

    人脸识别分两个部分 xff1a 第一步 xff1a 人脸图片预处理 xff0c 即检测图片中人脸并裁剪成指定尺寸的人脸图 第二步 xff1a 人脸识别 xff0c 包括模型训练 目标人脸分类训练 预测目标人脸 1 人脸检测原理 人脸识别 x
  • 制作自己的个人网站方法

    随着个人创业的流行 xff0c 很多个人也需要一个比较详细的网站来展示自己 xff0c 开展个人业务 xff0c 或者积累粉丝等等 那么怎么制作自己的个人网站呢 xff1f 又该怎么制作得更个性好看 xff1f 下面就跟大家分享下制作方法
  • 傻瓜书,VMware里的Ubuntu

    转自 xff1a http bbs cnw com cn thread 136057 1 1 html 傻瓜书 xff0c VMware里的Ubuntu 0 预备知识 什么是Ubuntu 如果不了解这一点 xff0c 本文的内容似乎与您无关
  • 痞子衡单片机排行榜(2022Q4)

    痞子衡单片机排行榜 2022Q4 继2020年开办的 痞子衡嵌入式半月刊 之后 xff0c 从2023年1月份开始痞子衡将为大家带来新项目 痞子衡单片机排行榜 一年分四季 xff0c 每个季度发布一期 xff0c 以MCU主频和Corema
  • [pdf]使用spire读取PDF的文字和图片

    概述 最近在梳理某项目的数据标准 xff0c 从标准网下载了很多PDF格式的标准文件 xff0c 需要提取文字和图片 xff0c 所以写了个程序提取 xff1b 本文使用了免费版的Spire 约束 免费版的Spire一次只能提取PDF的10
  • JetPack系列之ViewBinding

    viewBinding的作用启用视图绑定Activity中使用视图绑定Framgent中使用视图绑定与findViewById相比 viewBinding的作用 启用视图绑定之后 xff0c 系统会为每个xml生成一个绑定类 xff0c 我
  • 正则表达式记录

    去掉所有非1到9或者字母的其它字符 private static String dealWithVersion String versionArg String regex 61 34 1 9a zA Z 34 versionArg 61
  • 批量kill掉带有某些标识的进程的shell命令

    微信公众号 xff1a WELTest 分享一个常用命令 xff0c 批量杀掉一批进程 xff0c 这里以tomcat为例 xff1a ps ef grep tomcat awk 39 print 2 39 xargs kill 9 命令解
  • 【VUE】renren-fast-vue跳过验证码及使用mock数据单独添加一个页面

    效果图 解决办法 1 使用官方演示系统数据 1 把代理打开设置为True 2 在修改config目录下的index js的target值为 xff1a http demo open renren io renren fast server
  • 【软件测试】以闭环思维解决BUG复现率高问题

    bug复现率 要求复现BUG数 总bug数 背景 软件测试中提Bug 作为每个测试人员都应该遇到过 那每个测试人员可能也会遇到不停帮开发复现Bug的问题 如果Bug复现对环境要求不高 那复现成本还是比较低的 那如果环境复杂 那复现成本还是比
  • 自动化测试:功能移植之存储过程数据正确性验证

    自动化测试 功能移植之存储过程数据正确性验证 背景说明 系统架构的变更及调整 会引相同功能在不同架构上的移植工作 功能移植工作会产生多种变式 每种变式的测试策略是不一致的 本文主要讨论的变式为 业务不发生变动 只进行代码移植 结果表结构与原
  • docker mysql:5.6镜像安装mysqlreport、pt-query-digest

    更新debian源 echo 34 deb http ftp cn debian org debian stretch main 34 gt etc apt sources list echo 34 deb http ftp cn debi
  • 性能测试:模型趋势预测,让生产性能预测

    随着系统复杂度的提升 系统架构复杂度 部署规模也在逐步提升 这对性能测试测试 分析都带来挑战 古语有云 兵马未动粮草先行 针对测试而言测试环境及数据就是 粮草 性能测试如果环境 数据差异较大 性能测试出来的结果对生产指导意义就不是很大 那如
  • 【python黑帽子2】netcat.py编写及使用说明

    环境信息 python3 9 12 IDE为 xff1a vscode 源码 书中源码注意点 xff1a send函数中的if recv len lt 4096需要调整为if recv len lt 2 xff1a 该出的recv len值
  • 【Python黑帽子】proxy.py脚本

    span class token comment coding 61 utf 8 span span class token keyword import span sys span class token keyword import s