1 概述
MyBatis是一个优秀的持久层框架,它对JDBC操作数据库的过程进行封装,使开发者只需要关注 SQL本身,而不需要花费精力去处理例如注册驱动、创建connection、创建statement、手动设置参数、结果集检索等JDBC繁杂的过程代码。
Mybatis具有简单易学,灵活,解除sql与java代码的耦合性以及提供了丰富且强大的xml标签等特点。
MyBatis架构图如下:
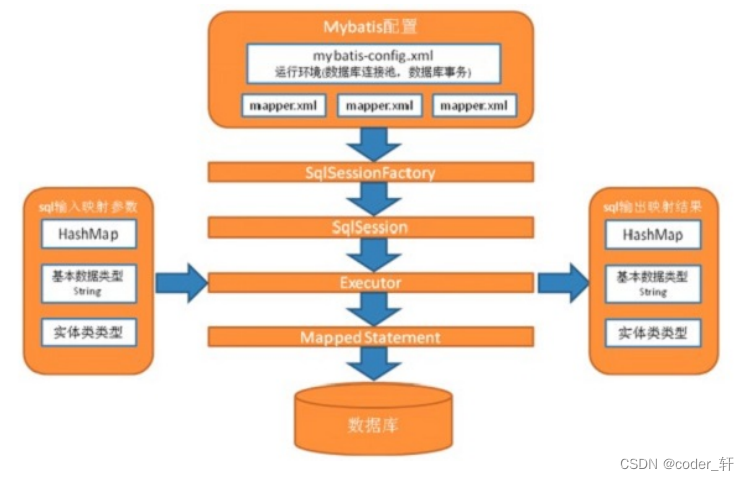
MyBatis想要正常工作,必不可少的就是全局配置文件和mapper映射文件:
1. 读取mybatis-config.xml全局配置文件进行初始化工作,并加载mapper映射文件
2. 创建SqlSessionFactory
3. 通过SqlSessionFactory获取SqlSession,相当于与数据库建立的链接
4. 然后通过sqlSession调用对应的增删改查方法,这个操作直至返回结果是在底层运行的,我们看不到。我们在mapper映射文件中写的每个sql+标签以及属性相当于一个MappedStatement。
2 入门使用
在使用之前记得在pom中引入相关依赖哦!
2.1 编写mybatis-config.xml配置文件
此配置文件只需要知道每个标签的含义是什么即可,复制粘贴修改就行,不用背!
<?xml version="1.0" encoding="UTF-8"?>
<!DOCTYPE configuration
PUBLIC "-//mybatis.org//DTD Config 3.0//EN"
"http://mybatis.org/dtd/mybatis-3-config.dtd">
<!-- configuration 文件的根节点 -->
<configuration>
<!--
properties 用于引入外部的properties配置文件
resource:引入类路径下的文件
url:引入磁盘或网路
-->
<properties/>
<!--
environments:多个配置环境;通过default属性可以对多个环境快速切换。
environments default属性的值必须和某个environment的id值一致。
-->
<!-- 和spring整合后 environments配置将废除,了解即可 -->
<environments default="mysql">
<environment id="mysql">
<!-- 配置事务:使用jdbc的事务管理 -->
<transactionManager type="JDBC"/>
<!--
配置数据源:连接数据库的信息
type: 表示连接是否使用连接池,POOLED表示mybatis中自带的连接池;JNDI、
POOLED、UNPOOLED
-->
<dataSource type="POOLED">
<property name="driver" value="com.mysql.jdbc.Driver"/>
<property name="url" value="jdbc:mysql://localhost:3306/test?characterEncoding=utf8&useSSL=false"/>
<property name="username" value="root"/>
<property name="password" value="123456"/>
</dataSource>
</environment>
</environments>
<!--加载mapper映射文件-->
<mappers>
<mapper resource="mapper/EmpMapper.xml"></mapper>
</mappers>
</configuration>
2.2 编写mapper映射文件
以下注释给有标签作用的详细解释:
需要提及的是,我们有时插入一条数据之后,可能有需求返回其主键,那么分两种情况,一种是主键自增时获取主键值方案,以及一般主键获取其值方案,结果是直接存到我们传入的实体类实例里:
插入数据的主键返回:
select last_insert_id(),表示得到刚insert进去记录的主键值,适用与自增主键的数据库;
select seq_demo.nextval from dual,表示获取下一个序列生成的值,适用于存在序列的数据库;
keyProperty:将查询到的主键值设置到parameterType指定的对象的哪个属性;
order:selectKey标签中Sql语句,相对于insert语句来说的执行顺序;
resultType:指定selectKey标签中Sql语句的结果类型;
<?xml version="1.0" encoding="UTF-8" ?>
<!DOCTYPE mapper PUBLIC "-//mybatis.org//DTD Mapper 3.0//EN"
        "http://mybatis.org/dtd/mybatis-3-mapper.dtd">

<!--
    namespace: 命名空间
-->
<mapper namespace="emp">
    <!--
        select:查询标签
        insert:新增标签
        update:更新标签
        delete:删除标签

        id:唯一标识
        parameterType:输入参数类型
        resultType:输出结果类型
        #{}:占位符
            当输入参数为基本类型时,内容可以自定义建议为value或者属性名    eg:#{value}
            当输入的参数时entity实体时,内容写成属性名    eg:#{ename}

        模糊查询实现方式:(推荐方式1)
            方式1:传入参数时拼接字符传 eg:"%"+ename+"%"
            方式2:在sql语句中使用mysql提供的concat()函数 eg:concat('%',#{ename},'%')
            方式3:在sql语句中使用${}占位符拼接字符串(占位符内容必须是value,不推荐使用,存在SQL注入问题) eg:'%${value}%'
    -->

    <!--查询所有-->
    <select id="select" resultType="com.wjx.entity.Emp">
        select * from emp;
    </select>

    <!--根据id查询-->
    <select id="selectById" parameterType="java.lang.Integer" resultType="com.wjx.entity.Emp">
        select * from emp where empno = #{empno};
    </select>

    <!--模糊查询-->
    <!--
        select * from emp where ename like #{ename};
        select * from emp where ename like concat('%',#{ename},'%');
        select * from emp where ename like '%${value}%';
    -->
    <select id="selectByEname" parameterType="java.lang.String" resultType="com.wjx.entity.Emp">
        select * from emp where ename like #{ename};
    </select>

    <!--插入数据-->
    <!--
    获取主键值:
        主键自增:
            在insert标签中添加如下属性即可
            useGeneratedKeys="true"
            keyProperty="empno"
        主键不自增:
            <selectKey resultType="int" keyProperty="empno" order="AFTER">
                select last_insert_id();
            </selectKey>

    -->
    <insert id="insert" parameterType="com.wjx.entity.Emp">
        <selectKey resultType="int" keyProperty="empno" order="AFTER">
            select last_insert_id();
        </selectKey>
        insert into emp values (#{empno}, #{ename},#{job},#{mgr},#{hiredate},#{sal},#{comm},#{deptno});
    </insert>

    <!--更新数据-->
    <update id="update" parameterType="com.wjx.entity.Emp">
        update emp set ename = #{ename},job = #{job},mgr = #{mgr},hiredate = #{hiredate},sal = #{sal},
            comm = #{comm},deptno = #{deptno} where empno = #{empno};
    </update>

    <!--删除数据-->
    <delete id="delete" parameterType="java.lang.Integer">
        delete from emp where empno = #{value};
    </delete>
</mapper>
2.3 编写test测试类进行测试
-
读取全局配置文件流
-
获得SqlSessionFactory的构建类
-
根据全局配置文件流构建SqlSessionFactory
-
获取SqlSession
-
执行sql并获取结果
public class MyBatisTest {
    private SqlSession sqlSession;

    @Before
    public void setUp() throws Exception {
        // 1. 读取全局配置文件流
        InputStream is = Resources.getResourceAsStream("mybatis-config.xml");
        // 2. 获得构建SqlSessionFactory类
        SqlSessionFactoryBuilder sqlSessionFactoryBuilder = new SqlSessionFactoryBuilder();
        // 3. 根据全局配置文件流构建SqlSessionFactory
        SqlSessionFactory factory = sqlSessionFactoryBuilder.build(is);
        // 4. 获取SqlSession
        sqlSession = factory.openSession();  // 默认不自动提交事务
    }

    @Test
    public void select() throws IOException {
        // 5. 执行sql并获取结果
        List<Emp> empList = sqlSession.selectList("emp.select");
        empList.forEach(System.out::println);
    }

    @Test
    public void selectById() {
        Emp emp = sqlSession.selectOne("emp.selectById", 7934);
        System.out.println(emp);
    }

    @Test
    public void insert(){
        Emp emp = new Emp();
        emp.setEname("张三");
        emp.setComm(1200.0);
        emp.setDeptno(10);
        emp.setJob("开发");
        emp.setHiredate(new Date());
        emp.setSal(10000.0);
        emp.setMgr(7920);
        int cnt = sqlSession.insert("emp.insert", emp);
        // 提交事务
        sqlSession.commit();
        System.out.println(cnt);
    }

    @Test
    public void update(){
        Emp emp = new Emp();
        emp.setEmpno(7936);
        emp.setEname("张三");
        emp.setComm(1200.0);
        emp.setDeptno(10);
        emp.setJob("开发");
        emp.setHiredate(new Date());
        emp.setSal(10000.0);
        emp.setMgr(7920);
        int cnt = sqlSession.update("emp.update", emp);
        // 提交事务
        sqlSession.commit();
        System.out.println(cnt);
    }

    @Test
    public void delete(){
        int cnt = sqlSession.delete("emp.delete", 7936);
        cnt += sqlSession.delete("emp.delete", 7938);
        // 提交事务
        sqlSession.commit();
        System.out.println(cnt);
    }

    @Test
    public void selectByEname(){
        List<Emp> empList = sqlSession.selectList("emp.selectByEname", "%s%");
        empList.forEach(System.out::println);
    }

    @After
    public void tearDown() throws Exception {
        sqlSession.close();
    }
}
3 还原dao层开发
3.1 封装MyBatisUtils工具类
经过入门案例中的测试,有一些工作是无需每次重复运行的,因此可以封装起来:
/**
 * Mybatis工具类
 * 读取全局配置,获取SqlSession对象
 */
public class MyBatisUtils {

    /**
     * 初始化SqlSessionFactory
     */
    private static SqlSessionFactory factory;

    static {
        // 1. 读取全局配置文件流
        InputStream is;
        try {
            is = Resources.getResourceAsStream("mybatis-config.xml");
        } catch (IOException e) {
            throw new RuntimeException(e);
        }
        // 2. 获得构建SqlSessionFactory的构建类
        SqlSessionFactoryBuilder sqlSessionFactoryBuilder = new SqlSessionFactoryBuilder();
        // 3. 根据全局配置文件流构建SqlSessionFactory
        factory = sqlSessionFactoryBuilder.build(is);
    }

    /**
     * 不让用户在外部创建工具类
     */
    private MyBatisUtils(){}

    /**
     * 获取SqlSession对象
     * @return SqlSession
     */
    public static SqlSession getSqlSession(){
        // 4. 获取SqlSession
        return factory.openSession(true);   // 设置事务为自动提交
    }
}
3.2 编写dao层接口
dao层接口我们再熟悉不过,这里不过多说明了:
public interface EmpDao {
    List<Emp> select();
    Emp selectById(Integer empno);
    List<Emp> selectByEname(String ename);
    Integer insert(Emp emp);
    Integer update(Emp emp);
    Integer delete(Integer empno);
}
3.3 编写dao层接口的实现类
dao层实现类这里与以往有点儿不同,因为我们是使用的mybatis,不再是之前使用的jdbc工具或者queryRunner等工具。
因此我们先通过工具栏初始化一个sqlSession,然后再重写方法,通过sqlSession调用对应映射文件中的sql语句,并接收结果返回。
注意:我这里偷懒了,一定要在使用sqlSession之后关闭。
public class EmpDapImpl implements EmpDao {
    private SqlSession sqlSession = MyBatisUtils.getSqlSession();
    @Override
    public List<Emp> select() {
        return sqlSession.selectList("emp.select");
    }

    @Override
    public Emp selectById(Integer empno) {
        return sqlSession.selectOne("emp.selectById", empno);
    }

    @Override
    public  List<Emp> selectByEname(String ename) {
        return sqlSession.selectList("emp.selectByEname", "%"+ename+"%");
    }

    @Override
    public Integer insert(Emp emp) {
        return sqlSession.insert("emp.insert", emp);
    }

    @Override
    public Integer update(Emp emp) {
        return sqlSession.update("emp.update", emp);
    }

    @Override
    public Integer delete(Integer empno) {
        return sqlSession.delete("emp.delete", empno);
    }
}
4 使用mapper代理
我们发现通过原始的dao层来使用mybatis,仍然有很多模板代码,因此mybatis给我们提供了一个很强大的mapper代理机制,通过此机制不仅可以解决我们java代码中诸如”emp.delete“等硬编码问题,还会大大简化我们的代码,提升开发效率。
但使用mapper代理有四大原则:
1、Mapper.xml文件中的namespace与mapper接口的类路径相同。
2、Mapper.xml中定义的每个标签的id与Mapper接口方法名相同。
3、Mapper.xml中定义的每个sql的parameterType的类型与Mapper接口方法的参数类型相同。
4、Mapper.xml中定义的每个sql的resultType的类型与Mapper接口方法返回值类型相同。
mapper映射文件其实与入门案例相比,仅仅改了一个namespace,因为我们的接口方法名字与id都是对应的,而且方法参数和返回参数类型也都是对应的,这样做的好处就是对mapper映射文件添加了约束,有了约束mybatis才能更好的解析我们写的代码,以简化我们的工作。
使用mapper代理,仍少不了sqlSession,通过SqlSession的getMapper()方法,来获取相对应的代理,并通过这个代理来调用接口的方法。其实获取的这个代理就相当于mybatis替我们实现了接口,并返回给我们一个这个接口的实例对象。
mapper映射文件如下:
<?xml version="1.0" encoding="UTF-8" ?>
<!DOCTYPE mapper PUBLIC "-//mybatis.org//DTD Mapper 3.0//EN"
        "http://mybatis.org/dtd/mybatis-3-mapper.dtd">

<!--
    mapper代理四一致原则:
        1、Mapper.xml文件中的namespace与mapper接口的类路径相同。
        2、Mapper.xml中定义的每个标签的id与Mapper接口方法名相同。
        3、Mapper.xml中定义的每个sql的parameterType的类型与Mapper接口方法的参数类型相同。
        4、Mapper.xml中定义的每个sql的resultType的类型与Mapper接口方法返回值类型相同。
-->

<!--
    namespace: 命名空间(可自定义但不要与别的命名空间重复)
        当使用mapper代理时,命名空间要写接口的全路径
-->
<mapper namespace="com.wjx.mapper.EmpMapper">
    <!--
        select:查询标签
        insert:新增标签
        update:更新标签
        delete:删除标签

        id:唯一标识
        parameterType:输入参数类型
        resultType:输出结果类型
        #{}:占位符
            当输入参数为基本类型时,内容可以自定义建议为value或者属性名    eg:#{value}
            当输入的参数时entity实体时,内容写成属性名    eg:#{ename}

        模糊查询实现方式:(推荐方式1)
            方式1:传入参数时拼接字符传 eg:"%"+ename+"%"
            方式2:在sql语句中使用mysql提供的concat()函数 eg:concat('%',#{ename},'%')
            方式3:在sql语句中使用${}占位符拼接字符串(占位符内容必须是value,不推荐使用,存在SQL注入问题) eg:'%${value}%'
    -->

    <!--查询所有-->
    <select id="select" resultType="com.wjx.entity.Emp">
        select * from emp;
    </select>

    <!--根据id查询-->
    <select id="selectById" parameterType="java.lang.Integer" resultType="com.wjx.entity.Emp">
        select * from emp where empno = #{empno};
    </select>

    <!--模糊查询-->
    <!--
        select * from emp where ename like #{ename};
        select * from emp where ename like concat('%',#{ename},'%');
        select * from emp where ename like '%${value}%';
    -->
    <select id="selectByEname" parameterType="java.lang.String" resultType="com.wjx.entity.Emp">
        select * from emp where ename like #{ename};
    </select>

    <!--插入数据-->
    <insert id="insert" parameterType="com.wjx.entity.Emp">
        insert into emp values (#{empno}, #{ename},#{job},#{mgr},#{hiredate},#{sal},#{comm},#{deptno});
    </insert>

    <!--更新数据-->
    <update id="update" parameterType="com.wjx.entity.Emp">
        update emp set ename = #{ename},job = #{job},mgr = #{mgr},hiredate = #{hiredate},sal = #{sal},
            comm = #{comm},deptno = #{deptno} where empno = #{empno};
    </update>

    <!--删除数据-->
    <delete id="delete" parameterType="java.lang.Integer">
        delete from emp where empno = #{value};
    </delete>
</mapper>
接口还和原来一样不变,测试的时候,只需通过mapper代理调用方法即可:
SqlSession sqlSession = MyBatisUtils.getSqlSession();
EmpMapper mapper = sqlSession.getMapper(EmpMapper.class);
List<Emp> empList = mapper.select();
empList.forEach(System.out::println)
5 配置文件详解
5.1 mybatis-config.xml文件配置
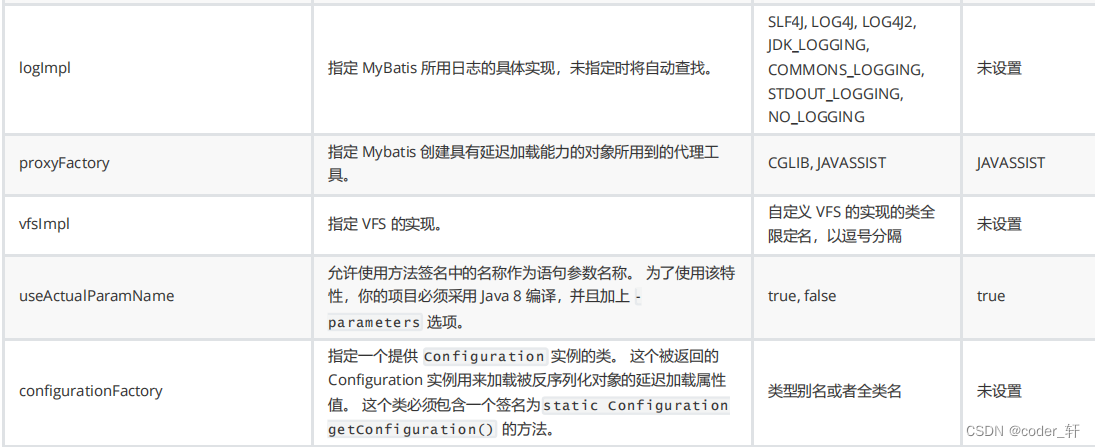
Mybatis的配置文件主要包含以下标签(有序进行配置):
- properties(属性)
- settings(全局配置参数)
- typeAliases(类型别名)
- typeHandlers(类型处理器)
- objectFactory(对象工厂)
- plugins(插件)
- environments(环境集合属性对象)
- environment(环境子属性对象)
- transactionManager(事务管理)
- dataSource(数据源)
- mappers(映射器)
常用的有properties,settings,typeAliases、environments和mappers。
5.1.1 properties
先说properties,这个我们之前已经很熟悉了,之前链接数据库时为了解决硬编码问题,我们经常写数据库的配置文件,在mybatis中我们依旧可以写配置文件,然后通过properties标签的resources属性来引用配置文件,然后通过“${driver}”进行引用参数。
也可以在properties标签中使用property 标签来定义一个键值对。具体使用如下:
    <properties resource="db.properties">
        <!--<property name="driver" value="com.mysql.jdbc.Driver"/>-->
    </properties>

    <environments default="mysql">
        <environment id="mysql">
            <!-- 配置事务:使用jdbc的事务管理 -->
            <transactionManager type="JDBC"/>
            <!--
                配置数据源:连接数据库的信息
                type: 表示连接是否使用连接池,POOLED表示mybatis中自带的连接池;JNDI、
                POOLED、UNPOOLED
            -->
            <dataSource type="POOLED">
                <property name="driver" value="${driver}"/>
                <property name="url" value="${url}"/>
                <property name="username" value="${username}"/>
                <property name="password" value="${password}"/>
            </dataSource>
        </environment>
    </environments>
1. 在properties标签体内定义的属性首先被读取;
2. 然后会读取properties标签中resource或url加载的属性,它会覆盖已读取的同名属性;
3. 最后读取parameterType传递的属性,它会覆盖已读取的同名属性;
建议:
1. 不要在properties标签体内添加任何属性值,只将属性值定义在properties文件中;
2. 在properties文件中定义属性名要有一定的特殊性,如:XXXXX.XXXXX.XXXX;
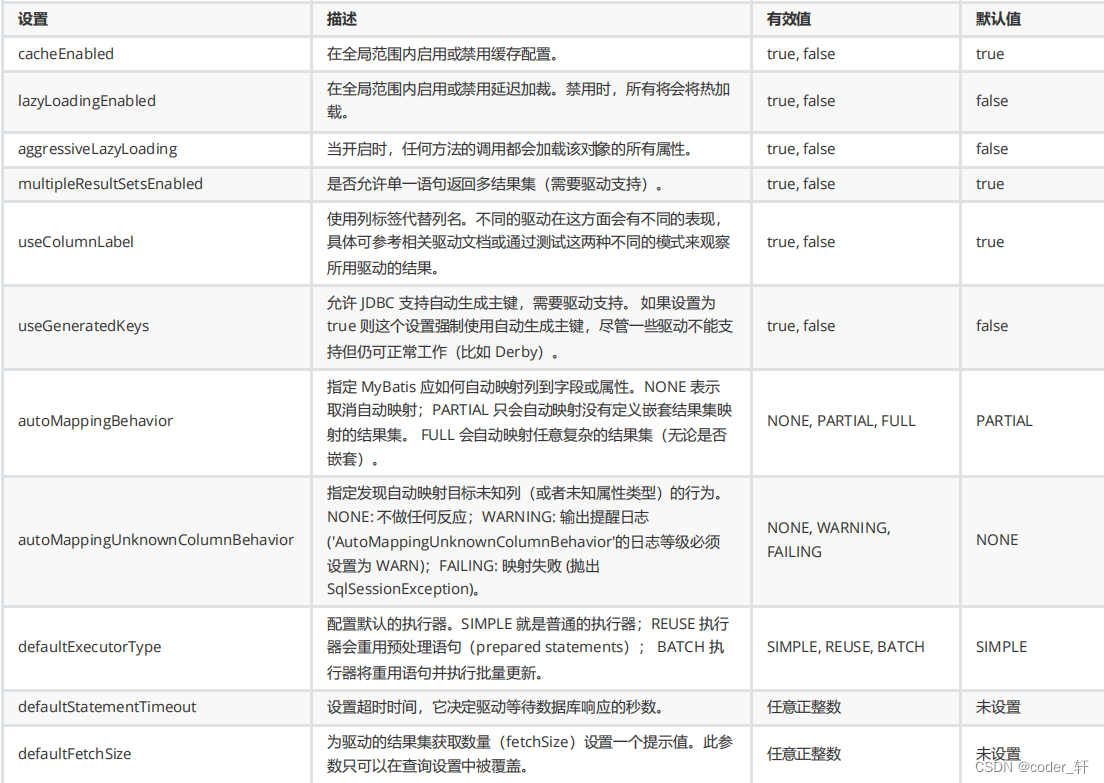
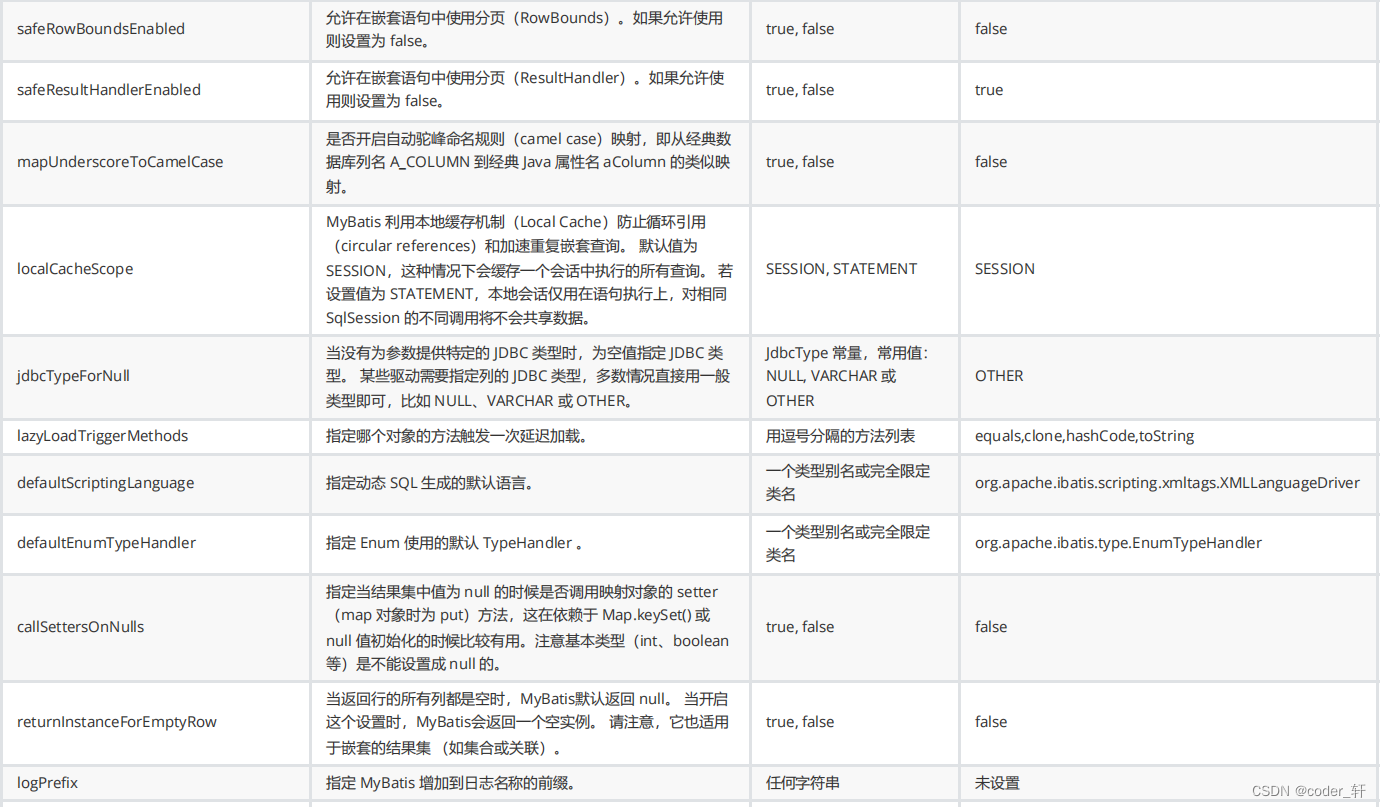
5.1.2 settings
settings标签用于设置各种全局配置,如开启字段下划线转驼峰,在全局内使用懒加载等等,详细的设置详情如下:
示例代码如下,开启下划线转驼峰:
    <settings>
        <setting name="mapUnderscoreToCamelCase" value="true"/>
    </settings>
5.1.3 typeAliases
typeAliases标签用来起类型别名,在我们的mappert映射文件中,对于输入和输出参数类型,尤其是复杂的实体类或更复杂的类型时我们都要对其指定,并且有多个sql时每次都要写一长串类型的全路径名,因此我们可以通过typeAliases标签来起别名,简化我们的代码:
typeAlias标签的type属性指定类型,alias属性指定别名。
当一个包内所有类都可能会作为mapper映射文件中的输入或输出参数时,我们可以直接使用package标签,来为整个包内的所有类都设置别名,别名设置的默认规则时首字母小写。
    <typeAliases>
        <!--<typeAlias type="com.wjx.entity.Emp" alias="emp"></typeAlias>-->

        <!--使用package 那么此包下的所有类都会起别名,规则为首字母小写-->
        <package name="com.wjx.entity"/>
    </typeAliases>
5.1.4 environments
environments就不用多说了,来配置我们数据库开发的环境,用的什么驱动,数据库链接,数据库连接池,用户名和密码等等。
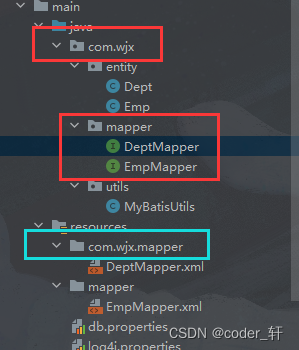
5.1.5 mappers
当我们使用mapper映射文件时,我们要加载它,就一定要在此进行加载,否则会报错提示找不到xxx.xml文件等错误。而加载mapper映射文件有以下三种方式:
- 通过mapper标签的resource加载mapper映射文件
- 通过mapper标签的class属性,也就是通过接口的全路径来加载mapper映射文件
- 通过package标签,也就是将包中的所有影身文件全部加载
注意:第二和第三种方法有弊端,因为要将映射文件和接口放在同一目录下,如何放呢,也简单,我们知道maven编译后resources目录下和java目录下的内容是放在一起的,我们只需要将mapper映射文件的目录结构创建的与接口一致即可解决。
    <!--加载mapper映射文件-->
    <mappers>
        <!--
            单个加载映射文件
                1、resource
                2、class
                    使用此方式要保证mapper文件与接口在同一目录下。
        -->
<!--        <mapper resource="mapper/EmpMapper.xml"></mapper>-->
<!--        <mapper class="com.wjx.mapper.DeptMapper"></mapper>-->

        <!--
            批量加载映射文件
                package标签
                使用此方式同样要保证mapper文件与接口在同一目录下。
                并且使用此方式,就不要再使用单个加载映射文件会出错。
        -->
        <package name="com.wjx.mapper"/>
    </mappers>
5.2 mapper.xml文件配置
5.2.1 输入映射类型parameterType
1. 简单类型
简单类型,在parameterType属性中,我们既可以写全路径如“java.lang.Integer”,也可以写内置好的别名“int”,在之前的demo中都已经尝试过,比如根据id查询数据。
2. 实体类型
实体类型,就是输入的参数是对应一个实体表的,配置有别名后,可以写别名例如以上所写的“emp”,"person","user"等等。类似新增和更新数据都用到了实体类型。
3. 自定义类型
自定义类型,其实和实体类型类似,只不过它不再对应表中的字段,而且如果你将该类写到了其他包下,记得要起别名或者在parameterType中引用全路径。
比如,分页查询,我们需要起始条目序号和每一页的数量,这就需要封装一个Page类来作为输入参数:
    <!--
        List<User> selectByPage(Page page)
        因为我们设置过别名,因此可以直接使用page无需写路径名
    -->
    <select id="selectByPage" parameterType="page" resultType="user">
        select * from user limit #{offset}, #{pageSize};
    </select>
4. 自定义复杂类型
自定义复杂类型也属于自定义类型的范畴,只不过结构更加深入了,比如我们要写一个带条见的分页查询,此时呢我们要再写一个UserQuery类,类中封装有一个page和一个user,以此类作为参数,在mapper映射文件中使用时候,多少有点不同,我们要用“对象.成员变量”的方式来给我们的sql语句传入参数例如:
    <!--
        List<User> selectByPageWithCondition(UserQuery userQuery)
        当输入参数是一个复杂类型时,如果成员不是简单类型,若要使用起成员的成员,切记用#{对象名.属性名}的方式来写占位符,类似ognl语言
    -->
    <select id="selectByPageWithCondition" parameterType="userQuery" resultType="user">
        select *
        from user
        where username like concat('%',#{user.username},'%')
        limit #{page.offset}, #{page.pageSize};
    </select>
5. Map类型
Map类型我们都知道,它存储的是一个键值对集合,那么使用起来和实体类型类似,使用实体类型是#{成员变量名},而使用map是#{key},比如我们需要根据账户名和密码查询一个用户信息:
    <!--
        User selectByNameWithPwd(Map<String, Object> map)
        占位符的内容取决与map中key的值
        注意:多个输入参数时,可以在接口方法出使用@Param("pwd")注解
            对应占位符也应该使用@Param注解的值来填充
    -->
    <select id="selectByNameWithPwd" parameterType="map" resultType="user">
        select * from user where username = #{name} and password = #{pwd};
    </select>
6. 多个输入参数
我们前五种类型,细心的会发现全都是一个参数,那么我们非要传入两个或者多个参数,但是mybatis给我们提供的sql标签中只有一个parameterType,怎样才能描述多个输入参数的类型呢。这其实是不可以的,但是也有解决方案,不是描述多种输入参数类型,而是给接口对应方法的输入参数加上@param("password")注解,注解中写的值,就是我们sql语句中要写的占位符内容,其实这种写法本质上就是mybatis帮我们封装了一个map,建议自己封装就好,不要用此注解,示例如下:
    /**
     * 多个输入参数 使用param注解 而映射文件中的占位符内容应写成param注解的值
     */
    User selectByNameWithPwd(@Param("name") String name, @Param("pwd") String pwd);
    <!--
        User selectByNameWithPwd(Map<String, Object> map)
        占位符的内容取决与map中key的值
        注意:多个输入参数时,可以在接口方法出使用@Param("pwd")注解
            对应占位符也应该使用@Param注解的值来填充
    -->
    <select id="selectByNameWithPwd" parameterType="map" resultType="user">
        select * from user where username = #{name} and password = #{pwd};
    </select>
5.2.2 输出映射类型resultType
1. 简单类型
我们之前所写的insert和update、delete等返回的可不是简单类型,因为当时我们就没有resultType属性。现在我们要统计人数,必然返回一个Integer类型的数据,此时就要定义resultType为int,还有根据名字查询住址也应该是一个简单类型String,示例如下:
    <!--
        Integer getTotal()
        输出参数为简单类型Integer
    -->
    <select id="getTotal" resultType="int">
        select count(1) from person;
    </select>

    <!--
        void getAdd()
        输出参数为简单类型String
            由于输入参数只有一个,且是简单类型,因此占位符中的内容可以为任意
    -->
    <select id="getAdd" parameterType="string" resultType="string">
        select person_address from person where person_name = #{value};
    </select>
2. 实体类型以及实体类列表
返回结果是一个实体类型或列表就不用过多赘述,之前所写的select以及selectById就是很好的例子……
3. Map类型
我们知道sql语句查询的其实是一个结果集,那么mybatis会根据查询到的列名和值封装成一个map,如果列名是下划线的写法,则对应的key值也是下划线写法,因此这种我们不太建议使用例如:
    <!--
        Map<String, Object> selectById(Integer id)
        输出参数为Map类型
            注意此时返回结果是:{person_address=洛阳, person_name=曹操, id=1, person_age=40}
    -->
    <select id="selectById" parameterType="int" resultType="map">
        select * from person where id = #{id};
    </select>
4. resultMap
我们的select标签中,还有一个属性就是resultMap,它用来定义自定义返回的结果集,应用 于什么场景呢?
如果我们没有开启下划线转驼峰,那么mybatis就会通过获取结果集的列名,然后通过反射的方式来给我们的实体类的实例对象成员进行赋值,那么很多字段可能都不存在,因此数据能查询到,但是数据却不是我们想要的数据,此时就用到了自定义结果集:
resultMap用于定义返回的结果或者结果集
id标签:设置主键字段与属性的映射关系
result标签:设置非主键字段与属性的映射关系
property属性:对应类中的属性
column属性:对应表中的字段
    <!--
       resultMap用于定义返回的结果或者结果集
       id标签:设置主键字段与属性的映射关系
       result标签:设置非主键字段与属性的映射关系
            property属性:对应类中的属性
            column属性:对应表中的字段
   -->
    <resultMap id="personResultMap" type="com.wjx.entity.Person">
        <id property="id" column="id"></id>
        <result property="personName" column="person_name"></result>
        <result property="personAddress" column="person_address"></result>
        <result property="personAge" column="person_age"></result>
    </resultMap>

    <!--
         public List<Person> select()
            在不设置下划线转驼峰时,若设置resultType=“person”,则返回的集合中很多字段值都为null,这是因为结果集与person对象属性不匹配造成的
            原因:mybatis底层通过反射的机制读取结果集和列名,并一一填充到实例对象中。
            解决:使用resultMap,自定义返回结果集
    -->
    <select id="select" resultMap="personResultMap">
        select * from person;
    </select>
5.2.3 动态SQL
1. where标签、if标签
想一下当我们使用淘宝搜索商品时,是不是有很多的筛选条件,但是我们并不是每次都写完所有的筛选条件进行筛选,我们筛选内容是不固定的,因此我们写一个多条件查询时往往是以判断用户输入的字段是否为null,然后进行拼接sql,这显然是一个很恶心人的过程,因此mybatis给我们提供了一系列动态sql的标签:
where标签:
根据是否有条件自动填充where关键字
并且会自动提出一个条件表达式的and或or关键字
if标签:
根据test中表达式的值来决定是否拼接sql
注意:test表达式中直接写输入参数的属性名即可,要进行逻辑运算应使用and 或 or
    <!--
        List<Emp> selectByCondition(Emp emp)
        where标签:
            根据是否有条件自动填充where关键字
            并且会自动提出一个条件表达式的and或or关键字
        if标签:
            根据test中表达式的值来决定是否拼接sql
    -->
    <select id="selectByCondition" parameterType="emp" resultType="emp">
        select * from emp
        <where>
            <if test="ename != null and ename != ''">
                and ename like concat('%',#{ename},'%')
            </if>
            <if test="sal != null">
                and sal > #{sal}
            </if>
            <if test="deptno != null">
                and deptno = #{deptno}
            </if>
        </where>
    </select>
2. set标签
当我们更新数据时,也有可能只更新部分,并不会一下子更新所有内容,因此我们也可以通过set和if标签来拼接动态sql:
set标签:
如果所有if条件都不成立不会添加set关键字,并且会自动提出末尾无用的逗号
    <!--
        Integer update(Emp emp)
        set标签:
            如果所有if条件都不成立不会添加set关键字,并且会自动提出末尾无用的逗号
    -->
    <update id="update" parameterType="emp">
        update emp
        <set>
            <if test="ename != null and ename != ''">
                ename = #{ename},
            </if>
            <if test="job != null">
                eno = #{eno},
            </if>
            <if test="mgr != null">
                mgr = #{mgr},
            </if>
            <if test="hiredate != null">
                hiredate = #{hiredate},
            </if>
            <if test="sal != null">
                sal = #{sal},
            </if>
            <if test="comm != null">
                comm = #{comm},
            </if>
            <if test="deptno != null">
                deptno = #{deptno},
            </if>
        </set>
        where empno = #{empno};
    </update>
3. trim标签
当我们新增一条数据时,也有可能一些字段值是空的,此时我们也可以进行编写动态sql,trim标签的作用就是给sql拼接开头和结尾字符串,但是该标签不常用,了解即可:
新增的字段值不确定有没有,此时可以通过trim标签和if标签配合使用,但trim不常用
trim标签属性解析:
prefix:前缀,包含内容前加上某些字符。
suffix:后缀,包含内容后加上某些字符。
prefixOverrides:剔除包含内容前的某些字符。
suffixOverrides:剔除包含内容后的某些字符。
    <insert id="insert" parameterType="emp">
        insert into emp
        <trim prefix="(" suffix=")" suffixOverrides=",">
            <if test="ename != null and ename != ''">
                ename,
            </if>
            <if test="job != null">
                job,
            </if>
            <if test="mgr != null">
                mgr,
            </if>
            <if test="hiredate != null">
                hiredate,
            </if>
            <if test="sal != null">
                sal,
            </if>
            <if test="comm">
                comm,
            </if>
            <if test="deptno != null">
                deptno,
            </if>
        </trim>
        values
        <trim prefix="(" suffix=")" suffixOverrides=",">
            <if test="ename != null and ename != ''">
                #{ename},
            </if>
            <if test="job != null">
                #{job},
            </if>
            <if test="mgr != null">
                #{mgr},
            </if>
            <if test="hiredate != null">
                #{hiredate},
            </if>
            <if test="sal != null">
                #{sal},
            </if>
            <if test="comm">
                #{comm},
            </if>
            <if test="deptno != null">
                #{deptno},
            </if>
        </trim>
    </insert>
4. foreach标签
foreach标签顾名思义,具有遍历的意思,应用场景很多,比如批量新增数据或者批量删除数据。批量新增我们的输入参数是一个实体类列表,批量删除我们输入参数是一个id数组,此时我们都可以通过foreach标签来对这些列表和数组进行遍历,拼接动态sql:
foreach标签:遍历集合或者数组
collection:
如果传入参数是集合固定list
如果传入参数是数组固定array
如果列表或者数组中的参数是实体类型,则使用时应为 对象名.属性名
item:每次遍历生成的对象
separator:每次遍历的分隔符,会剔除最后一次遍历的分隔符
open:开始遍历时拼接的串
close:结束遍历时拼接的串
写占位符时候,我们直接使用item属性定义的值即可,如果要用起成员,应使用item.成员属性!
    <!--
        Integer insertMore(List<Emp> empList)   一次新增多条数据
    -->
    <insert id="insertMore" parameterType="emp">
        insert into emp (ename,job,mgr,hiredate,sal,comm,deptno)
        values
        <foreach collection="list" item="emp" separator=",">
            (#{emp.ename},#{emp.job},#{emp.mgr},#{emp.hiredate},#{emp.sal},#{emp.comm},#{emp.deptno})
        </foreach>
    </insert>

    <!--
        Integer delete(Integer[] ids)
        一次删除多条数据
    -->
    <delete id="delete" parameterType="int">
        delete from emp where empno in
        <foreach collection="array" item="empno" open="(" close=")" separator=",">
            #{empno}
        </foreach>
    </delete>
5.2.4 SQL片段
sql片段就可以理解为前端中的代码片段,提取出来一块经常反复使用的代码块,来进行复用,既可以简化代码,也有利于维护。
sql标签:代码片段
id:代码片段唯一标识
include标签:引入代码片段
refid:引入代码片段的id
    <!--
        sql标签:代码片段
            id:代码片段唯一标识
        include标签:引入代码片段
            refid:引入代码片段的id
    -->
    <sql id="fields">
        empno, ename, job, mgr, hiredate, sal, comm, deptno
    </sql>

    <select id="select" resultType="emp">
        select
        <include refid="fields"></include>
        from emp;
    </select>
6 Mybatis关联查询
6.1 数据模型分析
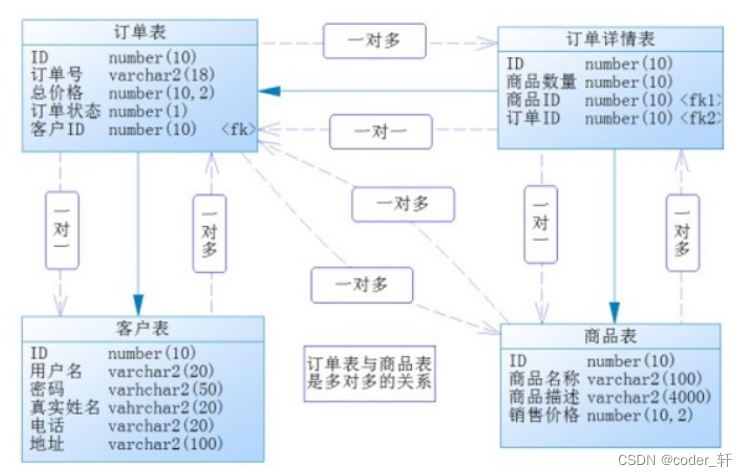
总共四张表:订单表,用户表,订单详情表,商品表
在分析前先记住一句话:多对多关系的两张表,一定存在着一张中间表
这四张表核心时订单表,根据现实生活经验不难想象,一条订单要与客户,订单详情,商品都要有关系。根据一条订单记录,我们可以确定是哪个客户下的订单,我们可以看到订单中的一系列相信信息,同时也能根据一条订单查询到对应商品的详细信息。
但是如果我们开发持久层的时候,会发小每个查询的结果集都不是一个具体的实体类,如若都封装成一个vo类,确实可行,但太让人头大了,起名字都是个事。因此呢我们要进行关联查询。
订单——客户:一个客户可以下多个订单,一个订单只属于一个客户
订单——订单详情:一个订单中有若干订单详情,因为一个订单中可以购买多个商品,一个订单详情只能属于一个订单
订单详情——商品:一个订单详情包含一个商品,一个商品可以放在多个订单详情中
订单——商品:一个订单存在多个商品,一个商品存在多个订单
不难发现:订单和商品是双向一对多的,因此他们之间属于多对多关系,因此呢他们有一个中间表来进行关联,那就是订单详情表。
6.2 一对一查询
要求:查询订单信息,要求包含用户信息,订单—>客户 (一对一)
我们就跳过封装vo类,直接通过resultMap来实现了,用到一个标签association(用于一对一关系映射描述)
property属性: 关系属性名称。
javaType属性: 关系属性类型。
因为是一对一关系,因此我们可以在订单实体类中加一个User客户属性,以此来丰富订单的信息。
其他都没什么要说的,接口和平常一样,主要看mapper,自定义返回结果集,然后使用association标签描述一对一关系:
    <resultMap id="baseResultMap" type="orders">
        <id column="id" property="id"></id>
        <result column="order_number" property="orderNumber"></result>
        <result column="total_price" property="totalPrice"></result>
        <result column="status" property="status"></result>
        <result column="user_id" property="userId"></result>
        <!--
            association标签:一对一映射关系
                property属性:要映射到返回结果的哪个成员变量上
                javaType属性:该成员变量类型,全路径描述,若配置有别名可以使用别名
        -->
        <association property="user" javaType="com.wjx.entity.User">
            <id column="user_id" property="id"></id>
            <result column="username" property="username"></result>
            <result column="password" property="password"></result>
            <result column="realname" property="realname"></result>
        </association>
    </resultMap>

    <select id="selectWithUserByResultMap" resultMap="baseResultMap">
        select o.id,
               o.order_number,
               o.total_price,
               o.status,
               o.user_id,
               u.username,
               u.password,
               u.realname
        from orders o,
             user u
        where o.user_id = u.id;
    </select>
6.3 一对多查询
要求: 查询订单信息,关联用户和订单详情
订单—>订单详情 (一对多)
因为是一对多的关系,而且依旧与订单表有直接关联,因此我们可以在订单实体中加一个List<OrderDetail>属性,来表示一个订单中有多条订单详情。在sql查询的结果集中是多条的,但是在我们返回的集合中是层次更深的,展开来看其实也可当成多条记录(细品)。
而一对多显然就不能用association标签了,需要用到collection标签:
collection标签
:
一对多关系映射描述。
property属性: 关系属性名称。
ofType属性: 关系属性是一个List
集合,集合中存放的元素类型。
mapper文件如下:
<!--
        extends属性:继承其他的resultMap
    -->
    <resultMap id="OrdersWithDetailMap" type="orders" extends="baseResultMap">
        <!--
            collection标签:一对多映射关系
                property属性:映射的成员变量
                ofType属性:该成员变量泛型类型
        -->
        <collection property="ordersDetailList" ofType="com.wjx.entity.OrdersDetail">
            <id column="detail_id" property="id"></id>
            <result column="amount" property="amount"></result>
            <result column="id" property="ordersId"></result>
            <result column="goods_id" property="goodsId"></result>
        </collection>
    </resultMap>

    <select id="selectWithUserAndDetail" resultMap="OrdersWithDetailMap">
        SELECT o.id,
               o.order_number,
               o.total_price,
               o.STATUS,
               o.user_id,
               u.username,
               u.PASSWORD,
               u.realname,
               d.id detail_id,
               d.amount,
               d.goods_id
        FROM orders o,
             user u,
             orders_detail d
        WHERE o.user_id = u.id
          and o.id = d.orders_id;
    </select>
注意:这里resultMap中使用了extends属性,它用来继承其他resultMap,可以简化我们重复的开发,也便于维护。
6.4 多对多查询
要求:查询订单信息,关联查询用户,订单详情和商品信息。
订单—>商品 (多对多)
细心的就会注意到,订单表和商品表并没有什么直接联系,而是通过中间表订单详情进行联系的,因此我们不能再在订单实体中添加商品属性了。不难想象,既然要展示出来商品信息,又不能在订单实体中添加属性,那就只有在订单详情中添加一个商品goods属性了,而且订单详情与商品表是一对一关系,既然是一对一关系我们已经学会了association标签的使用,只需要在一对多查询的基础上进行嵌套就可以了。
mapper文件如下:
    <!--
        查询订单信息 同时查询用户信息 订单详情信息 商品详情信息   多对多关系
        注意:
            双向一对多就是一个多对多关系
            多对多关系中,一定有一个中间表
            比如本例中:
                一个订单对应多个订单详情
                一个订单详情对应一个商品信息
                一个商品信息对应多个订单详情
    -->
    <resultMap id="OrdersWithUDGMap" type="Orders" extends="baseResultMap">
        <collection property="ordersDetailList" ofType="com.wjx.entity.OrdersDetail">
            <id column="detail_id" property="id"></id>
            <result column="amount" property="amount"></result>
            <result column="id" property="ordersId"></result>
            <result column="goods_id" property="goodsId"></result>
            <association property="goods" javaType="com.wjx.entity.Goods">
                <id column="goods_id" property="id"></id>
                <result column="goods_name" property="goodsName"></result>
                <result column="description" property="description"></result>
                <result column="price" property="price"></result>
            </association>
        </collection>
    </resultMap>

    <select id="selectWithUDG" resultMap="OrdersWithUDGMap">
        SELECT o.id,
               o.order_number,
               o.total_price,
               o.STATUS,
               o.user_id,
               u.username,
               u.PASSWORD,
               u.realname,
               d.id detail_id,
               d.amount,
               d.goods_id,
               g.goods_name,
               g.description,
               g.price
        FROM orders o,
             USER u,
             orders_detail d,
             goods g
        WHERE o.user_id = u.id
          and o.id = d.orders_id
          and d.goods_id = g.id;
    </select>
6.5 关联查询总结
使用association和collection完成一对一和一对多高级映射(对结果有特殊的映射要求)
作用:将关联查询信息映射到一个实体类对象中。
场合:为了方便查询关联信息可以使用association将关联信息映射为当前对象的一个属性,比如:查询订单以及关联用户信息。
作用:将关联查询信息映射到一个list集合中。
场合:为了方便查询遍历关联信息可以使用collection将关联信息映射到list集合中,比如:查询用户权限范围模块及模块下的菜单,可使用collection将模块映射到模块list中,将菜单列表映射到模块对象的菜单list属性中,这样的作的目的也是方便对查询结果集进行遍历查询。如果使用resultType无法将查询结果映射到list集合中。
resultMap标签可以通过extends属性来继承一个已有的或公共的resultMap,避免重复配置的出现,减少配置量。
7 Mybatis懒加载
这里懒加载的概念和前端懒加载的概念类似,就是在用户没有触发一些操作之前,只展示部分数据,当用户需要看到一些相信的信息时候,才会加载,以减轻服务器的压力。
而mybatis的懒加载也是一样的,如果你没有使用到一些属性时候,不进行加载,当你使用到了才会执行相关的sql,以此来减轻数据库服务器的压力。
但是要进行懒加载必须要拆分sql,如果不拆分sql它是万万不可能进行懒加载操作的。
7.1 懒加载配置
在mybatis配置文件mybatis-config.xml中还记得有一个settings标签吧,我们开启下划线转驼峰用到的就是此标签,同样若要开启懒加载也要用到此标签,以下是开启懒加载的属性:
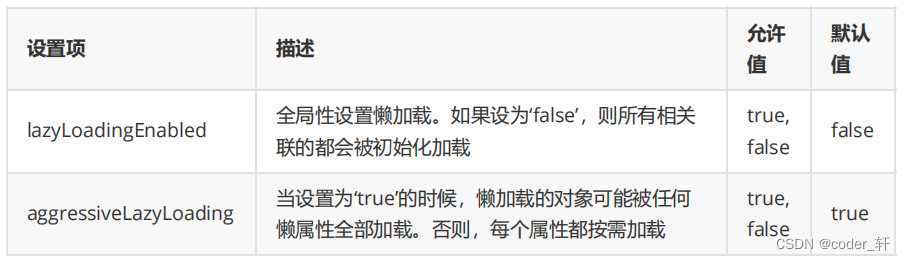
    <settings>
        <!--
            lazyLoadingEnabled:全局性设置懒加载 默认false
        -->
        <setting name="lazyLoadingEnabled" value="true"/>
        <!--
            aggressiveLazyLoading:当设置为‘true’的时候,懒加载的对象可能被任何懒属性全部加载。否则,每个属性都按需加载 默认true
        -->
        <setting name="aggressiveLazyLoading" value="false"/>
    </settings>
7.2 使用association实现懒加载
要求:查询所有员工信息,懒加载员工所属部门的信息
分析:
既然要拆分sql,原本我们做关联查询是把部门信息全都封装在员工列表中了,但是展示时候呢并不展示部门信息,只有进行点击或者某些操作时候才会显示所属部门信息,因此拆分sql(查询所有员工信息 + 查询该员工所属部门信息)。
我们依旧要在Emp员工实体类中定义一个部门信息属性,但是呢在没有使用到它的时候不进行加载,因此EmpMapper文件的编写如下:
<mapper namespace="com.wjx.mapper.EmpMapper">
    <!--
        List<Emp> selectOneToOne()
        懒加载:
            1. 开启全局懒加载(设置lazyLoadingEnabled:true aggressiveLazyLoading:false)
            2. 拆分sql
            3. resultMap中关联关系映射使用select和column属性值
    -->
    <resultMap id="baseResultMap" type="Emp">
        <id column="empno" property="empno"></id>
        <result column="ename" property="ename"></result>
        <result column="job" property="job"></result>
        <result column="mgr" property="mgr"></result>
        <result column="hiredate" property="hiredate"></result>
        <result column="sal" property="sal"></result>
        <result column="comm" property="comm"></result>
        <result column="deptno" property="deptno"></result>
        <association property="dept" javaType="dept" select="com.wjx.mapper.DeptMapper.selectByDeptno" column="deptno">
        </association>
    </resultMap>

    <select id="selectOneToOne" resultMap="baseResultMap">
        select * from emp;
    </select>

    <!--
        用于DeptMapper中懒加载部门员工列表信息
    -->
    <select id="selectByDeptno" parameterType="int" resultType="emp">
        select * from emp where deptno = #{deptno}
    </select>
</mapper>
deptmapper.xml文件的代码:
    <!--
        用于EmpMapper中懒加载部门信息
    -->
    <select id="selectByDeptno" parameterType="int" resultType="dept">
        select * from dept where deptno = #{deptno};
    </select>
当我们没有操作到emp的dept属性时候,就只执行了 select * from emp; 而当我们操作到dept属性时,就会调用association 标签中的select指定接口的方法,并传入指定的参数,注释中给有详细说明。
7.3 使用collection实现懒加载
同理拆分sql,依旧在dept实体中添加一个emp列表属性,当我们没有进行操作的时候,是不会加载员工列表相关信息的。
同时我们也要在empmapper接口中写一个根据部门id查询员工列表的方法,其实上面的EmpMapper文件中已经写好了根据部门id查询员工列表的方法,我们来看DeptMapper的代码:
    <!--
        List<Dept> selectOneToMore()
        懒加载:
            1. 开启全局懒加载(设置lazyLoadingEnabled:true aggressiveLazyLoading:false)
            2. 拆分sql
            3. resultMap中关联关系映射使用select和column属性值
    -->
    <resultMap id="baseResultMap" type="Dept">
        <id column="deptno" property="deptno"></id>
        <result column="dname" property="dname"></result>
        <result column="loc" property="loc"></result>
        <!--
        懒加载用到的属性:
                select属性:要调用的sql语句或者接口方法
                column属性:传入参数是那一列的值
        -->
        <collection property="empList" ofType="emp" select="com.wjx.mapper.EmpMapper.selectByDeptno" column="deptno"></collection>
    </resultMap>

    <select id="selectOneToMore" resultMap="baseResultMap">
        select * from dept;
    </select>
7.4 测试
package com.wjx;

import com.wjx.entity.Dept;
import com.wjx.entity.Emp;
import com.wjx.mapper.DeptMapper;
import com.wjx.mapper.EmpMapper;
import com.wjx.utils.MyBatisUtils;
import org.apache.ibatis.session.SqlSession;
import org.junit.After;
import org.junit.Before;
import org.junit.Test;
import sun.dc.pr.PRError;

import java.util.List;

public class LazyTest {
    private SqlSession sqlSession;
    private EmpMapper empMapper;
    private DeptMapper deptMapper;

    @Before
    public void before() {
        sqlSession = MyBatisUtils.getSqlSession();
        empMapper = sqlSession.getMapper(EmpMapper.class);
        deptMapper = sqlSession.getMapper(DeptMapper.class);
    }

    @After
    public void after() {
        sqlSession.close();
    }

    /**
     * 查询员工时 关联查询部门信息(懒加载方式) 一对一
     */
    @Test
    public void testOneToOne(){
        List<Emp> empList = empMapper.selectOneToOne();
        for (Emp emp : empList) {
            System.out.println(emp.getEmpno() + "," + emp.getEname());  //select * from emp;
            System.out.println("=============================华丽分割线(懒加载)============================================");
            System.out.println(emp.getDept().getDname());   //select * from dept where deptno = ?;
        }
    }

    /**
     * 查询部门时 关联查询员工信息(懒加载方式) 一对多
     */
    @Test
    public void testOneToMore(){
        List<Dept> depts = deptMapper.selectOneToMore();
        for (Dept dept : depts) {
            System.out.println(dept.getDeptno()+"," + dept.getDname()); //select * from dept;
            System.out.println("=============================华丽分割线(懒加载)============================================");
            System.out.println(dept.getEmpList().toString());   //select * from emp where deptno = ?
        }
    }
}
输出1(未调用empList):

输出2(调用了empList):
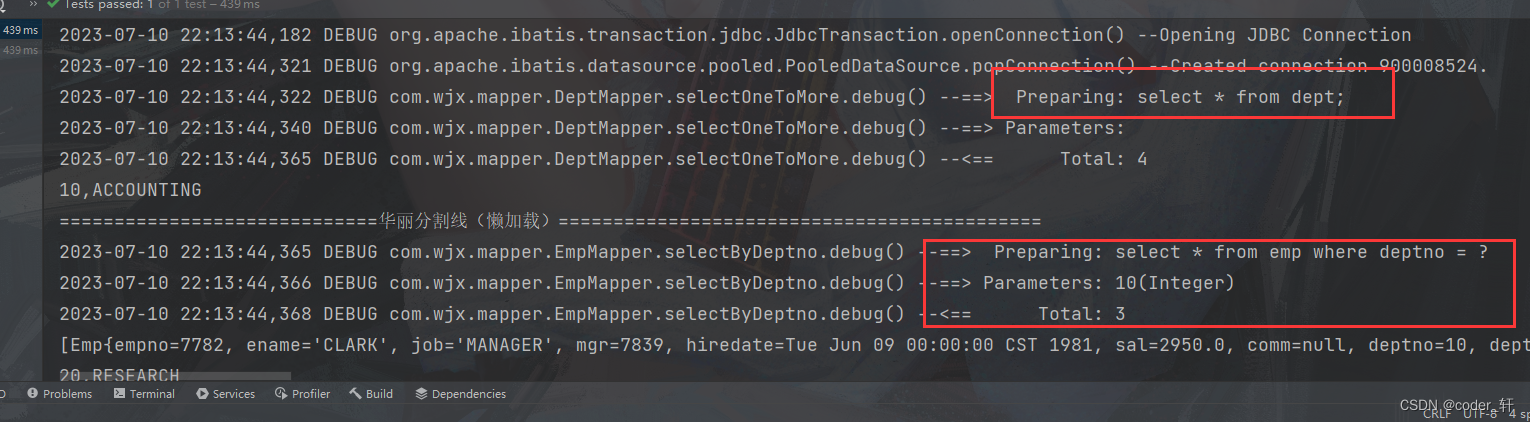
根据输出的日志,我们可以清晰看出,当没有调用懒加载的属性时,是不会执行相应的sql的,只有调用了才会执行对应sql。
8 mybatis缓存机制
8.1 什么是查询缓存
当我们读取数据时,避免不了重复读取同样的数据,此时我们可以在第一次读取数据的时候,将数据保存到缓存中,当我们再次读取该数据时候,检查缓存中是否有该数据,若有直接取走返回即可,不再去执行sql,以减轻数据库服务器的压力。
Mybatis提供了一级缓存和二级缓存。
一级缓存时sqlsession级别的缓存,即在一个sqlsession中有效,并且一级缓存时默认开启的。
二级缓存时mapper级别的缓存,即多个sqlSession共享一个二级缓存,因为一个mapper中存在多个sqlSession,二级缓存需要我们手动开启。

8.2 一级缓存
一级缓存原理:
比如此时我们要查询id为1的用户信息,当第一次查询时,我们会先检查该sqlsession缓存区域中是否有id为1的数据,很显然第一次肯定没有,然后执行相应的sql,并将结果存入缓存中;当第再次查询id为1的数据时,发现缓存区域中有该数据,就直接返回;若此sqlsession进行了增删改或者commit操作,就会清空sqlsession的缓存,为避免数据的脏读。
下面时一个使用一级缓存的例子:
mapper接口代码:
public interface PersonMapper {
    Person selectById(Integer id);
}
mapper映射文件:
    <select id="selectById" parameterType="int" resultType="person">
        select * from person where id = #{id};
    </select>
测试代码:
    @Test
    public void selectById() {
        Person person = personMapper.selectById(1);
        System.out.println(person);
        // sqlSession.commit();
        // 执行commit后会清除一级缓存中的数据
        Person person1 = personMapper.selectById(1);
        System.out.println(person1);
    }
8.3 二级缓存
二级缓存原理:
二级缓存其实原理与一级缓存类似,但是二级缓存相比一级缓存有更大的缓存区域,是根据namespace来进行划分的。
使用二级缓存有几个注意事项:
1. 开启二级缓存配置
        <!--
            lazyLoadingEnabled:全局性设置懒加载 默认false
        -->
        <setting name="lazyLoadingEnabled" value="true"/>
        <!--
            aggressiveLazyLoading:当设置为‘true’的时候,懒加载的对象可能被任何懒属性全部加载。否则,每个属性都按需加载 默认true
        -->
        <setting name="aggressiveLazyLoading" value="false"/>
2. 在mapper中加入cache标签
3. 对应的实体要实现序列化接口(因为当缓存放满之后会序列化到磁盘)
4. 如若对应的一个sqlsession不关闭或者不执行commit,那么它二级缓存不生效,也就是它查到的数据不会放到二级缓存中,这也是出于数据安全的一种考虑,避免脏读。
5. 若某一namespace内的sql不要使用二级缓存,可以将其useCache属性设置为false即可。
实体类代码:
public class Person implements Serializable {
    private static final long serialVersionUID = -8818879400811676080L;
    ……
}
mapper代码不变;
mapper映射文件:
<?xml version="1.0" encoding="UTF-8" ?>
<!DOCTYPE mapper PUBLIC "-//mybatis.org//DTD Mapper 3.0//EN"
        "http://mybatis.org/dtd/mybatis-3-mapper.dtd">
<mapper namespace="com.wjx.mapper.PersonMapper">
    <!--
        mybatis缓存机制:有一级缓存和二级缓存
            一级缓存:
                1. 默认开启
                2. 作用范围在session域内
                失效条件:
                    1. 执行commit
                    2. 输入参数改变
            二级缓存:
                1. 手动开启
                2. 作用范围在一个mapper内,一个mapper内多个sqlSession可以公用二级缓存
    -->
    <!--
        cache标签:开启二级缓存
            注意:
            1.同时对应的实体类要实现Serializable接口
            2.只有sqlSession关闭或者commit之后,二级缓存才会生效(是为了避免脏读)
            3.可以在select标签中通过useCache="false"来设置该sql二级缓存不生效,默认值为true
    -->
    <cache/>
    <select id="selectById" parameterType="int" resultType="person" useCache="false">
        select * from person where id = #{id};
    </select>
</mapper>
测试代码:
    @Test
    public void testTwoCache(){
        // PersonMapper开启了二级缓存
            //切记若开启二级缓存对应的实体应该实现Serializable接口

        // session1 查询id为1的数据
        Person person = personMapper.selectById(1);
        System.out.println(person);
//        sqlSession.close();
        sqlSession.commit(); // 此sqlSession要关闭或者commit一下,否则二级缓存不生效
        // session2 查询id为1的数据
        SqlSession sqlSession2 = MyBatisUtils.getSqlSession();
        PersonMapper mapper = sqlSession2.getMapper(PersonMapper.class);
        System.out.println(mapper.selectById(1));
        sqlSession2.close();

    }
9 MyBati分页
我们之前已经做过分页查询了,但是那是我们自己手写的,我们可以通过MbatisHelper来进行更为简单的分页查询。步骤如下:
1. 导入依赖
        <!-- PageHelper -->
        <dependency>
            <groupId>com.github.pagehelper</groupId>
            <artifactId>pagehelper</artifactId>
            <version>5.1.10</version>
        </dependency>
2. 配置分页插件
    <!-- 插件 -->
    <plugins>
        <!--
            分页插件
                interceptor属性:配置PageHelper插件中的核心拦截器类。
                PageInterceptor拦截器类(类似于JavaWeb阶段的过滤器):该拦截器的作用是在查询SQL执
                行之前,将编写的SQL语句改造成分页查询语句。
        -->
        <plugin interceptor="com.github.pagehelper.PageInterceptor">
            <!-- 开启合理化分页 -->
            <!--
                当页码小于1的时候查询第一页数据,当页码大于总页码的时候查询最后一页数据
            -->
            <property name="reasonable" value="true"/>
        </plugin>
    </plugins>
3. 接口和映射的编写
我们借助插件来进行分页查询,因此直接照常写查询所有的接口和sql即可:
public interface PersonMapper {
    List<Person> selectByPage();
}
    <!--
        分页查询
            使用pagehelper
            无需自己更改sql,只需要通过分页查询拦截器插件,在sql执行之前对sql进行改造
            具体参看测试类
    -->
    <select id="selectByPage" resultType="person">
        select * from person
    </select>
4. 拦截sql分页测试
在测试代码中通过调用PageHelper的静态方法,来拦截sql实现分页查询:
    @Test
    public void selectByPage() {
        SqlSession sqlSession = MyBatisUtils.getSqlSession();
        PersonMapper mapper = sqlSession.getMapper(PersonMapper.class);
        // 开启分页查询
        PageHelper.startPage(2,2);
        // 若不开启分页查询直接调用selectByPage则查询的是全部数据
        List<Person> personList = mapper.selectByPage();
        personList.forEach(System.out::println);
        // 获取分页的详细信息
        PageInfo pageInfo = new PageInfo(personList);
        System.out.println(pageInfo);
        /*   PageInfo{pageNum=2, pageSize=2, size=2, startRow=3, endRow=4, total=6, pages=3,

             list=Page{count=true, pageNum=2, pageSize=2, startRow=2, endRow=4, total=6, pages=3, reasonable=true,
             pageSizeZero=false}[Person{id=3, personName='孙权', personAge=29, personAddress='杭州'}, Person{id=4, personName='关羽', personAge=35, personAddress='荆州'}],

             prePage=1, nextPage=3, isFirstPage=false, isLastPage=false, hasPreviousPage=true, hasNextPage=true,
             navigatePages=8, navigateFirstPage=1, navigateLastPage=3, navigatepageNums=[1, 2, 3]}   */
    }
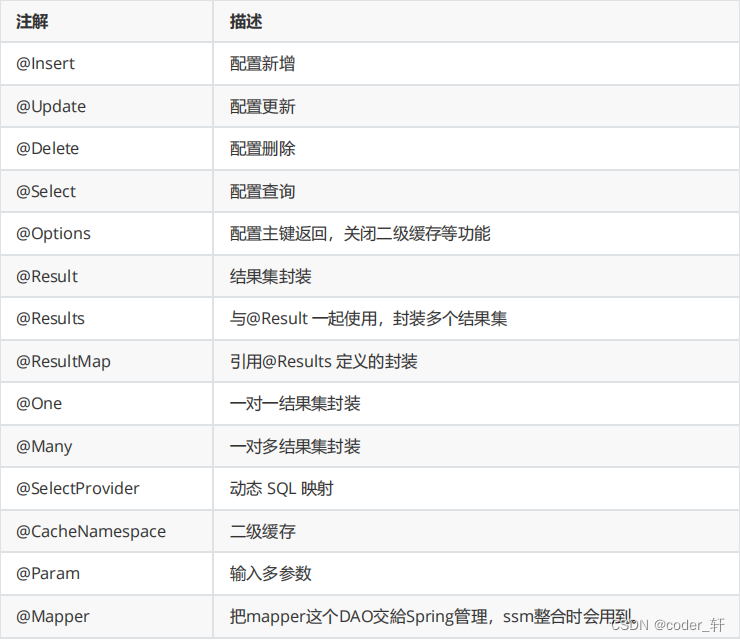
10 注解开发
注解开发不建议使用,因为使用mybatis的初衷就是为了解决硬编码问题,和对sql进行统一管理,使用注解的方式进行开发,又将sql写入了java代码中。而且在java代码中实现一对多和一对一映射的注解不如xml配置文件方式来的方便。以下是注解的说明: