token可用于登录验证和权限管理。
大致步骤分为:
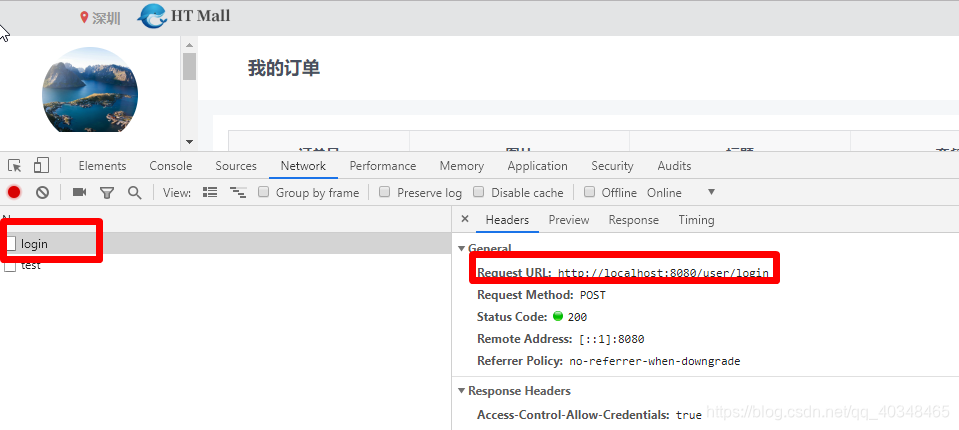
- 前端登录,post用户名和密码到后端。
- 后端验证用户名和密码,若通过,生成一个token返回给前端。
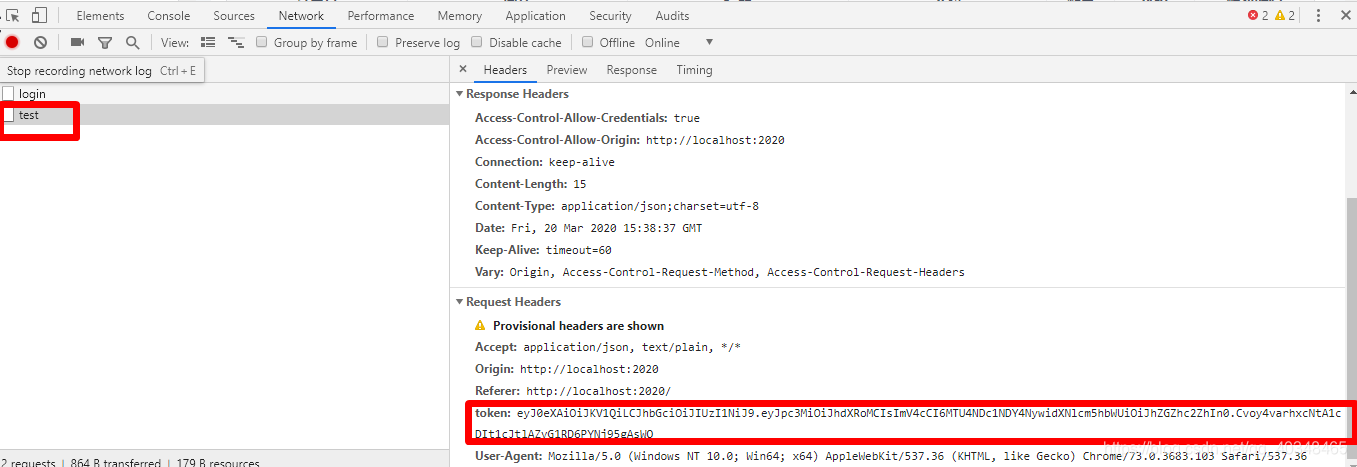
- 前端拿到token用vuex和localStorage管理,登录成功进入首页。
- 之后前端每一次权限操作如跳转路由,都需要判断是否存在token,若不存在,跳转至登录页。
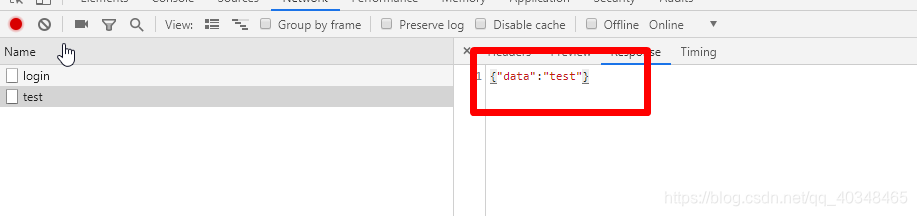
- 前端之后的每一个对后端的请求都要在请求头上带上token,后端查看请求头是否有token,拿到token检查是否过期,返回对应状态给前端。
-
若token已过期,清除token信息,跳转至登录页。
前端
- 登录页
-
<template>
<!-- 登录页面 -->
  <div>
    <Row class="container">
      <i-col span="13" offset="2" class="login-img-box">
        <img src="static/img/logo/htmalllogo.png" alt="">
      </i-col>
      <i-col span="7" class="login-box">
        <div class="login-container">
          <div class="login-header">
            <p>欢迎登录</p>
          </div>
          <div class="form-box">
            <Form ref="formInline" :model="formDate" :rules="ruleInline">
              <FormItem prop="username">
                  <i-input type="text" v-model="formDate.username" clearable size="large" placeholder="用户名">
                      <Icon type="person" slot="prepend"></Icon>
                  </i-input>
              </FormItem>
              <FormItem prop="password">
                  <i-input type="password" v-model="formDate.password" clearable size="large" placeholder="密码">
                      <Icon type="ios-locked-outline" slot="prepend"> </Icon>
                  </i-input>
              </FormItem>
              <FormItem>
                  <Button type="error" size="large" @click="handleSubmit('formInline')" long style="background-color: #2d8cf0;border-color:#2d8cf0">登录</Button>
              </FormItem>
          </Form>
          </div>
        </div>
      </i-col>
    </Row>
  </div>

</template>

<script>
import store from '@/vuex/store';
import { mapMutations, mapActions } from 'vuex';
export default {
  name: 'Login',
  data () {
    return {
      formDate: {
        username: '',
        password: ''
      },
      userToken:'',
      ruleInline: {
        username: [
          { required: true, message: '请输入用户名', trigger: 'blur' }
        ],
        password: [
          { required: true, message: '请输入密码', trigger: 'blur' },
          { type: 'string', min: 6, message: '密码不能少于6位', trigger: 'blur' }
        ]
      }
    };
  },
  methods: {
    ...mapMutations(['SET_USER_LOGIN_INFO','CHANGE_LOGIN']),
    ...mapActions(['login']),
    handleSubmit (name) {
      /*const father = this;
      console.log(this.formDate.username);
      this.$refs[name].validate((valid) => {
        if (valid) {
          this.login(father.formDate).then(result => {
            if (result) {
              this.$Message.success('登录成功');
              father.$router.push('/');
            } else {
              this.$Message.error('用户名或密码错误');
            }
          });
        } else {
          this.$Message.error('请填写正确的用户名或密码');
        }
      });*/
      let params = {
        'username':this.formDate.username,
        'password':this.formDate.password
      };

      this.$axios.post("/user/login",params).then(res => {
        // 请求成功

        console.log(res.data);
        this.userToken = res.data.token;
        // 将用户token保存到vuex中
        this.CHANGE_LOGIN({ Authorization:this.userToken });


         this.$router.push('/');
      }).catch(error => {
        // 请求失败,
        this.$Message.error("登录失败!请检查登录信息是否正确!")
      });
    },
  },
  store
};
</script>
vuex状态管理
- /store/store.js
import * as mutations from './mutations';

const store = new Vuex.Store({
  state: {
   // 存储token
    Authorization: localStorage.getItem('Authorization') ? localStorage.getItem('Authorization') : ''
}
 mutations
});

export default store;
/store/mutations.js
// 修改token,并将token存入localStorage
export const CHANGE_LOGIN = (state, user)=>{
  state.Authorization = user.Authorization;
  localStorage.setItem('Authorization', user.Authorization);
};
// 导航守卫
// 使用 router.beforeEach 注册一个全局前置守卫,判断用户是否登陆
router.beforeEach((to, from, next) => {
  iView.LoadingBar.start();
  if (to.path === '/Register' || to.path === '/Login') {
    next();
  } else {
    let token = localStorage.getItem('Authorization');
    if (token === 'null' || token === '') {
      next('/Login');
    } else {
      next();
    }
  }
});
// 添加请求拦截器,在请求头中加token
axios.interceptors.request.use(
    config => {
      if (localStorage.getItem('Authorization')) {
        config.headers.Authorization = localStorage.getItem('Authorization');
      }

      return config;
    },
    error => {
      return Promise.reject(error);
    });
测试页面
 <template>
  <div >
<button @click="getTestData">带token获取数据</button>
            <p>{{testData}}</p>

  </div>
</template>

export default {
data () {
    return {
 testData: ''
    };
  },
  methods: {

getTestData(){
      this.$axios.post("/user/test").then(res => {
        // 请求成功
        console.log(res.data);
        this.testData = res.data;
      }).catch(error => {
        // 请求失败,
        this.$Message.error("登录失败!请检查登录信息是否正确!")
      });
    }
  }
};
后端
- token生成工具类
/utils/TokenUtil.java
package com.project.htmall.util;

import com.auth0.jwt.JWT;
import com.auth0.jwt.JWTVerifier;
import com.auth0.jwt.algorithms.Algorithm;
import com.auth0.jwt.interfaces.DecodedJWT;
import com.project.htmall.model.User;

import java.util.Date;


/**
 * @version 1.0
 * @author:**
 * @date:2020/3/20
 */
public class TokenUtil {
  private static final long EXPIRE_TIME= 10*60*60*1000;
  private static final String TOKEN_SECRET="HuangTaoHTMALL";  //密钥盐

  /**
   * 签名生成
   * @param user
   * @return
   */
  public static String sign(User user){
    String token = null;
    try {
      Date expiresAt = new Date(System.currentTimeMillis() + EXPIRE_TIME);
      token = JWT.create()
        .withIssuer("auth0")
        .withClaim("username", user.getLoginName())
        .withExpiresAt(expiresAt)
        // 使用了HMAC256加密算法。
        .sign(Algorithm.HMAC256(TOKEN_SECRET));
    } catch (Exception e){
      e.printStackTrace();
    }
    return token;
  }

  /**
   * 签名验证
   * @param token
   * @return
   */
  public static boolean verify(String token){
    try {
      JWTVerifier verifier = JWT.require(Algorithm.HMAC256(TOKEN_SECRET)).withIssuer("auth0").build();
      DecodedJWT jwt = verifier.verify(token);
      System.out.println("认证通过:");
      System.out.println("username: " + jwt.getClaim("username").asString());
      System.out.println("过期时间:      " + jwt.getExpiresAt());
      return true;
    } catch (Exception e){
      return false;
    }
  }
}
- 拦截器类
/interceptor/TokenInterceptor.java
package com.project.htmall.interceptor;

import com.alibaba.fastjson.JSONObject;
import com.project.htmall.util.TokenUtil;
import org.springframework.stereotype.Component;
import org.springframework.web.servlet.HandlerInterceptor;
import javax.servlet.http.HttpServletRequest;
import javax.servlet.http.HttpServletResponse;

/**
 * @version 1.0
 * @author:**
 * @date:2020/3/20
 */
@Component
public class TokenInterceptor implements HandlerInterceptor {
  @Override
  public boolean preHandle(HttpServletRequest request, HttpServletResponse response,Object handler)throws Exception{
    if(request.getMethod().equals("OPTIONS")){
      response.setStatus(HttpServletResponse.SC_OK);
      return true;
    }
    response.setCharacterEncoding("utf-8");
    String token = request.getHeader("token");
    if(token != null){
      boolean result = TokenUtil.verify(token);
      if(result){
        System.out.println("通过拦截器");
        return true;
      }
    }
    response.setCharacterEncoding("UTF-8");
    response.setContentType("application/json; charset=utf-8");
    try{
      JSONObject json = new JSONObject();
      json.put("msg","token verify fail");
      json.put("code","50000");
      response.getWriter().append(json.toJSONString());
      System.out.println("认证失败,未通过拦截器");
    }catch (Exception e){
      e.printStackTrace();
      response.sendError(500);
      return false;
    }
    return false;
  }
}
- 配置拦截器
/config/WebConfiguration.java
注意最好写在一个配置类里,且WebMvcConfigurationSupport和WebMvcConfigurerAdapter不要同时存在
这里包括处理跨域的配置,而且全部改为implements WebMvcConfigurer接口
-
package com.project.htmall.configurer;


import com.alibaba.fastjson.JSON;
import com.alibaba.fastjson.serializer.SerializerFeature;
import com.alibaba.fastjson.support.config.FastJsonConfig;
import com.alibaba.fastjson.support.spring.FastJsonHttpMessageConverter4;
import com.project.htmall.core.ResultCode;
import com.project.htmall.core.ServiceException;
import com.project.htmall.core.Result;
import com.project.htmall.interceptor.TokenInterceptor;
import org.apache.commons.codec.digest.DigestUtils;
import org.apache.commons.lang3.StringUtils;
import org.slf4j.Logger;
import org.slf4j.LoggerFactory;
import org.springframework.beans.factory.annotation.Value;
import org.springframework.context.annotation.Configuration;
import org.springframework.http.converter.HttpMessageConverter;
import org.springframework.scheduling.concurrent.ConcurrentTaskExecutor;
import org.springframework.web.method.HandlerMethod;
import org.springframework.web.servlet.HandlerExceptionResolver;
import org.springframework.web.servlet.ModelAndView;
import org.springframework.web.servlet.NoHandlerFoundException;
import org.springframework.web.servlet.config.annotation.AsyncSupportConfigurer;
import org.springframework.web.servlet.config.annotation.CorsRegistry;
import org.springframework.web.servlet.config.annotation.InterceptorRegistry;
import org.springframework.web.servlet.config.annotation.WebMvcConfigurer;

import javax.servlet.ServletException;
import javax.servlet.http.HttpServletRequest;
import javax.servlet.http.HttpServletResponse;
import java.io.IOException;
import java.nio.charset.Charset;
import java.util.ArrayList;
import java.util.Collections;
import java.util.List;
import java.util.concurrent.Executors;

/**
 * Spring MVC 配置
 */
@Configuration
public class WebConfiguration implements WebMvcConfigurer {

    private final Logger logger = LoggerFactory.getLogger(WebConfiguration.class);
    @Value("${spring.profiles.active}")
    private String env;//当前激活的配置文件

    private TokenInterceptor tokenInterceptor;

  //构造方法
  public WebConfiguration(TokenInterceptor tokenInterceptor){
    this.tokenInterceptor = tokenInterceptor;
  }

  //解决跨域问题
  @Override
  public void addCorsMappings(CorsRegistry registry) {
      /*addMapping:允许所以映射
      allowedHeaders:允许所以请求头
      allowedMethods:允许所以请求方式,get、post、put、delete
      allowedOrigins:允许所以域名访问
      allowCredentials:允许携带cookie参数*/
    registry.addMapping("/**").allowedHeaders("*")
      .allowedMethods("*")
      .allowedOrigins("*")
      .allowCredentials(true);
  }


  @Override
  public void configureAsyncSupport(AsyncSupportConfigurer configurer){
    configurer.setTaskExecutor(new ConcurrentTaskExecutor(Executors.newFixedThreadPool(3)));
    configurer.setDefaultTimeout(30000);
  }

  @Override
  public void addInterceptors(InterceptorRegistry registry) {
    List<String> excludePath = new ArrayList<>();
    //排除拦截,除了注册登录(此时还没token),其他都拦截
    excludePath.add("/user/register");  //登录
    excludePath.add("/user/login");     //注册
    excludePath.add("/static/**");  //静态资源
    excludePath.add("/assets/**");  //静态资源

    registry.addInterceptor(tokenInterceptor)
      .addPathPatterns("/**")
      .excludePathPatterns(excludePath);
    WebMvcConfigurer.super.addInterceptors(registry);
  }


  //使用阿里 FastJson 作为JSON MessageConverter
    @Override
    public void configureMessageConverters(List<HttpMessageConverter<?>> converters) {
        FastJsonHttpMessageConverter4 converter = new FastJsonHttpMessageConverter4();
        FastJsonConfig config = new FastJsonConfig();
        config.setSerializerFeatures(SerializerFeature.WriteMapNullValue,//保留空的字段
                SerializerFeature.WriteNullStringAsEmpty,//String null -> ""
                SerializerFeature.WriteNullNumberAsZero);//Number null -> 0
        converter.setFastJsonConfig(config);
        converter.setDefaultCharset(Charset.forName("UTF-8"));
        converters.add(converter);
    }


    //统一异常处理
   /* @Override
    public void configureHandlerExceptionResolvers(List<HandlerExceptionResolver> exceptionResolvers) {
        exceptionResolvers.add(new HandlerExceptionResolver() {
            public ModelAndView resolveException(HttpServletRequest request, HttpServletResponse response, Object handler, Exception e) {
                Result result = new Result();
                if (e instanceof ServiceException) {//业务失败的异常,如“账号或密码错误”
                    result.setCode(ResultCode.FAIL).setMessage(e.getMessage());
                    logger.info(e.getMessage());
                } else if (e instanceof NoHandlerFoundException) {
                    result.setCode(ResultCode.NOT_FOUND).setMessage("接口 [" + request.getRequestURI() + "] 不存在");
                } else if (e instanceof ServletException) {
                    result.setCode(ResultCode.FAIL).setMessage(e.getMessage());
                } else {
                    result.setCode(ResultCode.INTERNAL_SERVER_ERROR).setMessage("接口 [" + request.getRequestURI() + "] 内部错误,请联系管理员");
                    String message;
                    if (handler instanceof HandlerMethod) {
                        HandlerMethod handlerMethod = (HandlerMethod) handler;
                        message = String.format("接口 [%s] 出现异常,方法:%s.%s,异常摘要:%s",
                                request.getRequestURI(),
                                handlerMethod.getBean().getClass().getName(),
                                handlerMethod.getMethod().getName(),
                                e.getMessage());
                    } else {
                        message = e.getMessage();
                    }
                    logger.error(message, e);
                }
                responseResult(response, result);
                return new ModelAndView();
            }

        });
    }*/

}
-
测试:

优化:
当登录成功,生成的Tokent中携带用户标识(如userId),并且当请求时携带的token通过验证后,取出token中的用户标识,不能简单的使用一个静态变量来保存取出来的用户标识,因为这样容易造成紊乱。所以使用线程内部存储类,ThreadLocal。
这样一来,便无需使用Session,
其实在用axios解决跨域问题后,是解决了Session会话问题(解决了跨域问题后,SessionId会像以前一样随着请求带过来,但是Session是存储在内存中的,如果始终访问的是一台机器还好),
但如果有多台服务器,登录时访问的是服务器A,Session信息也存在A,若接下来有请求访问其他服务器,此时其他服务器上没有相关的Session信息,则就会为空。
threadlocal而是一个线程内部的存储类,可以在指定线程内存储数据,数据存储以后,只有指定线程可以得到存储数据,官方解释如下。
/**
 * This class provides thread-local variables.  These variables differ from
 * their normal counterparts in that each thread that accesses one (via its
 * {@code get} or {@code set} method) has its own, independently initialized
 * copy of the variable.  {@code ThreadLocal} instances are typically private
 * static fields in classes that wish to associate state with a thread (e.g.,
 * a user ID or Transaction ID).
 */
/ **
*此类提供线程局部变量。 这些变量不同之处在于它们的访问对应对象是每个线程(通过其访问)
* {@code get}或{@code set}方法)有自己的,独立初始化的
*变量的副本。 {@code ThreadLocal}实例通常是私有的
*希望将状态与线程相关联的类中的静态字段(例如,
*用户ID或交易ID)。
* /
针对以上优化:
新建一个
UserContextHolder类
import java.util.List;

/**
 * token验证通过后,将token中的用户标识,如userId取出来并赋值给该类中的一个 线程变量
 * @version 1.0
 * @author:HuangTao
 * @date:2020/3/27
 */
public class UserContextHolder {
 // threadlocal而是一个线程内部的存储类,可以在指定线程内存储数据,数据存储以后,只有指定线程可以得到存储数据。
  //ThreadLocal提供了线程内存储变量的能力,这些变量不同之处在于每一个线程读取的变量是对应的互相独立的。通过get和set方法就可以得到当前线程对应的值。
  //当某些数据是以线程为作用域并且不同线程具有不同的数据副本的时候,就可以考虑采用ThreadLocal。
  private static final ThreadLocal<Long> currentUserId = new ThreadLocal<Long>();

  public static void setCurrentUserId(Long userId){
     currentUserId.set(userId);
  }

  public static Long getCurrentUserId(){
    return currentUserId.get();
  }

  public static void clearCurrentUserId(){
    currentUserId.get();
  }

}
然后在验证通过时,取出token中的值,并且赋值给线程存储变量
TokenUtil.java
package com.project.htmall.util;

import com.auth0.jwt.JWT;
import com.auth0.jwt.JWTVerifier;
import com.auth0.jwt.algorithms.Algorithm;
import com.auth0.jwt.interfaces.DecodedJWT;
import com.project.htmall.core.UserContextHolder;
import com.project.htmall.model.User;

import java.util.Date;


/**
 * @version 1.0
 * @author:HuangTao
 * @date:2020/3/20
 */
public class TokenUtil {
  //过期时间为3小时
  private static final long EXPIRE_TIME= 3*60*60*1000;
  private static final String TOKEN_SECRET="HTMALL";  //密钥盐


  /*JWT包含了三部分:
  Header 头部(标题包含了令牌的元数据,并且包含签名和/或加密算法的类型)
  Payload 负载 (载荷就是存放有效信息的地方。)
  Signature 签名/签证*/

  /**
   * 签名生成
   * @param user
   * @return
   */
  public static String sign(User user){
    String token = null;
    try {
      Date expiresAt = new Date(System.currentTimeMillis() + EXPIRE_TIME);
      token = JWT.create()
        .withIssuer("huangtao")
        .withClaim("currentUserName", user.getLoginName())
        .withClaim("currentUserId",user.getId())
        .withExpiresAt(expiresAt)
        // 使用了HMAC256加密算法。
        .sign(Algorithm.HMAC256(TOKEN_SECRET));
    } catch (Exception e){
      e.printStackTrace();
    }
    return token;
  }

  /**
   * 签名验证
   * @param token
   * @return
   */
  public static boolean verify(String token){
    try {
      JWTVerifier verifier = JWT.require(Algorithm.HMAC256(TOKEN_SECRET)).withIssuer("huangtao").build();
      DecodedJWT jwt = verifier.verify(token);
      //认证通过之后,将token中用户标识userId赋值给一个线程内部存储变量
      UserContextHolder.setCurrentUserId(jwt.getClaim("currentUserId").asLong());


      System.out.println("认证通过:");
      System.out.println("currentUserName: " + jwt.getClaim("currentUserName").asString());
      System.out.println("currentUserId: " + jwt.getClaim("currentUserId").asLong());
      System.out.println("过期时间:      " + jwt.getExpiresAt());
      return true;
    } catch (Exception e){
      return false;
    }finally {
      //若出现异常,应该清理上面的线程内部存储变量
      UserContextHolder.clearCurrentUserId();
    }
  }
}
注意在JWT取值时,其类型要准确,如此处我的“currentUserId”类型为Long,若是用.asString()则会取不到值。
在需要取得用户标识的地方,直接取就好了,如:
 @GetMapping("/getCurrentUserInfo")
  public Result getInfoById(){
    User user = new User();
    user.setId(UserContextHolder.getCurrentUserId());
    System.out.println("获取当前用户信息:"+UserContextHolder.getCurrentUserId());
    user = userService.findOne(user);
    if(user!=null){
      return ResultGenerator.genSuccessResult(user);
    }
    return ResultGenerator.genFailResult("数据不存在!");
  }