测试cloudstack搭建,并不一定适用。 供个人 复习使用
首先准备三台 机器,由于测试使用 就用VMware Workstation是创建的虚拟机。
cloudsatck版本安装4.12.0 系统模板使用4.11.2 模板。gluster 版本 6.0 ceph 版本luminous
最终结果,测试GlusterFS和ceph的依赖库版本似乎不一样。因此并没有成功安装ceph,另外ctdb集群搭建管理节点和计算节点是同一个ctdb集群,这样会有虚拟IP的问题。计算节点在访问管理节点端口时可能使用的是虚拟IP。。但是虚拟IP也不一定指向 管理节点,emmm,没考虑到。所以,这也是因为实验环境受限,不然可以多个计算节点搭建ctdb 集群实现gluster挂载高可用,也不用管理节点参与了。。。
准备
管理节点2G内存 计算节点4G ceph-admin 1G 管理节点和计算节点记得勾选处理器的虚拟化Intel VT-x、EP 或 AMD-V/RV(V)
电脑内存少,没办法。。。就分配的少一点。
| 主机名 |
IP |
作用 |
除系统所在硬盘外添加额外硬盘数 |
| manager |
192.168.199.91 |
cloudstack管理节点 |
2块,一块用于ceph,一块用于gluster |
| agent |
192.168.199.92 |
cloudstack计算节点 |
3块,同上。大小设置为30G。还有一块作为nfs主存储 |
| ceph-admin |
192.168.199.93 |
ceph-deploy部署节点和管理节点 |
2块,同manager。大小设置为30G |
也就是说,两个主存储。一个是nfs共享,一个是ceph集群存储池。
设置主机名和 /etc/hosts
主机名设置
vim /etc/hostname
将主机名称写入,重启后生效
编辑/etc/hosts 文件
vim /etc/hosts
192.168.199.91  manager
192.168.199.92  agent
192.168.199.93  ceph-admin
关闭防火墙,设置selinux,如果不想关闭防火墙,可以开放相应文件软件端口。比如cloudstack,ceph,nfs,mariadb 等。具体端口可以自行查找。
关闭防火墙并禁止开机自启
systemctl disable firewalld
systemctl stop firewalld
设置selinux为permissive
vi /etc/selinux/config
编辑文件设置
SELINUX=permissive
保存后重启才会生效。想要立即生效
setenforce permissive
安装epel-release
非常重要
yum -y install epel*
yum makecache
设置桥接文件
cloudstack虚拟实例网络使用,需要在manager节点和agent节点设置桥接文件。ceph-admin节点也顺便设置一下。
manager 节点设置
安装 网络工具包
yum -y install net-tools
yum -y install bridge-utils
新增桥接文件
vim /etc/sysconfig/network-scripts/ifcfg-cloudbr0
内容大致如下
TYPE=Bridge
BOOTPROTO=none
DEVICE=cloudbr0
ONBOOT=yes
IPADDR=192.168.199.91
NETMASK=255.255.255.0
GATEWAY=192.168.199.1
STP=yes
设置原网卡文件,修改添加如下内容
不同主机的网卡名可能不一样
vim /etc/sysconfig/network-scripts/ifcfg-ens33
BOOTPROTO="none"
ONBOOT="yes"
BRIDGE="cloudbr0"
最后一行指明 网卡桥接设备是 cloudbr0。
重启network
systemctl restart network
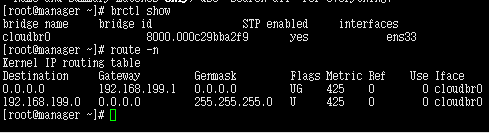
查看 网桥状态和 路由
brctl show
route -n
agent 节点设置
通manager节点一致,只是将cloudbr0的IPADDR修改成192.168.199.92
vim /etc/sysconfig/network-scripts/ifcfg-cloudbr0
TYPE=Bridge
BOOTPROTO=none
DEVICE=cloudbr0
ONBOOT=yes
IPADDR=192.168.199.92
NETMASK=255.255.255.0
GATEWAY=192.168.199.1
STP=yes
其他的一致。
cdph-admin 节点
只是IP变了,其他的一致
设置时间同步
CentOS7 一般会使用chronyd 进行时间同步。
时间同步有两个方案,一个是 所有节点 设置同一个 公共ntp服务器 进行时间同步,比如阿里云。 另一个 就是选择其中一个节点作为 时间同步服务器,其它的 的节点设置ntp 服务器为 该节点。
简单起见 设置一个 公共 ntp 服务器 阿里云
ntp.aliyun.com
ntp1.aliyun.com
方法很简单,安装chronyd
yum -y chrony
编辑配置文件
vim /etc/chrony.conf
注释掉原来的时间同步服务器
#server 0.centos.pool.ntp.org iburst
#server 1.centos.pool.ntp.org iburst
#server 2.centos.pool.ntp.org iburst
#server 3.centos.pool.ntp.org iburst
增加阿里的
server ntp.aliyun.com iburst
server ntp1.aliyun.com iburst
server ntp2.aliyun.com iburst
server ntp3.aliyun.com iburst
重启chronyd服务
systemctl restart chronyd
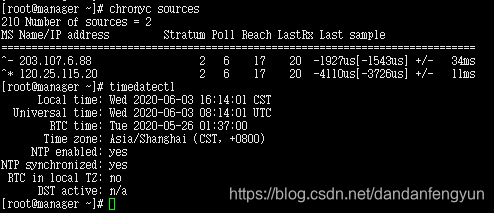
查看时间同步
chronyc sources
查看当前时间
timedatectl
部署gluster
gluster集群创建的卷 使用gluster方式挂载到本地,然后设置成共享点,使用内核态nfs方式 实现挂载。
或者安装NFS-Ganesha 直接用户态方式实现nfs挂载。
使用第二种方法。可参考
https://blog.csdn.net/dandanfengyun/article/details/105371521
安装gluster软件
三个节点都执行
搜索gluster的软件源
yum search centos-release-gluster
安装相应gluster版本的软件源
由于cloudstack安装依赖gluster,且默认版本是6.0,为了避免版本冲突 所以 安装6。
yum -y install centos-release-gluster6
安装gluster 软件包
yum -y install glusterfs glusterfs-server glusterfs-rdma glusterfs-geo-replication