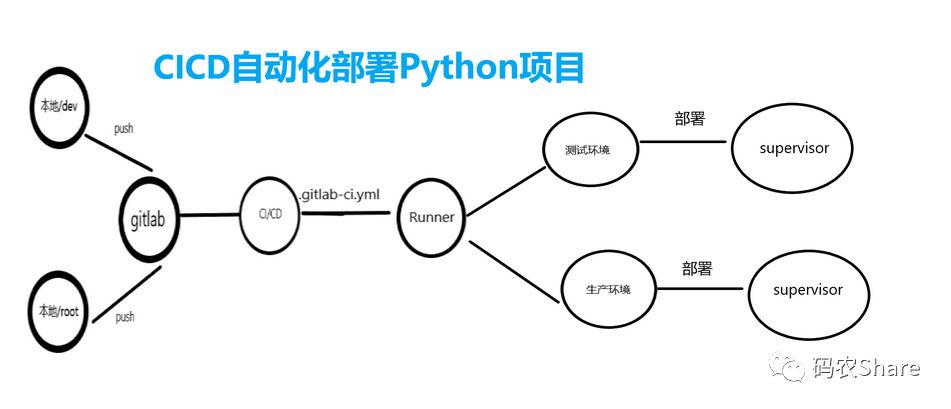
使用CICD原理:当我们push项目到gitlab,就会触发.gitlab-ci.yml 文件,文件里面的 only:- maste表示,当push的分支为master则执行脚本。执行时通过tags:- shell选择已有的runner去执行。这时候他会把项目拉取到gitlab-runner中,例如文件夹/home/gitlab-runner/builds/gdf435/0/name/test/,相同的runner文件夹的gdf435地址相同。这时候我们通过ssh 将项目复制到我们的测试环境,所以需要配置ssh免密登录,当把项目拉取到测试环境后,我们可以启动supervisor来管理我们的项目。我们可以通过分支来选择部署的环境。
## 一 、配置gitlab—Runner
### 1、拉取镜像
```sh
docker pull gitlab/gitlab-runner:latest
```
### 2、创建容器
```shell
docker run -d --name gitlab-runner --restart always -p 8093:8093 -v /var/run/docker.sock:/var/run/docker.sock -v gitlab-runner-config:/etc/gitlab-runner gitlab/gitlab-runner:latest
```
### 3、注册
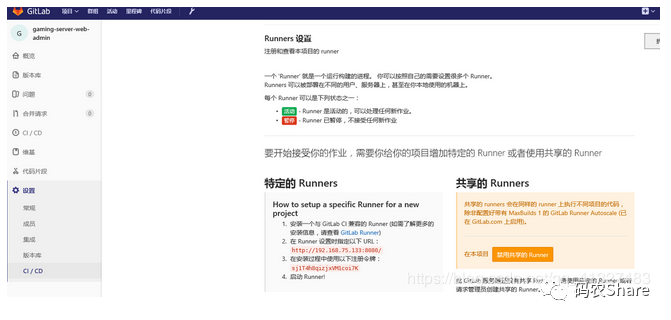
输入的数据在gitlab,在 项目 --> 设置 --> CI/CD --> Runner 设置:
- 注册
```
docker exec -it gitlab-runner gitlab-runner register
```
- 输入gitlab域名
```
Please enter the gitlab-ci coordinator URL (e.g. https://gitlab.com )
https://gitlab.com
```
- 输入gitlab的token
```
Please enter the gitlab-ci token for this runner
xxx
```
- Runner的description ,可在gitlab修改
```
Please enter the gitlab-ci description for this runner
[hostname] my-runner
```
- Runner的标签,可修改
```
Please enter the gitlab-ci tags for this runner (comma separated):
my-tag,another-tagEnter the [Runner executor](https://docs.gitlab.com/runner/executors/README.html):
```
- Enter the [Runner executor](https://docs.gitlab.com/runner/executors/README.html):
```
Please enter the executor: ssh, docker+machine, docker-ssh+machine, kubernetes, docker, parallels, virtualbox, docker-ssh, shell:
shell
```
## 二、配置CICD
### 1、安装supervior(参考别人)
### 2、配置runner免密登录到生产机器
在gitlab-runner里切换至gitlab-runner用户配置免密登录,因为runner执行.gitlab-ci.yml时,使用的用户就是gitlab-runner。
```
docker exec -it gitlab-runner bash
su gitlab-runner
ssh-keygen -t rsa
ssh-copy-id -i /root/.ssh/id_rsa.pub root@生产机器IP
```
输入密码后配置成功
```
ssh 生产机器IP地址
```
无需密码进入则成功
### 3、编写.gitlab-ci.yml 文件
```yaml
stages:
- clean_env # 清理环境及杀死进程
- deploy_src # 部署源码。
- install_dependency # 更新依赖 .
- restart_server # 重启服务.
- check_server # 检测服务.
variables:
BASE_DIR: "/test/"
job clean_env_job:
stage: clean_env
script:
# 停止之前运行的项目
- ssh -o stricthostkeychecking=no root@生产机器IP地址 supervisorctl stop yourrunner|| true
#- ssh -o stricthostkeychecking=no root@生产机器IP地址 killall python3 || true
#- ssh -o stricthostkeychecking=no root@生产机器IP地址 killall /data/miniconda3/envs/go2cloud_platform/bin/python || true
# 删除原有的项目
- ssh -o stricthostkeychecking=no root@生产机器IP地址 rm -rf /data/gitlab-runner/project${BASE_DIR}*
tags:
- shell
only:
- master
when: always
job deploy_src_job:
stage: deploy_src
script:
# 复制新的项目到生产机器
- scp -r /home/gitlab-runner/builds/3245234gfh/0/name/test/* root@生产机器IP地址:/data/gitlab-runner/project${BASE_DIR}
tags:
- shell
only:
- master
when: always
job install_dependency_job:
stage: install_dependency
script:
# 安装环境所需要的依赖
- ssh -o stricthostkeychecking=no root@生产机器IP地址 pip3 install -r /data/gitlab-runner/project${BASE_DIR}requirements.txt
tags:
- shell
only:
- master
when: manual
job restart_server_job:
stage: restart_server
script:
- ssh -o stricthostkeychecking=no root@生产机器IP地址 sleep 7
# 重启项目
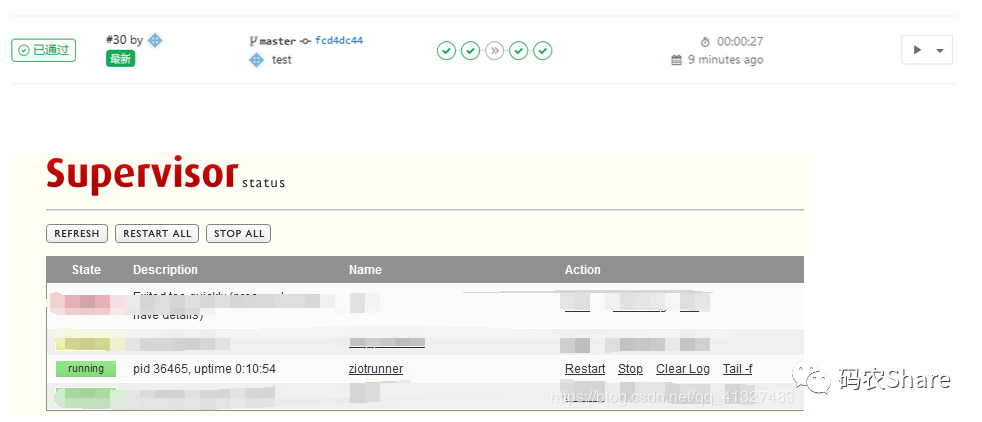
- ssh -o stricthostkeychecking=no root@生产机器IP地址 supervisorctl start yourrunner
# 查看supervisord的状态
- ssh -o stricthostkeychecking=no root@生产机器IP地址 ps -ef |grep supervisord |grep -v grep
tags:
- shell
only:
- master
when: always
job check_server_job:
stage: check_server
script:
- ssh -o stricthostkeychecking=no root@生产机器IP地址 sleep 7
# 查看项目的状态
- ssh -o stricthostkeychecking=no root@生产机器IP地址 ps -ef|grep "8193"
tags:
- shell
only:
- master
when: always
```