Netty核心源码分析(五)核心组件EventLoop源码分析

2023-05-16

文章目录

  • 系列文章目录
  • 一、EventLoop源码分析
    • 1、NioEventLoop源码
    • 2、EventLoop的父接口SingleThreadEventExecutor
      • (1)addTask方法
      • (2)startThread方法
    • 3、NioEventLoop的run方法(核心!)
      • (1)select
    • 4、小结

系列文章目录

Netty核心源码分析(一),Netty的Server端启动过程源码分析
Netty核心源码分析(二),Netty的Server端接收请求过程源码分析
Netty核心源码分析(三)业务请求执行关键——ChannelPipeline、ChannelHandler、ChannelHandlerContext源码分析
Netty核心源码分析(四)心跳检测源码分析
Netty核心源码分析(五)核心组件EventLoop源码分析

一、EventLoop源码分析

之前我们简单分析过NioEventLoopGroup的源码。今天我们分析一下EventLoop执行的源码。

1、NioEventLoop源码

首先我们分析一下类继承关系图:
在这里插入图片描述
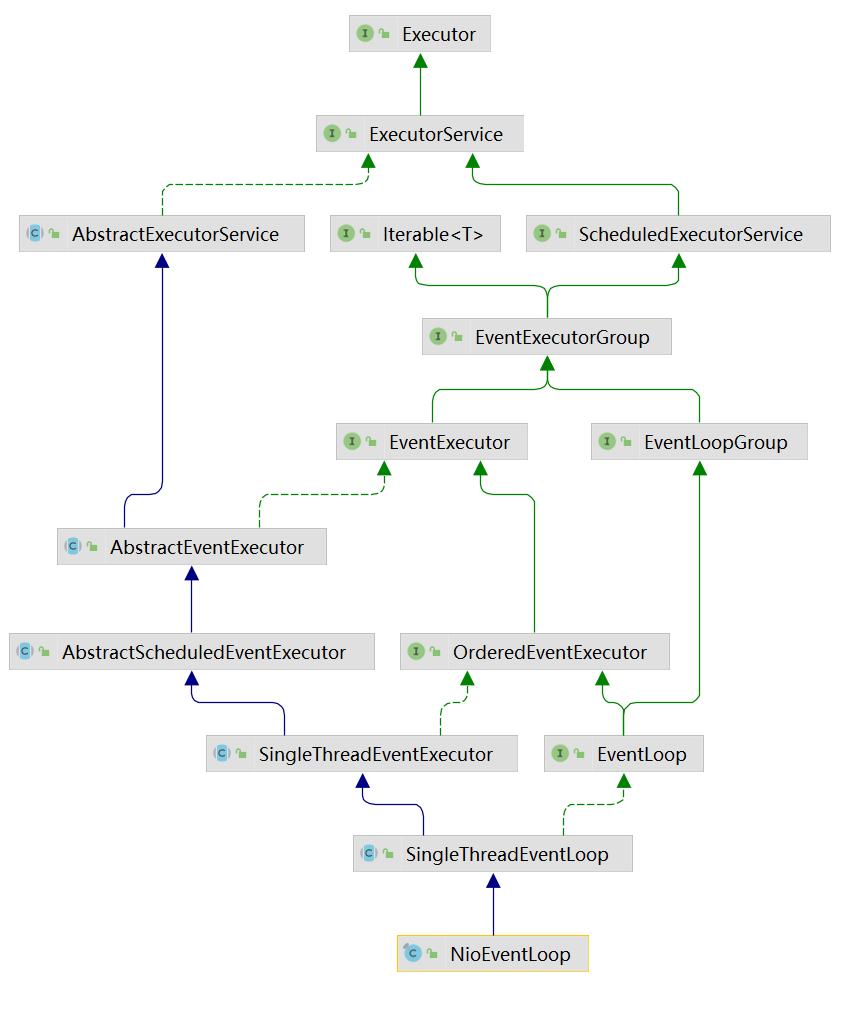
(1)ScheduledExecutorService接口表示是一个定时任务接口,EventLoop可以接受定时任务。
(2)EventLoop接口:一旦Channel注册了,就处理该Channel对应的所有IO操作。
(3)SingleThreadEventExecutor接口表示这是一个单线程的线程池。
(4)EventLoop是一个单例的线程池,里面含有一个死循环的线程不断地做着三件事情:监听端口、处理端口事件、处理队列事件。每个EventLoop都可以绑定多个Channel,而每个Channel始终只能由一个EventLoop来处理。

2、EventLoop的父接口SingleThreadEventExecutor

SingleThreadEventExecutor是一个单线程的线程池,其中包含着execute方法是EventLoop使用的源头:

// io.netty.util.concurrent.SingleThreadEventExecutor#execute
@Override
public void execute(Runnable task) {
    if (task == null) {
        throw new NullPointerException("task");
    }
	// 是否是当前线程
    boolean inEventLoop = inEventLoop();
    addTask(task);
    if (!inEventLoop) { // 如果该EventLoop的线程不是当前线程
        startThread(); // 开启线程
        if (isShutdown() && removeTask(task)) {
        	// 如果线程已经停止,并且删除任务失败,执行拒绝策略,默认是抛出异常RejectedExecutionException
            reject();
        }
    }
	// 如果addTaskWakesUp是false,并且任务不是NonWakeupRunnable类型的,尝试唤醒selector,这个时候,阻塞在selector的线程会立即返回
    if (!addTaskWakesUp && wakesUpForTask(task)) {
        wakeup(inEventLoop);
    }
}

(1)addTask方法

// io.netty.util.concurrent.SingleThreadEventExecutor#addTask
protected void addTask(Runnable task) {
    if (task == null) {
        throw new NullPointerException("task");
    }
    if (!offerTask(task)) {
        reject(task);
    }
}
// io.netty.util.concurrent.SingleThreadEventExecutor#offerTask
final boolean offerTask(Runnable task) {
    if (isShutdown()) {
        reject();
    }
    return taskQueue.offer(task);
}

(2)startThread方法

首先判断是否启动过了,保证EventLoop只有一个线程,如果没有启动过,尝试使用CAS将state状态改为ST_STARTED,然后调用doStartThread启动

// io.netty.util.concurrent.SingleThreadEventExecutor#startThread
private void startThread() {
    if (state == ST_NOT_STARTED) {
        if (STATE_UPDATER.compareAndSet(this, ST_NOT_STARTED, ST_STARTED)) {
            try {
            	// 启动
                doStartThread();
            } catch (Throwable cause) {
            	// 异常回滚
                STATE_UPDATER.set(this, ST_NOT_STARTED);
                PlatformDependent.throwException(cause);
            }
        }
    }
}
// io.netty.util.concurrent.SingleThreadEventExecutor#doStartThread
private void doStartThread() {
    assert thread == null;
    // executor就是创建EventLoopGroup时创建的ThreadPerTaskExecutor类,将runnable包装秤Netty的FastThreadLocalThread
    executor.execute(new Runnable() {
        @Override
        public void run() {
            thread = Thread.currentThread();
            // 判断中断状态
            if (interrupted) {
                thread.interrupt();
            }

            boolean success = false;
            // 设置最后一次的执行时间
            updateLastExecutionTime();
            try {
            	// this就是NioEventLoop,执行NioEventLoop的run方法,这个方法是个死循环,也是整个EventLoop的核心!
                SingleThreadEventExecutor.this.run();
                success = true;
            } catch (Throwable t) {
                logger.warn("Unexpected exception from an event executor: ", t);
            } finally {
            	// 使用CAS不断修改state状态,改成ST_SHUTTING_DOWN 
                for (;;) {
                    int oldState = state;
                    if (oldState >= ST_SHUTTING_DOWN || STATE_UPDATER.compareAndSet(
                            SingleThreadEventExecutor.this, oldState, ST_SHUTTING_DOWN)) {
                        break;
                    }
                }

                // Check if confirmShutdown() was called at the end of the loop.
                if (success && gracefulShutdownStartTime == 0) {
                    logger.error("Buggy " + EventExecutor.class.getSimpleName() + " implementation; " +
                            SingleThreadEventExecutor.class.getSimpleName() + ".confirmShutdown() must be called " +
                            "before run() implementation terminates.");
                }

                try {
                    // Run all remaining tasks and shutdown hooks.
                    for (;;) {
                        if (confirmShutdown()) {
                            break;
                        }
                    }
                } finally {
                    try {
                    	// cheanup
                        cleanup();
                    } finally {
                    	// 修改状态ST_TERMINATED
                        STATE_UPDATER.set(SingleThreadEventExecutor.this, ST_TERMINATED);
                        threadLock.release();
                        if (!taskQueue.isEmpty()) {
                            logger.warn(
                                    "An event executor terminated with " +
                                            "non-empty task queue (" + taskQueue.size() + ')');
                        }
						// 回调terminationFuture方法
                        terminationFuture.setSuccess(null);
                    }
                }
            }
        }
    });
}

3、NioEventLoop的run方法(核心!)

该方法是一个死循环,也是整个NioEventLoop的核心!

从源码我们可以看出,run方法总共做了三件事:
(1)select获取感兴趣的事件。
(2)processSelectedKeys处理事件。
(3)runAllTasks执行队列中的任务。

// io.netty.channel.nio.NioEventLoop#run
@Override
protected void run() {
    for (;;) {
        try {
            switch (selectStrategy.calculateStrategy(selectNowSupplier, hasTasks())) {
                case SelectStrategy.CONTINUE:
                    continue;
                case SelectStrategy.SELECT:
                	// select
                    select(wakenUp.getAndSet(false));

                    // 'wakenUp.compareAndSet(false, true)' is always evaluated
                    // before calling 'selector.wakeup()' to reduce the wake-up
                    // overhead. (Selector.wakeup() is an expensive operation.)
                    //
                    // However, there is a race condition in this approach.
                    // The race condition is triggered when 'wakenUp' is set to
                    // true too early.
                    //
                    // 'wakenUp' is set to true too early if:
                    // 1) Selector is waken up between 'wakenUp.set(false)' and
                    //    'selector.select(...)'. (BAD)
                    // 2) Selector is waken up between 'selector.select(...)' and
                    //    'if (wakenUp.get()) { ... }'. (OK)
                    //
                    // In the first case, 'wakenUp' is set to true and the
                    // following 'selector.select(...)' will wake up immediately.
                    // Until 'wakenUp' is set to false again in the next round,
                    // 'wakenUp.compareAndSet(false, true)' will fail, and therefore
                    // any attempt to wake up the Selector will fail, too, causing
                    // the following 'selector.select(...)' call to block
                    // unnecessarily.
                    //
                    // To fix this problem, we wake up the selector again if wakenUp
                    // is true immediately after selector.select(...).
                    // It is inefficient in that it wakes up the selector for both
                    // the first case (BAD - wake-up required) and the second case
                    // (OK - no wake-up required).

                    if (wakenUp.get()) {
                        selector.wakeup();
                    }
                    // fall through
                default:
            }

            cancelledKeys = 0;
            needsToSelectAgain = false;
            final int ioRatio = this.ioRatio;
            if (ioRatio == 100) {
                try {
                	// 处理select keys
                    processSelectedKeys();
                } finally {
                    // Ensure we always run tasks.
                    runAllTasks();
                }
            } else {
                final long ioStartTime = System.nanoTime();
                try {
                    processSelectedKeys();
                } finally {
                    // Ensure we always run tasks.
                    final long ioTime = System.nanoTime() - ioStartTime;
                    runAllTasks(ioTime * (100 - ioRatio) / ioRatio);
                }
            }
        } catch (Throwable t) {
            handleLoopException(t);
        }
        // Always handle shutdown even if the loop processing threw an exception.
        try {
            if (isShuttingDown()) {
                closeAll();
                if (confirmShutdown()) {
                    return;
                }
            }
        } catch (Throwable t) {
            handleLoopException(t);
        }
    }
}

(1)select

大致的逻辑就是:调用NIO的selector的select方法,默认阻塞一秒钟,如果有定时任务,则在定时任务剩余时间的基础上再加上0.5秒进行阻塞。当执行execute方法的时候,也就是添加任务的时候,会唤醒selector,防止selector阻塞时间过长。

// io.netty.channel.nio.NioEventLoop#select
private void select(boolean oldWakenUp) throws IOException {
    Selector selector = this.selector;
    try {
        int selectCnt = 0;
        long currentTimeNanos = System.nanoTime();
        long selectDeadLineNanos = currentTimeNanos + delayNanos(currentTimeNanos);
        for (;;) {
            long timeoutMillis = (selectDeadLineNanos - currentTimeNanos + 500000L) / 1000000L;
            if (timeoutMillis <= 0) {
                if (selectCnt == 0) {
                    selector.selectNow();
                    selectCnt = 1;
                }
                break;
            }

            // If a task was submitted when wakenUp value was true, the task didn't get a chance to call
            // Selector#wakeup. So we need to check task queue again before executing select operation.
            // If we don't, the task might be pended until select operation was timed out.
            // It might be pended until idle timeout if IdleStateHandler existed in pipeline.
            if (hasTasks() && wakenUp.compareAndSet(false, true)) {
                selector.selectNow();
                selectCnt = 1;
                break;
            }
			// 阻塞给定时间,默认一秒
            int selectedKeys = selector.select(timeoutMillis);
            selectCnt ++;
			// 如果有返回值||select被用户唤醒||任务队列有任务||有定时任务即将被执行,则跳出循环
            if (selectedKeys != 0 || oldWakenUp || wakenUp.get() || hasTasks() || hasScheduledTasks()) {
                // - Selected something,
                // - waken up by user, or
                // - the task queue has a pending task.
                // - a scheduled task is ready for processing
                break;
            }
            if (Thread.interrupted()) {
                // Thread was interrupted so reset selected keys and break so we not run into a busy loop.
                // As this is most likely a bug in the handler of the user or it's client library we will
                // also log it.
                //
                // See https://github.com/netty/netty/issues/2426
                if (logger.isDebugEnabled()) {
                    logger.debug("Selector.select() returned prematurely because " +
                            "Thread.currentThread().interrupt() was called. Use " +
                            "NioEventLoop.shutdownGracefully() to shutdown the NioEventLoop.");
                }
                selectCnt = 1;
                break;
            }

            long time = System.nanoTime();
            if (time - TimeUnit.MILLISECONDS.toNanos(timeoutMillis) >= currentTimeNanos) {
                // timeoutMillis elapsed without anything selected.
                selectCnt = 1;
            } else if (SELECTOR_AUTO_REBUILD_THRESHOLD > 0 &&
                    selectCnt >= SELECTOR_AUTO_REBUILD_THRESHOLD) {
                // The selector returned prematurely many times in a row.
                // Rebuild the selector to work around the problem.
                logger.warn(
                        "Selector.select() returned prematurely {} times in a row; rebuilding Selector {}.",
                        selectCnt, selector);

                rebuildSelector();
                selector = this.selector;

                // Select again to populate selectedKeys.
                selector.selectNow();
                selectCnt = 1;
                break;
            }

            currentTimeNanos = time;
        }

        if (selectCnt > MIN_PREMATURE_SELECTOR_RETURNS) {
            if (logger.isDebugEnabled()) {
                logger.debug("Selector.select() returned prematurely {} times in a row for Selector {}.",
                        selectCnt - 1, selector);
            }
        }
    } catch (CancelledKeyException e) {
        if (logger.isDebugEnabled()) {
            logger.debug(CancelledKeyException.class.getSimpleName() + " raised by a Selector {} - JDK bug?",
                    selector, e);
        }
        // Harmless exception - log anyway
    }
}

4、小结

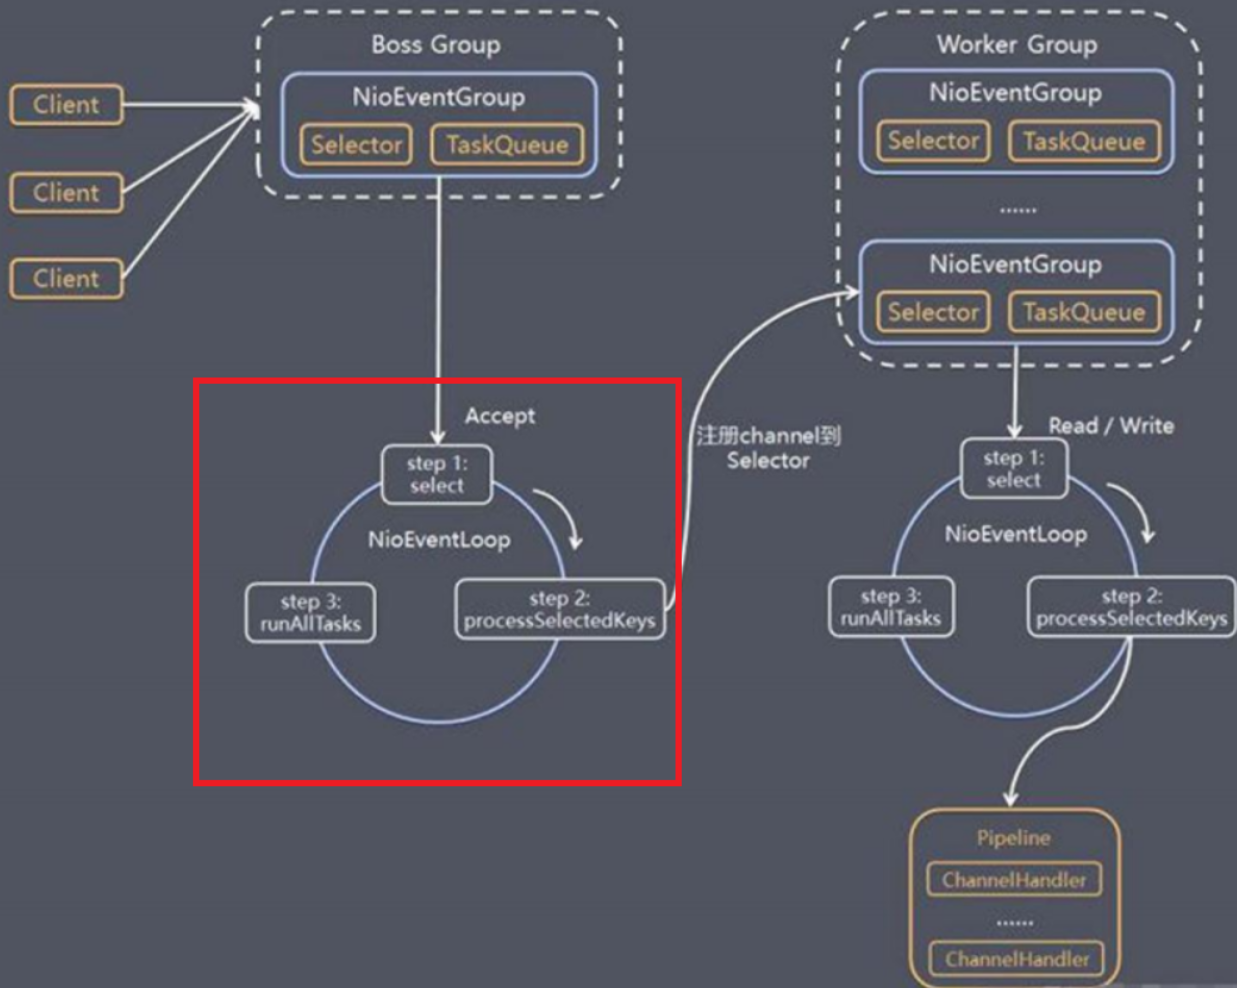
每次执行 ececute 方法都是向队列中添加任务。当第一次添加时就启动线程,执行 run 方法,而 run 方法是整个 EventLoop 的核心,就像 EventLoop 的名字一样,Loop Loop ,不停的 Loop ,Loop 做什么呢?做3件事情。

  • 调用 selector 的 select 方法,默认阳塞一秒钟,如果有定时任务,则在定时任务剩余时间的基础上在加上0.5秒进行阻塞。当执行 execute 方法的时候,也就是添加任务的时候,唤醒 selecor,防止 selector 阻塞时间过大。
  • 当 selector 返回的时候,会调用 processSelectedKeys 方法对 selectKey 进行处理。
  • 当 processSelectedKeys 方法执行结束后,则按照 ioRatio 的比例执行 runAlITasks 方法,默认是 IO 任务时间和非IO 任务时间是相同的,你也可以根据你的应用特点进行调优 。比如 非IO任务比较多,那么你就将ioRatio 调小一点,这样非 IO 任务就能执行的长一点。防止队列积攒过多的任务。

此时,下图红圈部分源码我们分析完毕。
在这里插入图片描述

本文内容由网友自发贡献,版权归原作者所有,本站不承担相应法律责任。如您发现有涉嫌抄袭侵权的内容,请联系:hwhale#tublm.com(使用前将#替换为@)

Netty核心源码分析(五)核心组件EventLoop源码分析 的相关文章

随机推荐

  • alpine linux中docker mysql踩坑记录

    写在前头 xff0c 本文只是记录这个坑 xff0c 目前没有找到解决办法 研究了一天了 xff0c 也没有解决 环境 我使用vmware安装了alpine linux 安装过程见 xff1a vmware安装alpine linux ht
  • [精简]RuoYi开发实战-搭建开发环境

    文章目录 简介说明RuoYi环境准备JDK安装dockermysql安装redis 6 2安装 下载源码数据库初始化Redis配置数据源配置Logback报错解决测试后端是否启动成功前端运行 简介 RuoYi 使用若依快速构建web应用程序
  • CentOS Stream8 与CentOS7有什么区别?

    工作中一直在用CentOS7和CentOS6 本来想抽空尝试一下CentOS8玩一玩 结果CentOS8已经走完了生命周期 一直好奇Centos Linux 和 CentOS Stream有什么区别 xff0c 今天就来安装一下 CentO
  • RuoYi若依实战-代码生成

    代码生成 使用admin登录管理后台 xff0c 菜单路径如下 xff1a 首页 系统工具 代码生成 建表 span class token comment auto generated definition span span class
  • CentOS stream 8同步时间

    虚拟机中的CentOS stream8挂起以后 xff0c 重新打开系统时间依然是之前的时间 会导致一些操作无效了 CentOS7中可以使用ntpdate同步时间 xff0c 在CentOS stream 8中发现已经无法成功安装此软件了
  • RuoYi开发实战- PostMan请求接口

    最近在学习若依这个开源项目 xff0c 在调试接口时遇到一个小坎 默认的情况下接口是无法直接请求的 xff0c 请求会报以下的错误 xff1a span class token punctuation span span class tok
  • RuoYi若依代码生成+一键部署

    若依代码生成器很强大的 xff0c 可以让我们写增删改查的效率大增 但是我在用的过程中总感觉还不够爽快 我想根据自己的想法改造一下 若依代码生成的基本操作如下 xff1a https www bilibili com video BV1ba
  • 若依yml配置文件读取方法学习

    SpringBoot的yml配置用了好多年了 xff0c 若依的方式让我眼前一亮 这些做确实挺好用的 generator yml RuoYi Vue ruoyi generator src main resources generator
  • Netty核心源码分析(四)心跳检测源码分析

    文章目录 系列文章目录一 心跳检测案例二 源码分析1 Netty心跳的三个Handler2 IdleStateHandler源码 xff08 1 xff09 四个关键属性 xff08 2 xff09 handlerAdded方法 xff08
  • mybatis执行sql脚本

    最近在学习若依这个开源项目 xff1a https gitee com y project RuoYi Vue 默认的代码生成模块用起来总感觉别扭 xff0c 比如说 xff0c 每次生成的代码还要单独的手动执行一下SQL语句 我就在想能不
  • 解决@Autowired IDEA编译Could not autowire. No beans of ‘xxxx‘ type found.

    现象 最近在学习若依开发框架 xff0c 发现若依的一些代码在IDEA中有报错显示 xff0c 但是实际上是可以正常编译的 虽然不影响实际开发 xff0c 对于强迫证程序员来说看到这两个erro真的难受 原因分析 IDEA 可以理解 Spr
  • 若依框架登录去除验证码

    若依框架自带的登录功能还是挺好用的 但是在开发过程中经过因在编写代码或者编写设计文档登录会话到期重新登录 重新登录就会出现验证码 xff0c 一天如果要输入10次验证码也会浪费不少时间 验证码这个功能在生产环境非常有必要 xff0c 但是在
  • IDEA若依框架新建模块

    创建新的module 项目上鼠标右键 选择Maven项目 Parent选ruoyi 点击Finish 编辑RuoYi Vue Wisdom ruoyi wisdom pom xml 在 lt artifactId gt ruoyi wisd
  • SpringBoot拦截指定路径统一处理

    最近在做一个有趣的项目 xff0c 做一个API生成小工具 可以对简单的API路径进行配置SQL自动生成API 简单来讲 xff1a URI对应sql api userselect from user api user addresssel
  • vim代码注释生成插件neogen

    更好的注释生成器 支持多种语言和注释约定 项目地址 xff1a https github com danymat neogen 注意事项 nvim版本以大于等于NVIM v0 6 1不然会有报错 插件安装 插件的运行需要依赖nvim tre
  • SpringBoot中封装jdbc工具类

    背景 现在的数据层的开发 xff0c 大多会使用如MyBatis或JPA之类的开发工具 这些开发工具给我们的开发过程中带来了极大的便利 但是在一些极端的场景下往往原生的jdbc方式操作数据库更灵活 xff0c 性能更高 由于部分场景下MyB
  • 若依设置匿名访问路径

    背景 在实际开发的过程中 xff0c 会有一些开放的API是可以游客访问的 xff0c 无需登录的 那么在若依这套框架中如何设置呢 xff1f 配置 文件路径如下 xff1a span class token class name RuoY
  • 初探OGNL表达式

    简介 对象导航图语言 xff08 Object Graph Navigation Language xff09 xff0c 简称OGNL xff0c 是应用于Java中的一个开源的表达式语言 xff08 Expression Languag
  • mvn命令启动Spring boot项目

    Spring boot项目在IDEA中启动非常的方便 xff0c 点击绿色三角按钮就可以启动了 最近有用vim开发Spring boot的小伙伴问我 xff0c 能不能在命令中手动启动Spring boot项目呢 xff1f 当时是可以的
  • Netty核心源码分析(五)核心组件EventLoop源码分析

    文章目录 系列文章目录一 EventLoop源码分析1 NioEventLoop源码2 EventLoop的父接口SingleThreadEventExecutor xff08 1 xff09 addTask方法 xff08 2 xff09