模板编译流程是什么?
1. 获取 outerHTML
<div id="app">{{name}}</div>
2. 正则查找转义成 ast 语法树
ast = {
    "tag": "div",
    "attrs": [
        {
            "name": "id",
            "value": "app"
        }
    ],
    "children": [
        {
            "type": 3,
            "text": "{{name}}"
        }
    ],
    "parent": null,
    "type": 1
}
3. ast 语法树转换成 render 字符串函数
const code = '_c("div", {id:"app"},_v(_s(name)))'
4. 执行 redner 函数 生成 vnode
const render = new Function(`with(this){return ${code}}`)
const vnode = render.call(vm) // 目的就是让 render 函数 this 指向 vue 实例, 因为 vue 实例有 _c, _v, _s 这些方法

// vnode 大体结构如下
vnode = {
    children: [{children: null, data: null, key: null, tag: null, text: "小米", vm: Vue}]
    data: {id: 'app'}
    key: undefined
    tag: "div"
    text: null
    vm: Vue {$options: {…}, _data: {…}, $el: undefined, …}
}
其实 vue 模板编译就上面这几个步骤,拆分一下是不是很清晰,接下来我们一步一步看看是怎么实现的!
1. 获取 outerHTML
很简单 el 就是用户 new Vue({ el: '#app' }) 里面的 #app, outerHTML 就是获取节点的 html 代码
 const el = document.querySelector(el);
 const template = el.outerHTML // <div id="app">{{name}}</div>
2. 正则查找转义成 ast 语法树
复制一下代码放入浏览器执行你会发现 ast 就被解析出来了
const template = '<div id="app">{{name}}</div>'
const ast = parserHTML(template)
解析过程:
- 找到标签头
<div 准备对象 {tagName: ‘div’,attrs: []}, 删除html上匹配到的内容
- 找到标签属性
id="app" 添加属性,------------------- 删除html上匹配到的内容
- 找到标签头结尾
> 返回 ast 入栈 [ ast ],-------------- 删除html上匹配到的内容
- 找到标签内容
{{name}} ast 添加 children,----------- 删除html上匹配到的内容
- 找到标签尾
</div> 出栈 [ ],-------------------------- 删除html上匹配到的内容
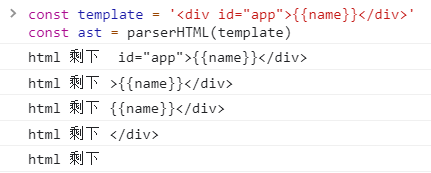
看懂了吗?就是将匹配到的一点一点删掉,直到 html 没了
下面的正则理解不了, 可以复制到 正则解析网站 里看看
const ncname = `[a-zA-Z_][\\-\\.0-9_a-zA-Z]*`; // 用来描述标签的
const qnameCapture = `((?:${ncname}\\:)?${ncname})`;
const startTagOpen = new RegExp(`^<${qnameCapture}`); // 标签开头的正则 捕获的内容是标签名
const endTag = new RegExp(`^<\\/${qnameCapture}[^>]*>`); // 匹配标签结尾的  捕获的是结束标签的标签名
const attribute = /^\s*([^\s"'<>\/=]+)(?:\s*(=)\s*(?:"([^"]*)"+|'([^']*)'+|([^\s"'=<>`]+)))?/; // 匹配属性的  分组1 拿到的是属性名  , 分组3 ,4, 5 拿到的是key对应的值

const startTagClose = /^\s*(\/?)>/; // 匹配标签结束的 /> or >

function parserHTML(html) {
  function advance(n) {
    html = html.substring(n) // 每次根据传入的长度截取html
    console.log("html 剩下", html)
  }

  // 树的操作 ,需要根据开始标签和结束标签产生一个树
  let root
  // 如何创建树的父子关系
  let stack = []

  function createASTElement(tagName, attrs) {
    return {
      tag: tagName,
      attrs,
      children: [],
      parent: null,
      type: 1
    }
  }

  // 开始标签进栈 (先进后出原理)
  function start(tagName, attrs) {
    let element = createASTElement(tagName, attrs)
    if (root == null) {
      root = element
    }
    let parent = stack[stack.length - 1] // 取到栈中的最后一个
    if (parent) {
      element.parent = parent       // 让这个元素记住自己的父亲是谁
      parent.children.push(element) // 让父亲记住儿子是谁
    }
    stack.push(element) //入栈
  }

  // 结束标签出栈
  function end(tagName) {
    stack.pop() //出栈
  }

  // 处理标签内容
  function chars(text) {
    text = text.replace(/\s/g, '')
    if (text) {
      let parent = stack[stack.length - 1]
      parent.children.push({ // 增加一个子元素
        type: 3, // 类型 3 表示文本
        text
      })
    }
  }

  //  ast 描述的是语法本身 ,语法中没有的,不会被描述出来  虚拟dom 是描述真实dom的可以自己增添属性
  while (html) {
    // 1. 处理开始标签 (就是处理 <div id="app">{{name}}</div>  的 <div id="app"> 部分)
    let textEnd = html.indexOf('<')
    if (textEnd === 0) {
      const startTagMatch = parseStartTag(); // 解析开始标签  {tagName:'div',attrs:[{name:"id",value:"app"}]}
      if (startTagMatch) {
        start(startTagMatch.tagName, startTagMatch.attrs)
        continue
      }

      // 3. 处理结束标签 (就是处理 <div id="app">{{name}}</div>  的 </div> 部分)
      let matches
      if (matches = html.match(endTag)) {
        end(matches[1])
        advance(matches[0].length)
        continue
      }
    }

    // 2. 处理标签内容 (就是处理 <div id="app">{{name}}</div> 的 {{name}} 部分)
    let text
    if (textEnd >= 0) {
      text = html.substring(0, textEnd)
    }
    if (text) {
      advance(text.length) // html 删去 text, 处理一点删一点
      chars(text)
    }
  }

  function parseStartTag() {
    const matches = html.match(startTagOpen) // 获取标签头 <div id="app">{{name}}</div> 的 <div 部分
    if (matches) {
      const match = {
        tagName: matches[1],
        attrs: []
      }
      advance(matches[0].length) // 删除html前面匹配到的标签名字符串
      let end, attr
      while (!(end = html.match(startTagClose)) && (attr = html.match(attribute))) {
        // while循环取属性 直到取完
        match.attrs.push({ name: attr[1], value: attr[3] || attr[4] || attr[5] || true })
        advance(attr[0].length) // 取到一个属性删除一个
      }
      if (end) {
        advance(end[0].length)
        return match
      }
    }
  }

  return root
}
3. ast 语法树转换成 render 字符串函数
const ast = {"tag": "div","attrs": [{"name": "id","value": "app"}],"children": [{"type": 3,"text": "{{name}}"}],"parent": null,"type": 1}  // 别看了就是上面那个 ast 对象

let code = genCode(ast) // '_c("div", {id:"app"},_v(_s(name)))'
逻辑如下:(看不下去就别看了,放浏览器执行一下看结果吧)
const defaultTagRE = /\{\{((?:.|\r?\n)+?)\}\}/g // 匹配双花括号中间单的内容

function genCode(ast) {
  let code
  code = `_c("${ast.tag}", ${
    ast.attrs.length ? genProps(ast.attrs) : 'undefined'
  }${
    ast.children ? (',' + genChildren(ast)) : ''
  })` // 后面的参数都是 children

  return code
}

// 参数拼接成对象
function genProps(attrs) {
  let str = ''
  for (let i = 0; i < attrs.length; i++) {
    let attr = attrs[i]
    if (attr.name === 'style') {
      let obj = {}
      attr.value.split(';').reduce((memo, current) => {
        let [key, value] = current.split(':')
        memo[key] = value
        return memo
      }, obj)
      attr.value = obj // 这里是样式对象 例:{color:red,background:blue}
    }
    str += `${attr.name}:${JSON.stringify(attr.value)},`
  }
  return `{${str.slice(0,-1)}}` // 删除最后的 ,
}

function genChildren(ast) {
  const children = ast.children
  return children.map(child => gen(child)).join(',') // 孩子 , 拼接
}


function gen(node) {
  if (node.type === 1) {  // 是节点
    return genCode(node)
  } else {
    let text = node.text
    if (!defaultTagRE.test(text)) {
      return `_v(${JSON.stringify(text)})` // 不带表达式的
    } else {
      let tokens = []
      let match
      // exec 遇到全局匹配会有 lastIndex 问题 每次匹配前需要将lastIndex 置为 0
      let startIndex = defaultTagRE.lastIndex = 0
      while (match = defaultTagRE.exec(text)) {
        let endIndex = match.index // 匹配到索引
        if (endIndex > startIndex) {
          tokens.push(JSON.stringify(text.slice(startIndex, endIndex)))
        }
        tokens.push(`_s(${match[1].trim()})`)
        startIndex = endIndex + match[0].length
      }
      if (startIndex < text.length) { // 最后的尾巴放进去
        tokens.push(JSON.stringify(text.slice(startIndex)))
      }
      return `_v(${tokens.join('+')})` // 最后将动态数据 和非动态的拼接在一起
    }
  }
}
4. 执行 redner 函数 生成 vnode
new Function('字符串') 可以让字符串变成函数
with(this){内部的代码} 可以让内部的代码变量从 this 里获取
function Vue() {}
const code = '_c("div", {id:"app"},_v(_s(name)))'
lifeCycleMixin(Vue)  // 给 Vue 实例添加 _c, _v, _s 等方法

const vm = new Vue()
vm.$options = {
   render: new Function(`with(this){return ${code}}`)
}
mountComponent(vm)  // 生成 vnode 并且交给 _update 方法将 vnode 渲染成真实 dom
今天就介绍到生成 vnode 了,后续的 _update 方法里面包含了 diff 算法,这不是本系列的重点,放后面讲吧!
function lifeCycleMixin(Vue) {
  Vue.prototype._c = function() { // 生成 vnode
    return createElement(this, ...arguments)
  }
  Vue.prototype._v = function() {
    return createTextNode(this, ...arguments)
  }
  Vue.prototype._s = function(value) { // 将数据转化成字符串 因为使用的变量对应的结果可能是一个对象
    if(typeof value === 'object' && value !== null){
      return JSON.stringify(value)
    }
    return value
  }
  Vue.prototype._render = function() {
    const vm = this;
    const render = vm.$options.render;
    let vnode = render.call(vm); // _c( _s _v)  with(this)
    console.log("vnode =", vnode)
    return vnode;
  }
  Vue.prototype._update = function(vnode) { // 将虚拟节点变成真实节点
    // 将 vnode 渲染el元素中
    // const vm = this;
    // vm.$el = patch(vm.$el,vnode); // 可以初始化渲染, 后续更新也走这个patch方法
  }
}

function createElement(vm, tag, data = {}, ...children) {
    return vnode(vm,tag,data,children,data.key,null)
}

function createTextNode(vm,text) {
    return vnode(vm,null,null,null,null,text)
}

function vnode(vm,tag,data,children,key,text){
    return {
        vm,
        tag,
        data,
        children,
        key,
        text
        // ...
    }
}


function mountComponent(vm) {
  // 实现页面的挂载流程
  const updateComponent = () => {
    // 需要调用生成的render函数 获取到虚拟节点  -> 生成真实的dom
    vm._update(vm._render());
  }
  updateComponent(); // 如果稍后数据变化 也调用这个函数重新执行
  // 后续:观察者模式 + 依赖收集 + diff算法
}
如果你想运行以上代码,ctrl + shift + n 进入无痕模式运行

看到这为什么 vue 不直接把 template 一步到位转成 vnode,而是 template 转成 render 再转成 vnode?
知道就写评论里,不知道就算了我不会告诉你的?
| 手写 vue 代码仓库 |
链接 |
| GitHub |
https://github.com/shunyue1320/vue-resolve/tree/vue-02 |
| Gitee |
https://gitee.com/shunyue/vue-resolve/tree/vue-02/ |