实现思路
- 前端使用webSocket与服务端创建连接的时候,将用户ID传给服务端
- 服务端将用户ID与channel关联起来存储,同时将channel放入到channel组中
- 如果需要给所有用户发送消息,直接执行channel组的writeAndFlush()方法
- 如果需要给指定用户发送消息,根据用户ID查询到对于的channel,然后执行writeAndFlush()方法
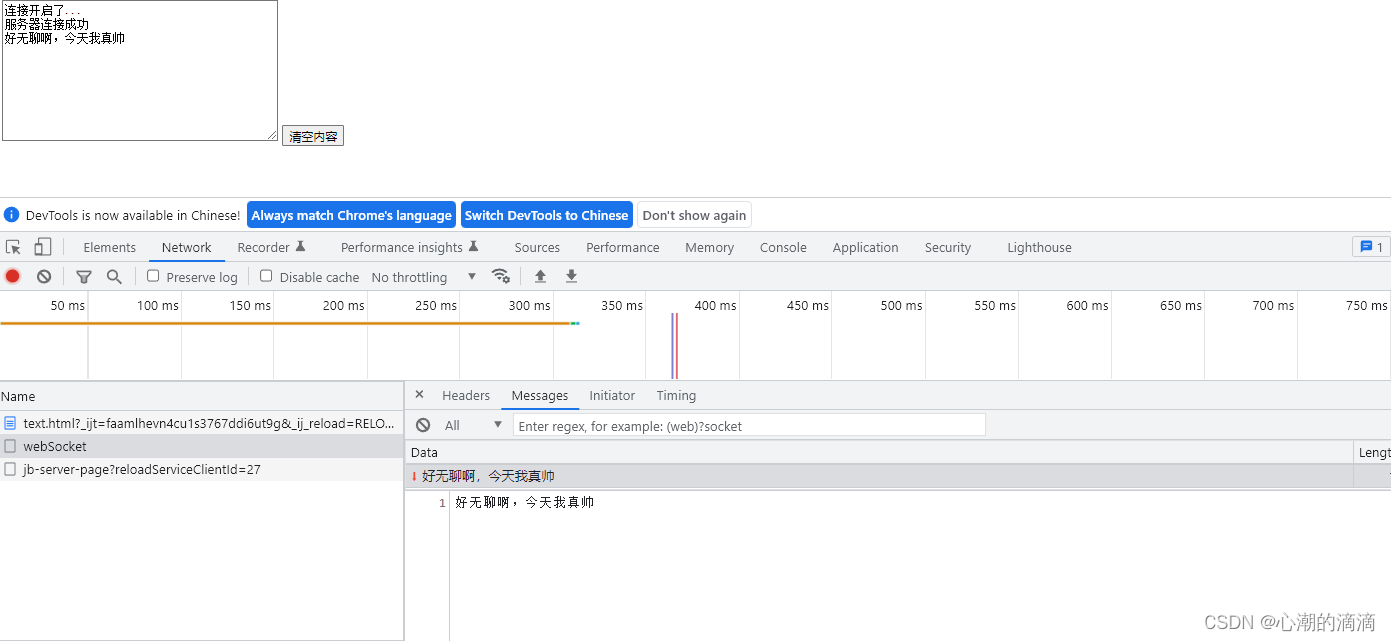
- 前端获取到服务端推送的消息之后,将消息内容展示到文本域中
实现步骤
一、引入依赖
<dependency>
    <groupId>io.netty</groupId>
    <artifactId>netty-all</artifactId>
    <version>4.1.36.Final</version>
</dependency>
<dependency>
   <groupId>cn.hutool</groupId>
    <artifactId>hutool-all</artifactId>
    <version>5.2.3</version>
</dependency>
二、编写NettyConfig
定义一个channel组,管理所有的channel,再定义一个map,管理用户与channel的对应关系
public class NettyConfig {

    /**
     * 定义一个channel组,管理所有的channel
     * GlobalEventExecutor.INSTANCE 是全局的事件执行器,是一个单例
     */
    private static ChannelGroup channelGroup = new DefaultChannelGroup(GlobalEventExecutor.INSTANCE);

    /**
     * 存放用户与channel的对应消息,用于给指定用户发送消息
     */
    private static ConcurrentHashMap<String, Channel> userChannelMap = new ConcurrentHashMap<>();

    private NettyConfig() {}

    /**
     * 获取channel组
     */
    public static ChannelGroup getChannelGroup() {
        return channelGroup;
    }

    /**
     * 获取用户 channel map
     */
    public static ConcurrentHashMap<String, Channel> getUserChannelMap() {
        return userChannelMap;
    }
}
三、具体实现业务的WebSocketHandler
@Component
@ChannelHandler.Sharable
public class WebSocketHandler extends SimpleChannelInboundHandler<TextWebSocketFrame> {
private static final Logger logger = LoggerFactory.getLogger(NettyServer.class);
// 一旦连接,第一个被执行
@Override
public void handlerAdded(ChannelHandlerContext ctx) throws Exception {
logger.info("handlerAdded 被调用: " + ctx.channel().id().asLongText());
// 添加到channelGroup 通道组
NettyConfig.getChannelGroup().add(ctx.channel());
}
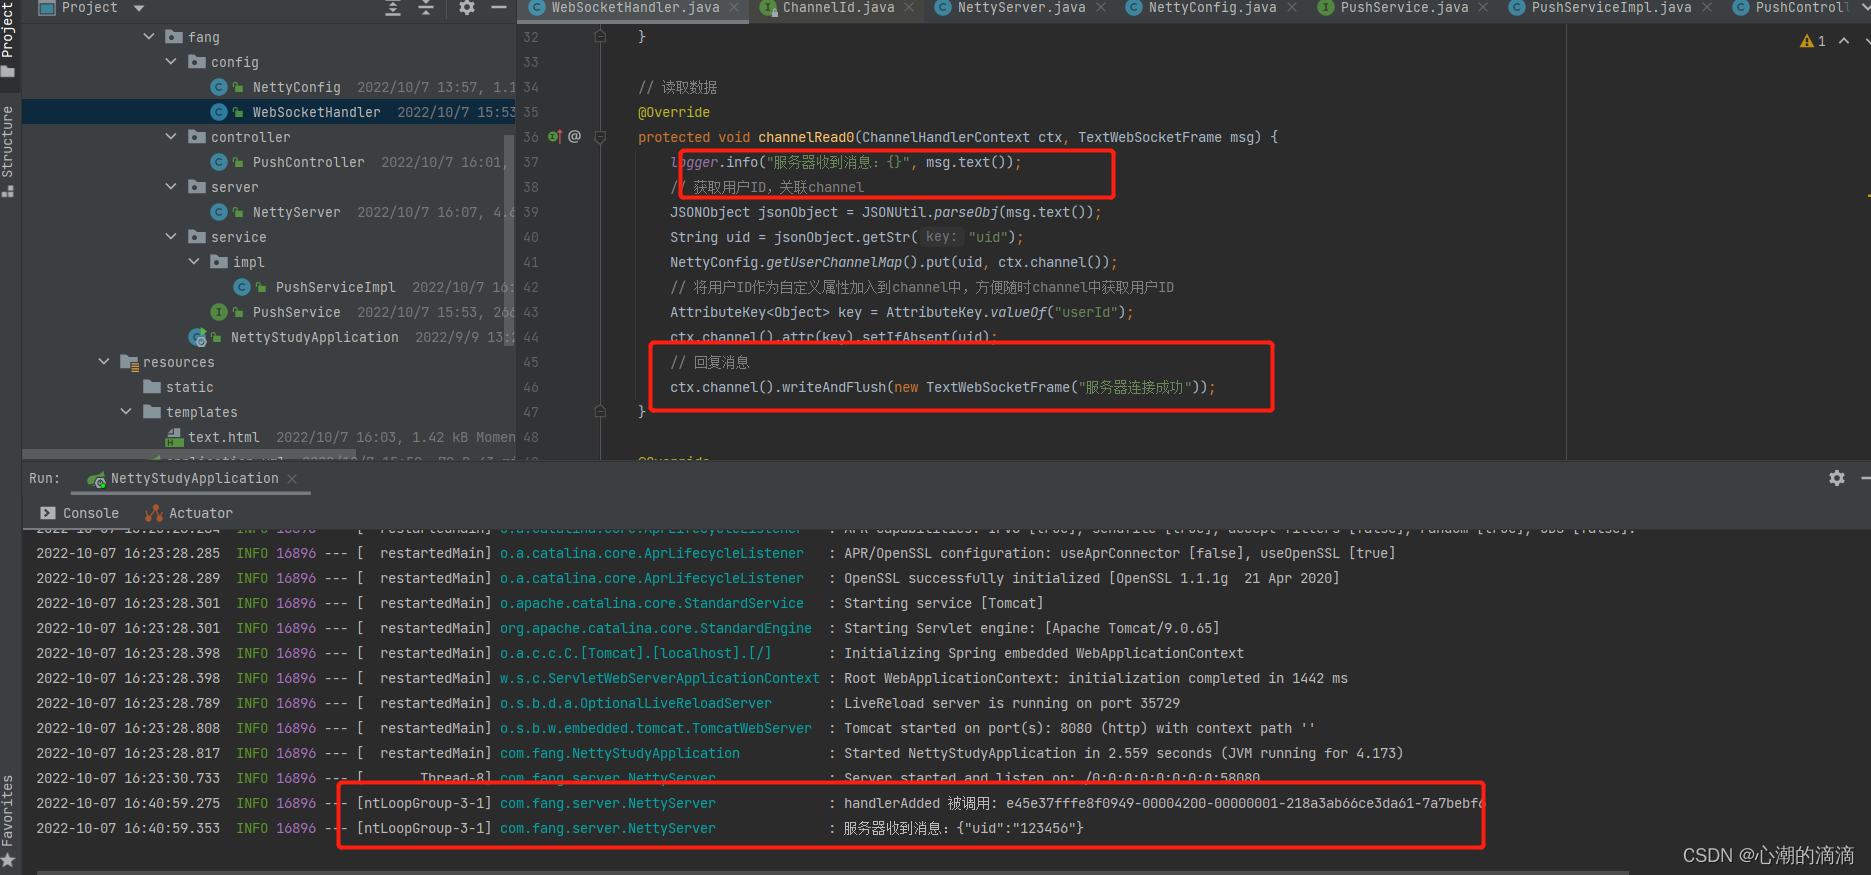
// 读取数据
@Override
protected void channelRead0(ChannelHandlerContext ctx, TextWebSocketFrame msg) {
logger.info("服务器收到消息:{}", msg.text());
// 获取用户ID,关联channel
JSONObject jsonObject = JSONUtil.parseObj(msg.text());
String uid = jsonObject.getStr("uid");
NettyConfig.getUserChannelMap().put(uid, ctx.channel());
// 将用户ID作为自定义属性加入到channel中,方便随时channel中获取用户ID
AttributeKey<Object> key = AttributeKey.valueOf("userId");
ctx.channel().attr(key).setIfAbsent(uid);
// 回复消息
ctx.channel().writeAndFlush(new TextWebSocketFrame("服务器连接成功"));
}
@Override
public void handlerRemoved(ChannelHandlerContext ctx) {
logger.info("handlerRemoved 被调用: " + ctx.channel().id().asLongText());
// 删除通道
NettyConfig.getChannelGroup().remove(ctx.channel());
removeUserId(ctx);
}
@Override
public void exceptionCaught(ChannelHandlerContext ctx, Throwable cause) {
logger.info("异常: {}", cause.getMessage());
// 删除通道
NettyConfig.getChannelGroup().remove(ctx.channel());
removeUserId(ctx);
ctx.close();
}
// 删除用户与channel的对应关系
private void removeUserId(ChannelHandlerContext ctx) {
AttributeKey<String> key = AttributeKey.valueOf("userId");
String userId = ctx.channel().attr(key).get();
NettyConfig.getUserChannelMap().remove(userId);
}
}
@Sharable注解用来说明ChannelHandler是否可以在多个channel直接共享使用
四、创建NettyServer
定义两个EventLoopGroup,BossGroup辅助客户端的TCP连接请求,workGroup负责与客户端之前的读写操作,需要说明的是,需要开启一个新的线程来执行NettyServer,要不然会阻塞主线程,到时候就无法调用项目的其他controller接口了
@Component
@RequiredArgsConstructor
public class NettyServer {

    private static final Logger logger = LoggerFactory.getLogger(NettyServer.class);

    // webSocket协议名
    private static final String WEBSOCKET_PROTOCOL = "WebSocket";

    /**
     * 端口号
     */
    @Value("${webSocket.netty.port:58080}")
    private int port;

    /**
     * webSocket路径
     */
    @Value("${webSocket.netty.path:/webSocket}")
    private String webSocketPath;

    private final WebSocketHandler webSocketHandler;

    private EventLoopGroup bossGroup;
    private EventLoopGroup workGroup;

    // 启动
    @SneakyThrows
    private void start() {
        bossGroup = new NioEventLoopGroup();
        workGroup = new NioEventLoopGroup();
        ServerBootstrap bootstrap = new ServerBootstrap();
        // bossGroup辅助客户端的tcp连接请求,workGroup负责与客户端之前的读写操作
        bootstrap.group(bossGroup, workGroup);
        // 设置NIO类型的channel
        bootstrap.channel(NioServerSocketChannel.class);
        // 设置监听端口
        bootstrap.localAddress(new InetSocketAddress(port));
        // 连接达到时会创建一个通道
        bootstrap.childHandler(new ChannelInitializer<SocketChannel>() {
            @Override
            protected void initChannel(SocketChannel ch) {
                // 流水线管理通道中的处理程序(Handle),用来处理业务
                // webSocket协议本身是基于http协议的,所以这边也要使用http编解码器
                ch.pipeline().addLast(new HttpServerCodec());
                ch.pipeline().addLast(new ObjectEncoder());
                // 以块的方式来写的处理器
                ch.pipeline().addLast(new ChunkedWriteHandler());
                /*
                  1.http数据在传输过程中是分段的,HttpObjectAggregator可以将多个段聚合
                  2.这就是为什么,当浏览器发送大量数据时,就会发送多次http请求
                 */
                ch.pipeline().addLast(new HttpObjectAggregator(8192));
                /*
                  1.对应websocket,它的数据是以帧(frame)的形式传递
                  2.浏览器请求时 ws://localhost:58080/xxx 表示请求的url
                  3.核心功能是将http协议升级为ws协议,保持长连接
                 */
                ch.pipeline().addLast(new WebSocketServerProtocolHandler(webSocketPath, WEBSOCKET_PROTOCOL, Boolean.TRUE, 65536 * 10));
                // 自定义handler,处理业务逻辑
                ch.pipeline().addLast(webSocketHandler);
            }
        });
        // 配置完成,开始绑定server,通过调用sync同步方法阻塞知道绑定成功
        ChannelFuture channelFuture = bootstrap.bind().sync();
        logger.info("Server started and listen on: {}", channelFuture.channel().localAddress());
        // 对关闭通道进行监听
        channelFuture.channel().closeFuture().sync();
    }

    @SneakyThrows
    @PreDestroy
    public void destroy() {
        if (Objects.nonNull(bossGroup)) {
            bossGroup.shutdownGracefully().sync();
        }
        if (Objects.nonNull(workGroup)) {
            workGroup.shutdownGracefully().sync();
        }
    }

    @PostConstruct
    public void init() {
        // 需要开启一个新的线程来执行Netty server 服务器
        new Thread(this::start).start();
    }
}
五、编写前端页面
<!DOCTYPE html>
<html lang="en">
<head>
	<meta charset="UTF-8">
	<title>Title</title>
</head>
<body>
<script>
    let socket;
    // 判断当前浏览器是否支持webSocket
    if (window.WebSocket) {
        socket = new WebSocket("ws://localhost:58080/webSocket")
        // 相当于channel的read事件,ev 收到服务器回送的消息
        socket.onmessage = function (ev) {
            let rt = document.getElementById("responseText");
            rt.value = rt.value + "\n" + ev.data;
        }
        // 相当于连接开启
        socket.onopen = function (ev) {
            let rt = document.getElementById("responseText");
            rt.value = "连接开启了..."
            socket.send(
                JSON.stringify({
                    // 连接成功将,用户ID传给服务端
                    uid: "123456"
                })
            );
        }
        // 相当于连接关闭
        socket.onclose = function (ev) {
            let rt = document.getElementById("responseText");
            rt.value = rt.value + "\n" + "连接关闭了...";
        }
    } else {
        alert("当前浏览器不支持webSocket")
    }
</script>
<form onsubmit="return false">
	<textarea id="responseText" style="height: 150px; width: 300px;"></textarea>
	<input type="button" value="清空内容" onclick="document.getElementById('responseText').value=''">
</form>
</body>
</html>
测试
·1. 启动服务端

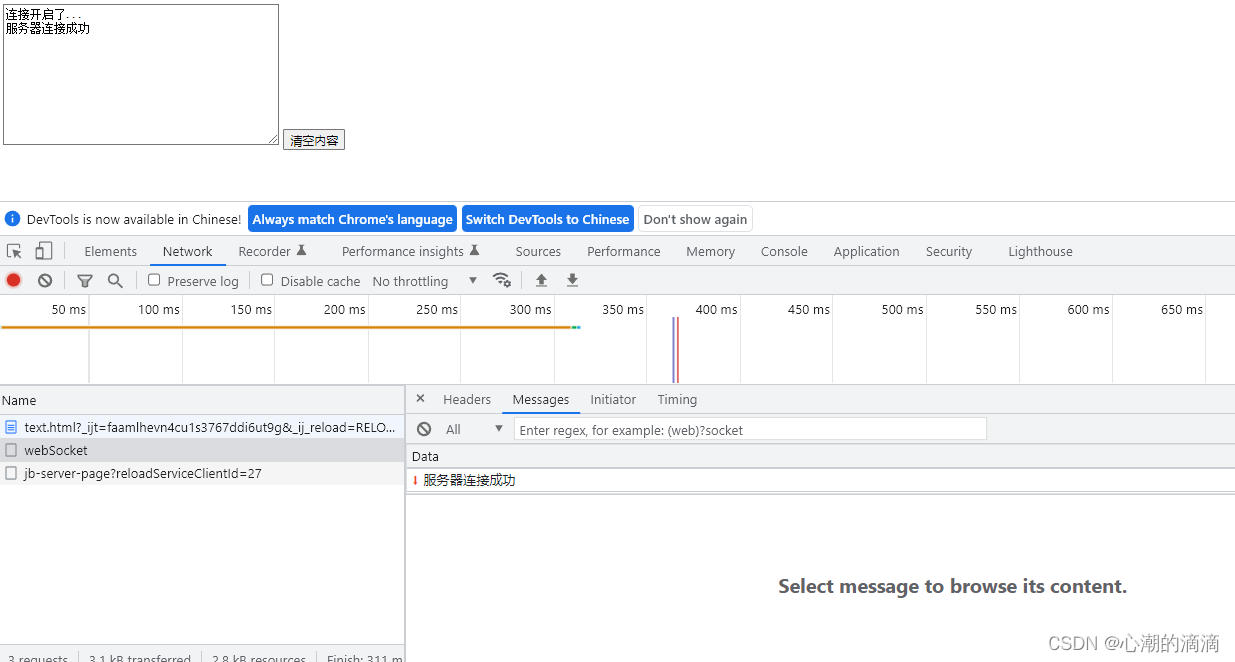
2. 启动客户端
客户端启动之后,服务端就会收到消息,且会返回消息
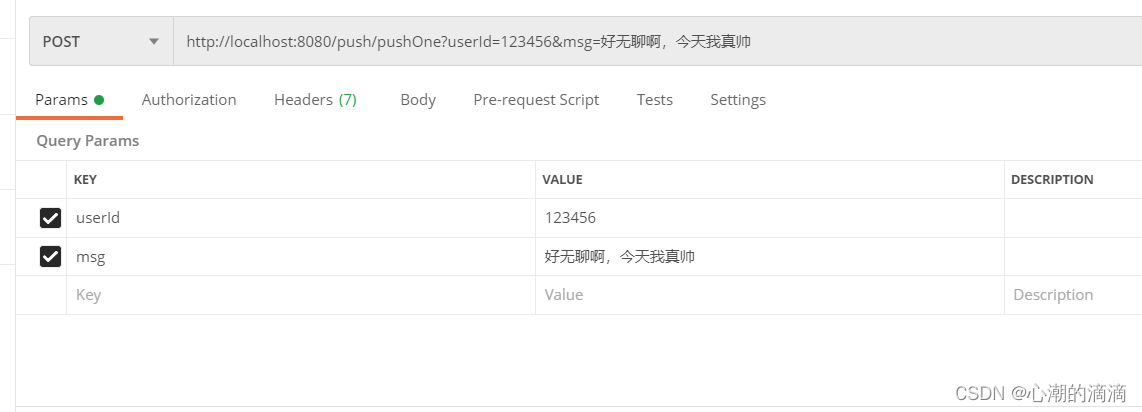
- 使用postman测试发送消息