小程序用户头像昵称获取规则调整公告
调整说明
自 2022 年 10 月 25 日 24 时后(以下统称 “生效期” ),用户头像昵称获取规则将进行如下调整:
-
自生效期起,小程序 wx.getUserProfile 接口将被收回:生效期后发布的小程序新版本,通过 wx.getUserProfile 接口获取用户头像将统一返回默认灰色头像,昵称将统一返回 “微信用户”。生效期前发布的小程序版本不受影响,但如果要进行版本更新则需要进行适配。
-
自生效期起,插件通过 wx.getUserInfo 接口获取用户昵称头像将被收回:生效期后发布的插件新版本,通过 wx.getUserInfo 接口获取用户头像将统一返回默认灰色头像,昵称将统一返回 “微信用户”。生效期前发布的插件版本不受影响,但如果要进行版本更新则需要进行适配。通过 wx.login 与 wx.getUserInfo 接口获取 openId、unionId 能力不受影响。
-
「头像昵称填写能力」支持获取用户头像昵称:如业务需获取用户头像昵称,可以使用「头像昵称填写能力」(基础库 2.21.2 版本开始支持,覆盖iOS与安卓微信 8.0.16 以上版本),具体实践可见下方《最佳实践》。
-
小程序 wx.getUserProfile 与插件 wx.getUserInfo 接口兼容基础库 2.27.1 以下版本的头像昵称获取需求:对于来自低版本的基础库与微信客户端的访问,小程序通过 wx.getUserProfile 接口将正常返回用户头像昵称,插件通过 wx.getUserInfo 接口将正常返回用户头像昵称,开发者可继续使用以上能力做向下兼容。
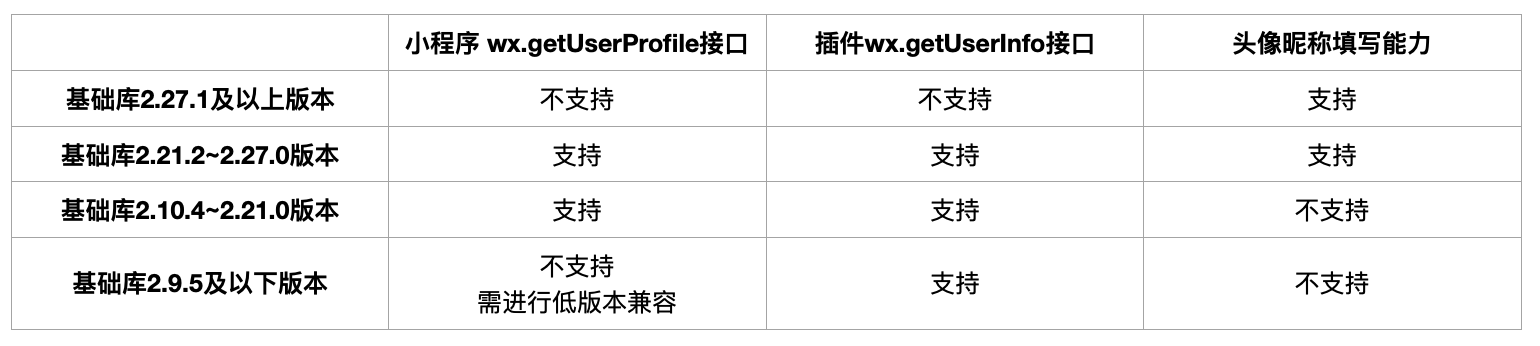
对于上述 3,wx.getUserProfile 接口、wx.getUserInfo 接口、头像昵称填写能力的基础库版本支持能力详细对比见下表:
以上是微信小程序对用户头像昵称更改的公告,从上文不能看出之前用到的wx.getUserProfile、wx.getUserInfo将被弃用,不在返回正确的用户昵称及头像信息。emm......完全看不懂为什么微信小程序总是揪着这个功能不放,一而再再而三的改动...
新Api介绍及实战
头像昵称填写
从基础库 2.21.2 开始支持。
需要将 button 组件 open-type 的值设置为 chooseAvatar,当用户选择需要使用的头像之后,可以通过 bindchooseavatar,uniApp使用@chooseavatar事件回调获取到头像信息的临时路径。
项目实战以uniApp为例
<template>
	<view class="containar">
		<view class="avatarUrl">
			<button type="balanced" open-type="chooseAvatar" @chooseavatar="onChooseavatar">
				<image :src="avatarUrl" class="refreshIcon"></image>
			</button>
		</view>
		<view class="nickname">
			<text>昵称:</text>
			<input type="nickname" class="weui-input" :value="nickName" @blur="bindblur"
				placeholder="请输入昵称" @input="bindinput"/>
		</view>

		<view class="btn">
			<view class="btn-sub" @click="onSubmit">保存</view>
		</view>
	</view>
</template>
export default {
		data() {
			return {
				avatarUrl: '',
				nickName: ''
			};
		},
		onLoad(option) {},
		methods: {
			bindblur(e) {
				this.nickName = e.detail.value; // 获取微信昵称
			},
			bindinput(e){
				this.nickName = e.detail.value; //这里要注意如果只用blur方法的话用户在输入玩昵称后直接点击保存按钮,会出现修改不成功的情况。
			},
			onChooseavatar(e) {
				let self = this;
				let {
					avatarUrl
				} = e.detail;
				uni.showLoading({
					title: '加载中'
				});
				uni.uploadFile({
					url: '后台uploadFile接口',
					filePath: avatarUrl,
					name: 'file',
					header: {
						token: '自己的token',
					},
					success: uploadFileRes => {
                        // 注意:这里返回的uploadFileRes.data 为JSON 需要自己去转换
						let data = JSON.parse(uploadFileRes.data);
						if (data.code === 0) {
							this.avatarUrl = data.data;
						}
					},
					fail: (error) => {
						uni.showToast({
							title: error,
							duration: 2000
						});
					},
					complete: () => {
						uni.hideLoading();
					}
				});
			},
			onSubmit() {
				if(this.nickName === ''){
					uni.showToast({
						icon: 'none',
						title: '请输入昵称'
					})
					return false;
				}
                // 这里做自己公司的存储逻辑
			}
		}
	};
.containar {
	.avatarUrl {
		padding: 80rpx 0 40rpx;
		background: #fff;
		button {
			background: #fff;
			line-height: 80rpx;
			height: auto;
			width: auto;
			padding: 20rpx 30rpx;
			margin: 0;
			display: flex;
			justify-content: center;
			align-items: center;
			.refreshIcon {
				width: 160rpx;
				height: 160rpx;
				border-radius: 50%;
			}
			.jt{
				width: 14rpx;
				height: 28rpx;
			}
		}
	}
	.nickname{
		    background: #fff;
		    padding: 20rpx 30rpx 80rpx;
		    display: flex;
		    align-items: center;
		    justify-content: center;
			.weui-input{
				padding-left: 60rpx;
			}
	}
	.btn{
		width: 100%;
		.btn-sub{
			width: 670rpx;
			margin: 80rpx auto 0;
			height: 90rpx;
			background: #DF8585;
			border-radius: 45rpx;
			line-height: 90rpx;
			text-align: center;
			font-size: 36rpx;
			color: #fff;
		}
	}
}
效果图:


这次分享就到这里了。希望能帮助到你。如果有需要做小程序的可以私信我哦。