初始springboot
本教程假设您已有了 springmvc mysql mybatis基础。
1:教程配套章节视频
2:教程结束后,会配有综合项目案例 ,毕竟不整合不能确切的理解各点的真正含义。(案例现在还没想好),大家也可以提供案例,技术栈基于:sboot+vue+mybatisplus+redis.
3:每个技术栈都有对应的快速入门教程,可查缺补漏。
4:最近很忙(其实就没闲着),但我会按对知识点的消化进度持续更新
1 快速搭建sboot项目
在左上角 File-> new->project 按New Project 选择响应配置

name: 项目名称
location: 项目地址
language: java
Type: maven项目
Group| Artifact:项目坐标
package: 基本包路径名
java: 8 使用JDK8版本
package: jar
next 选择 Spring Web即可

2 项目结构

在这里注意 xxxApplication是项目的启动类,在包的根路径下 (com.example.demo),之后所有的类,都要建在其下一级包内。这是因为 在根路径下,启动类的 @SpringBootApplication 注解会扫描主程序及其所有子(孙子)包。

如果非要嘚瑟 那就只能指定扫描包路径
@SpringBootApplication(scanBasePackages = “org.xxx.xxx”)
3:编写 properties文件

4:启动
Run 'DemoApplication’是以运行方式启动
Debug ‘DemoApplication’ 是以调试方式启动(开发时,建议使用调试模式)

看到如下提示说明启动成功,一个最简单的sboot项目创建完毕

从上图的红框处可以看到,sboot内置tomcat,所以 运行sboot无需单独配置tomcat服务器。
5: POM文件

在第1步 快速搭建 sboot项目中 我们选择了 spring web这个选项,sboot 引入了spring-boot-starter-web依赖,注意该依赖还包括下面的(spring-boot-starter-test)没有版本号,这是因为他们依赖的父项目 已经预置了相对应的版本。


你会看到各种插件的预置场景的版本

对插件版本我们一般不会在maven中写版本号,而由spring-boot-dependies自动版本仲裁,如有特殊需要非仲裁版本号 需要写版本。
至于sboot预置了哪些版本,可以看上图,也可以在pom中

一定要按需引入,如下图,在POM中我们只引入了 web starter这个场景,那么其余的右边部分场景将不会引入

二 springboot 基本配置
springboot不同于springmvc,已不再推荐使用xml方式进行配置。
1:注解配置
1:@configuration 声明配置类
@Configuration取代了 spring中IOC容器中的bean标签

在启动spring boot时,会把所有使用@configuration的类加载到容器中
@configuration 属性proxyBeanMethods
proxyBeanMethods 默认为true 2.6.2之前版本默认为false.
1: 如果将proxyBeanMethods 设置为true (默认), 则使用CGlib的代理模式,以单例 bean的模式将类加载到容器中,在sboot中称为bean的full 模式
2:将proxyBeanMethods 设置为false,则不使用CGlib代理模式,每次new都将创建一个新的对象。称为 bean的lite轻量级模式
全模式允许bean的依赖,lite轻量级模式不允许bean间的依赖

proxyBeanMethods = true 时 full全模式,启动sboot 将会一直检查容器中是否有该实例(如:MyPc ) 以保证该实例的单例性,带来的问题是 加载速度慢
proxyBeanMethods = false时 lite轻量模式,启动sboot 将不会检查容器中是否有该实例(如:MyPc ) 加载速度快
使用场景:
如果在配置类中一个组件需要依赖另外一个组件 如上图,我们把proxyBeanMethods 设置为true,不用设置 默认就是true;
如果只是配置类 没有依赖 则把proxyBeanMethods 设置为false
配置类本身也是一个组件 BeanConfig
@Configuration和@component 不同
在@configuration中 @Bean注解告诉Spring这个方法将会返回一个对象,这个对象要注册为Spring应用上下文中的bean。通常方法体中包含了最终产生bean实例的逻辑
@configuration也是一个@component.
在应用程序@Component所在的包上启用扫描。同时会表明一个类会作为组件类,并告知Spring要为这个类创建bean
2:@Conditional

@conditionalOnXXX :当满足某个条件时,才会do somthing.
@conditionalOnMissingXXX: 当没有某个条件时,才会 do somthing


该注解可应用于方法和类上
3: @ImportResource
引入外部资源文件。如早起spring项目中都是在xml中使用bean标签将组件放入容器中管理,现在 我们在修改这类文件时,没必要再一个一个的把他们放到配置类中;使用@ImportResource(classpath: 类路径.xml)即可实现导入
测试如下:
[外链图片转存失败,源站可能有防盗链机制,建议将图片保存下来直接上传(img-rCNESjm0-1641722143818)(D:\微服务课件\第二章 springboot\SpringBoot教程.assets\image-20220102220908498-1641132550565.png)]
4: @PropertySource
1:@PropertySource 自定义配置文件名称,多用于配置文件与实体属性映射;
2: 所有配置都放在主配置文件中(application.properties 或yml)导致主配置文件臃肿,
@ImportSource则多用于自定义的xml配置,见3 importResource的使用
使用步骤
1:必须放在spring容器中
@Component
@PropertySource("classpath:config.properties")
@ConfigurationProperties(prefix = "mycat")
@Data
public class MyCat {
    private String name;
    private String addr;
}
2: 创建config.properties文件
mycat.name=xm
mycat.addr=山东济南
5:@ConfigurationProperties
用于读取propertis配置文件的内容,并封装到bean中
步骤1: 在JAVAbean中添加@Component和 @ConfigurationProperties(prefix = “mycar”) 注解;前者将类放入容器中,否则无法读取配置文件
@Data
@AllArgsConstructor
@NoArgsConstructor
@Component
@ConfigurationProperties(prefix = "mycar")
public class MyCar {
    private String name;
}
步骤2: 配置文件中使用 mycar.name=haah mycar是注解prefix。 name是MyCar的属性 haah是值
mycar.name=haah
步骤3:启动sboot
6:@ComponentScan
根据定义的扫描路径,把符合扫描规则的类装配到spring容器中.
类似于springmvc
<context:component-scan>
1:com.example.demo.components包中存在两个service
[外链图片转存失败,源站可能有防盗链机制,建议将图片保存下来直接上传(img-i5GPETpU-1641722143819)(D:\微服务课件\第二章 springboot\SpringBoot教程.assets\image-20220103092626160-1641173187989.png)]
package com.example.demo.components;

import org.springframework.stereotype.Service;

@Service
public class ComponentDemo2 {
}
2: 在启动类使用@ComponentScan 扫描
@SpringBootApplication
@ComponentScan("com.example.demo.components")
public class DemoApplication {
    public static void main(String[] args) {
        ApplicationContext run = SpringApplication.run(DemoApplication.class, args);
        String[] beanDefinitionNames = run.getBeanDefinitionNames();
        for (String beanDefinitionName : beanDefinitionNames) {
            System.out.println(beanDefinitionName);
        }
    }
}

三 springboot如何启动

四 自定义smartFileUtil-spring-boot-starter
自定义启动类,完成 文件的读取操作
1:新建空项目
![1:[外链图片转存失败,源站可能有防盗链机制,建议将图片保存下来直接上传(img-9KaiFKFq-1641722389026)(D:\微服务课件\第二章 springboot\SpringBoot教程.assets\image-20220103150316210-1641193397896.png)]](https://img-blog.csdnimg.cn/082327b968234b83944bb264f256146e.png?x-oss-process=image/watermark,type_d3F5LXplbmhlaQ,shadow_50,text_Q1NETiBA5oqA6IO95L6g,size_20,color_FFFFFF,t_70,g_se,x_16)
2:新建autoconfigure和 starter
在该空项目中(smartfile)创建两个module
![[外链图片转存失败,源站可能有防盗链机制,建议将图片保存下来直接上传(img-RPPFaZUh-1641722389026)(D:\微服务课件\第二章 springboot\SpringBoot教程.assets\image-20220103155313759-1641196395301.png)]](https://img-blog.csdnimg.cn/61ae354d83db4667bfd0523d7725080d.png?x-oss-process=image/watermark,type_d3F5LXplbmhlaQ,shadow_50,text_Q1NETiBA5oqA6IO95L6g,size_20,color_FFFFFF,t_70,g_se,x_16)
2.1: smartfile-spring-boot-autoconfigure
1 创建springboot项目
![1: [外链图片转存失败,源站可能有防盗链机制,建议将图片保存下来直接上传(img-j2LsZV7c-1641722389027)(D:\微服务课件\第二章 springboot\SpringBoot教程.assets\image-20220103190912743-1641208154720.png)]](https://img-blog.csdnimg.cn/8d0147a2fcfa4eaa8b4a61cd8dc7e09a.png?x-oss-process=image/watermark,type_d3F5LXplbmhlaQ,shadow_50,text_Q1NETiBA5oqA6IO95L6g,size_20,color_FFFFFF,t_70,g_se,x_16)

2.2 : smartfile-spring-boot-starter
创建maven
![[外链图片转存失败,源站可能有防盗链机制,建议将图片保存下来直接上传(img-4ztYpjAn-1641722389027)(D:\微服务课件\第二章 springboot\SpringBoot教程.assets\image-20220103191229755-1641208351401.png)]](https://img-blog.csdnimg.cn/f79144b1db694350a9ebbf544b331092.png?x-oss-process=image/watermark,type_d3F5LXplbmhlaQ,shadow_50,text_Q1NETiBA5oqA6IO95L6g,size_20,color_FFFFFF,t_70,g_se,x_16)
3: 删除test
删除configure项目的启动类
删除configure项目中POM的build标签
删除两个项目的test目录
删除POM依赖的 test
4: starter项目引入configure依赖
<dependency>
    <groupId>org.haojia</groupId>
    <artifactId>smartfile-spring-boot-autoconfigure</artifactId>
    <version>0.0.1-SNAPSHOT</version>
</dependency>
5:创建spring.factories
![[外链图片转存失败,源站可能有防盗链机制,建议将图片保存下来直接上传(img-sfD9Bz0H-1641722389027)(D:\微服务课件\第二章 springboot\SpringBoot教程.assets\image-20220103191946392-1641208788968.png)]](https://img-blog.csdnimg.cn/cebcd03bdbee41a1b4a1993564dc6f21.png?x-oss-process=image/watermark,type_d3F5LXplbmhlaQ,shadow_50,text_Q1NETiBA5oqA6IO95L6g,size_20,color_FFFFFF,t_70,g_se,x_16)
org.springframework.boot.autoconfigure.EnableAutoConfiguration=\
com.example.smartfile.springboot.autoconfigure.SmartFileConfigure
sboot启动后 会读取spring.factories,加载SmartFileConfigure类
6:创建配置类
该项目加载到springboot后,可以在YAML文件中配置属性
@Data
@ConfigurationProperties(prefix = "org.haojia")
// 注意这个地方不需要@configuration;我们在SmartFileConfigure中 设置了@EnableConfigurationProperties(SmartFileProperties.class)
public class SmartFileProperties {
    private String savePath; // 指定保存路径
    private String fileType; // 文件保存类型
    private String fileName; // 文件名
}
7: 创建SmartFileConfigure
@Configuration
@ConditionalOnWebApplication
@EnableConfigurationProperties(SmartFileProperties.class)
public class SmartFileConfigure {
    @Autowired
    private SmartFileProperties smartFileProperties;
    @Bean
    public SmartFileUtil smartFileUtil(){
        return new SmartFileUtil(smartFileProperties);
    }
}
8: 创建SmartFileUtil
public class SmartFileUtil {
    private SmartFileProperties smartFileProperties;
    public SmartFileUtil() {
    }
    public SmartFileUtil(SmartFileProperties smartFileProperties) {
        this.smartFileProperties = smartFileProperties;
    }
    // 保存文件
    public boolean saveFile(String con) throws IOException {
        String path=smartFileProperties.getSavePath()
                    + File.separator
                    + smartFileProperties.getFileName()
                    + "."
                    + smartFileProperties.getFileType();
        BufferedWriter bw=new BufferedWriter(new FileWriter( path ));
        bw.write(con);
        bw.flush();
        bw.close();
        return true;
    }

}
9: 打包项目
将configure项目打包
将两个项目install安装 先configure项目 再 starter项目 顺序不能错
10:测试
10.1:新建sboot项目 在pom中导入依赖
<dependency>
            <groupId>org.example</groupId>
            <artifactId>smartfile-spring-boot-starter</artifactId>
            <version>1.0-SNAPSHOT</version>
        </dependency>
10.2 配置YAML文件
![[外链图片转存失败,源站可能有防盗链机制,建议将图片保存下来直接上传(img-NrAsnTyL-1641722389028)(D:\微服务课件\第二章 springboot\SpringBoot教程.assets\image-20220103202722796-1641212845396.png)]](https://img-blog.csdnimg.cn/e5f62899a8bd494898eb8c0051987a21.png?x-oss-process=image/watermark,type_d3F5LXplbmhlaQ,shadow_50,text_Q1NETiBA5oqA6IO95L6g,size_20,color_FFFFFF,t_70,g_se,x_16)
10.3 创建controller
@RestController
public class MyTestController {
    @Autowired
    private SmartFileUtil smartFileUtil;
    @RequestMapping("hi")
    public String test() throws IOException {
        smartFileUtil.saveFile("wahaha");
        return "hi";
    }
}
11: 添加热启动
1: POM中导入依赖
<dependency>
            <groupId>org.springframework.boot</groupId>
            <artifactId>spring-boot-devtools</artifactId>
            <optional>true</optional>
        </dependency>
使用ctrl+f9项目会自动从启动。
注意:在使用dubbo时,不要使用热启动,可能报莫名错误
五 sboot 配置
一:YAML配置
1.1 文件配置
sboot提供了三种格式的配置文件
1: application.properties
2: application.yml
3: application.yaml
优先级依次降低 即 1>2>3
三种格式文件共存时,相同配置按优先级覆盖,不同配置保留.
Tips:
当输入配置,发现没有提示时,(一般发生在application.yaml中),可以 调出 project structure facets

1.2 注入值配置
YAML: YAML Ain’t Markup Language(YAML不是标记语言缩写),适合做以数据为中心的配置文件
1:注意事项
1: K: V (注意 冒号后面有空格)
2: 区分大小写
3:使用缩进区分层级关系
4:缩进不允许使用tab,只允许使用空格,空格数不重要,但同层级左对齐
2:基本语法
2.1 字面量:最小单位,不可再分 如基本数据类型
k: v
2.2 对象 map hash set object
行内写法: k: {k1:v1,k2:v2}
k:
k1: v1
k2: v2
2.3 数组 array list
行内写法: k: [v1,v2,v3]
k:
 - v1
 - v2
类属性和YAML对照示例表
@Data
@AllArgsConstructor
@NoArgsConstructor
@Component
// 注意 引入ConfigurationProperties一直会有提示 让人感到不爽,添加插件-------------》(见插件1)
@ConfigurationProperties(prefix = "student")

public class Student {
    private String uname;
    private Boolean isStu;
    private Date bornDate;
    private Integer age;
    # 此处默认不会有提示,如果像加上提示 1:添加@NestedConfigurationProperty 2:在类上方添加@EnableConfigurationProperties(类.class)
    #3 运行maven的lifecycle中的package命令
    private Major major;
    private String[] favies;
    private String[] friends;
    private List<String> subs;
    private Map<String,Integer> scores;
    private Map<String,List<Major>> majors;
}
student:
  age: 15
  is-stu: true
  uname: xm
  born-date: 2012/12/12
  favies: [足球,乒乓球]
  friends:
    - xm
    - lm
  subs: [语文,数学]
  major:
   name: 专业
   score: 80
  scores: { enclish: 20,china: 90}
  majors:
    wenke:
      - {name: xm,score: 20}
      - {name: lm,score: 24}
major类
@Data
@AllArgsConstructor
@NoArgsConstructor
public class Major {
    private String name;
    private Integer score;
}
编写controller
@RestController
public class TestController {
    @Autowired
    private Student student;
    @GetMapping("hi")
    public Student hello(){
        return student;
    }
}

1.3 使用@Value 变量引用

插件1处理
POM添加
<dependency>
            <groupId>org.springframework.boot</groupId>
            <artifactId>spring-boot-configuration-processor</artifactId>
            <optional>true</optional>
        </dependency>
打包时不需要该jar,打包时排除
 <build>
        <plugins>
            <plugin>
                <groupId>org.springframework.boot</groupId>
                <artifactId>spring-boot-maven-plugin</artifactId>
                <configuration>
                    <excludes>
                        <exclude>
                            <groupId>org.springframework.boot</groupId>
                            <artifactId>spring-boot-configuration-processor</artifactId>
                        </exclude>
                    </excludes>
                </configuration>
            </plugin>
        </plugins>
    </build>
1.4 端口号配置
server.port=8080
springboot相关配置请参考 官网 列出了所有的配置
添加banner
spring.banner.image.height=15
spring.banner.image.location=11.jpg  #放在resources目录下
spring.banner.image.width=50
https://docs.spring.io/spring-boot/docs/current/reference/html/index.html
二: 静态资源配置
1:sboot静态资源默认目录为 /static (或者是/public /resources /META-INF//resources)
2: sboot先到controller中查找有无对应地址,如果没有,再去静态资源查找对应路径
3: sboot静态资源默认映射路径为 /** ,一般静态资源加前缀,我们可以在YAML文件中,使用
spring.mvc.static-path-pattern=/static/**
指定静态资源的路径。 这样静态资源路径为 根目录+/static/静态资源文件名
4:使用 spring.web.resources.static-locations: classpath/xx指定静态资源存储路径
spring:
  mvc:
    static-path-pattern: /static/**    # 静态资源访问路径
  web:
    resources:
      static-locations: classpath:/hello  # 静态资源存储目录

观察 在hello内存储2.jpg 访问 http://localhost:8080/static/2.jpg
三:多配置文件
一个项目只能有一个主配置文件,但可以有多个子配置文件,在开发生产中,我们往往会根据需求在不同阶段配置不同文件。如我们可以在开发阶段配置dev.yml(properties)文件,在生产中可以配置pro.yml文件
application-环境名称.yml
如:
生产环境 application-pro.yml
开发环境 application-dev.yml
*主配置文件:* application.yml
在主配置文件中引入:
spring.profiles.active: dev #dev要和括号()内字体相同 application-dev.properties或yml
测试代码如下

四:REST风格
Rest :Representational state Transfer 变现形式状态转换;使用行为动作区分对资源操作的方式;根据Rest风格访问资源的方式教RestFull
4.1 优点:
1: 书写简化
2:隐藏访问行为,无法通过访问地址获取操作方式
3:减少客户端/服务器耦合,在不破坏现有客户端的情况下扩充 REST 接口要容易得多
4.2 Restfull 请求方式注解
| URL |
操作 |
请求类别 |
请求方式 |
| http://localhost:8080/users/1 |
查询用户 |
GET |
GetMapping(“xxx”) |
| http://localhost:8080/users/1 |
删除用户 |
DELETE |
DeleteMapping(“xx”) |
| http://localhost:8080/users |
添加用户 |
POST |
Postmapping(“xx”) |
| http://localhost:8080/users |
修改用户 |
PUT(修改/更新) |
putMapping(“xx”) |
| http://localhost:8080/users |
查询全部用户 |
GET |
getMapping(“xx”) |
4.3 Rest风格对应的参数注解
1:@RequestPost 接受JSON数据,2个以上建议以JSON作为传递的参数
2: @RequestParam 接收URL地址的参数或 form表单参数
3: @PathVariable 接收路径参数,一般传递的是ID值
具体应用下文。
六 springboot整合mybatis

1: 引入POM文件
<!-- 引入mybatis依赖 -->
<dependency>
            <groupId>org.mybatis.spring.boot</groupId>
            <artifactId>mybatis-spring-boot-starter</artifactId>
            <version>2.2.1</version>
        </dependency>
<!-- 引入mysql依赖 这里使用的是MySQL8版本 -->
<dependency>
            <groupId>mysql</groupId>
            <artifactId>mysql-connector-java</artifactId>
            <version>8.0.27</version>
        </dependency>
2 在yaml文件中配置数据库连接
spring:
 datasource:
    url: jdbc:mysql://localhost:3306/crm?useSSL=false&serverTimezone=Asia/Shanghai&characterEncoding=utf-8&autoReconnect=true
    driver-class-name: com.mysql.cj.jdbc.Driver
    username: root
    password: 123
3 编写POJO类
@Data
@AllArgsConstructor
@NoArgsConstructor
public class EmpyEntity implements Serializable {
    private static final long serialVersionUID = 8564386633310333L;
    private String empyName;
    private String pwd;
    private String phone;
    private Integer id;
}
4 编写mapper类
@Mapper // 注意 这里必须写@Mapper
public interface EmpyMapper {
    @Select("select * from empy")
    List<EmpyEntity> findAll();
    @Delete("delete from empy where id=#{id}")
    int del(Serializable id);
    @Update("update empy set empyName=#{empyName},pwd=#{pwd},phone=#{phone} where id=#{id}")
    int update(EmpyEntity empyEntity);
    @Select("select * from empy where id=${id}")
    EmpyEntity queryById(Serializable id);
    @Insert("insert into empy (id,empyName,pwd,phone) values(#{id},#{empyName},#{pwd},#{phone})")
    int add(EmpyEntity empyEntity);
}
5 编写controller
@RestController
@RequestMapping("empy")
public class EmpyController {
    @Autowired
    private EmpyMapper empyMapper;
    // 查询全部
    @GetMapping
    public List<EmpyEntity> findAll(){
        return empyMapper.findAll();
    }
    // 修改
    @PutMapping
    public int upd(@RequestBody EmpyEntity empyEntity){
        return empyMapper.update(empyEntity);
    }
    //增加
    @PostMapping
    public int add(@RequestBody EmpyEntity empyEntity){
        return empyMapper.add(empyEntity);
    }
    // 按ID查询
    @GetMapping("{id}")
    public EmpyEntity queryById(@PathVariable Integer id){
        return empyMapper.queryById(id);
    }
    //删除
    @DeleteMapping("{id}")
    public int delete(@PathVariable Integer id){
        return empyMapper.del(id);
    }
}
6 数据库
sboot已经配置了数据源,我们只需要在配置文件中配置即可。如上6.2 (在yaml文件中配置数据库连接)中数据库的配置
6.1 连接池
1:默认连接池 Hikari
在springboot的自动配置包autoconfiguration中,可以org.springframework.boot.autoconfigure.jdbc.DataSourceConfiguration,
通过查看源码可以找到springboot支持的数据库连接池以及为什么默认使用的HikariDataSource数据库连接池
org.springframework.boot.autoconfigure.jdbc
6.2 更换连接池
spring:
  mvc:
    static-path-pattern: /static/**
  web:
    resources:
      static-locations: classpath:/hello
  datasource:
    type: com.alibaba.druid.pool.DruidDataSource

    druid:
      url: jdbc:mysql://192.168.1.7:3306/crm?useSSL=false&serverTimezone=Asia/Shanghai&characterEncoding=utf-8&autoReconnect=true&allowPublicKeyRetrieval=true
      driver-class-name: com.mysql.cj.jdbc.Driver
      username: root
      password: 123
      initial-size: 10 #启动时初始化多少个连接
      max-active: 100 #连接池最多支持多少个会话
      max-wait: 6000 #程序向连接池中请求连接时,超过maxWait的值后,认为本次请求失败,即连接池 没有可用连接,单位毫秒,设置-1时表示无限等待
      time-between-eviction-runs-millis: 200 #检查空闲连接的频率,单位毫秒, 非正整数时表示不进行检查
      min-evictable-idle-time-millis: 300000 #池中某个连接的空闲时长达到 N 毫秒后, 连接池在下次检查空闲连接时,将回收该连接,要小于防火墙超时设置
      test-on-borrow: false #程序 申请 连接时,进行连接有效性检查(低效,影响性能)
      test-on-return: false #程序 返还 连接时,进行连接有效性检查(低效,影响性能)
      test-while-idle: true #如果为true(默认true),当应用向连接池申请连接,并且testOnBorrow为false时,连接池将会判断连接是否处于空闲状态,如果是,则验证这条连接是否可用
      validation-query: SELECT 1 #检查池中的连接是否仍可用的 SQL 语句,drui会连接到数据库执行该SQL, 如果正常返回,则表示连接可用,否则表示连接不可用
      validation-query-timeout: 1000
      keep-alive: true #程序没有close连接且空闲时长超过 minEvictableIdleTimeMillis,则会执行validationQuery指定的SQL,以保证该程序连接不会池kill掉,其范围不超过minIdle指定的连接个数。
      remove-abandoned: true #要求程序从池中get到连接后, N 秒后必须close,否则druid 会强制回收该连接,不管该连接中是活动还是空闲, 以防止进程不会进行close而霸占连接。
      remove-abandoned-timeout: 180 #设置druid 强制回收连接的时限,当程序从池中get到连接开始算起,超过此值后,druid将强制回收该连接,单位秒。

      log-abandoned: true #当druid强制回收连接后,是否将stack trace 记录到日志中
      pool-prepared-statements: true #缓存通过以下两个方法发起的SQL: public PreparedStatement prepareStatement(String sql)   ;  public PreparedStatement prepareStatement(String sql, int resultSetType, int resultSetConcurrency)
      max-pool-prepared-statement-per-connection-size: 20 #每个连接最多缓存多少个SQL
      filters: stat,wall,slf4j
      use-global-data-source-stat: true
      filter:
        stat: #监控统计
          slow-sql-millis: 5000
          merge-sql: true
          log-slow-sql: true
        slf4j: #日志监控:
          enabled: true
        wall:
          config:
            multi-statement-allow: true
      max-open-prepared-statements: 100
      connection-properties: druid.stat.mergeSql=true;druid.stat.slowSqlMillis=5000
      stat-view-servlet:
        allow: 127.0.0.1
        enabled: true
        url-pattern: /druid/*
        reset-enable: false
        login-password: 123456
        login-username: admin
      web-stat-filter:
        url-pattern: /*
        exclusions: "*.js,*.gif,*.jpg,*.png,*.css,*.ico,druid/*" #监控放行资源
访问 http://localhost:8080/druid 可以看到druid架空仪表盘
六 springboot整合mybatis-plus
一 : springboot基本安装使用
1: 引入maven依赖
<dependency>
    <groupId>com.baomidou</groupId>
    <artifactId>mybatis-plus-boot-starter</artifactId>
    <version>3.5.0</version>
</dependency>
2:配置启动类mapper
@SpringBootApplication
@MapperScan("org.haojia.mapper")
public class Demo3Application {
    public static void main(String[] args) {
        SpringApplication.run(Demo3Application.class, args);
    }
}
3: 配置分页启动类
@Configuration
public class MyBatisConfig {
    @Bean
    public MybatisPlusInterceptor mybatisPlusInterceptor() {
        MybatisPlusInterceptor interceptor = new MybatisPlusInterceptor();
        interceptor.addInnerInterceptor(new PaginationInnerInterceptor(DbType.MYSQL));
        return interceptor;
    }
}
4: mapper
public interface CustomMapper extends BaseMapper<Custom> {

}
5: service\
public interface ICustomService extends IService<Custom> {
}
5: controller
@RestController
@RequestMapping("custom")
public class CustomerController {
    @Autowired
    private ICustomService customService;
    // 保存
    @PostMapping
    public boolean save(@RequestBody Custom custom){
        boolean save = customService.save(custom);
        return save;//
    }
    /**
    普通分页查询
    */
    @GetMapping("{curPage}/{size}")
    public IPage<Custom> query(@PathVariable Integer curPage,@PathVariable Integer size){
        IPage<Custom> page = new Page<>(curPage, size);
        return customService.page(page);
    }
    /**
	带条件的分页查询
	*/
    @GetMapping("term/{curPage}/{size}")
    public IPage<Custom> query(@RequestBody CustomDto custom,@PathVariable Integer curPage,@PathVariable Integer size){
        IPage<Custom> page = new Page<>(curPage, size);
        QueryWrapper<Custom> c=new QueryWrapper<>();
        c.like("comName",custom.getComName());
        c.eq("phone",custom.getPhone());
        // 查询状态 ,0 存在1 删除 这一步mp会自动帮你加上
       // c.eq("deleted",custom.getDeleted());
        return customService.page(page,c);
    }
    // 按ID查询
    @GetMapping("{id}")
    public Custom queryById(@PathVariable Integer id){
        Custom custom = customService.getById(id);
        return custom;//
    }
    // 更新
    @PutMapping
    public boolean update(@RequestBody Custom custom){
        UpdateWrapper<Custom> uw=new UpdateWrapper<>();
        uw.eq("id",custom.getId());
        boolean update = customService.update(custom, uw);
        return update;//
    }
    // 逻辑删除
    @DeleteMapping("{id}")
    public boolean del(@PathVariable Integer id){
        boolean b = customService.removeById(id);
        return b;
    }
}

**DTO类**
public class CustomDto extends Custom {
}
在这里插入代码片
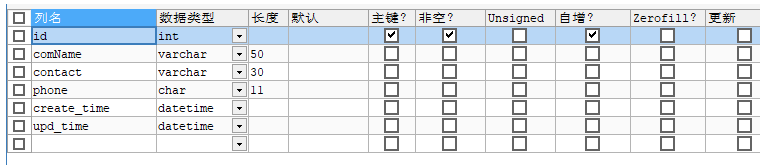
6: pojo
@Data
@AllArgsConstructor
@NoArgsConstructor
@TableName("custom")
public class Custom implements Serializable {
    @TableId(type = IdType.AUTO)
    private Integer id;
    @TableField("comName")
    private String comName;
    private String contact;
    private String phone;
}
7:使用postman进行测试
二:mybatisplus启动原理
Spring自动加载MP流程:通过spring.factories文件,读取MybatisPlusAutoConfiguration类,该类是一个自动配置类,将组件自动加载到spring容器中.

我们可以看到 ,spring采用lite模式,加载MP,也就说MP并没有把自己放在spring容器的代理中,这样可以提高sboot的启动速度。
通过注解@ConditionalOnClass(****当给定的类名在类路径上存在,则实例化当前Bean****)启动MP的前提条件时必须先存在SQLSessionFactory和SqlSessionFactoryBean这两个类.

在该类中有我们需要的配置类

三:mybatisplus常用注解
3.1 实体类用注解
1:@TableName(name=”表名”)
用于实体类,当实体类名和数据表不一致时,MP将无法把表和实体类进行映射,此时,我们需要使用该注解进行映射。

2: @TableId
@Data
@TableName("users")
public class MyUser implements Serializable {
    @TableId(type = IdType.AUTO,value="id") // 指明ID生成策略  value映射table字段
    private String id;
private String name;
    private Integer age;
    private Integer salary;
}
2.1 主键生成策略
| *值* |
*描述* |
| AUTO |
数据库ID自增 |
| NONE |
无状态,该类型为未设置主键类型(注解里等于跟随全局,全局里约等于 INPUT) |
| INPUT |
insert前自行set主键值 |
| ASSIGN_ID |
分配ID(主键类型为Number(Long和Integer)或String)(since 3.3.0),使用接口IdentifierGenerator的方法nextId(默认实现类为DefaultIdentifierGenerator雪花算法) |
| ASSIGN_UUID |
分配UUID,主键类型为String(since 3.3.0),使用接口IdentifierGenerator的方法nextUUID(默认default方法) |
| ID_WORKER |
分布式全局唯一ID 长整型类型(please use ASSIGN_ID) |
| UUID |
32位UUID字符串(please use ASSIGN_UUID) |
| ID_WORKER_STR |
分布式全局唯一ID 字符串类型(please use ASSIGN_ID) |
3:@TableField 自动填充
tableField是做实体类属性和表字段映射的,大部分情况下我们的属性名和表字段都是一样的,如表中的字段名是name,在javapojo类中的字段名也是name,这种情况下可以省略不用谢TableField注解,在此我们只了解填充功能
我们一般都会在pojo类和数据表中保留 创建时间和修改时间 的字段,这里面的值我们无需手动改写,只需利用填充功能即可完成值的注入
数据表
步骤如下:
1:
@Data
@AllArgsConstructor
@NoArgsConstructor
@TableName("custom")
public class Custom implements Serializable {
    @TableId(type = IdType.AUTO)
    private Integer id;
    @TableField("comName")
    private String comName;
    private String contact;
    private String phone;
    @TableField(value = "create_time",fill = FieldFill.INSERT)
    private Date createTime;
    @TableField(value="upd_time",fill = FieldFill.INSERT_UPDATE)
    private Date updTime;
}
2:
@Component
public class MPMetaHandler implements MetaObjectHandler {
    @Override
    public void insertFill(MetaObject metaObject) {
        // createDate和模型类的属性保持一致
        this.setFieldValByName("createTime",new Date(),metaObject);
        this.setFieldValByName("updTime",new Date(),metaObject);
    }
    @Override
    public void updateFill(MetaObject metaObject) {
        // updTime和模型类的属性保持一致
        this.setFieldValByName("updTime",new Date(),metaObject);
    }
}
tips
配置类MPMetaHandler 官网的配置如下
this.strictUpdateFill(metaObject, "updateTime", LocalDateTime.class, LocalDateTime.now());
但不知道为何我的不起作用
3 postman测试
添加

修改
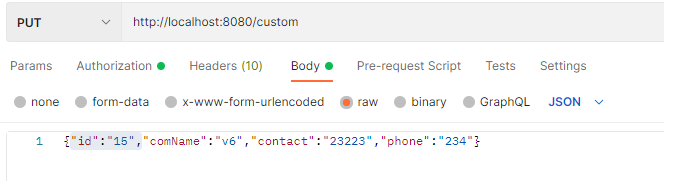
4:@Version乐观锁 悲观锁
标记乐观锁字段,添加到字段上
我们一般初始版本默认值为1:
此时如果有两个线程进入修改
线程1:Update xxxxx where id=1 and version=1
线程2:Update xxxxx where id=1 and version=1
当线程2修改version为2时,线程1再次进行修改则会发生版本号不对,因为找不到对应版本号,这样他就无法进行修改。因此,同一时间只能对同一记录更改一次
配置步骤如下:
@Configuration
public class MyBatisConfig {
    @Bean
    public MybatisPlusInterceptor mybatisPlusInterceptor() {
        MybatisPlusInterceptor interceptor = new MybatisPlusInterceptor();
        interceptor.addInnerInterceptor(new PaginationInnerInterceptor(DbType.MYSQL));
        // 添加乐观锁和悲观锁
        interceptor.addInnerInterceptor(new OptimisticLockerInnerInterceptor());
        return interceptor;
    }
}
2:在表中增加version字段
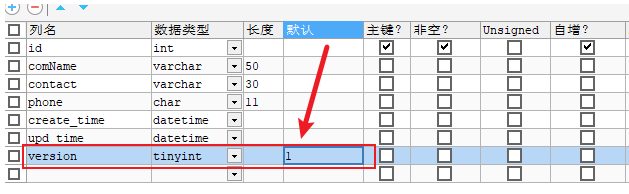
3: 在实体类中增加version字段
@Data
@AllArgsConstructor
@NoArgsConstructor
@TableName("custom")
public class Custom implements Serializable {
    @TableId(type = IdType.AUTO)
    private Integer id;
    @TableField("comName")
    private String comName;
    private String contact;
    private String phone;
    @TableField(value = "create_time",fill = FieldFill.INSERT)
    private Date createTime;
    @TableField(value="upd_time",fill = FieldFill.INSERT_UPDATE)
    private Date updTime;
    // 在此处增加version字段
    @Version
    private Integer version;
}
4: controller
@PutMapping
    public boolean update(@RequestBody Custom custom){
        UpdateWrapper<Custom> uw=new UpdateWrapper<>();
        uw.eq("id",custom.getId());
        // 获取当前的版本号
        Custom cus = customService.getById(custom.getId());
        // 在修改的类中设置当前版本号
        custom.setVersion(cus.getVersion());
        boolean update = customService.update(custom, uw);
        return update;//
    }

5:@TableLogic
表字段逻辑处理注解(逻辑删除),一般我们不会删除数据,只是在表中增加一个字段,对要删除的数据进行逻辑值的修改即可 。
配置步骤:
1: 数据表增加字段deleted

1:配置properties或yaml
mybatis-plus.global-config.db-config.logic-delete-value=1  #设置删除的值为1
mybatis-plus.global-config.db-config.logic-not-delete-value=0  #设置未删除的值未0
2: 实体类增加逻辑删除字段
@TableLogic  // 在字段上添加该注解
private Integer deleted;
3: controller
 @DeleteMapping("{id}")
    public boolean del(@PathVariable Integer id){
        boolean b = customService.removeById(id);
        return b;
    }
4:postman测试
发现已经变成了1
四:springboot整合Swagger
swagger作用:1:生成接口文档 2 接口测试
一:演示
1: 引入依赖
<dependency>
    <groupId>io.springfox</groupId>
    <artifactId>springfox-swagger2</artifactId>
    <version>2.9.2</version>
</dependency>
<dependency>
    <groupId>io.springfox</groupId>
    <artifactId>springfox-swagger-ui</artifactId>
    <version>2.9.2</version>
</dependency>
<!-- 第三方UI插件,浏览3.5部分 -->
<dependency>
    <groupId>com.github.xiaoymin</groupId>
    <artifactId>swagger-bootstrap-ui</artifactId>
    <version>1.9.6</version>
</dependency>
2: 编写配置类
import org.springframework.context.annotation.Bean;
import org.springframework.context.annotation.Configuration;
import springfox.documentation.builders.ApiInfoBuilder;
import springfox.documentation.builders.ParameterBuilder;
import springfox.documentation.builders.RequestHandlerSelectors;
import springfox.documentation.schema.ModelRef;
import springfox.documentation.service.Contact;
import springfox.documentation.service.Parameter;
import springfox.documentation.spi.DocumentationType;
import springfox.documentation.spring.web.plugins.Docket;
import springfox.documentation.swagger2.annotations.EnableSwagger2;

import java.util.ArrayList;
import java.util.List;

@Configuration
@EnableSwagger2
public class SwaggerConfig {
    @Bean
    public Docket docket(){
        ParameterBuilder ticketPar = new ParameterBuilder();
        List<Parameter> pars = new ArrayList<Parameter>();
        ticketPar.name("ticket").description("user ticket")
                .modelRef(new ModelRef("string")).parameterType("header")
                .required(false).build(); //header中的ticket参数非必填,传空也可以
        pars.add(ticketPar.build());  //根据每个方法名也知道当前方法在设置什么参数

        Docket doc=new Docket(DocumentationType.SWAGGER_2);
        ApiInfoBuilder api = new ApiInfoBuilder();
        api.title("我的test");
        Contact contact = new Contact("haojia","http://www.myblog.com","2021551911@qq.com");
        api.contact(contact);
        api.description("使用springboot+redis+vue+swagger文档编写我的test");
        api.version("v1.0");
        // doc.apiInfo(api.build());
        doc.select().apis(RequestHandlerSelectors.basePackage("org.haojia.controller"))
                .build().globalOperationParameters(pars).apiInfo(api.build());

        return doc;
    }
}
3: 启动类
@SpringBootApplication
public class Demo3Application {
    public static void main(String[] args) {
        SpringApplication.run(Demo3Application.class, args);
    }
}
4:配置yml文件
使用2.6.2后,需要添加这一条注解
spring.mvc.pathmatch.matching-strategy=ant_path_matcher
5: 启动
http://localhost:8080/swagger-ui.html
二:注解说明
注解只应用在controller类中,主要是为前端开发提供接口说明文档
API注解
1:@API注解应用在类上,提供对类功能的描述
@Api(tags = {"测试类说明1"})

public class TestController
2:@ApiOperation @ApiIgnore
该注解应用在方法上用以对方法提供文档说明;@ApiIgnore 该方法不会被声明为文档
@ApiOperation("获取用户信息")
public Teacher getUserModel(){
    System.out.println("============="+name);
   return null;
}
3: @ApiImplicitParams
用在方法上,用来对参数提供文档说明,dataType=该参数的数据类型 name=参数名称
Value=该参数的汉字说明 required 是否必传参数 true必须传 fasle 不是必传项
@ApiOperation("分页查询")
    @ApiImplicitParams({
            @ApiImplicitParam(dataType = "Integer",value = "当前页",required = true,name = "curPage"),
            @ApiImplicitParam(dataType = "Integer",value = "页大小",required = true,name = "size")

    })
    @GetMapping("{curPage}/{size}")
    public IPage<Custom> query(@PathVariable Integer curPage,@PathVariable Integer size){
        IPage<Custom> page = new Page<>(curPage, size);
        return customService.page(page);
    }

@ApiOperation("更新客户信息")
    @ApiImplicitParam(dataType = "Custom",name = "custom",value = "客户类",required = true)
    @PutMapping
    public boolean update(@RequestBody Custom custom){
        UpdateWrapper<Custom> uw=new UpdateWrapper<>();
        uw.eq("id",custom.getId());
        Custom cus = customService.getById(custom.getId());
        custom.setVersion(cus.getVersion());
        boolean update = customService.update(custom, uw);
        return update;//
    }
4: @ApiModel
用来修饰模型类
@ApiModel(value = "Custom",description = "对用户模型的描述")
public class Custom implements Serializable {
    @TableId(type = IdType.AUTO)
    @ApiModelProperty(value = "id",dataType = "Integer")
    private Integer id;
    @TableField("comName")
    @ApiModelProperty(value = "comName",dataType = "String")
    private String comName;
}