一、实验目的
- (1)理解设备是文件的概念。
- (2)掌握Linux模块、驱动的概念和编程流程
- (3)Windows /Linux下掌握文件读写基本操作
二、实验内容
- (1)编写一个Linux内核模块,并完成模块的安装/卸载等操作。
- (2)编写Linux驱动程序(字符类型或杂项类型)并编程应用程序测试。
功能:write几个整数进去,read出其和或差或最大值。
- (3)编写Linux驱动程序(字符类型或杂项类型)并编程应用程序测试。
功能:有序读和写内核缓冲区,可以重复读,可以覆盖写。返回实际读写
字节数。
- (4)Linux中文件软连接和硬链接的验证实验
三、实验要求
- 寝室提前做完,老师机房检查和答疑。1和4必做,2和3选择其一
四、实验过程
任务一 编写一个Linux内核模块,并完成模块的安装/卸载等操作。
借鉴blog:(二)Linux设备驱动的模块化编程
1.编写模块
test1.c
    #include <linux/kernel.h>
    #include <linux/module.h>

    static int hello_init(void)
    {
        printk("hello_init");

        return 0;
    }

    static void hello_exit(void)
    {
        printk("hello_exit");
    }


    MODULE_LICENSE("GPL");
    module_init(hello_init);
    module_exit(hello_exit);
2. 编写Makefile文件
#————————————————
#版权声明:本文为CSDN博主「hanp_linux」的原创文章,遵循CC 4.0 BY-SA版权协议,转载请附上原文出处链接及本声明。
#原文链接:https://blog.csdn.net/hanp_linux/article/details/90445164

#定义一些变量,增加代码的阅读性和扩展性
#`uname -r`这种写法就是执行uname -r这个shell命令,从而构造这个绝对路径,
#因为每个人的计算机的绝对路径都不一样,这样提高通用性,
#对于我的主机,这个路径相当于/lib/modules/4.4.0-31-generic/build
KERNEL_PATH := /lib/modules/`uname -r`/build
PWD := $(shell pwd)

#这个名字表示:要生产的模块的名字,最终会生成hello.ko //这里改为test1(你自己的.c文件名)
MODULE_NAME := test1

#表示要生成hello.ko要依靠中间文件hello.o  kbuild系统会将源码hello.c编译成hello.o
obj-m := $(MODULE_NAME).o

#当执行make命令默认会寻找第一个目标,即all
all:
	$(MAKE) -C $(KERNEL_PATH) M=$(PWD)

#执行make clean要执行的操作,将编译生成的中间文件删掉
clean:
	rm -rf .*.cmd *.o *.mod.c *.order *.symvers  *.ko
3. 编译
在当前文件夹下打开终端
make

4. 安装模块
sudo insmod test1.ko
一些查看操作
dmesg //查看系统从开机到当前时刻由printk输出到缓存的所有log
sudo dmesg -c //查看显示log信息,并将整个缓存清除掉
sudo dmesg -C //不显示log信息,将整个缓存清除掉
lsmod | grep test1//查看是否有test1这个模块
输入
 sudo insmod test1.ko
 sudo dmesg -c
输出

很奇怪为什么会输出hello_exit 应该是hello_init,别人的没问题,但我的有。
5. 卸载模块
卸载并打印内存输出
sudo rmmod test1.ko
sudo dmesg -c

任务二 编写Linux驱动程序(字符类型或杂项类型)并编程应用程序测试
借鉴自:(三)写一个完整的Linux驱动程序访问硬件并写应用程序进行测试
1.编写驱动程序代码
要求:
输入为两个整形数据的字符型指针,int num[2]。
输出为一个整形的字符型指针,int sum[1].
#include <linux/kernel.h>
#include <linux/module.h>
#include <linux/cdev.h>
#include <linux/fs.h>
#include <asm/uaccess.h>

dev_t devno;
int major = 255;
const char DEVNAME[] = "hello_device";
char data[64]  = "";
char data2[64] = "";

int hello_open(struct inode * ip, struct file * fp)
{
    printk("%s : %d\n", __func__, __LINE__);

    /* 一般用来做初始化设备的操作 */
    return 0;
}

int hello_close(struct inode * ip, struct file * fp)
{
    printk("%s : %d\n", __func__, __LINE__);

    /* 一般用来做和open相反的操作,open申请资源,close释放资源 */
    return 0;
}

ssize_t hello_read(struct file * fp, char __user * buf, size_t count, loff_t * loff)
{
    int ret;

    int *datan = (int*)data;
    int *data2n = (int*)data2;
    data2n[0] = datan[0]+datan[1];
    /* 将用户需要的数据从内核空间copy到用户空间(buf) */
    printk("%s : %d\n", __func__, __LINE__);
    if ((ret = copy_to_user(buf, data2, count)))
    {
        printk("copy_to_user err\n");
        return -1;
    }
    return count;
}

ssize_t hello_write(struct file * fp, const char __user * buf, size_t count, loff_t * loff)
{
    int ret;
    /* 将用户需要的数据从内核空间copy到用户空间(buf) */
    printk("%s : %d\n", __func__, __LINE__);
    if ((ret = copy_from_user(data, buf, count)))
    {
        printk("copy_from_user err\n");
        return -1;
    }
    return count;
}

/* 2. 分配file_operations结构体 */
struct file_operations hello_fops = {
    .owner = THIS_MODULE,
    .open  = hello_open,
    .release = hello_close,
    .read = hello_read,
    .write = hello_write
};
struct cdev cdev;

static int hello_init(void)
{
    int ret;
    printk("%s : %d\n", __func__, __LINE__);

    /* 1. 生成并注册设备号 */
    devno = MKDEV(major, 0);
    ret  = register_chrdev_region(devno, 1, DEVNAME);
    if (ret != 0)
    {
        printk("%s : %d fail to register_chrdev_region\n", __func__, __LINE__);
        return -1;
    }

    /* 3. 分配、设置、注册cdev结构体 */
    cdev.owner = THIS_MODULE;
    ret = cdev_add(&cdev, devno, 1);
    cdev_init(&cdev, &hello_fops);
    if (ret < 0)
    {
        printk("%s : %d fail to cdev_add\n", __func__, __LINE__);
        return -1;
    }
    printk("success!\n");
    return 0;
}

static void hello_exit(void)
{
    printk("%s : %d\n", __func__, __LINE__);

    /* 释放资源 */
    cdev_del(&cdev);
    unregister_chrdev_region(devno, 1);
}

MODULE_LICENSE("GPL");
module_init(hello_init);
module_exit(hello_exit);
2. 编写Makefile文件
KERNEL_PATH := /lib/modules/`uname -r`/build
PWD := $(shell pwd)
MODULE_NAME := hello

obj-m := $(MODULE_NAME).o

all:
	$(MAKE) -C $(KERNEL_PATH) M=$(PWD)

clean:
	rm -rf .*.cmd *.o *.mod.c *.order *.symvers *.tmp *.ko
3.编写app应用文件测试驱动程序
输入为int num[2]。
输出打印在终端上。
代码中num[2]为123,2。
app.c
#include <unistd.h>
#include <sys/stat.h>
#include <sys/types.h>
#include <fcntl.h>
#include <stdio.h>

int main(char argc, char * argv[])
{
    int fd;
    int ret;
    char buf[64] = "hello";
    char buf2[64] = "";
    int num[2]={123,2};
    char* num2 = (char*)num;

    /* 将要打开的文件的路径通过main函数的参数传入 */
    if (argc != 2)
    {
        printf("Usage: %s <filename>\n", argv[0]);
        return -1;
    }

    fd = open(argv[1], O_RDWR);
    if (fd < 0)
    {
        perror("fail to open file");
        return -1;
    }

    /* write data */
    ret = write(fd, num2, sizeof(num));
    if (ret < 0)
    {
        printf("read err!");
        return -1;
    }

    /* read data */
    ret = read(fd, num2, sizeof(num));
    if (ret < 0)
    {
        printf("read err!");
        return -1;
    }
    printf("buf2 = %d\n", num[0]);


    close(fd);
    return 0;
}
4.编译&安装&链接模块
make
sudo insmod hello.ko
cat /proc/devices
查看驱动号,为255

创建设备节点和设备挂钩
sudo mknod /dev/hello c 255 0
看到这个设备节点的详细信息
ls -l /dev/hello

5.编译$运行app
gcc app.c -o app
sudo ./app /dev/hello
输出为125,正确。

任务四 Linux中文件软连接和硬链接的验证实验
借鉴自:Linux系统硬链接和软链接具体实例讲解(超详细)
1.创建两个文件
echo “this is a test” >test.c
echo “this is a test2” >test2.c
2.创建一个软链接
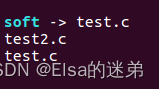
软链接:ln -s 源文件 目标文件
ln -s   test.c  soft
ls -li           #查看目录下的信息
3.创建一个硬链接
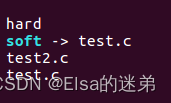
硬链接:ln 源文件 目标文件
ln  test2.c  hard
ls -li
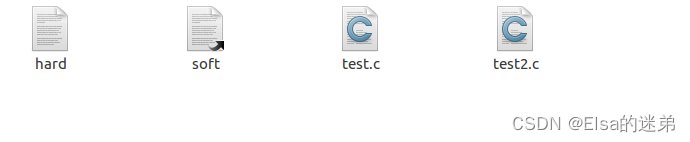
文件夹中文件
4.分析
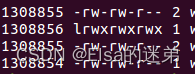
通过上面两图:地址空间--------文件名
可以看出:
硬链接:和源文件同时是访问同一个地址空间,生成一个硬链接相当于copy一份该文件,如果删除源文件test.2.c,hard文件不会删除,文件的内容也是在的。
硬链接==复制
软链接相当于记录了源文件的地址,访问该软链接相当于直接访问该源文件如果删除源文件,该软链接也会相应丢失源文件内容,访问出错 。
软链接==快捷方式