oh-my-posh安装教程

2023-05-16

简介

  • github: https://github.com/JanDeDobbeleer/oh-my-posh
  • docs: https://ohmyposh.dev/

docs中有详细的安装和使用说明,下文中有不明白的可以移步官方文档自行学习使用~

安装

下面以新安装的x86_64的debian环境进行举例

Linux debian 5.10.0-19-amd64 #1 SMP Debian 5.10.149-2 (2022-10-21) x86_64 GNU/Linux

针对内网和非root用户进行安装,避免污染其他用户的使用环境

#!/bin/bash

# 获取posh可执行文件,内网环境可以直接从github中下载后,拷贝到用户下指定目录
# 当前命令中下载的可执行文件是基于amd64架构的,根据自己的系统架构选择下载
mkdir -p ~/oh-my-posh
wget https://github.com/JanDeDobbeleer/oh-my-posh/releases/latest/download/posh-linux-amd64 -O ~/oh-my-posh/posh;
chmod +x ~/oh-my-posh/posh;

# 下载主题
mkdir -p ~/oh-my-posh/.poshthemes;
wget https://github.com/JanDeDobbeleer/oh-my-posh/releases/latest/download/themes.zip -O ~/oh-my-posh/.poshthemes/themes.zip;
unzip -q ~/oh-my-posh/.poshthemes/themes.zip -d ~/oh-my-posh/.poshthemes;
rm ~/oh-my-posh/.poshthemes/themes.zip -vf;
chmod u+rw ~/oh-my-posh/.poshthemes/*.omp.*;

# 向~/.profile,或者~/.bashrc,或者~/.bash_profile中写入posh初始化命令,下面命令中以~/.profile为例,并指定主题 montys.omp.json
sed -i '$a eval "$(~/oh-my-posh/posh init bash --config ~/oh-my-posh/.poshthemes/montys.omp.json)"' ~/.profile;

# 重新启用bash
source ~/.profile;

# 若安装了zsh,则最后两行命令用下面两行替代
# 向~/.zshrc中写入posh初始化命令,并指定主题 montys.omp.json
#sed -i '$a eval "$(~/oh-my-posh/posh init zsh --config ~/oh-my-posh/.poshthemes/montys.omp.json)"' ~/.zshrc;
# 应用新的.zshrc文件
#exec zsh;

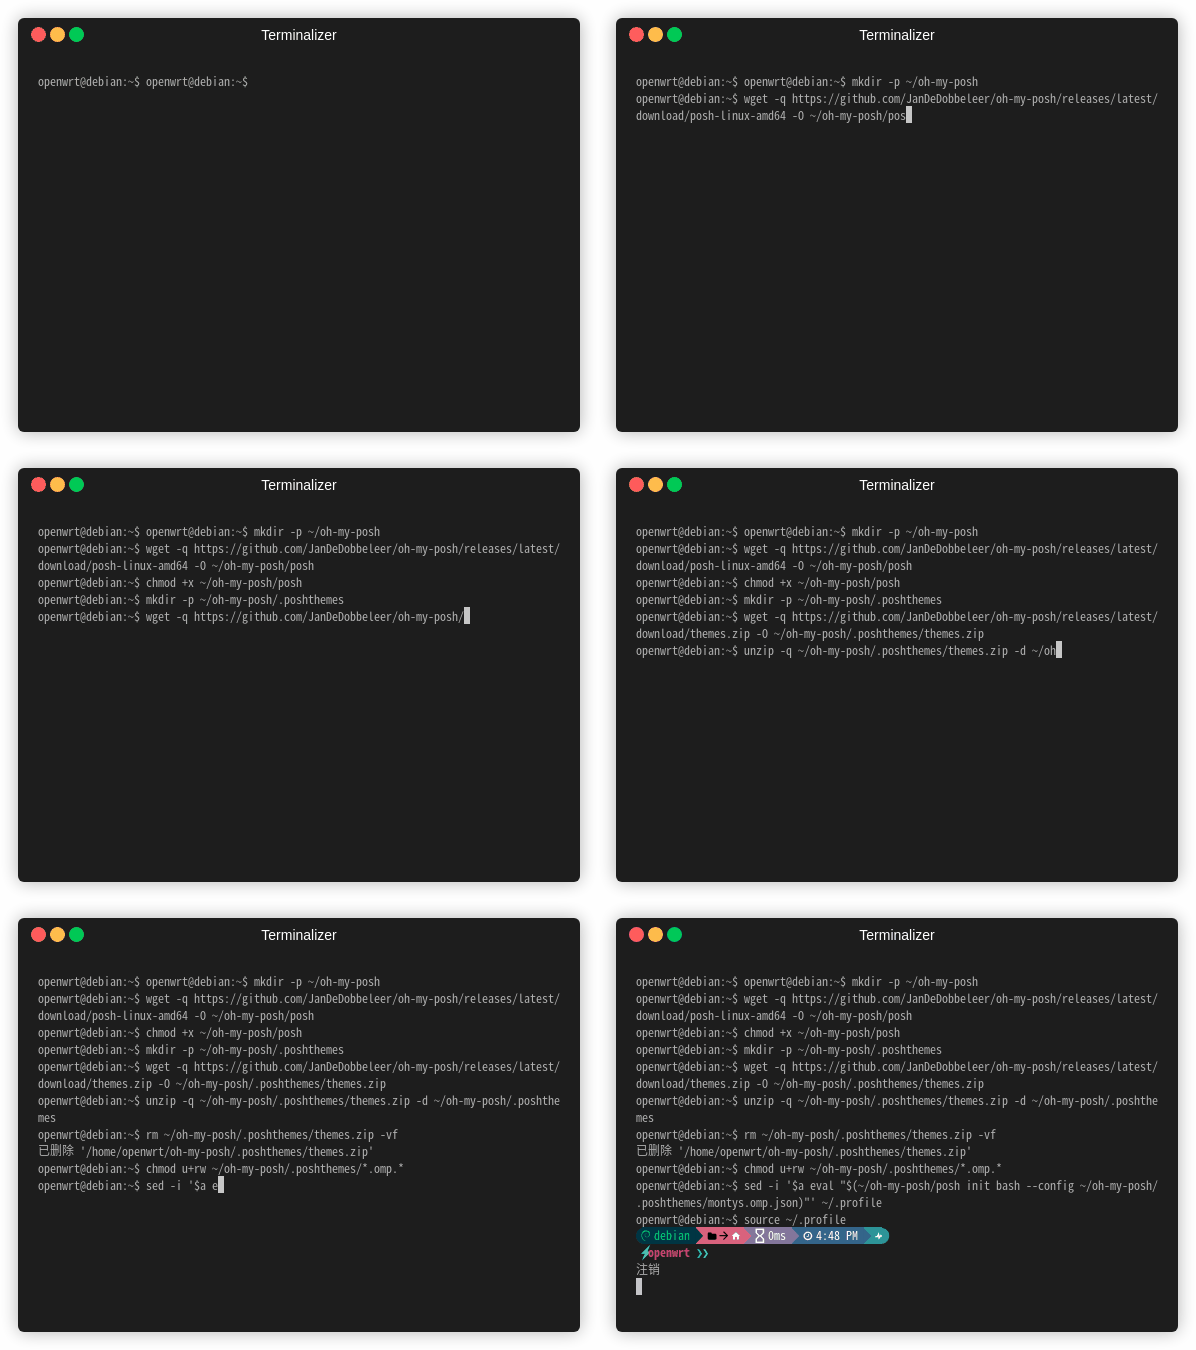
示例动画

montys.omp.json主题微调

由于montys主题默认会在powerline中输出完整的路径,当路径层级较深时,powerline显示就太长了,因此参考文档进行了微调。

diff --git a/themes/montys.omp.json b/themes/montys.omp.json
index c7797e88..c8eeb6c4 100644
--- a/themes/montys.omp.json
+++ b/themes/montys.omp.json
@@ -17,10 +17,11 @@
           "foreground": "#ffffff",
           "powerline_symbol": "\ue0b0",
           "properties": {
-            "folder_icon": "\uf115",
+            "folder_icon": "\uf07c",
             "folder_separator_icon": "\\",
             "home_icon": "\uf7db",
-            "style": "full"
+            "style": "agnoster_short",
+            "max_depth": 3
           },
           "style": "powerline",
           "template": " <#000>\uf07b \uf553</> {{ .Path }} ",

效果对比:

before:

after:

本文内容由网友自发贡献,版权归原作者所有,本站不承担相应法律责任。如您发现有涉嫌抄袭侵权的内容,请联系:hwhale#tublm.com(使用前将#替换为@)

oh-my-posh安装教程 的相关文章

  • ubuntu 如何禁止Chrome弹出无法更新的提示窗

    方法1 禁用更新 sudo apt mark hold google chrome stable 目前发现过一段时间还是会提示更新 xff0c 可以设置开机自启运行这段代码 方法2 删除更新程序 rm rf Library Google G
  • Mysql查看数据库时区并设置时区

    当我们使用docker部署Mysql数据库后 xff0c 我们的数据库时区会有偏差 xff0c 下面我们看看如何解决 xff1a 1 查看数据库时区 show variables like 39 time zone 39 2 设置时区 修改
  • Linux环境下如何解压jar包,压缩jar包文件

    1 解压jar包文件里面的文件 jar xvf jar xvf test jar BOOT INF classes com hsc test MyTest class 解释说明 xff1a 解压 test jar包里面的MyTest cla
  • 基数排序

    基数排序 一 什么是基数排序二 基数排序的代码实现三 总结 一 什么是基数排序 基数排序属于非比较类排序 非比较类排序包括计数排序 基数排序 桶排序 基数排序是由计数排序改善而来的 xff0c 基数排序将整数或者字符串切分不同的数字或字符
  • win11怎么取消显示更多选项

    1 点击Windows键 xff0c 输入cmd xff0c 然后选择以管理员运行cmd xff0c 最后敲入下面命令 reg add HKCU Software Classes CLSID 86ca1aa0 34aa 4e8b a509
  • Docaker部署Nginx配置多个域名

    1 拉取nginx镜像 sudo docker pull nginx 2 映射端口指定配置文件和前端目录 sudo docker run d p 9524 9524 p 9525 9525 p 10080 10080 restart alw
  • 硬件消抖——开关并联电容的那点事儿

    硬件消抖 开关并电容的那点事儿 一年前做过的小脚丫的消抖实验和不消抖实验的区别 xff0c 开关如果不消抖 xff0c 产生的毛刺和电平变化确实给开关带来了不良影响 xff0c 比如按键不灵 xff0c 需要按暂停或者切换的时候要反复按多次
  • 微信电脑版登录不了了,怎么办?不显示二维码

    今天微信开发者工具不显示二维码 xff0c 很尬 xff0c 找了好了方法 xff0c 最满意的一个如下 xff0c 如果解决了 xff0c 记得给我点赞 电脑上无法登录微信的解决方法 xff1a 1 先退出电脑微信登录页面 2 按Win
  • eclipse集成git关联到gitee同步代码

    eclipse集成git关联到gitee同步代码 1 注册gitee2 eclipse集成git3 eclipse配置git4 gitee配置用户ssh公钥5 本地新建项目提交到本地git仓库6 本地git仓库提交到远程gitee仓库7 修
  • JavaEE互联网轻量级框架整合开发-1入门和技术基础-JDK代理

    JDK代理 1 定义接口 public interface HelloYuan public void sayHelloYuan 2 实现接口 public class HelloYuanImpl implements HelloYuan
  • 阿里巴巴代码规范4点

    阿里巴巴代码规范 一 安全规约 前端 后端接口进行权限和角色校验展示敏感数据时需脱敏 xff08 用户个人手机号码 xff1a 137 3927 xff09 SQL注入问题 xff08 字符串拼接访问数据库 xff09 xff0c 表示先编
  • Cannot read property ‘appendChild‘ of null错误

    记前端Js报错 xff0c Cannot read property appendChild of null 页面由上至下执行 xff0c 提示获取不到插入的节点 将js代码放到body中的最后面
  • The new driver class is `com.mysql.cj.jdbc.Driver‘.

    记一次数据库连接数据库报错 报错提示 xff1a Loading class com mysql jdbc Driver 39 This is deprecated The new driver class iscom mysql cj j
  • Consider defining a bean of type ‘com.project.springboot.mapper.UserMapper‘ in your configuration.

    新建springboot项目启动时出现报错 xff1a Consider defining a bean of type com project springboot mapper UserMapper in your configurat
  • 面试官:如何优化sql

    在面试的环节中 xff0c 面试官问到 xff1a 你是如何设计你的表结构的 xff0c 画一下E R图 xff1f 接着又继续深挖 xff0c 如果有慢查询 xff0c 你是如何优化你的sql的 xff1f 今天 xff0c 我就来和大家
  • PageNotFound.noHandlerFound No mapping found for HTTP request with URI

    学习SpringMVC接收参数 xff0c 不小心配置xml文件包名出错 浏览器访问出现以下报错 xff0c 后端提示 xff1a org span class token punctuation span springframework
  • The driver has not received any packets from the server

    idea启动本地项目提示报错 The driver has not received any packets from the server xff0c 可能是数据库Mysql服务被停止 解决办法 xff1a 1 打开计算机的任务管理器 2
  • [Vue-Treeselect Warning] Detected duplicate presence of node id

    只能说出现这个问题的小伙伴们 xff0c 和曾经的我一样 xff0c 给自己挖了一个巨坑 问题点 xff1a 不影响任何业务需求或者操作 xff0c 但是在控制台出现了以上截图报错 xff08 找到问题的我不顾上班时间 xff0c 愤怒写下
  • vmware-horizon-client安装失败无反应

    公司周日下午5点说开始远程办公 xff0c 让我们装上vmware horizon client开始居家办公啦 xff0c 但是捏 xff0c 我昨天光是安装就傻了 xff0c 整一晚上 xff0c 点击安装软件exe xff08 下面截图
  • springboot搭建web项目

    记录在本地搭建的springboot web项目 1 file gt New gt Project 2 选择Spring Initializr gt next 3 选择对应构建 开发语言 打包方式 JDK版本等内容 4 选择需要添加的依赖

随机推荐