线性布局(Linearlayout)
属性
orientation 布局管理器内组件的排列方式(horizontal(水平)和vertical(垂直),默认值为 horizontal.)
layout_weight 权重 à 用于设置组件占父容器剩余空间的比例
layout_backgound 背景颜色
|
layout_gravity 设置当前组件在布局管理器中的位置
|
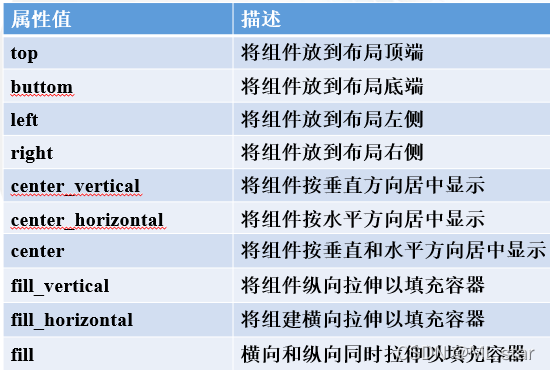 |
|
示例
代码
<?xml version="1.0" encoding="utf-8"?>
<LinearLayout xmlns:android="http://schemas.android.com/apk/res/android"
    android:layout_width="match_parent"
    android:layout_height="match_parent"
    android:orientation="vertical" >
    <Button
        android:id="@+id/tv_bt1"
        android:layout_width="wrap_content"
        android:layout_height="wrap_content"
        android:text="bt1"
        android:layout_weight="2"
		 />

    <LinearLayout
        android:layout_width="match_parent"
        android:layout_height="wrap_content"
        android:background="#90f0"
        android:layout_weight="2"
        >
    <Button
        android:id="@+id/tv_bt4"
        android:layout_width="wrap_content"
        android:layout_height="wrap_content"
        android:text="bt4"
        android:layout_gravity="center"
		 />
    <Button
        android:id="@+id/tv_bt5"
        android:layout_width="wrap_content"
        android:layout_height="wrap_content"
        android:text="bt5"
        android:layout_weight="2"
		android:layout_gravity="right|bottom"
		 />
    </LinearLayout>

    <Button
        android:id="@+id/tv_bt2"
        android:layout_width="wrap_content"
        android:layout_height="wrap_content"
        android:text="bt2"
		 />
    <Button
        android:id="@+id/tv_bt3"
        android:layout_width="wrap_content"
        android:layout_height="wrap_content"
        android:text="bt3"
        android:layout_weight="1"

		 />
</LinearLayout>
显示

相对布局(RelativeLayout)
需要设置id属性
因为相对布局需要以其它控件(id)或父容器作为参照, 后放入控件的位置依赖于先放入的控件。
属性
| 控件属性 |
功能描述 |
| android:layout_centerInParent |
设置当前控件位于父布局的中央位置, 其属性值为boolean值 |
| android:layout_centerVertical |
设置当前控件位于父布局的垂直居中位置, 其属性值为boolean值 |
| android:layout_centerHorizontal |
设置当前控件位于父控件的水平居中位置, 其属性值为boolean值 |
| android:layout_above |
设置当前控件位于某控件上方, 其属性值为其他UI组件的id属性 |
| android:layout_below |
设置当前控件位于某控件下方, 其属性值为其他UI组件的id属性 |
| android:layout_toLeftOf |
设置当前控件位于某控件左侧, 其属性值为其他UI组件的id属性 |
| android:layout_toRightOf |
设置当前控件位于某控件右侧, 其属性值为其他UI组件的id属性 |
| android:layout_alignParentTop |
设置当前控件停靠于布局顶端, 其属性值为boolean值 |
| android:layout_alignParentLeft |
设置当前控件停靠于布局左侧, 其属性值为boolean值 |
| android:layout_alignParentRight |
设置当前控件停靠于布局右侧, 其属性值为boolean值 |
| android:layout_alignParentBottom |
设置当前控件停靠于布局底端, 其属性值为boolean值 |
| 设置当前控件的上边界与某控件的上边界对齐 |
| android:layout_alignTop |
设置当前控件的上边界与某控件的上边界对齐, 其属性值为其他UI组件的id属性 |
| android:layout_alignBottom |
设置当前控件的下边界与某控件的下边界对齐, 其属性值为其他UI组件的id属性 |
| android:layout_alignLeft |
设置当前控件的左边界与某控件的左边界对齐, 其属性值为其他UI组件的id属性 |
| android:layout_alignRight |
设置当前控件的右边界与某控件的右边界对齐, 其属性值为其他UI组件的id属性 |
| 设置当前控件边界与某控件的距离 |
| android:layout_marginTop |
设置当前控件上边界与某控件的距离 |
| android:layout_marginBottom |
设置当前控件底边界与某控件的距离 |
| android:layout_marginLeft |
设置当前控件左边界与某控件的距离 |
| android:layout_marginRight |
设置当前控件右边界与某控件的距离 |
|
|
示例
<?xml version="1.0" encoding="utf-8"?>
<RelativeLayout xmlns:android="http://schemas.android.com/apk/res/android"
    android:layout_width="match_parent"
    android:layout_height="match_parent" >


    <Button
        android:id="@+id/bt1"
        android:layout_width="wrap_content"
        android:layout_height="wrap_content"
        android:text="bt1"
        />
    <Button
        android:id="@+id/bt2"
        android:layout_width="wrap_content"
        android:layout_height="wrap_content"
        android:layout_centerHorizontal="true"
        android:text="bt2"
        />
    <Button
        android:id="@+id/bt3"
        android:layout_width="wrap_content"
        android:layout_height="wrap_content"
        android:layout_alignParentRight="true"
        android:text="bt3"
        />
    <Button
        android:id="@+id/bt4"
        android:layout_width="wrap_content"
        android:layout_height="wrap_content"
        android:layout_centerVertical="true"
        android:text="bt4"
        />
    <Button
        android:id="@+id/bt5"
        android:layout_width="wrap_content"
        android:layout_height="wrap_content"
        android:layout_centerInParent="true"
        android:text="bt5"
        />
    <Button
        android:id="@+id/bt6"
        android:layout_width="wrap_content"
        android:layout_height="wrap_content"
        android:layout_alignParentRight="true"
        android:layout_centerVertical="true"
        android:text="bt6"
        />
    <Button
        android:id="@+id/bt7"
        android:layout_width="wrap_content"
        android:layout_height="wrap_content"
        android:layout_alignParentBottom="true"
        android:text="bt7"
        />
    <Button
        android:id="@+id/bt8"
        android:layout_width="wrap_content"
        android:layout_height="wrap_content"
        android:layout_alignParentBottom="true"
        android:layout_centerHorizontal="true"
        android:text="bt8"
        />

    <Button
        android:id="@+id/bt9"
        android:layout_width="wrap_content"
        android:layout_height="wrap_content"
        android:layout_alignParentBottom="true"
        android:layout_alignParentRight="true"
        android:text="bt9"
        />
    <Button
        android:id="@+id/bt10"
        android:layout_width="wrap_content"
        android:layout_height="wrap_content"
        android:layout_below="@id/bt1"
        android:layout_toRightOf="@id/bt4"
        android:layout_above="@id/bt4"
        android:layout_alignRight="@id/bt2"
        android:text="bt10"
        />
    <Button
        android:id="@+id/bt11"
        android:layout_width="wrap_content"
        android:layout_height="wrap_content"
        android:layout_below="@id/bt10"
        android:layout_above="@id/bt7"
        android:layout_toRightOf="@id/bt4"
        android:text="bt11"
        />
    <Button
        android:id="@+id/bt12"
        android:layout_width="wrap_content"
        android:layout_height="wrap_content"
        android:layout_alignLeft="@id/bt5"
        android:layout_below="@id/bt5"
        android:layout_toLeftOf="@id/bt6"
        android:layout_alignBaseline="@id/bt11"
        android:text="bt12"
        />


</RelativeLayout>

表格布局(Tablelayout)
表格布局属性
| 控件属性 |
功能描述 |
| android:layout_column |
设置该单元显示位置 |
| android:layout_span |
设置该单元格占据几行,默认为1行 |
表格布局中控件属性
| 控件属性 |
功能描述 |
| android:layout_column |
设置该单元显示位置 |
| android:layout_span |
设置该单元格占据几行,默认为1行 |
示例
<?xml version="1.0" encoding="utf-8"?>
<TableLayout xmlns:android="http://schemas.android.com/apk/res/android"
    android:layout_width="match_parent"
    android:layout_height="match_parent"
    android:stretchColumns="1,2" >

    <TableRow
        android:layout_width="match_parent"
        android:layout_height="wrap_content"
        >
        <TextView
            android:layout_width="wrap_content"
            android:layout_height="wrap_content"
            android:text="点a:"/>

        <EditText
            android:id="@+id/et_ax"
            android:layout_width="wrap_content"
            android:layout_height="wrap_content"
            android:hint="x"/>

        <EditText
            android:id="@+id/et_ax"
            android:layout_width="wrap_content"
            android:layout_height="wrap_content"
            android:hint="y"/>

    </TableRow>

     <TableRow
        android:layout_width="match_parent"
        android:layout_height="wrap_content"
        >
        <TextView
            android:layout_width="wrap_content"
            android:layout_height="wrap_content"
            android:text="点b:"/>

        <EditText
            android:id="@+id/et_bx"
            android:layout_width="wrap_content"
            android:layout_height="wrap_content"
            android:hint="x"/>

        <EditText
            android:id="@+id/et_bx"
            android:layout_width="wrap_content"
            android:layout_height="wrap_content"
            android:hint="y"/>

    </TableRow>

     <Button
         android:id="@+id/bt"
         android:layout_width="wrap_content"
         android:layout_height="wrap_content"
         android:text="确定"/>


</TableLayout>

帧布局(FrameLayout)
示例
<?xml version="1.0" encoding="utf-8"?>
<FrameLayout xmlns:android="http://schemas.android.com/apk/res/android"
    android:layout_width="match_parent"
    android:layout_height="match_parent"
    android:foreground="@drawable/ic_launcher"
    android:foregroundGravity="right|bottom"
    >

    <TextView
        android:layout_gravity="center"
        android:layout_width="400px"
        android:layout_height="400px"
        android:background="#f00"
        android:text="红色背景的TextView"/>

    <TextView
        android:layout_gravity="center"
        android:layout_width="300px"
        android:layout_height="300px"
        android:background="#FF8000"
        android:text="橙色背景的TextView"/>

    <TextView
        android:layout_gravity="center"
        android:layout_width="200px"
        android:layout_height="200px"
        android:background="#FFFF00"
        android:text="黄色背景的TextView"/>

</FrameLayout>

网格布局(GridLayout)
示例
<?xml version="1.0" encoding="utf-8"?>
<GridLayout xmlns:android="http://schemas.android.com/apk/res/android"
    android:layout_width="match_parent"
    android:layout_height="match_parent"
    android:columnCount="4"
    >

    <Button
        android:id="@+id/bt1"
        android:layout_width="wrap_content"
        android:layout_height="wrap_content"
        android:text="bt1"
        android:layout_column="3"
        />
    <Button
        android:id="@+id/bt2"
        android:layout_width="wrap_content"
        android:layout_height="wrap_content"
        android:text="bt2"
        />
    <Button
        android:id="@+id/bt3"
        android:layout_width="wrap_content"
        android:layout_height="wrap_content"
        android:text="bt3"
        />
    <Button
        android:id="@+id/bt4"
        android:layout_width="wrap_content"
        android:layout_height="wrap_content"
        android:text="bt4"
        />
    <Button
        android:id="@+id/bt5"
        android:layout_width="wrap_content"
        android:layout_height="wrap_content"
        android:text="bt5"
        />
    <Button
        android:id="@+id/bt6"
        android:layout_width="wrap_content"
        android:layout_height="wrap_content"
        android:text="bt6"
        />
    <Button
        android:id="@+id/bt7"
        android:layout_width="wrap_content"
        android:layout_height="wrap_content"
        android:text="bt7"
        />
    <Button
        android:id="@+id/bt8"
        android:layout_width="wrap_content"
        android:layout_height="wrap_content"
        android:text="bt8"
        />
    <Button
        android:id="@+id/bt9"
        android:layout_width="wrap_content"
        android:layout_height="wrap_content"
        android:text="bt9"
        />
    <Button
        android:id="@+id/bt10"
        android:layout_width="wrap_content"
        android:layout_height="wrap_content"
        android:text="bt10"
        />
    <Button
        android:id="@+id/bt11"
        android:layout_width="wrap_content"
        android:layout_height="wrap_content"
        android:text="bt11"
        />
    <Button
        android:id="@+id/bt12"
        android:layout_width="wrap_content"
        android:layout_height="wrap_content"
        android:text="bt12"
        />

    <Space />
    <Button
        android:id="@+id/bt13"
        android:layout_width="wrap_content"
        android:layout_height="wrap_content"
        android:text="bt13"
        android:layout_columnSpan="2"
        android:layout_gravity="fill_horizontal"
        />
    <Button
        android:id="@+id/bt14"
        android:layout_width="wrap_content"
        android:layout_height="wrap_content"
        android:text="bt14"
        />
    <Button
        android:id="@+id/bt15"
        android:layout_width="wrap_content"
        android:layout_height="wrap_content"
        android:layout_rowSpan="2"
        android:layout_gravity="fill_vertical"
        android:text="bt15"

        />
    <Button
        android:id="@+id/bt16"
        android:layout_width="wrap_content"
        android:layout_height="wrap_content"
        android:layout_columnSpan="3"
        android:layout_gravity="fill_horizontal"
        android:text="bt16"
        />
    <Space />

</GridLayout>
