开发十年,就只剩下这套Java开发体系了 >>> 
1、添加依赖
<dependency>
	<groupId>org.activiti</groupId>
	<artifactId>activiti-spring-boot-starter-basic</artifactId>
	<version>6.0.0</version>
</dependency>
2、配置数据库信息
mysql数据库配置
server:
  port: 8080
spring:
  application:
    name: activiti
  datasource:
    url: jdbc:mysql://xxxx.x.x.x:3306/xxxx?characterEncoding=utf8&useSSL=true
    driver-class-name: com.mysql.jdbc.Driver #配置JDBC Driver
    username: xxx
    password: xxxx
  jpa:
    hibernate:
      ddl-auto: update
    properties:
      hibernate:
        show_sql: true
        use_sql_comments: true
        format_sql: true
3、接口定义及实现
接口ActivityService
public interface ActivityService {
	/**
	 * 工作流
	 * @return
	 */
	public boolean startActivity();

}
实现ActivityServiceImpl
import java.util.HashMap;
import java.util.Map;

import org.activiti.engine.RuntimeService;
import org.activiti.engine.TaskService;
import org.activiti.engine.impl.persistence.entity.ExecutionEntity;
import org.activiti.engine.task.Task;
import org.slf4j.Logger;
import org.slf4j.LoggerFactory;
import org.springframework.beans.factory.annotation.Autowired;
import org.springframework.stereotype.Service;

@Service("activityService")
public class ActivityServiceImpl implements ActivityService {
	private final Logger logger = LoggerFactory.getLogger(getClass());

	@Autowired
	private RuntimeService runtimeService;
	@Autowired
	private TaskService taskService;

	@Override
	public boolean startActivity() {
		logger.info("工作流启动....");
		Map<String, Object> map = new HashMap<String, Object>();
		map.put("apply", "zhangsan");
		map.put("approve", "lisi");
		// 流程启动
		ExecutionEntity pi1 = (ExecutionEntity) runtimeService.startProcessInstanceByKey("leave2", map);

		String processId = pi1.getId();
		Task task = taskService.createTaskQuery().processInstanceId(processId).singleResult();
		logger.info("task 第一步:{}", task);
		taskService.complete(task.getId(), map);// 完成第一步申请

		task = taskService.createTaskQuery().processInstanceId(processId).singleResult();
		logger.info("task 第二步:{}", task);
		String taskId2 = task.getId();
		map.put("pass", false);
		taskService.complete(taskId2, map);// 驳回申请

		task = taskService.createTaskQuery().processInstanceId(processId).singleResult();
		logger.info("task 第三步:{}", task);
		logger.info("工作流结束....");
		return false;
	}
}
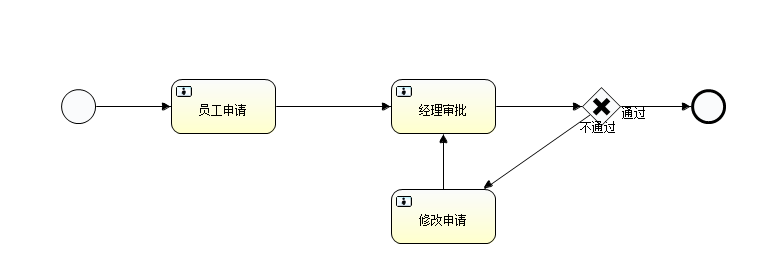
4、创建bpmn文件
在resources目录下新建文件夹:processes,并在processes创建一个新的bpmn文件
<?xml version="1.0" encoding="UTF-8"?>
<definitions xmlns="http://www.omg.org/spec/BPMN/20100524/MODEL" xmlns:xsi="http://www.w3.org/2001/XMLSchema-instance" xmlns:xsd="http://www.w3.org/2001/XMLSchema" xmlns:activiti="http://activiti.org/bpmn" xmlns:bpmndi="http://www.omg.org/spec/BPMN/20100524/DI" xmlns:omgdc="http://www.omg.org/spec/DD/20100524/DC" xmlns:omgdi="http://www.omg.org/spec/DD/20100524/DI" typeLanguage="http://www.w3.org/2001/XMLSchema" expressionLanguage="http://www.w3.org/1999/XPath" targetNamespace="http://www.activiti.org/test">
  <process id="leave2" name="My process" isExecutable="true">
    <startEvent id="startevent1" name="Start"></startEvent>
    <userTask id="usertask1" name="员工申请" activiti:assignee="${apply}"></userTask>
    <userTask id="usertask2" name="经理审批" activiti:assignee="${approve}"></userTask>
    <endEvent id="endevent1" name="End"></endEvent>
    <sequenceFlow id="flow1" sourceRef="startevent1" targetRef="usertask1"></sequenceFlow>
    <sequenceFlow id="flow2" sourceRef="usertask1" targetRef="usertask2"></sequenceFlow>
    <userTask id="usertask3" name="修改申请" activiti:assignee="${apply}"></userTask>
    <sequenceFlow id="flow6" sourceRef="usertask3" targetRef="usertask2"></sequenceFlow>
    <exclusiveGateway id="exclusivegateway1" name="是否通过"></exclusiveGateway>
    <sequenceFlow id="flow7" sourceRef="usertask2" targetRef="exclusivegateway1"></sequenceFlow>
    <sequenceFlow id="flow9" name="通过" sourceRef="exclusivegateway1" targetRef="endevent1">
      <conditionExpression xsi:type="tFormalExpression"><![CDATA[${pass}]]></conditionExpression>
    </sequenceFlow>
    <sequenceFlow id="flow10" name="不通过" sourceRef="exclusivegateway1" targetRef="usertask3">
      <conditionExpression xsi:type="tFormalExpression"><![CDATA[${!pass}]]></conditionExpression>
    </sequenceFlow>
  </process>
  <bpmndi:BPMNDiagram id="BPMNDiagram_leave2">
    <bpmndi:BPMNPlane bpmnElement="leave2" id="BPMNPlane_leave2">
      <bpmndi:BPMNShape bpmnElement="startevent1" id="BPMNShape_startevent1">
        <omgdc:Bounds height="35.0" width="35.0" x="60.0" y="90.0"></omgdc:Bounds>
      </bpmndi:BPMNShape>
      <bpmndi:BPMNShape bpmnElement="usertask1" id="BPMNShape_usertask1">
        <omgdc:Bounds height="55.0" width="105.0" x="170.0" y="80.0"></omgdc:Bounds>
      </bpmndi:BPMNShape>
      <bpmndi:BPMNShape bpmnElement="usertask2" id="BPMNShape_usertask2">
        <omgdc:Bounds height="55.0" width="105.0" x="390.0" y="80.0"></omgdc:Bounds>
      </bpmndi:BPMNShape>
      <bpmndi:BPMNShape bpmnElement="endevent1" id="BPMNShape_endevent1">
        <omgdc:Bounds height="35.0" width="35.0" x="690.0" y="90.0"></omgdc:Bounds>
      </bpmndi:BPMNShape>
      <bpmndi:BPMNShape bpmnElement="usertask3" id="BPMNShape_usertask3">
        <omgdc:Bounds height="55.0" width="105.0" x="390.0" y="190.0"></omgdc:Bounds>
      </bpmndi:BPMNShape>
      <bpmndi:BPMNShape bpmnElement="exclusivegateway1" id="BPMNShape_exclusivegateway1">
        <omgdc:Bounds height="40.0" width="40.0" x="580.0" y="87.0"></omgdc:Bounds>
      </bpmndi:BPMNShape>
      <bpmndi:BPMNEdge bpmnElement="flow1" id="BPMNEdge_flow1">
        <omgdi:waypoint x="95.0" y="107.0"></omgdi:waypoint>
        <omgdi:waypoint x="170.0" y="107.0"></omgdi:waypoint>
      </bpmndi:BPMNEdge>
      <bpmndi:BPMNEdge bpmnElement="flow2" id="BPMNEdge_flow2">
        <omgdi:waypoint x="275.0" y="107.0"></omgdi:waypoint>
        <omgdi:waypoint x="390.0" y="107.0"></omgdi:waypoint>
      </bpmndi:BPMNEdge>
      <bpmndi:BPMNEdge bpmnElement="flow6" id="BPMNEdge_flow6">
        <omgdi:waypoint x="442.0" y="190.0"></omgdi:waypoint>
        <omgdi:waypoint x="442.0" y="135.0"></omgdi:waypoint>
      </bpmndi:BPMNEdge>
      <bpmndi:BPMNEdge bpmnElement="flow7" id="BPMNEdge_flow7">
        <omgdi:waypoint x="495.0" y="107.0"></omgdi:waypoint>
        <omgdi:waypoint x="580.0" y="107.0"></omgdi:waypoint>
      </bpmndi:BPMNEdge>
      <bpmndi:BPMNEdge bpmnElement="flow9" id="BPMNEdge_flow9">
        <omgdi:waypoint x="620.0" y="107.0"></omgdi:waypoint>
        <omgdi:waypoint x="690.0" y="107.0"></omgdi:waypoint>
        <bpmndi:BPMNLabel>
          <omgdc:Bounds height="14.0" width="100.0" x="620.0" y="107.0"></omgdc:Bounds>
        </bpmndi:BPMNLabel>
      </bpmndi:BPMNEdge>
      <bpmndi:BPMNEdge bpmnElement="flow10" id="BPMNEdge_flow10">
        <omgdi:waypoint x="600.0" y="127.0"></omgdi:waypoint>
        <omgdi:waypoint x="442.0" y="190.0"></omgdi:waypoint>
        <bpmndi:BPMNLabel>
          <omgdc:Bounds height="14.0" width="100.0" x="600.0" y="127.0"></omgdc:Bounds>
        </bpmndi:BPMNLabel>
      </bpmndi:BPMNEdge>
    </bpmndi:BPMNPlane>
  </bpmndi:BPMNDiagram>
</definitions>
5、测试类测试
import org.junit.Test;
import org.junit.runner.RunWith;
import org.springframework.boot.test.context.SpringBootTest;
import org.springframework.test.context.junit4.SpringJUnit4ClassRunner;

import com.spring.pro.ProviderApplication;
import com.spring.pro.service.ActivityService;

@RunWith(SpringJUnit4ClassRunner.class)
@SpringBootTest(classes = ProviderApplication.class)
public class ActivitiTest {

	@Resource(name = "activityService")
	private ActivityService activityService;

	@Test
	public void leaveProcess() {
		activityService.startActivity();
	}
}