测试环境说明:基于docker来测试。
3台centos7虚拟机,已搭建docker swarm集群,环境如下:
#manager
192.168.240.131  82端口
#worker1
192.168.240.130  81端口
#worker2
192.168.240.129  80端口
一、实验步骤
1、docker config创建3台nginx配置文件
配置文件主要对监听端口和代理地址进行修改。主要信息如下
#worker1 监听80端口   将请求代理到worker2 81端口
server {
        listen       80;
        server_name  localhost;

        #charset koi8-r;

        #access_log  logs/host.access.log  main;

        location / {
            proxy_pass  http://192.168.240.130:81;#代理配置
            proxy_set_header Host $host;
            proxy_set_header X-Real-IP $remote_addr;
            proxy_set_header X-Forwarded-For $proxy_add_x_forwarded_for;
            proxy_set_header REMOTE-HOST $remote_addr;
            add_header X-Cache $upstream_cache_status;
            add_header Cache-Control no-cache;
        }
}

#worker2 监听81端口   将请求代理到manager 82端口
server {
        listen       81;
        server_name  localhost;

        #charset koi8-r;

        #access_log  logs/host.access.log  main;

        location / {
            proxy_pass  http://192.168.240.131:82;#代理配置
            proxy_set_header Host $host;
            proxy_set_header X-Real-IP $remote_addr;
            proxy_set_header X-Forwarded-For $proxy_add_x_forwarded_for;
            proxy_set_header REMOTE-HOST $remote_addr;
            add_header X-Cache $upstream_cache_status;
            add_header Cache-Control no-cache;
        }
}

#manager 监听82端口
server {
        listen       82;
        server_name  localhost;

        #charset koi8-r;

        #access_log  logs/host.access.log  main;

        location / {
            proxy_set_header Host $host;
            proxy_set_header X-Real-IP $remote_addr;
            proxy_set_header X-Forwarded-For $proxy_add_x_forwarded_for;
            proxy_set_header REMOTE-HOST $remote_addr;
            add_header X-Cache $upstream_cache_status;
            add_header Cache-Control no-cache;

            #测试页面,也可以继续做代理,去请求后端服务等
            root   /usr/share/nginx/html;
            index  index.html index.htm;
        }
}
#示例完整配置
#user  nobody;
worker_processes  1;

events {
    worker_connections  1024;
}


http {
    include       mime.types;
    default_type  application/octet-stream;
    sendfile        on;
    keepalive_timeout  65;

    gzip  on;

    server {
        listen       80;
        server_name  localhost;

        #charset koi8-r;

        #access_log  logs/host.access.log  main;

        location / {
            proxy_pass  http://192.168.240.130:81;
            proxy_set_header Host $host;
            proxy_set_header X-Real-IP $remote_addr;
            proxy_set_header X-Forwarded-For $proxy_add_x_forwarded_for;
            proxy_set_header REMOTE-HOST $remote_addr;
            add_header X-Cache $upstream_cache_status;
            add_header Cache-Control no-cache;
        }

        error_page   500 502 503 504  /50x.html;
        location = /50x.html {
            root   html;
        }
    }
}
创建完的config文件如下:

2、集群node节点打标签
分别给三台测试节点打好标签,例如 ng_pt=node29_80、ng_pt=node30_81、ng_pt=node31_82
3、docker-compose编排文件
version: '3.3'

services:
  nginx_29:
    container_name: nginx_29
    image: nginx
    restart: always
    ports:
      - target: 80
        published: 80
        protocol: tcp
        mode: host
    configs:
      - source: nginx_29
        target: /etc/nginx/nginx.conf
        uid: '103'
        gid: '103'
        mode: 0440
    deploy:
      placement:
        constraints:
          - "node.labels.ng_pt==node29_80"

  nginx_30:
    container_name: nginx_30
    image: nginx
    restart: always
    ports:
      - target: 81
        published: 81
        protocol: tcp
        mode: host
    configs:
      - source: nginx_30
        target: /etc/nginx/nginx.conf
        uid: '103'
        gid: '103'
        mode: 0440
    deploy:
      placement:
        constraints:
          - "node.labels.ng_pt==node30_81"

  nginx_31:
    container_name: nginx_31
    image: nginx
    restart: always
    ports:
      - target: 82
        published: 82
        protocol: tcp
        mode: host
    configs:
      - source: nginx_31
        target: /etc/nginx/nginx.conf
        uid: '103'
        gid: '103'
        mode: 0440
    volumes:
      - /home/nginx/html:/usr/share/nginx/html #目标nginx返回测试页面
    deploy:
      placement:
        constraints:
          - "node.labels.ng_pt==node31_82"


#三个nginx配置文件声明
configs:
   nginx_29:
     external: true
   nginx_30:
     external: true
   nginx_31:
     external: true
4、在manager节点创建目录
创建/home/nginx/html 目录,映射html文件
mkdir -p /home/nginx/html
5、部署服务
可以通过docker stack部署,部署后效果如下:

6、访问测试
编写index.html 上传到manager 节点 /home/nginx/html 下,然后进行访问测试,如下:
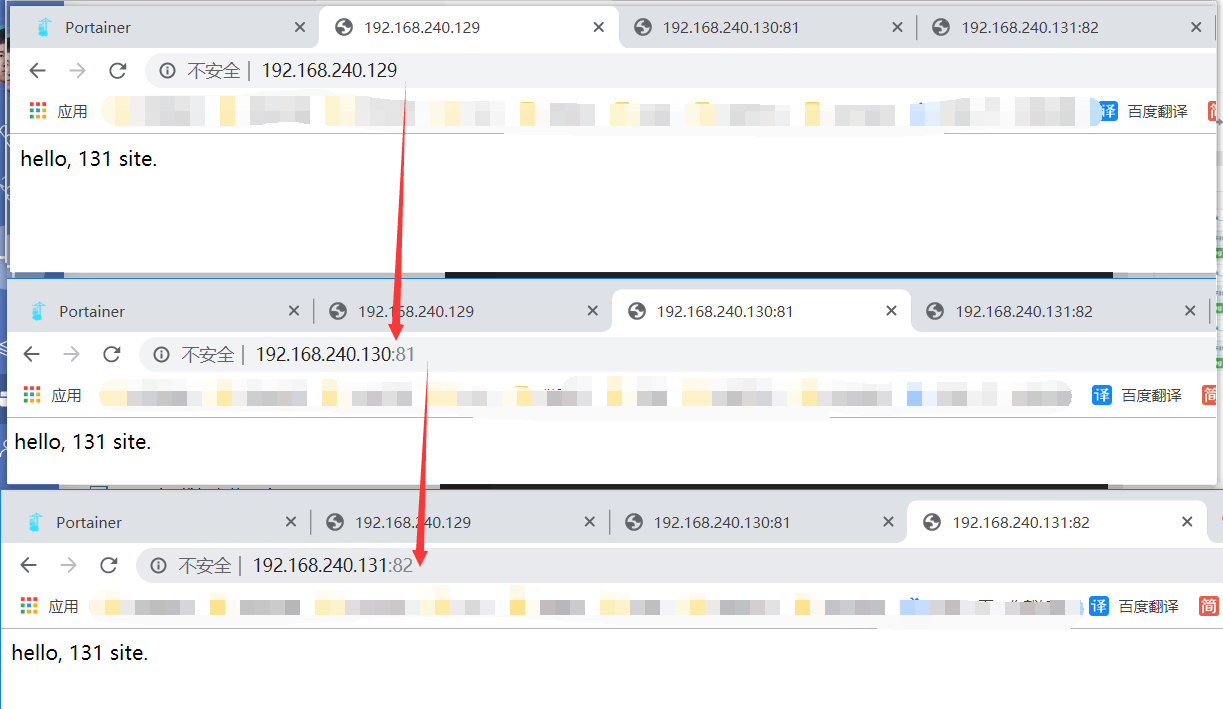
总结:
可以看到,访问129节点的80端口,拿到了131节点82端口nginx返回的内容。也可以通过每个节点的nginx去访问,拿到同样的响应内容。