环境搭建
创建工程
添加maven依赖
<dependencies>
    <!-- Spring IOC最小依赖是beans、context,我们引入context依赖,maven会自动将beans依赖一并引入 -->
    <dependency>
        <groupId>org.springframework</groupId>
        <artifactId>spring-context</artifactId>
        <version>5.1.5.RELEASE</version>
    </dependency>
</dependencies>
快速开始
-
编写配置文件
<?xml version="1.0" encoding="UTF-8"?>
<beans xmlns="http://www.springframework.org/schema/beans"
       xmlns:xsi="http://www.w3.org/2001/XMLSchema-instance"
       xmlns:context="http://www.springframework.org/schema/context"
       xsi:schemaLocation="http://www.springframework.org/schema/beans
        https://www.springframework.org/schema/beans/spring-beans.xsd
        http://www.springframework.org/schema/context
        https://www.springframework.org/schema/context/spring-context.xsd">

    <context:annotation-config/>
    <context:component-scan base-package="com.john.spring" />

</beans>
-
依赖注入(DI)
/**
 * Service
 */
public interface StudentService {
    List<Student> queryStudents();
}

public class StudentServiceImpl implements StudentService {

    // 通过Spring DI自动注入
    @Autowired
    private StudentDao studentDao;

    @Override
    public List<Student> queryStudents() {
        return studentDao.queryStudents();
    }
}

/**
 * dao
 */
public interface StudentDao {
    List<Student> queryStudents();
}

public class StudentDaoImpl implements StudentDao {
    @Override
    public List<Student> queryStudents() {
        return new ArrayList<>();
    }
}

/**
 * 实体类
 */
@Setter
@Getter
@Component
public class Student {
    private Integer id;
    private String sname;
    private Integer age;
    private String gender;
    private String nickName;
}
-
加载配置文件,获取SpringContext管理的Bean(控制反转IOC)
public static void main(String[] args) {
        ApplicationContext ctx = new ClassPathXmlApplicationContext("applicationContext.xml");
        Student stu = ctx.getBean(Student.class);
        System.out.println(stu);
    }
Spring控制反转(IOC)
什么是SpringIOC
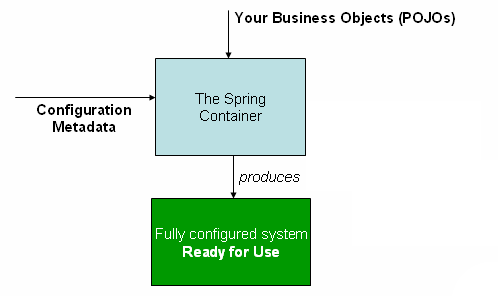
SpringIOC(Inversion of Control)是一个容器,也就是我们通常所说的控制反转。 IOC容器将我们的javabean和一些用于描述这些bean应该如何初始化、组装的配置信息进行整合。提供给我们开发人员一个配置、组装完成的上下文给我们使用,我们可以方便的通过IOC容器将繁杂的对象创建、管理工作托管给IOC容器。所以称之为控制反转。(由原来的开发人员自己控制对象的创建、组装改为交由Spring IOC容器负责)
配置元数据
配置元数据用于告诉SpringIOC容器,你的javabean应该怎么初始化、装配,以及它的生命周期(单例、原型等)。
配置元数据有xml和annotation两种方式。
Xml Or Annotation?
自从Spring3.0开始全面支持Java注解后,网上开始有很多人讨论到底哪种配置方式更好? 甚至有许多人觉得有了Annotation的方式,就可以完全替代以前的xml配置了。
其实这两种配置方式没有绝对的优劣,各自有适用的场景。我们一般在工作中会结合两者来使用。
XML配置方式
<?xml version="1.0" encoding="UTF-8"?>
<beans xmlns="http://www.springframework.org/schema/beans"
    xmlns:xsi="http://www.w3.org/2001/XMLSchema-instance"
    xsi:schemaLocation="http://www.springframework.org/schema/beans
        https://www.springframework.org/schema/beans/spring-beans.xsd">

    <bean id="..." class="...">
        <!-- collaborators and configuration for this bean go here -->
    </bean>

    <bean id="..." class="...">
        <!-- collaborators and configuration for this bean go here -->
    </bean>

    <!-- more bean definitions go here -->

</beans>
* id属性代表该bean在Spring容器中的唯一标识
* class属性指定该bean的类型,需要指定类的全名
在一个配置文件中导入其他配置文件
<beans>
    <!-- 被导入的文件必须包含完整的beans根节点 -->
    <import resource="services.xml"/>
    <!-- 导入类路径下的resources目录下的messageSource.xml文件 -->
    <import resource="resources/messageSource.xml"/>
    <!-- spring会忽略开头的/, 但是官方不建议路径以/开始,因为这里写的都是相对路径 -->
    <import resource="/resources/themeSource.xml"/>

    <bean id="bean1" class="..."/>
    <bean id="bean2" class="..."/>
</beans>
Annotation配置方式
注解配置的优缺点:
注解的要先与xml配置方式注入,这也就意味着如果你在注解和xml中都配置了某项配置,那么xml中的配置会覆盖掉注解中的配置。
开启注解支持
我们可以通过下面两种方式开启注解扫描支持(非web工程推荐这种方式,因为这样配置后注解配置的bean和xml中配置的bean都可以加载进来)
- 在xml配置文件中通过context命名空间中的annotation-config标签开启注解配置
<?xml version="1.0" encoding="UTF-8"?>
<beans xmlns="http://www.springframework.org/schema/beans"
    xmlns:xsi="http://www.w3.org/2001/XMLSchema-instance"
    xmlns:context="http://www.springframework.org/schema/context"
    xsi:schemaLocation="http://www.springframework.org/schema/beans
        https://www.springframework.org/schema/beans/spring-beans.xsd
        http://www.springframework.org/schema/context
        https://www.springframework.org/schema/context/spring-context.xsd">

    <!-- 开启注解支持 -->
  	<context:annotation-config/>
  	<!-- 开启注解支持,同时指定扫描的包路径(指定了这个就不用指定上面的) -->
  	<context:component-scan base-package="com.john.spring" />

</beans>
@Configuration
@ComponentScan("com.john.spring")
public class AppConfig  {

  	@Bean
    public StudentDao studentDao() {
       return new StudentDao();
    }
  	// 其他bean配置....

    public static void main(String[] args) {
      // 如果在非web工程中使用这种方式开启注解支持,需要使用下面的方式初始化ioc容器,否则@ComponentScan注解会被忽略
      ConfigurableApplicationContext ctx = new AnnotationConfigApplicationContext(AppConfig.class);
    }
}
一个用@Configuration注解标注的类就相当于一个xml配置文件,我们可以给其添加一个@ComponentScan注解来开启注解扫描支持,同时指定扫描包根路径
如果是在非web工程中,通过这种方式开启注解支持,需要使用new AnnotationConfigApplicationContext(Application.class); 来初始化ioc容器
注解扫描过滤(一般用不到)
Spring默认会扫描componentScan配置的basePackages包下所有带有扩展自@Component注解(如:@Repository、@Service、@Controller)的类。我们可以通过给componentscan添加filter来进一步控制扫描哪些注解、忽略哪些注解
如:下面展示了如何忽略@Repository注解,而用含Stub关键字前缀的自定义Repository注解代替
@Configuration
@ComponentScan(basePackages = "org.example",
        includeFilters = @Filter(type = FilterType.REGEX, pattern = ".*Stub.*Repository"),
        excludeFilters = @Filter(Repository.class))
public class AppConfig {
    ...
}
对应的xml配置方法
<beans>
    <context:component-scan base-package="org.example">
        <context:include-filter type="regex"
                expression=".*Stub.*Repository"/>
        <context:exclude-filter type="annotation"
                expression="org.springframework.stereotype.Repository"/>
    </context:component-scan>
</beans>
常用注解
@Required
用于标注在setter方法之上,表示此属性必须要注入。如果容器初始化该bean时没有合适的值注入到该属性则直接抛出异常。
在spring5.1之后弃用,因为必须要注入的属性,我们可以通过构造参数来注入。
@Autowired
根据依赖的类型自动注入。该注解可以用于标注在 属性、setter方法、构造方法、或带参数的普通方法之上。Spring会将符合的参数自动注入到属性、或方法参数中。
如果@Autowired注入的对象是一个数组类型、集合类型或者Map类型,Spring会将上下文中所有符合类型的bean都注入进来。如果你需要注入进来的bean的顺序,可以通过让这些Bean实现Ordered接口或添加@Order注解或者是标准的@Priority注解(@Priority注解不能指定通过@Bean配置的bean的顺序)。
注:如果注入的属性是一个单值类型,但Spring上下文中有多个匹配类型的候选Bean,那将会直接报错,因为Spring不知道该用哪个注入
所有可用@Autowired的地方,我们也可以直接使用 JSR 330’s @Inject注解,两者效果一致。
注:@Autowired、@Inject、@Value和@Resource注解都是通过BeanPostProcessor实现的注入。这意味着在我们自定义的BeanPostProcessor和BeanFactoryPostProcessor中将无法使用这些注解,只能通过xml配置的方式注入。
@Resource
根据依赖bean的名称自动注入。除了可以通过Spring特有的@Autowired注解进行依赖注入外,Spring也支持原生JSR-250中的 @Resource注解。
public class SimpleMovieLister {

    private MovieFinder movieFinder;

    @Resource(name="myMovieFinder")
    public void setMovieFinder(MovieFinder movieFinder) {
        this.movieFinder = movieFinder;
    }
}
@Resource注解的name属性不是必须的,如果不指定,那默认的名称将取决于变量名称、setter方法的名称(取决于注解在变量上还是setter方法上)
@Resource注解还有个好处,如果按名称无法找到一个匹配bean的时候,它会自动按照类型查找注入。
@Primary
当我们通过@Autowired注解来注入属性或者参数时,如果遇到上面说的单值属性有多个匹配类型候选bean,如果其中一个候选Bean上配置了@Primary注解或者在xml配置中设置了primary=“true”,那将不会报错,Spring会优先将带primary标记的候选bean注入(当然,如果有多个带primary标记的匹配类型还是会报错滴)。
@Qualifier
该注解可以让我们通过名称在多个候选bean中进一步限定。
public class MovieRecommender {

    @Autowired
    @Qualifier("main")
    private MovieCatalog movieCatalog;

    // ...
}
通过@Qualifier限定构造参数注入
public class MovieRecommender {

    private MovieCatalog movieCatalog;

    private CustomerPreferenceDao customerPreferenceDao;

    @Autowired
    public void prepare(@Qualifier("main") MovieCatalog movieCatalog,
            CustomerPreferenceDao customerPreferenceDao) {
        this.movieCatalog = movieCatalog;
        this.customerPreferenceDao = customerPreferenceDao;
    }

    // ...
}
给bean添加qualifier标识符
在xml中我们可以通过子标签来给一个bean添加标识符, 以供注入时@Qualifier使用。如果不显示指定标识符,spring会用id、name代替。
<bean class="example.SimpleMovieCatalog">
        <qualifier value="main"/>
</bean>
如果bean是通过注解的方式配置的,我们可以这样做
@Component
@Qualifier("Action")	// 给bean添加qualifier标识符
public class ActionMovieCatalog implements MovieCatalog {
    // ...
}
@PostConstruct、@PreDestroy
指定bean的生命周期方法,详见《自定义bean的行为特征》章节
@Component、@Repository、 @Service、@Controller
@Component注解是一个通用注解,代表一个组件,可以用来标识所有希望让Spring管理的bean。
@Repository、 @Service、@Controller三个注解扩展自@Component,带有具体的语义色彩,专门用于修饰dao、service、controller层的类
上面这几个注解都可以通过给定value参数来指定bean的name,如果没有给定参数。那将由Spring的AnnotationBeanNameGenerator来自动生成(其实底层就是调用了java.beans.Introspector#decapitalize()方法来实现)
@Bean、@Configuration
@Configuration 注解的类相当于xml配置文件中的
@Bean注解允许我们通过注解的方式定义在Java代码中定义bean的配置元数据,相当于xml配置文件中的
示例:
@Configuration	// 类上面必须添加此注解,否则里面用@Bean配置无法使用自动注入其他参数(被称为"精简"bean“)
public class FactoryMethodComponent {

    private static int i;

    @Bean
    @Qualifier("public")	// 定义bean的标识符相当于xml方式给<bean>标签指定子标签<qualifier>
    public TestBean publicInstance() {
        return new TestBean("publicInstance");
    }

    // 自动注入特定bean方法参数,和普通字符串类型参数
    @Bean
    protected TestBean protectedInstance(
            @Qualifier("public") TestBean spouse,
            @Value("#{privateInstance.age}") String country) {
        TestBean tb = new TestBean("protectedInstance", 1);
        tb.setSpouse(spouse);
        tb.setCountry(country);
        return tb;
    }

  	// 指定生命周期init方法,相当于xml中给<bean>添加init-method属性
  	@Bean(initMethod = "init")
    public BeanOne beanOne() {
        return new BeanOne();
    }

  	// 指定生命周期destroy方法,相当于xml中给<bean>添加destroy-method属性
    @Bean(destroyMethod = "cleanup")
    public BeanTwo beanTwo() {
        return new BeanTwo();
    }

	  //通过name属性指定bean的名称,相当于xml中给<bean>添加name属性
  	//如果不指定name属性,默认取值为方法名
    @Bean(name="testBean")
    private TestBean privateInstance() {
        return new TestBean("privateInstance", i++);
    }

    @Bean
    @RequestScope	// 指定scope, 相当于xml配置给<bean>添加scope属性
    public TestBean requestScopedInstance() {
        return new TestBean("requestScopedInstance", 3);
    }
}
@Scope
@Scope注解可以限定通过注解配置的bean的作用域。适用于通过@Component(或其派生注解)、@Bean注解配置的bean。@Scope注解的默认值是singleton,可取得值参见《IOC中bean的作用域》章节
@Configuration
public class MyConfiguration {

    @Bean
    @Scope("prototype")
    public Encryptor encryptor() {
        // ...
    }
}
@Qualifier
@Qualifier注解可以限定通过注解配置的bean的qualifier标识符。适用于通过@Component(或其派生注解)、@Bean注解配置的bean。 相当于xml配置的的子标签
@Nullable
@Nullable 可用于字段、方法参数和返回值,用于将非空语义覆盖为可空语义。通常配合@Autowired或@Inject注解使用。作用与jdk8中的java.util.Optional类似
@Import
通过注解的方式导入其他注解配置
示例:
@Import({MyConf.class})
@Configuration
public class Application {

    @Bean
    public StudentService studentService() {
      return new StudentServiceImpl();
    }

    ...
}


@Configuration
public class MyConf {

    @Bean
    public StudentDao studentDao() {
      return new StudentDaoImpl();
    }

    ...
}
@ImportResource
通过注解的方式引入xml配置
示例:
@Configuration
@ImportResource("classpath:/com/acme/properties-config.xml")
public class AppConfig {

    @Value("${jdbc.url}")
    private String url;

    @Value("${jdbc.username}")
    private String username;

    @Value("${jdbc.password}")
    private String password;

    @Bean
    public DataSource dataSource() {
        return new DriverManagerDataSource(url, username, password);
    }
}
properties-config.xml
<beans>
    <context:property-placeholder location="classpath:jdbc.properties"/>
</beans>
jdbc.properties
jdbc.url=jdbc:hsqldb:hsql://localhost/xdb
jdbc.username=sa
jdbc.password=sa
使用入口:
public static void main(String[] args) {
    ApplicationContext ctx = new AnnotationConfigApplicationContext(AppConfig.class);
    TransferService transferService = ctx.getBean(TransferService.class);
    // ...
}
@PropertySource
此注解用于加载properties文件到环境中,然后我们就可以通过env获取properties文件中定义的属性
使用示例:
@Configuration
@PropertySource("classpath:app.properties")
public class AppConfig {

    @Autowired
    Environment env;

    @Bean
    public TestBean testBean() {
        TestBean testBean = new TestBean();
        testBean.setName(env.getProperty("testbean.name"));
        return testBean;
    }
}
@Lookup
@Lookup注解用于实现基于Lookup方式的方法注入。本文只讲实现方式,了解更多方法注入详情请参见《依赖注入——方法注入章节》
- 定义两个prototype bean及其父类
@Component
@Scope("prototype")
public class Apple extends Fruit {

    public Apple() {
        System.out.println("Apple construct!");
    }
}

@Component
@Scope("prototype")
public class Banana extends Fruit {

    public Banana() {
        System.out.println("Banana construct!");
    }
}


public class Fruit {
    public Fruit() {
        System.out.println("Fruit construct!");
    }

}
- 定义抽象类,其中有一个需要注入具体实现方法的抽象方法。并通过
@Lookup注解注入具体方法实现
/**
 * 果盘
 */
@Component
public abstract class FruitPlate {

    /**
     * 每次从果盘中拿到的都是一个新的水果(实例)
     * @return
     */
    @Lookup("apple")	// 如果不传注解的参数,将按照匹配类型注入
    public abstract Fruit getFruit();
}
- 使用FruitPlate
public static void main(String[] args) throws SQLException {

        ConfigurableApplicationContext ctx = new AnnotationConfigApplicationContext(Application.class);

        FruitPlate applePlate = ctx.getBean(FruitPlate.class);
        applePlate.getFruit();
    }
使用JSR 330标准注解
从Spring3.0开始,我们除了可以使用spring提供的注解完成依赖注入外,还可以直接使用标准的JSR 330注解完成依赖注入。要使用它们需要添加如下依赖到工程中:
<dependency>
    <groupId>javax.inject</groupId>
    <artifactId>javax.inject</artifactId>
    <version>1</version>
</dependency>
@Inject、@Named
@Inject注解作用和Spring的@Autowired注解效果一致
@Named 注解有两个作用。 当用作方法的参数时和Spring的@Qualifier注解效果类似;而用作类上面的注解时作用和Spring的@Component注解类似
JSR 330标准注解与Spring注解对比
| Spring |
javax.inject.* |
javax.inject 限制 / 描述 |
| @Autowired |
@Inject |
@Inject has no ‘required’ attribute. Can be used with Java 8’s Optionalinstead. |
| @Component |
@Named / @ManagedBean |
JSR-330 没有提供可组合的方式,Spring注解可以通过自由组合创建扩展自@Component的自定义的注解。 |
| @Scope(“singleton”) |
@Singleton |
JSR-330中只提供了一个@Singleton可用,虽然也提供了一个@Scope注解,但只是用于我们扩展自己的自定义注解,无法直接像Spring提供的@Scope一样直接应用。 |
| @Qualifier |
@Qualifier / @Named |
javax.inject.Qualifier 只是一个元注解(注解的注解)。 要想实现类似Spring中@Qualifier注解的功能,我们可以用 @Named注解 |
| @Value |
- |
|
| @Required |
- |
|
| @Lazy |
- |
|
XML配置和Annotation注解混合使用
前面说过,Spring提供@Configuration、@Bean等注解的方式并不是为了要完全取代xml配置方式, 而是要看使用场合,比如数据源的配置, 就不适合通过注解来配置。否则数据源配置一发生变化就得改代码。
下面是一种典型的混合配置示范:
<beans>
    <!-- 开启注解配置支持 -->
    <!-- <context:annotation-config/> -->
	  <!-- 扫描注解的包路径,配置了这个后无需再配置上面那个 -->
  	<context:component-scan base-package="com.acme"/>
    <!-- 读取properties配置文件,用于替换spring配置中的${}占位符 -->
  	<context:property-placeholder location="classpath:jdbc.properties"/>

    <bean class="com.acme.AppConfig"/>

    <bean class="org.springframework.jdbc.datasource.DriverManagerDataSource">
        <property name="url" value="${jdbc.url}"/>
        <property name="username" value="${jdbc.username}"/>
        <property name="password" value="${jdbc.password}"/>
    </bean>
</beans>
jdbc.url=jdbc:hsqldb:hsql://localhost/xdb
jdbc.username=sa
jdbc.password=sa
@Configuration
public class AppConfig {

    @Autowired
    private DataSource dataSource;

    @Bean
    public AccountRepository accountRepository() {
        return new JdbcAccountRepository(dataSource);
    }

    @Bean
    public TransferService transferService() {
        return new TransferService(accountRepository());
    }
}
public static void main(String[] args) {
    ApplicationContext ctx = new ClassPathXmlApplicationContext("classpath:system-test-config.xml");
    TransferService transferService = ctx.getBean(TransferService.class);
    // ...
}
环境抽象
Profiles
定义特定于部署环境的配置参数,比如测试环境有对应一套配置参数,生产环境对应一套配置参数。
通过注解方式配置Profiles
示例一:在类上添加@Profile注解
@Configuration
@Profile("development")
public class StandaloneDataConfig {

    @Bean
    public DataSource dataSource() {
        return new EmbeddedDatabaseBuilder()
            .setType(EmbeddedDatabaseType.HSQL)
            .addScript("classpath:com/bank/config/sql/schema.sql")
            .addScript("classpath:com/bank/config/sql/test-data.sql")
            .build();
    }
}
@Configuration
@Profile("production")
public class JndiDataConfig {

    @Bean(destroyMethod="")
    public DataSource dataSource() throws Exception {
        Context ctx = new InitialContext();
        return (DataSource) ctx.lookup("java:comp/env/jdbc/datasource");
    }
}
示例二:在方法上添加@Profile注解
@Configuration
public class AppConfig {

    @Bean("dataSource")
    @Profile("development")
    public DataSource standaloneDataSource() {
        return new EmbeddedDatabaseBuilder()
            .setType(EmbeddedDatabaseType.HSQL)
            .addScript("classpath:com/bank/config/sql/schema.sql")
            .addScript("classpath:com/bank/config/sql/test-data.sql")
            .build();
    }

    @Bean("dataSource")
    @Profile("production")
    public DataSource jndiDataSource() throws Exception {
        Context ctx = new InitialContext();
        return (DataSource) ctx.lookup("java:comp/env/jdbc/datasource");
    }
}
通过xml方式配置Profiles
示例一:在不同的xml中定义特定的Profile配置
<beans profile="development"
    xmlns="http://www.springframework.org/schema/beans"
    xmlns:xsi="http://www.w3.org/2001/XMLSchema-instance"
    xmlns:jdbc="http://www.springframework.org/schema/jdbc"
    xsi:schemaLocation="...">

    <jdbc:embedded-database id="dataSource">
        <jdbc:script location="classpath:com/bank/config/sql/schema.sql"/>
        <jdbc:script location="classpath:com/bank/config/sql/test-data.sql"/>
    </jdbc:embedded-database>
</beans>
<beans profile="production"
    xmlns="http://www.springframework.org/schema/beans"
    xmlns:xsi="http://www.w3.org/2001/XMLSchema-instance"
    xmlns:jee="http://www.springframework.org/schema/jee"
    xsi:schemaLocation="...">

    <jee:jndi-lookup id="dataSource" jndi-name="java:comp/env/jdbc/datasource"/>
</beans>
示例二:在同一个xml中定义特定的Profile配置
<beans xmlns="http://www.springframework.org/schema/beans"
    xmlns:xsi="http://www.w3.org/2001/XMLSchema-instance"
    xmlns:jdbc="http://www.springframework.org/schema/jdbc"
    xmlns:jee="http://www.springframework.org/schema/jee"
    xsi:schemaLocation="...">

    <!-- other bean definitions -->

    <beans profile="development">
        <jdbc:embedded-database id="dataSource">
            <jdbc:script location="classpath:com/bank/config/sql/schema.sql"/>
            <jdbc:script location="classpath:com/bank/config/sql/test-data.sql"/>
        </jdbc:embedded-database>
    </beans>

    <beans profile="production">
        <jee:jndi-lookup id="dataSource" jndi-name="java:comp/env/jdbc/datasource"/>
    </beans>
</beans>
启动时设定所用的Profile
示例一:启动注解方式配置的Profiles
AnnotationConfigApplicationContext ctx = new AnnotationConfigApplicationContext();
// 通过这两行设定启用的Profiles,可以启用多个
// ctx.getEnvironment().setActiveProfiles("profile1", "profile2");
ctx.getEnvironment().setActiveProfiles("development");
ctx.refresh();
示例二:启动xml方式配置的Profiles
ApplicationContext ctx = new ClassPathXmlApplicationContext("applicationContext.xml");
// 通过这两行设定启用的Profiles,可以启用多个
ctx.getEnvironment().setActiveProfiles("product");
ctx.refresh();
示例三:通过命令行参数指定启用的Profiles
-Dspring.profiles.active="profile1,profile2"
如何使用IOC容器
Bean工厂BeanFactory、ApplicationContext
在Spring中,构成应用程序主干并由Spring IoC容器管理的对象称为bean。bean是一个由Spring IoC容器实例化,组装和管理的对象。
Spring提供了一个顶层的BeanFactory接口来管理Spring上下文中的所有类。同时还为我们提供了ApplicationContext子接口,提供了更为强大的功能。ApplicationContext代表了SpringIOC容器,通过它我们可以实现对SpringIOC容器的所有操作:实例化、配置、组装bean。
通常我们在开发中直接用到的是ApplicatoinContext接口和它的各种实现类。
ClassPathXmlApplicationContext
用于加载类路径下的spring配置文件,通常用于控制台程序
使用方法:
ApplicationContext ctx = new ClassPathXmlApplicationContext("applicationContext.xml");
StudentService ss = ctx.getBean(StudentService.class);
System.out.println(ss);
AnnotationConfigApplicationContext
用于初始化通过注解方式配置的ioc容器
@Configuration
public class AppConfig {

    @Bean
    public MyService myService() {
        return new MyServiceImpl();
    }

  	public static void main(String[] args) {
      ApplicationContext ctx = new AnnotationConfigApplicationContext(AppConfig.class);
      MyService myService = ctx.getBean(MyService.class);
      myService.doStuff();
		}
}
FileSystemXmlApplicationContext
用于加载本地目录中的spring文件文件
使用方法:
ApplicationContext ctx = new FileSystemXmlApplicationContext("" +
                "F:/applicationContext.xml");
StudentService ss = ctx.getBean(StudentService.class);
System.out.println(ss);
XmlWebApplicationContext
XmlWebApplicatoinContext用于在Web工程中初始化SpringIOC容器,不过我们一般不会手动通过它来初始化IOC容器,Spring针对Web工程专门给我们提供了一个监听器来完成IOC容器的初始化工作,用法如下:
在项目的web.xml中配置
<!-- 通过Spring提供的ContextLoaderListener监听器完成Spring容器初始化 -->
<context-param>
    <param-name>contextConfigLocation</param-name>
    <param-value>/WEB-INF/daoContext.xml /WEB-INF/applicationContext.xml</param-value>
</context-param>

<listener>
    <listener-class>org.springframework.web.context.ContextLoaderListener</listener-class>
</listener>
在ContextLoaderListener中Spring会优先判断用户是否在web.xml中配置了名为contextClass的参数,如果配置了优先使用用户制定的ApplicationContext实现类来初始化IOC,反之则使用默认的ApplicationContext实现类:org.springframework.web.context.support.XmlWebApplicationContext来完成IOC容器的初始化工作。
注:XmlWebApplicationContext默认加载路径是/WEB-INF/applicationContext.xml,如果我们的配置spring文件是放在这里的,并且只有这一个,我们可以不配置contextConfigLocation参数。
深入了解Beans
Spring容器通过在xml中通过标签来添加一个JavaBean到IOC容器中(注解中通过@Bean、@Component、@Service等注解来添加一个Bean到容器中)
Spring给我们提供了下面这些属性来管理bean的实例化、生命周期(初始化、销毁)、参数&属性注入、作用域、装配方式等。
| 属性 |
含义 |
| class |
全路径类名,表示该bean的类型 |
| name |
在ioc容器中的名称,在获取bean的时候可以通过名称获取 |
| scope |
见下表scope |
| 构造参数注入 (子标签) |
DI 章节 注入构造方法的参数
|
| 属性注入 (子标签) |
DI 章节 注入属性
|
| autowire |
DI章节 自动装配模式
|
| lazy-init |
是否启用懒加载: true/false |
| init-method |
允许我们指定一个自定义的初始化方法 |
| destroy-method |
允许我们指定一个自定义的销毁方法 |
IOC中bean的作用域
| Scope |
Description |
| singleton |
单例。在整个ioc容器中只有一个此类型的示例。(默认值) |
| prototype |
原型。每次使用都用创建一个新的对象。 |
| request |
对象的实例仅在一个request请求周期内有效,仅限在web环境中使用。 |
| session |
对象的实例仅在一个session会话周期内有效,仅限在web环境中使用。 |
| application |
对象的实例在整个application生命周期内有效,仅限在web环境中使用。 |
| websocket |
对象的实例仅在一个websocket生命周期内有效,仅限在web环境中使用。 |
命名beans
使用id属性命名bean
id属性的值只能指定一个,不建议含有特殊字符(虽然自spring3.1开始id属性的值可以包含任意字符)。
使用name属性命名bean
使用name属性可以给一个bean指定多个名称,多个值之间可以用","、";"或空格分开
注: 无论是id属性还是bean属性都需要保证整个IOC容器内唯一,并且id属性的值和name属性的值也不能重复
我们可以同时指定id和name属性。 也可以都不指定,如果都不指定,IOC容器会为该bean生成一个唯一的名称。
实例化beans
通过构造方法实例化
这种方式是最常用的方式,适合绝大多数的javabean,因为我们的java类无需继承任何父类或实现任何接口。但是我们通常需要提供一个无参的构造方法。
<bean id="exampleBean" class="examples.ExampleBean"/>

<bean name="anotherExample" class="examples.ExampleBeanTwo"/>
通过有参数的构造方法实例化对象,参见DI章节,自动注入构造参数
通过静态工厂方法实例化
<bean id="clientService" class="examples.ClientService" factory-method="createInstance">
	<!-- 如果工厂方法需要参数,通过此标签传参 -->
  <constructor-arg name="cname" value="TestService" />
</bean>
public class ClientService {
    private static ClientService clientService = null;
  	private String cname;
    private ClientService() {}
  	private ClientService(String cname) {this.cname = cname;}

    public synchronized static ClientService createInstance(String cname) {
        if(clientService == null) {
           clientService = new ClientService(cname);
        }
      return clientService;
    }

  	public synchronized static ClientService createInstance() {
        if(clientService == null) {
           clientService = new ClientService();
        }
      return clientService;
    }
}
这种方式适合需要让Spring管理自己实现的单例类,用的很少。因为通过Spring IOC容器我们只需配置一下scope="singleton"就可以实现单例了。
通过对象工厂方法实例化
<!-- the factory bean, which contains a method called createClientServiceInstance() -->
<bean id="serviceLocator" class="examples.DefaultServiceLocator">
    <!-- inject any dependencies required by this locator bean -->
</bean>

<!-- the bean to be created via the factory bean -->
<bean id="clientService"
    factory-bean="serviceLocator"
    factory-method="createClientServiceInstance"/>

<!-- the bean to be created via the factory bean -->
<bean id="accountService"
    factory-bean="serviceLocator"
      factory-method="createAccountServiceInstance">

  	<!-- 如果工厂方法需要参数,通过此标签传参 -->
  	<!-- <constructor-arg name="cname" value="TestService" /> -->

</bean>
public class DefaultServiceLocator {

    private static ClientService clientService = new ClientServiceImpl();

  	private static AccountService accountService = new AccountServiceImpl();

    public ClientService createClientServiceInstance() {
        return clientService;
    }

  	public AccountService createAccountServiceInstance() {
        return accountService;
    }
}
这种方式用的也不多,只有特定场合才会用到
自定义bean的行为特征
自定义bean生命周期回调方法
Spring允许我们将一个bean的某个方式指定为生命周期方法(比如:创建、销毁),这样在对应的生命周期Spring会自动回调对应的生命周期方法。
在Spring中一共有3中方式可以指定bean的生命周期方法
1. 通过实现InitializingBean接口、DisposableBean接口
官方不推荐这种方式,因为你的应用代码会和Spring框架高度耦合
java代码:
package com.john.spring.lifecycle;

import lombok.extern.slf4j.Slf4j;
import org.springframework.beans.factory.DisposableBean;
import org.springframework.beans.factory.InitializingBean;

/**
 * 通过实现接口的方法,指定bean的生命周期方法
 */
@Slf4j(topic = "LifeCycleWithInterface")
public class LifeCycleWithInterface implements InitializingBean, DisposableBean {

    private String sname;

    @Override
    public void destroy() throws Exception {
        log.debug("lifecycle method: destroy called");
    }

    /**
     * 设置完bean的所有属性后回调
     * @throws Exception
     */
    @Override
    public void afterPropertiesSet() throws Exception {
        log.debug("lifecycle method: afterPropertiesSet called");
    }

    public String getSname() {
        return sname;
    }

    public void setSname(String sname) {
        log.debug("setSname: " + sname);
        this.sname = sname;
    }
}
xml配置:
<bean class="com.john.spring.lifecycle.LifeCycleWithInterface" p:sname="张三" />
控制台输出:
12:49:24.281 [main] DEBUG LifeCycleWithInterface - setSname: 张三
12:49:24.283 [main] DEBUG LifeCycleWithInterface - lifecycle method: afterPropertiesSet called
12:49:24.348 [main] DEBUG LifeCycleWithInterface - lifecycle method: destroy called
2. 通过xml中给bean配置init-method、destroy-method属性
java代码示例:
package com.john.spring.lifecycle;

import lombok.extern.slf4j.Slf4j;
import org.springframework.beans.factory.DisposableBean;
import org.springframework.beans.factory.InitializingBean;

/**
 * 通过在xml中配置bean的init-method、destroy-method,指定bean的生命周期方法
 */
@Slf4j(topic = "LifeCycleWithXML")
public class LifeCycleWithXML {

    private String sname;

    public void destroy() throws Exception {
        log.debug("lifecycle method: destroy called");
    }

    /**
     * 设置完bean的所有属性后回调
     * @throws Exception
     */
    public void init() throws Exception {
        log.debug("lifecycle method: init called");
    }

    public String getSname() {
        return sname;
    }

    public void setSname(String sname) {
        log.debug("setSname: " + sname);
        this.sname = sname;
    }
}
xml配置:
<bean class="com.john.spring.lifecycle.LifeCycleWithXML" init-method="init" destroy-method="destroy" p:sname="张三" />
控制台输出:
12:56:30.106 [main] DEBUG LifeCycleWithXML - setSname: 张三
12:56:30.108 [main] DEBUG LifeCycleWithXML - lifecycle method: init called
12:56:30.177 [main] DEBUG LifeCycleWithXML - lifecycle method: destroy called
可以看到在xml中指定的init方法其实也是在注入所有的属性后才被调用的,和构造方法的执行时机不同
3. 通过给方法添加@PostConstruct、@PreDestroy注解
官方强烈推荐用这种方式, 但是要Spring2.5以后的版本才支持
java代码示例:
package com.john.spring.lifecycle;

import lombok.extern.slf4j.Slf4j;

import javax.annotation.PostConstruct;
import javax.annotation.PreDestroy;

/**
 * 通过注解,指定bean的生命周期方法
 */
@Slf4j(topic = "LifeCycleWithAnnotation")
public class LifeCycleWithAnnotation {

    private String sname;

    @PreDestroy
    public void destroy() throws Exception {
        log.debug("lifecycle method: destroy called");
    }

    @PostConstruct
    public void init() throws Exception {
        log.debug("lifecycle method: init called");
    }

    public String getSname() {
        return sname;
    }

    public void setSname(String sname) {
        log.debug("setSname: " + sname);
        this.sname = sname;
    }
}
xml配置
<bean class="com.john.spring.lifecycle.LifeCycleWithAnnotation" p:sname="张三" />
控制台输出:
13:05:27.070 [main] DEBUG LifeCycleWithAnnotation - setSname: 张三
13:05:27.072 [main] DEBUG LifeCycleWithAnnotation - lifecycle method: init called
13:05:27.142 [main] DEBUG LifeCycleWithAnnotation - lifecycle method: destroy called
小结
可以看到上面这三种配置bean生命周期方法的方式是等效的,但是第一种会和Spring框架代码高度耦合,第二种和第三种不会
设置默认生命周期方法
设想一下,如果你的工程中有几十个类都需要添加自定义生命周期方法,以便完成一些初始化和销毁的操作。并且你的代码非常有规律,所有的初始化生命周期方法都叫init,所有的销毁生命周期方法都叫destroy。 这种情况下我们无需每个bean都配置一遍生命周期方法,spring给我们提供了一下方式可以完成:
<!-- 在beans上添加default-init-method、default-destroy-method属性,所有在beans范围内配置的bean如果没有显示指定init-method、destroy-method,会默认使用beans上的配置 -->
<beans default-init-method="init" default-destroy-method="destroy">

  <bean id="blogService" class="com.something.BlogService">
        <property name="blogDao" ref="blogDao" />
    </bean>

  	<!--
 			其他的bean ...
		-->
</beans>
bean配置的继承
我们可以通过给bean标签添加parent属性来指定bean的继承关系,子bean自动从父bean继承注入的属性等配置,可以大大减少我们的配置信息
使用示例:
<bean id="man" class="com.john.bean.Man">
    <property name="tag" value="人类"/>
    <property name="name" value="张三"/>
  	<property name="age" value="10"/>
</bean>

<bean id="student"
        class="com.john.bean.Student"
        parent="inheritedTestBean" init-method="initialize">

  	<!-- tag属性在子bean中配置会覆盖父bean中的值 -->
  	<property name="tag" value="学生"/>
    <!-- age和name属性会继承父bean中的值 -->
</bean>
bean的scope、构造参数、属性、方法都可以从父bean继承。depends-on、autowire、lazy-init这些属性则永远读取子bean的配置,不会从父bean继承。
创建bean配置模板
我们可以将bean显示的指定成abstract,这样我们无需指定明确的class属性,这种bean并不会被容器实例化,更多的是作为一种配置模板来让其他bean继承
<!-- 这个bean就没有明确的class属性值 -->
<bean id="inheritedTestBeanWithoutClass" abstract="true">
    <property name="name" value="parent"/>
    <property name="age" value="1"/>
</bean>

<bean id="inheritsWithClass" class="org.springframework.beans.DerivedTestBean"
        parent="inheritedTestBeanWithoutClass" init-method="initialize">
    <property name="name" value="override"/>
    <!-- 年龄属性会自动从父bean继承过来-->
</bean>
扩展IOC容器功能
通过BeanPostProcessor在bean创建前后添加自定义回调
我们可以通过实现BeanPostProcessor给IOC中的每个bean在创建前和创建后添加自定义的回调事件,如:
import lombok.extern.slf4j.Slf4j;
import org.springframework.beans.BeansException;
import org.springframework.beans.factory.config.BeanPostProcessor;

@Slf4j
public class MySimpleBeanPostProcessor implements BeanPostProcessor {

    @Override
    public Object postProcessBeforeInitialization(Object bean, String beanName) throws BeansException {
        return bean;
    }

  	// 在bean创建后打印一行日志
    @Override
    public Object postProcessAfterInitialization(Object bean, String beanName) throws BeansException {
        log.debug("bean: " + beanName + ", created: " + bean);
        return bean;
    }
}
注:上面两个回调方法中的返回值,用于有多个BeanPostProcessor实现时用。如果返回null, 那后面的BeanPostProcessor将无法正常工作
xml配置:
<!-- 只要将自定义的BeanPostProcessor实现配置到IOC容器中即可 -->
<bean class="com.john.spring.postprocessor.MySimpleBeanPostProcessor" />
通过BeanFactoryPostProcessor自定义元数据
BeanFactoryPostProcessor的使用方法与BeanPostProcessor类似,但BeanFactoryPostProcessor用于操作bean配置相关的元数据。这意味着Spring IOC容器允许BeanFactoryPostProcessor在容器中其他bean初始化之前读取配置元数据或者改变它。
Spring中BeanFactoryPostProcessor的典型应用就是PropertyPlaceholderConfigurer,可以在所有bean实例化之前读取项目中的properties配置文件,用properties中的属性值替换所有bean配置中出现的${}占位符对应的值。
<bean class="org.springframework.beans.factory.config.PropertyPlaceholderConfigurer">
        <property name="location" value="classpath:jdbc.properties" />
    </bean>

<bean id="dataSource" class="com.alibaba.druid.pool.DruidDataSource" lazy-init="true"
      p:driverClassName="${jdbc.driver.className}"
      p:url="${jdbc.url}"
      p:username="${jdbc.username}"
      p:password="${jdbc.password}"
      p:maxIdle="${jdbc.maxIdle}"
      p:minIdle="${jdbc.minIdle}"
      p:maxActive="${jdbc.maxActive}"
      />
- BeanFactoryPostProcessor可以定义多个,建议BeanFactoryPostProcessor的实现类同时实现Ordered接口,这样我们就可以通过指定order属性来控制多个BeanFactoryPostProcessor之间的处理顺序
- 和BeanPostProcessor一样,BeanFactoryPostProcessor也是只要配置到IOC容器中就可以生效
在应用中获取ApplicationContext
某些时候我们可能需要获取Spring上下文,以便在需要的时候手动获取bean。 Spring给我们提供了一个ApplicationContextAware接口,具体用法如下:
import org.springframework.context.ApplicationContext;
import org.springframework.context.ApplicationContextAware;

public class CommandManager implements ApplicationContextAware {

    private ApplicationContext applicationContext;

    /*
     *  重写ApplicationContextAware接口中的此方法,Spring会自动将上下文对象注入进来
     */
    public void setApplicationContext(
            ApplicationContext applicationContext) throws BeansException {
        this.applicationContext = applicationContext;
    }
}
此外,我们还可以通过注解的方式直接将上下文对象注入进来
public class MovieRecommender {

    @Autowired
    private ApplicationContext context;

    public MovieRecommender() {
    }

    // ...
}
注:只有在极少数场景下才会需要在应用中获取上下文对象,因为它将业务代码与Spring代码高度耦合,并且完全不符合IOC控制反转的宗旨
其他可用的Aware接口
在非web应用中优雅的关闭SpringIOC容器
我们可以通过registerShutdownHook()实现在JVM停止的同时优雅的关闭IOC容器
import org.springframework.context.ConfigurableApplicationContext;
import org.springframework.context.support.ClassPathXmlApplicationContext;

public class Boot {

    public static void main(final String[] args) throws Exception {
        ConfigurableApplicationContext ctx = new ClassPathXmlApplicationContext("beans.xml");

        // 给上面初始化的IOC容器添加一个基于JVM的关闭回调,
        ctx.registerShutdownHook();

        // 其他业务代码...

   			// 在main方法运行结束后,IOC容器会在JVM的关闭回调中正常关闭
    }
}
注:只有在非web应用中才需要这样做,因为Web应用中的ApplicationContext实现类在应用停止时可以自己正常关闭
避免循环引用
举个例子,你有一个ClassA在构造参数中依赖了ClassB,而ClassB在构造参数中又依赖了ClassA。这样就造成了循环引用。如果出现这样的情况,Spring会在运行时抛出BeanCurrentlyInCreationException。
Spring依赖注入——DI
Spring 依赖注入(DI Dependency Injection),可以自动帮我们解决类与类之间的各种依赖问题。通常公司中的项目都包含很多的类,而这些类与类之间都有各种依赖关系,比如:组合、聚合、依赖等。通过Spring的DI功能,结合IOC容器, 我们可以把这些复杂的关系交由Spring来管理, 我们在使用时,Spring会自动帮我们把依赖的对象注入进来,大大降低开发难度。
Spring中的依赖注入主要包含两种:通过构造方法中的注入和通过Setter方法注入
构造参数注入
package x.y;

public class ThingOne {
		private int age;
  	private String sname;
  	private int gender;
  	private ThingTwo thingTwo;
    public ThingOne(int age, ThingTwo thingTwo, String sname, int gender) {
        this.age = age;
				this.thingTwo = thingTwo;
      	this.sname = sname;
      	this.gender = gender;
  	    // ...
    }
}


public class ThingTwo {
  // ...
}
<beans>
    <bean id="beanOne" class="x.y.ThingOne">
        <!-- 通过此标签注入构造方法中的参数 -->
      	<constructor-arg  name="age" value="18" />
      	<constructor-arg  type="java.lang.String" value="张三" />
      	<constructor-arg ref="beanTwo"/>
    </bean>

    <bean id="beanTwo" class="x.y.ThingTwo"/>
</beans>
constructor-arg标签属性
| 属性名 |
取值 |
含义 |
| name |
字符串 |
构造参数的名称 |
| value |
数值、字符串 |
构造参数的属性值,只适用于简单类型 |
| type |
类的全名 |
构造参数的类型,如果是简单类型,需要指定对应的封装类型
如果构造参数中有多个命中的类型,按照配置的先后顺序注入(可以通过配合index属性改变默认顺序) |
| index |
数值 |
构造参数的位置,从0开始 |
| ref |
其他在Spring容器中配置的bean的name或者id |
将容器中的其他bean作为构造参数注入 |
通过c命名空间注入构造参数
<beans xmlns="http://www.springframework.org/schema/beans"
    xmlns:xsi="http://www.w3.org/2001/XMLSchema-instance"
    xmlns:c="http://www.springframework.org/schema/c"
    xsi:schemaLocation="http://www.springframework.org/schema/beans
        https://www.springframework.org/schema/beans/spring-beans.xsd">

    <bean id="beanTwo" class="x.y.ThingTwo"/>
    <bean id="beanThree" class="x.y.ThingThree"/>

    <!-- 传统方式注入构造参数 -->
    <bean id="beanOne" class="x.y.ThingOne">
        <constructor-arg name="thingTwo" ref="beanTwo"/>
        <constructor-arg name="thingThree" ref="beanThree"/>
        <constructor-arg name="email" value="something@somewhere.com"/>
    </bean>

    <!-- c命名空间方式注入构造参数 -->
    <bean id="beanOne" class="x.y.ThingOne" c:thingTwo-ref="beanTwo"
        c:thingThree-ref="beanThree" c:email="something@somewhere.com"/>

</beans>
Setter方式注入
package com.demo;
public class Driver {
    private Car car;
  	private String dname;
    public void setCar(Car car) {
        this.car = car;
    }
  	public void setDname(String dname) {
      	this.dname = dname;
    }
}

public class Car{}
<bean id="driver" class="com.demo.Driver">
	<!-- 注入引入类型属性 -->
  <property name="car" ref="car" />
	<!-- 注入简单类型属性 -->
  <property name="dname" value="张三" />
</bean>
<bean id="car" class="com.demo.Car" />
通过p命名空间注入属性
如上面的例子,我们除了可以使用property子标签外,还可以通过引入一个p命名空间来实现
<beans xmlns="http://www.springframework.org/schema/beans"
    xmlns:xsi="http://www.w3.org/2001/XMLSchema-instance"
    xmlns:p="http://www.springframework.org/schema/p"
    xsi:schemaLocation="http://www.springframework.org/schema/beans
    https://www.springframework.org/schema/beans/spring-beans.xsd">

  <bean id="driver" class="com.demo.Driver" p:car-ref="car" p:dname="张三" />
  <bean id="car" class="com.demo.Car" />

</beans>
使用p命名空间比上面一种更简洁,但是它在编写的时候需要使用支持自动提示的IDE(如IDEA、STS),否则在编写时很容易拼写错误,只能到运行期才发现。
通过PropertyPlaceholderConfigurer工具类注入Properties文件中的属性
<!--
<bean class="org.springframework.beans.factory.config.PropertyPlaceholderConfigurer">
  <property name="location" value="classpath:jdbc.properties" />
</bean>
-->
<!-- 通过下面这种方式和上面等效,推荐 -->
<context:property-placeholder location="classpath:jdbc.properties"/>

<bean id="dataSource" class="com.alibaba.druid.pool.DruidDataSource"
          p:driverClassName="${jdbc.driver.className}"
          p:url="${jdbc.url}"
          p:username="${jdbc.username}"
          p:password="${jdbc.password}"
          p:maxIdle="${jdbc.maxIdle}"
          p:minIdle="${jdbc.minIdle}"
          p:maxActive="${jdbc.maxActive}"
    />
jdbc.properties
jdbc.driver.className=com.mysql.jdbc.Driver
jdbc.url=jdbc:mysql://localhost:3306/mydb
jdbc.username=root
jdbc.password=root
jdbc.maxIdle=3
jdbc.minIdle=1
jdbc.maxActive=10
注入匿名内部类
<bean id="outer" class="...">
    <!-- 这里示例不通过 ref方式引用外部的bean,而是直接用内部bean的方式注入 -->
    <property name="target">
        <bean class="com.example.Person"> <!-- this is the inner bean -->
            <property name="name" value="Fiona Apple"/>
            <property name="age" value="25"/>
        </bean>
    </property>

  	<!-- 构造参数也支持用内部匿名bean的方式注入 -->
    <constructor-arg name="target">
        <bean class="com.example.Person"> <!-- this is the inner bean -->
            <property name="name" value="Fiona Apple"/>
            <property name="age" value="25"/>
         </bean>
    </constructor-arg>
</bean>
内部bean不需要指定id、name属性,如果指定了也无法在外部直接获取,另外内部bean也不支持scope属性,因为内部bean始终是由外部bean创建的,并且只能在外部bean中使用
注入集合类型属性
Spring给我们提供了
<bean id="moreComplexObject" class="example.ComplexObject">
    <!-- results in a setAdminEmails(java.util.Properties) call -->
    <property name="adminEmails">
        <props>
            <prop key="administrator">administrator@example.org</prop>
            <prop key="support">support@example.org</prop>
            <prop key="development">development@example.org</prop>
        </props>
    </property>
    <!-- results in a setSomeList(java.util.List) call -->
    <property name="someList">
        <list>
            <!-- 普通元素 -->
          	<value>a list element followed by a reference</value>
            <!-- 引用类型元素 -->
          	<ref bean="myDataSource" />
        </list>
    </property>
    <!-- results in a setSomeMap(java.util.Map) call -->
    <property name="someMap">
        <map>
          	<entry key="an entry" value="just some string"/>
            <entry key ="a ref" value-ref="myDataSource"/>
        </map>
    </property>
    <!-- results in a setSomeSet(java.util.Set) call -->
    <property name="someSet">
        <set>
            <value>just some string</value>
            <ref bean="myDataSource" />
        </set>
    </property>
</bean>
注入null和空字符串属性值
<bean class="ExampleBean">
    <property name="email" value=""/>
</bean>

<bean class="ExampleBean">
    <property name="email">
        <null/>
    </property>
</bean>
注入复合属性值
比如有一个ThingOne类中持有一个fred类型的属性,fred类型的属性中又包含一个bob属性,bob类型的属性中又有一个sammy属性,sammy属性的值需要设置为123。我们可以直接通过下面的方式来配置
<bean id="something" class="things.ThingOne">
    <property name="fred.bob.sammy" value="123" />
</bean>
方法注入(method Injection)
通过lookup-method方式覆盖目标bean的指定方法
设想一下,如果我们在ioc容器中有个普通的单例类,它有一个方法中需要依赖其他一个非单例的类。由于单例类在整个ioc容器的生命周期中只会被初始化一次,那它依赖的那个非单例的类也就只有一个实例(因为只有初始单例类时注入一次),这显然不满足我们的需求。
Spring除了构造参数注入和setter注入外,还给我们提供了一种方式叫做方法注入,专门用于解决这种场景的问题,具体用法如下
实例
假设有一个果盘,果盘里放了一些水果,比如苹果,香蕉等,我们希望我们每次在果盘里拿到的都是最新鲜的水果。
java代码:
// 定义一个水果类
public class Fruit {
    public Fruit() {
        System.out.println("I got Fruit");
    }
}

// 苹果
public class Apple extends Fruit {
    public Apple() {
        System.out.println("I got a fresh apple");
    }
}

// 香蕉
public class Banana extends Fruit {
    public Banana () {
        System.out.println("I got a  fresh banana");
    }
}

// 水果盘,可以拿到水果
public abstract class FruitPlate{
    // 抽象方法获取新鲜水果
    public abstract Fruit getFruit();
}
spring配置:
<!-- method lookup inject start -->

<!-- 注意这两个bean是prototype -->
<bean id="apple" class="com.john.spring.methodinject.Apple" scope="prototype" />
<bean id="banana" class="com.john.spring.methodinject.Banana" scope="prototype" />

<!-- 苹果果盘 -->
<bean id="applePlate" class="com.john.spring.methodinject.FruitPlate">
  <lookup-method name="getFruit" bean="apple" />
</bean>

<!-- 香蕉果盘 -->
<bean id="bananaPlate" class="com.john.spring.methodinject.FruitPlate">
  <lookup-method name="getFruit" bean="banana" />
</bean>

<!-- method lookup inject end -->
测试代码:
public static void main(String[] args) {
    ApplicationContext app = new ClassPathXmlApplicationContext("classpath:resource/applicationContext.xml");

    FruitPlate fp1= (FruitPlate)app.getBean("fruitPlate1");
    FruitPlate fp2 = (FruitPlate)app.getBean("fruitPlate2");

    fp1.getFruit();
    fp2.getFruit();
}
测试结果:
I got Fruit

I got a fresh apple

I got Fruit

I got a fresh bananer
示例说明:
从上面例子我们可以看到,在代码中,我们没有用到Spring的任何类和接口,实现了与Spring代码的解耦。
其中,最为核心的部分就是lookup-method的配置和FruitPlate.getFruit()方法。上面代码中,我们可以看到getFruit()方法是个抽象方法,我们并没有实现它啊,那它是怎么拿到水果的呢。这里的奥妙就是Srping应用了CGLIB(动态代理)类库。Spring在初始化容器的时候对配置的bean做了特殊处理,Spring会对bean指定的class做动态代理,代理标签中name属性所指定的方法,返回bean属性指定的bean实例对象。每次我们调用fruitPlate1或者fruitPlate2这2个bean的getFruit()方法时,其实是调用了CGLIB生成的动态代理类的方法。关于CGLIB大家可自行在网上查阅。
lookup-method实现方式说明
说白了lookup-method注入是容器覆盖容器管理的bean上的方法并返回容器中另一个命名bean的能力
如果通过xml方式配置,我们可以这样做:
<bean class="beanClass">
    <lookup-method name="method" bean="non-singleton-bean"/>
</bean>
method是beanClass中的一个方法,beanClass和method是不是抽象都无所谓,不会影响CGLIB的动态代理,根据项目实际需求去定义。non-singleton-bean指的是lookup-method中bean属性指向的必须是一个非单例模式的bean,当然如果不是也不会报错,只是每次得到的都是相同引用的bean(同一个实例),这样用lookup-method就没有意义了。
如果通过注解的方式,我们可以这样做:
public abstract class CommandManager {

    public Object process(Object commandState) {
        Command command = createCommand();
        command.setState(commandState);
        return command.execute();
    }

    @Lookup("myCommand")
    // @Lookup //这里也可以不写参数,让Spring容器根据类型来自动返回匹配此类型的bean(有多于一个匹配返回类型的bean会报错)
    protected abstract Command createCommand();
}
lookup-method的目标method的签名标准
<public|protected> [abstract] <return-type> theMethodName(no-arguments);
-
public|protected要求方法必须是可以被子类重写和调用的;
-
abstract可选,如果是抽象方法,CGLIB的动态代理类就会实现这个方法,如果不是抽象方法,就会覆盖这个方法,所以没什么影响;
-
return-type就是non-singleton-bean的类型咯,当然可以是它的父类或者接口。
-
no-arguments不允许有参数。
通过replaced-method方式替换目标bean的方法(不常用)
比如我们原本有一个类,其中有一个computeValue方法
public class MyValueCalculator {

    public String computeValue(String input) {
        // 原来的具体实现
    }

    // 其他方法...
}
如果我们需要替换上面类中的computeValue方法,我们需要新建一个类,并且实现MethodReplacer接口
public class ReplacementComputeValue implements MethodReplacer {

    public Object reimplement(Object o, Method m, Object[] args) throws Throwable {
        String input = (String) args[0];
        // 替换后的具体实现
        return ...;
    }
}
xml中的配置:
<bean id="myValueCalculator" class="x.y.z.MyValueCalculator">
    <!-- 指定用哪个replacer来替换myValueCalculator中的哪个方法 -->
  	<replaced-method name="computeValue" replacer="replacementComputeValue">
        <!-- <arg-type/> 可以指定多个,主要用于限定方法的签名,通过上面指定的方法名和这里的参数个数、类型唯一定位要替换的方法 -->
      	<arg-type>java.lang.String</arg-type>
    </replaced-method>
</bean>

<bean id="replacementComputeValue" class="a.b.c.ReplacementComputeValue"/>
注:通常重载的方法之间,我们通过参数个数就足以定位到一个具体的方法,所以对于参数的类型Spring不要求我们必须写类型的全路径,比如上面的java.lang.String,我们就可以直接写成String或者Str都可以。
depends-on
试想这样一种场景, 假如我们有一个类ClassA依赖ClassB,而ClassB又需要依赖ClassC。表面上看我们的ClassA好像和ClassC没有什么直接的依赖关系, 但若没有ClassC对象的话ClassB就无法正常工作,进而ClassA也无法工作,也就是说我们的ClassA其实是间接的依赖到了ClassC。 那我们在用ClassA之前就得保证IOC容器已经有ClassC的对象。这样我们的ClassA才能正常使用。
也就是说,我们需要告诉容器在初始化某个类之前应该先帮我们初始化它要依赖的类。depends-on就负责制定类的依赖关系。比如:
<!-- depends-on可以有多个属性值,多个值之间用,、;或者空格隔开 -->
<bean id="beanOne" class="ExampleBean" depends-on="manager,accountDao">
    <property name="manager" ref="manager" />
</bean>

<bean id="manager" class="ManagerBean" />
<bean id="accountDao" class="x.y.jdbc.JdbcAccountDao" />
由于beanOne这个bean我们添加了depends-on属性,那么IOC容器在初始化beanOne之前会先把manager和accountDao这两个bean初始化;销毁的时候反过来,先销毁beanOne,再销毁manager和accountDao。
简单来说就是depends-on可以根据bean之间的依赖关系控制bean初始化和销毁的顺序,被依赖链最底端的bean最先初始化,最后销毁;依赖链最顶端的类最后初始化,最先销毁。
懒加载(lazy-init)
Spring IOC容器默认会在启动的时候初始化我们配置的所有bean,这在大多数情况下是适合的,如果有什么错误可以在启动时及时发现。但是在特定的业务场景下,这种行为可能并不适合,我们可能需要让某些bean延迟初始化的时机,在我们真正使用时才去初始化。
我们可以在bean上面添加lazy-init属性,属性值可以是true、false、default。 默认情况下是false。
<bean id="lazy" class="com.something.ExpensiveToCreateBean" lazy-init="true"/>
<bean name="not.lazy" class="com.something.AnotherBean"/>
设置bean全局懒加载默认值
<beans default-lazy-init="true">
    <!-- 下面配置的所有bean默认都会开启懒加载 -->
</beans>
自动装配(autowire)
自动装配允许我们不用显示给某个bean注入依赖的属性或者构造参数,而交由Spring自动帮我们注入所需的依赖。
Spring给我们提供了以下四种选项
| 自动装配模式 |
说明 |
no |
(默认值) 禁止Spring帮我们自动装配依赖,所有依赖由开发者显示注入。 |
byName |
按照bean的名称注入。比如beanA有一个属性beanB需要注入,如果beanA配置了自动装配模式是byName,那么Spring会在容器中找bean的名称为beanB的bean,找到后自动帮我们注入到beanA中。如果没找到,则不会注入。 |
byType |
按照bean的类型注入。byType模式需要保证容器中符合注入的类型的bean只有一个,如果匹配的类型有不止一个bean,那么会直接抛出运行时异常。如果没有一个匹配类型的bean,则不会注入。 |
constructor |
类似于byType。但这种模式应用的对象是构造参数。如果构造参数需要注入参数类型的bean有不止一个,同样会抛出运行时异常。 |
将某个bean从自动装配候选中排除
我们可以通过给bean添加autowire-candidate属性,并且设置为false,从而让这个bean不参与自动装配(不会被自动装配到其他bean上)
资源管理(Resource)
验证&数据绑定&类型转换
Spring 表达式语言(SpEL)
面向切面编程(AOP)
空值安全(Null-safety)
数据缓冲&数据编码
附录
<?xml version="1.0" encoding="UTF-8"?>
<beans xmlns="http://www.springframework.org/schema/beans"
       xmlns:xsi="http://www.w3.org/2001/XMLSchema-instance"
       xmlns:context="http://www.springframework.org/schema/context"
       xsi:schemaLocation="http://www.springframework.org/schema/beans
        https://www.springframework.org/schema/beans/spring-beans.xsd
        http://www.springframework.org/schema/context
        https://www.springframework.org/schema/context/spring-context.xsd">

    <context:annotation-config/>
    <context:component-scan base-package="com.john.spring" />

</beans>