朋友伙伴匹配系统笔记2
1.前端整合路由
由于我们使用的是vue3,所以对应的是4版本的路由
npm install vue-router@4
或者
yarn add vue-router@4
如下图
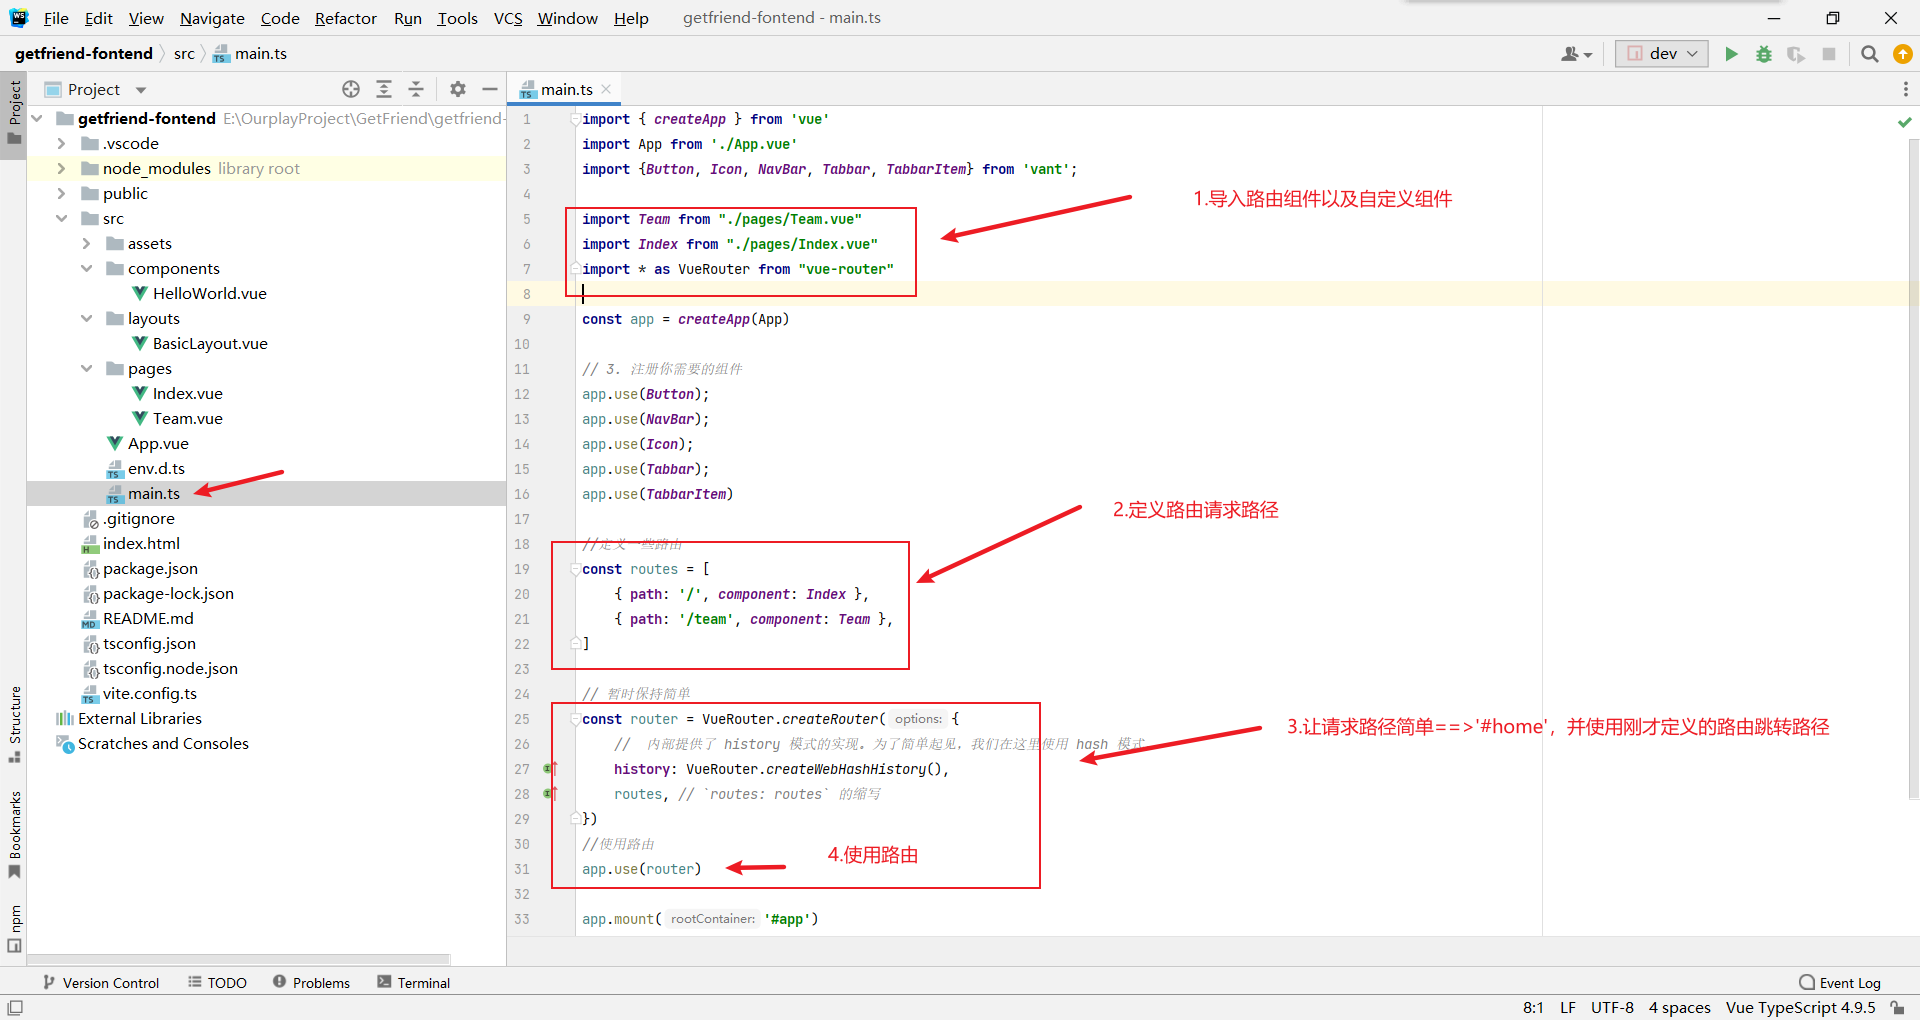
但是这样定义会有问题,如果我们的路径太多,就会导致我们的main.ts特别臃肿,所以,要把路由单独抽出来定义
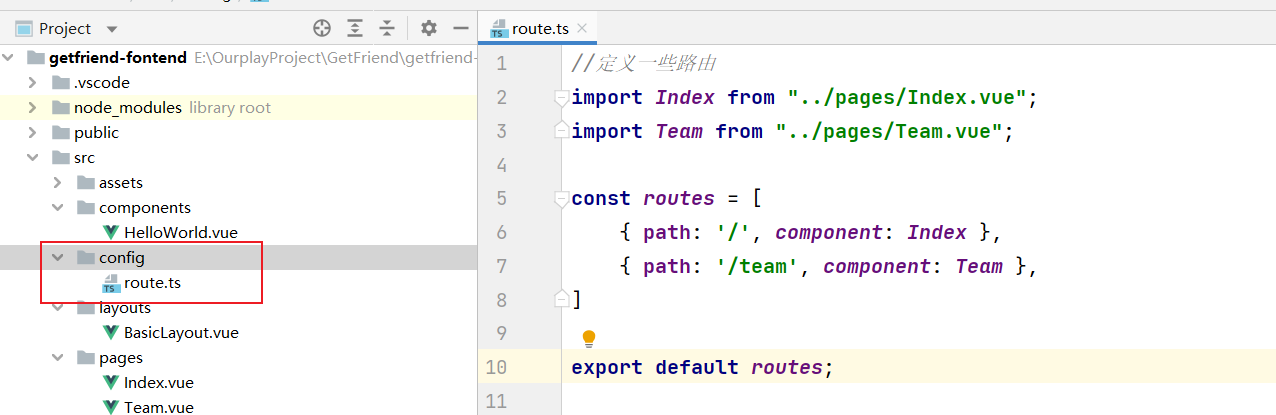
当然,这边导出之后也别忘了在main.ts中导入
import routes from "./config/route";
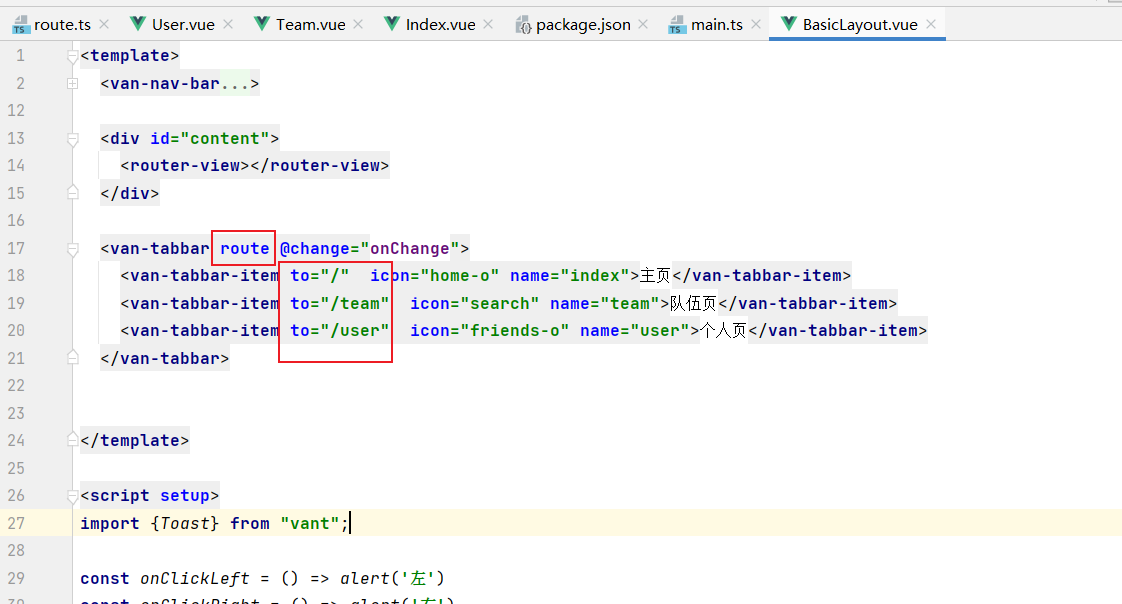
查看vant3文档,可以直接使用
标签栏支持路由模式,用于搭配 vue-router 使用。路由模式下会匹配页面路径和标签的 to 属性,并自动选中对应的标签。
<router-view />

<van-tabbar route>
  <van-tabbar-item replace to="/home" icon="home-o">标签</van-tabbar-item>
  <van-tabbar-item replace to="/search" icon="search">标签</van-tabbar-item>
</van-tabbar>
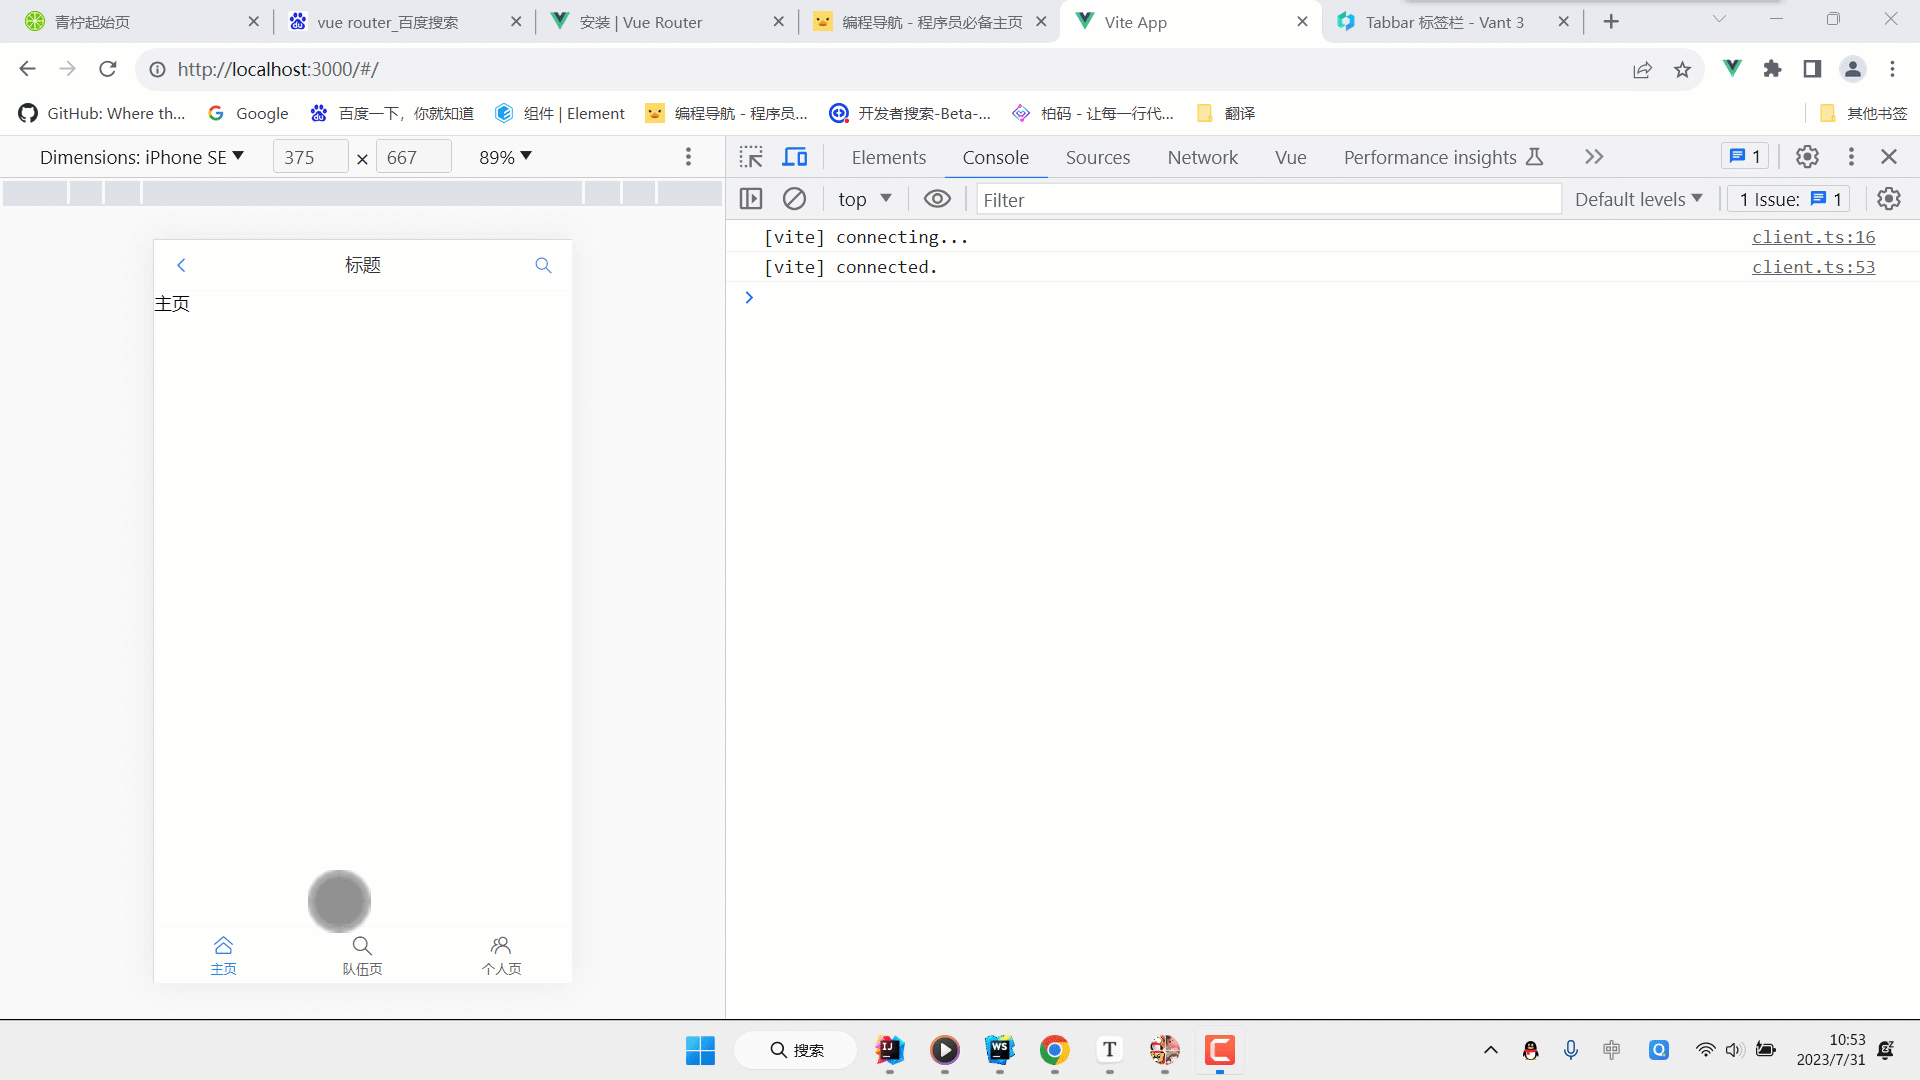
现在我们需要做一个搜索页面
导入vant组件搜索样式
-
模板
<template>
  <form action="/">
    <van-search
        v-model="value"
        show-action
        placeholder="请输入搜索关键词"
        @search="onSearch"
        @cancel="onCancel"
    />
  </form>

</template>

<script>
import { ref } from 'vue';
import { Toast } from 'vant';

export default {
  setup() {
    const value = ref('');
    const onSearch = (val) => Toast(val);
    const onCancel = () => Toast('取消');
    return {
      value,
      onSearch,
      onCancel,
    };
  },
};
</script>

<style scoped>

</style>
我们用vue3 的写法试试?
<template>
  <form action="/">
    <van-search
        v-model="searchText"
        show-action
        placeholder="请输入搜索标签"
        @search="onSearch"
        @cancel="onCancel"
    />
  </form>

</template>

<script setup>
import { ref } from 'vue';
import { Toast } from 'vant';

const searchText = ref('');
const onSearch = (val) => Toast(val);
const onCancel = () => Toast('取消');

</script>

<style scoped>

</style>
发现有什么不同了吗?
vue3的写法相比于vue2变的更简洁了
2.添加搜索页面
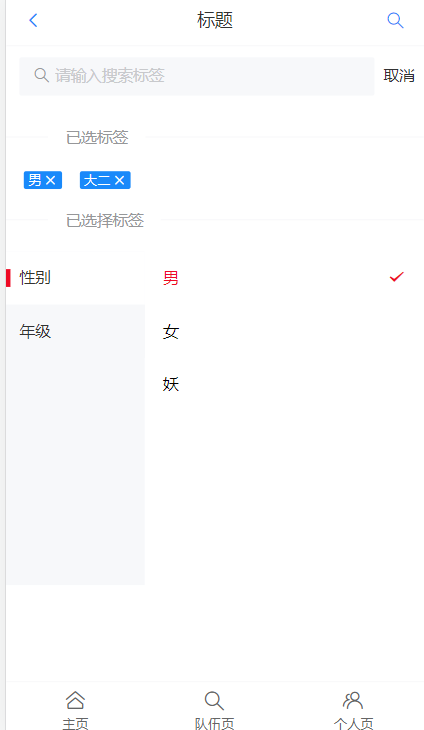
新建一个SearchPage.vue,这里是写好的
<template>
  <form action="/">
    <van-search
        v-model="searchText"
        show-action
        placeholder="请输入搜索标签"
        @search="onSearch"
        @cancel="onCancel"
    />
  </form>

  <van-divider content-position="left">已选标签</van-divider>
  <div v-if="activeIds.length === 0">暂无已选标签</div>
<van-row gutter="16" style="padding: 0 16px">
  <van-col v-for="tag in activeIds" >
    <van-tag closeable size="small" type="primary" @close = "doClose(tag)" >
      {{ tag }}
    </van-tag>
  </van-col>
</van-row>
  <van-divider content-position="left">请选择标签</van-divider>
  <van-tree-select
      v-model:active-id="activeIds"
      v-model:main-active-index="activeIndex"
      :items="tagList"
  />


</template>

<script setup>
import { ref } from 'vue';

const searchText = ref('');

//标签列表,之后要从数据库取值,元数据
const originTagList = [
  {
    text: '性别',
    children: [
      { text: '男', id: '男' },
      { text: '女', id: '女' },
      { text: '妖', id: '妖' },
    ],
  },
  {
    text: '年级',
    children: [
      { text: '大一', id: '大一' },
      { text: '大二', id: '大二' },
      { text: '大三', id: '大三' },
    ],
  },
];

//标签列表
let tagList = ref(originTagList);

const onSearch = (val) => {
  tagList.value = originTagList.map(parentTag => {
    //克隆原始数组
    const tempChildren = [...parentTag.children];
    const tempParentTag = {...parentTag};
    tempParentTag.children = tempChildren.filter(item => item.text.includes(searchText.value));
    return tempParentTag;
  });
  console.log(tagList.value)
}

//点击取消,清空搜索框
const onCancel = () => {
  searchText.value = '';
  tagList.value = originTagList;
}

//已选中标签
const activeIds = ref([]);//默认选中的标签数组
const activeIndex = ref(0);//默认选中的左侧索引

//标签的取消,移除
const doClose = (tag)=>{
  //过滤之后再赋值给刚才的标签数组
  activeIds.value = activeIds.value.filter(item =>{
    //表达式为true,filter保留
    return item !== tag;
  })
}

</script>

<style scoped>

</style>
效果展示
3.用户展示页面
- 新建一个models包,定义一个数据模型
user.d.ts文件
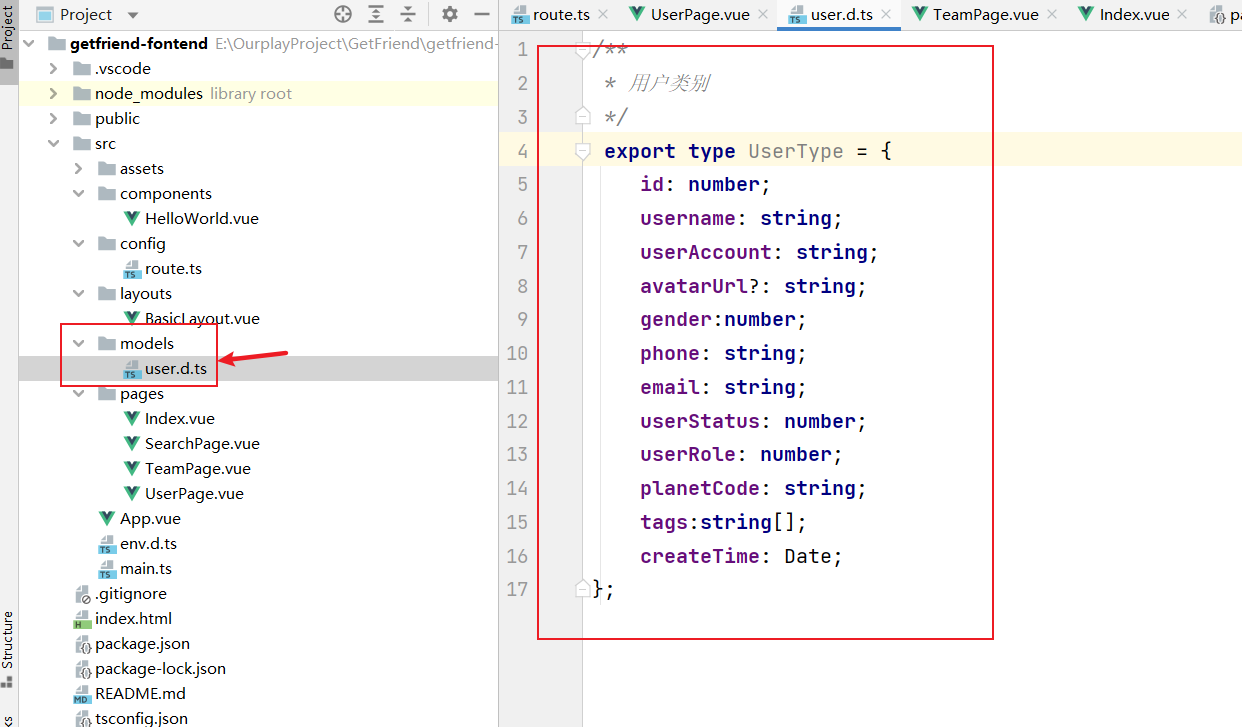
-
修改用户展示界面UserPage.vue
代码
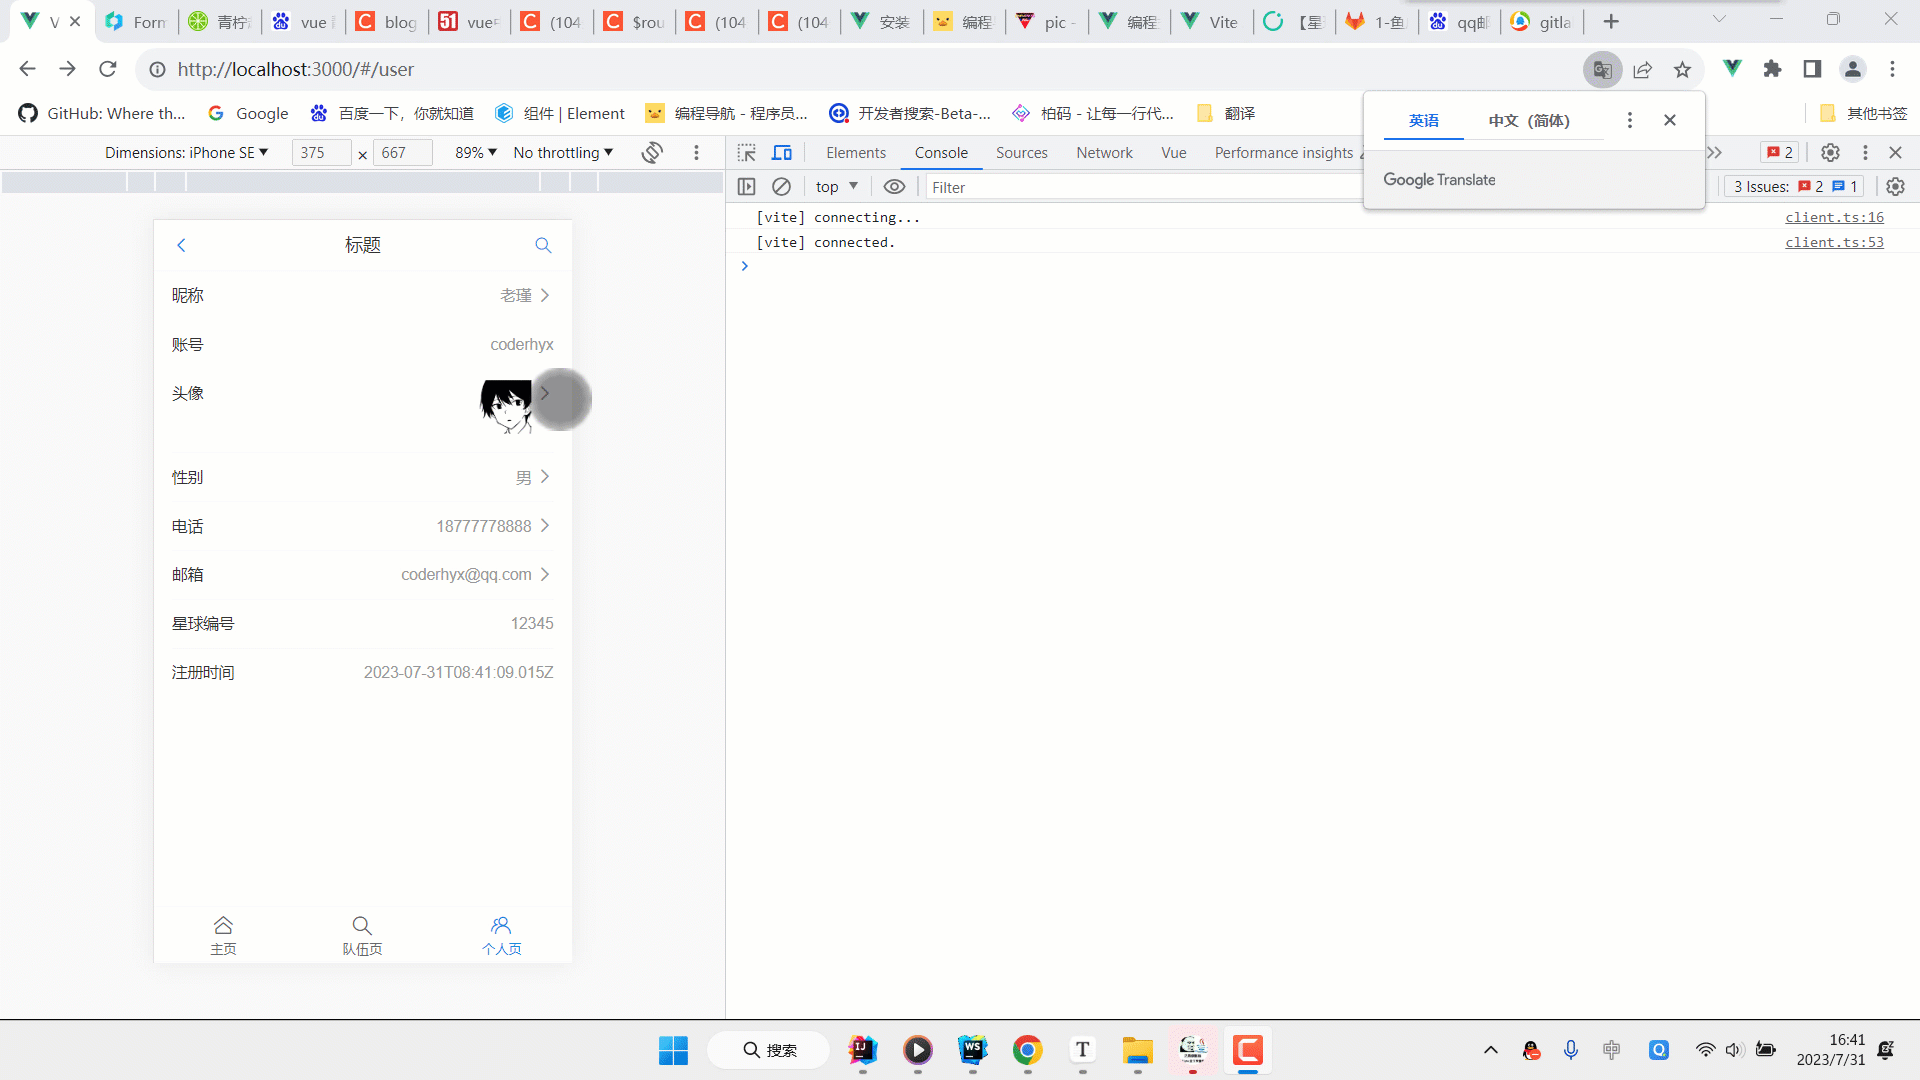
<template>
  <van-cell title="昵称" is-link to="/user/edit" :value="user.username" />
  <van-cell title="账号"  :value="user.userAccount" />
  <van-cell title="头像" is-link to="/user/edit"  :value="user.avatarUrl" >
    <img style="height:48px"  :src="user.avatarUrl" >
  </van-cell>
  <van-cell title="性别" is-link to="/user/edit"  :value="user.gender" />
  <van-cell title="电话" is-link to="/user/edit"  :value="user.phone" />
  <van-cell title="邮箱" is-link to="/user/edit"  :value="user.email" />
  <van-cell title="星球编号"  :value="user.planetCode" />
  <van-cell title="注册时间"  :value="user.createTime.toISOString()" />

</template>

<script setup>
const user={
  id: 1,
  username: '老瑾',
  userAccount: 'xxx',
  avatarUrl: 'http://xxx.xxx.com/images/2023/07/31/pic.md.jpg',
  gender:'男',
  phone: '18777778888',
  email: 'xxx@qq.com',
  planetCode: 'xxx',
  createTime:new Date(),
}
</script>

<style scoped>

</style>
效果展示

这样,我们的资料展示页面就做好了
4.用户资料修改页面
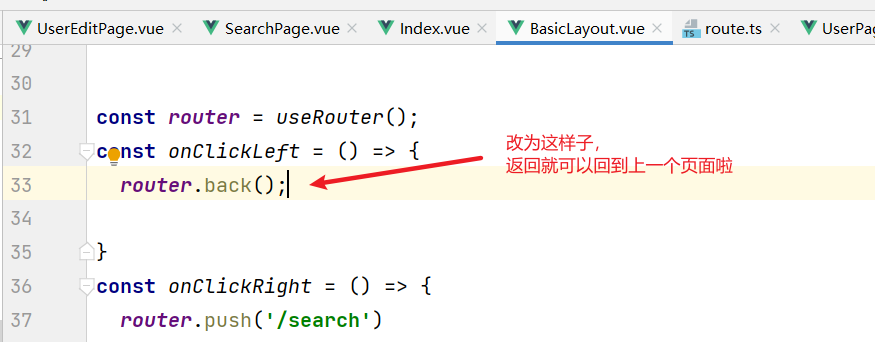
我们都知道,修改信息需要显示信息,需要传入修改某个信息的必要参数,以及修改前的值,首先需要传参到修改页面
vuerouter传参,由于我们使用的是静态路由
首先需要在修改页面(UserEditPage.vue)添加引入
import {useRoute} from "vue-router";

const route  = useRoute();
思考 :这里的route和之前的引入的router有什么区别?
import {useRouter} from "vue-router";

const router = useRouter();
router为VueRouter的实例,相当于一个全局的路由器对象,里面含有很多属性和子对象,例如history对象。。。经常用的跳转链接就可以用this.$router.push,和router-link跳转一样
this.$router.push会往history栈中添加一个新的记录
route相当于当前正在跳转的路由对象。。可以从里面获取name,path,params,query等
我们可以测试一下打印this.
r
o
u
t
e
和
t
h
i
s
.
route和this.
route和this.router
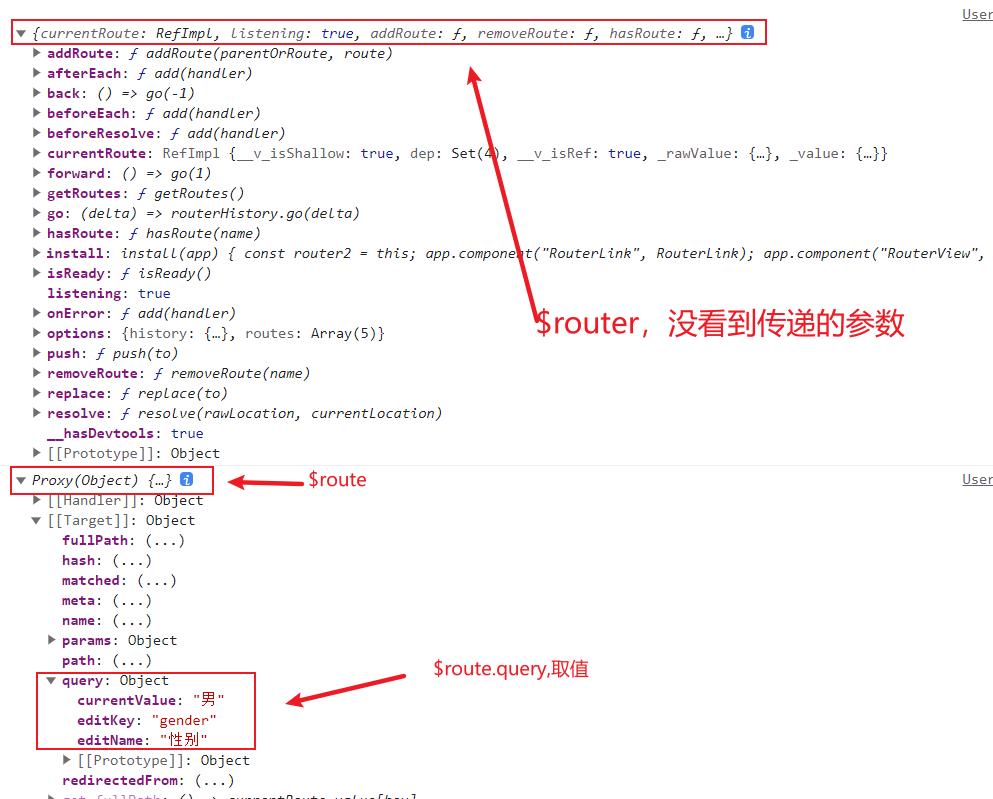
这次我们跳转页面传参,接收参数用route
<template>
  <van-cell title="昵称" is-link  :value="user.username" @click = "toEdit('username','昵称',user.username)" />
  <van-cell title="账号"  :value="user.userAccount" />
  <van-cell title="头像" is-link to="/user/edit"  :value="user.avatarUrl" >
    <img style="height:48px"  :src="user.avatarUrl" >
  </van-cell>
  <van-cell title="性别" is-link :value="user.gender" @click = "toEdit('gender','性别',user.gender)" />
  <van-cell title="电话" is-link :value="user.phone" @click = "toEdit('phone','电话',user.phone)" />
  <van-cell title="邮箱" is-link :value="user.email" @click = "toEdit('email','邮箱',user.email)"  />
  <van-cell title="星球编号"  :value="user.planetCode" />
  <van-cell title="注册时间"  :value="user.createTime.toISOString()" />

</template>

<script setup lang="ts">
import {useRouter} from "vue-router";

const user={
  id: 1,
  username: '老瑾',
  userAccount: 'coderhyx',
  avatarUrl: 'http://pic.vxmsgpush.xyz/images/2023/07/31/pic.md.jpg',
  gender:'男',
  phone: '18777778888',
  email: 'coderhyx@qq.com',
  planetCode: '12345',
  createTime:new Date(),
}
const router = useRouter();

const toEdit = (editKey: string,editName: string,currentValue: string) => {
  router.push({
    path:'/user/edit',
    query:{
      editKey,
      editName,
      currentValue
    }
  })
}
</script>

<style scoped>

</style>
<template>
  <van-form @submit="onSubmit">
      <van-field
          v-model="editUser.currentValue"
          :name="editUser.editKey"
          :label="editUser.editName"
          :placeholder="`请输入${editUser.editName}`"
          :rules="[{ required: true, message: '请填写xxx' }]"
      />
    <div style="margin: 16px;">
      <van-button round block type="primary" native-type="submit">
        提交
      </van-button>
    </div>
  </van-form>

</template>

<script setup lang="ts">
import {useRoute} from "vue-router";
import {ref} from "vue";
const route  = useRoute();
//console.log(route)

const editUser = ref({
  editKey:route.query.editKey,
  currentValue:route.query.currentValue,
  editName:route.query.editName,
})

const onSubmit = (values) => {
  //todo 把editKey currentValue editName 提交到后台
  console.log('onSubmit',values);
};
</script>

<style scoped>

</style>
这样我们的修改资料的页面就做好了
细节优化