应用案例
之前学习了逻辑回归,我们现在来做一个案例。
一个图片验证码识别的案例:怎么从图片中准确的识别出正确的数字。
我们分了三步。
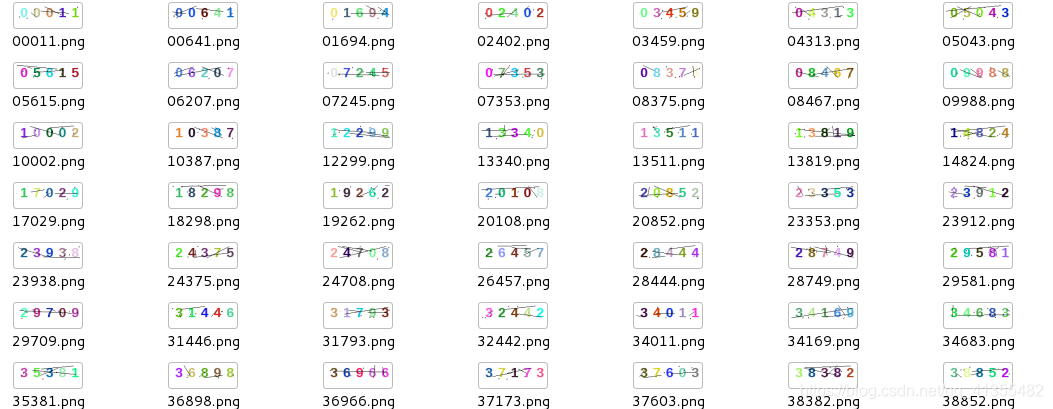
第一步:先生成150验证码图片,每个图片有5个数字。图片中有随机的噪点。
具体代码实现:
"""
Date: 2019--10 09:39
User: yz
Email: 1147570523@qq.com
Desc:

"""
from PIL import Image
from PIL import ImageDraw
from PIL import ImageFont
import random

def getRandomStr():
    random_num=str(random.randint(0,9))
    return random_num

def getRandomColor():
    #生成三个0~255的随机数字
    num1=random.randint(0,255)
    num2=random.randint(0,255)
    num3=random.randint(0,255)
    return num1,num2,num3

def generate_captcha():
    image=Image.new("RGB",(150,50),(255,255,255))
    draw=ImageDraw.Draw(image)
    font=ImageFont.truetype("LiberationSans-Bold.ttf",size=32)

    lable=""
    for i in range(5):
        #得到一个随机的数字
        random_char=getRandomStr()
        lable +=random_char
        draw.text((10+i*30,0),random_char,getRandomColor(),font=font)

    width =150
    height=30

    for i in range(3):
        x1=random.randint(0,width)
        x2=random.randint(0,width)
        y1=random.randint(0,height)
        y2=random.randint(0,height)
        draw.line((x1,y1,x2,y2),fill=(0,0,0))

    for i in range(5):
        draw.point([random.randint(0,width),random.randint(0,height)],fill=getRandomColor())
        x=random.randint(0,width)
        y=random.randint(0,height)
        draw.arc((x,y,x+4,y+4),0,90,fill=(0,0,0))
    #保存
    image.save(open(''.join(['img/',lable,'.png']),'wb'),'png')

if __name__ == '__main__':
    for i in range(150):
        generate_captcha()
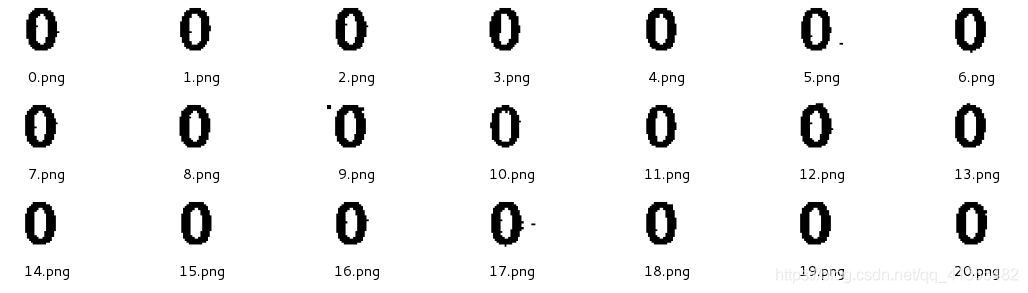
第二步: 对150张验证码图像进行处理。
(1)二值化:首先把图像从RGB3通道转化成Gray1通道,然后把灰度图(0~255)转化成二值图(0,1)
(2)降噪:通过处理孤立点,对二值化的图进行降噪
(3)图片切割:根据像素格,把图片中的所有(5个)数字,分别保存到对应的0~9文件夹下
具体代码实现:
"""
Date: 2019--10 10:49
User: yz
Email: 1147570523@qq.com
Desc:
"""
from PIL import Image
import numpy as np
import matplotlib.pyplot as plt
import os

def binarizaion(path):
    img = Image.open(path)
    img_gray = img.convert('L')
    img_gray = np.array(img_gray)
    w, h = img_gray.shape
    for x in range(w):
        for y in range(h):
            gray = img_gray[x, y]
            if gray <= 230:
                img_gray[x, y] = 0
            else:
                img_gray[x, y] = 1
    plt.figure('')
    plt.imshow(img_gray, cmap='gray')
    plt.axis('off')
    # plt.show()
    return img_gray

def noiseReduction(img_gray, label):
    w, h = img_gray.shape
    for x in range(w):
        for y in range(h):
            cnt = 0
            if img_gray[x,y]==1:
                continue
            if x == 0 or y == 0 or x == w - 1 or y == h - 1:
                img_gray[x, y] = 1
            else:
                if img_gray[x, y - 1] == 0:
                    cnt += 1
                if img_gray[x, y + 1] == 0:
                    cnt += 1
                if img_gray[x + 1, y] == 0:
                    cnt += 1
                if img_gray[x - 1, y] == 0:
                    cnt += 1
                if img_gray[x - 1, y + 1] == 0:
                    cnt += 1
                if img_gray[x - 1, y - 1] == 0:
                    cnt += 1
                if img_gray[x + 1, y - 1] == 0:
                    cnt += 1
                if img_gray[x + 1, y + 1] == 0:
                    cnt += 1
                if cnt < 4:
                    img_gray[x, y] = 1
    plt.figure('')
    plt.imshow(img_gray, cmap='gray')
    plt.axis('off')
    # plt.show()
    plt.savefig(''.join(['imgs_logistic/', label, '.png']))

def cutImg(label):
    labels = list(label)
    img = Image.open(''.join(['imgs_logistic/', label, '.png']))
    for i in range(5):
        pic = img.crop((100*(1+i), 170, 100*(1+i)+100, 280))
        plt.imshow(pic)
        seq = get_save_seq(labels[i])
        pic.save(''.join(['cut_number/', str(labels[i]), '/', str(seq), '.png']))

def get_save_seq(num):
    numlist = os.listdir(''.join(['cut_number/', num, '/']))
    if len(numlist) == 0 or numlist is None:
        return 0
    else:
        max_file = 0
        for file in numlist:
            if int(file.split('.')[0]) > max_file:
                max_file = int(file.split('.')[0])
        return int(max_file)+1

def create_dir():
    for i in range(10):
        os.mkdir(''.join(['cut_number/', str(i)]))

def img_2_clean():
    captchas = os.listdir(''.join(['img/']))
    for captcha in captchas:
        label = captcha.split('.')[0]
        img_path = ''.join(['img/', captcha])
        # 二值化
        im = binarizaion(img_path)
        # 降噪
        noiseReduction(im, label)

def clean_to_cut():
    captchas = os.listdir(''.join(['imgs_logistic/']))
    for captcha in captchas:
        label = captcha.split('.')[0]
        cutImg(label)

if __name__ == '__main__':
    img_2_clean()
    clean_to_cut()
第三步: 利用逻辑回归做模型,来测试一张图片验证码。这里生成模型过程比较漫长,我们可以先生成模型,在做测试。
-
把数据带入逻辑回归进行建模
(1)把切割好的数据,按照X(二位数组),Y(一维数组)的方式传入logisticRegression.fit()函数进行拟合
我们可以通过网格搜索(GridSearch)来进行调参
(2)通过joblib包,把模型保存到本地
-
得到模型后,进行图像验证
(1)根据步骤1,重复操作新的图像
(2)对切割好的每个图像,独立的进行预测
(3)把最后预测结果进行拼接
具体代码实现:
"""
Date: 2019--10 14:26
User: yz
Email: 1147570523@qq.com
Desc:
"""
import os
from PIL import Image
import numpy as np
from sklearn.model_selection import train_test_split
from sklearn.linear_model import  LogisticRegression
from sklearn.externals import joblib
from captcha_logistic import *

def load_data():
    X,Y=[],[]
    cut_list=os.listdir('cut_number/')
    for numC in cut_list:
        num_list_dir=''.join(['cut_number/',str(numC),'/'])
        nums_dir=os.listdir(num_list_dir)
        for num_file in nums_dir:
            img=Image.open(''.join(['cut_number/',str(numC),'/',num_file]))
            img_gray=img.convert('L')
            img_array=np.array(img_gray)
            w,h=img_array.shape
            for x in range(w):
                for y in range(h):
                    gray = img_array[x, y]
                    if gray <= 240:
                        img_array[x, y] = 0
                    else:
                        img_array[x, y] = 1
            img_re=img_array.reshape(1,-1)
            X.append(img_re[0])
            Y.append(int(numC))
    return np.array(X),np.array(Y)

def generate_model(X,Y):
    X_train,X_test,Y_train,Y_test=train_test_split(X,Y,test_size=0.3)

    log_clf=LogisticRegression(multi_class='ovr',solver='sag',max_iter=10000)

    log_clf.fit(X_train,Y_train)
    joblib.dump(log_clf,'captcha_model/captcha_model.model')

def get_model():
    model=joblib.load('captcha_model/captcha_model.model')
    return model

def captcha_predict():
    path='captcha_predict/unknown.png'
    pre_img_gray=binarizaion(path)
    noiseReduction(pre_img_gray,'unknown')
    labels=['0','1','2','3','4']

    img=Image.open(''.join(['imgs_logistic/unknown.png']))
    for i in range(5):
        pic=img.crop((100*(1+i),170,100*(1+i)+100,280))
        plt.imshow(pic)
        pic.save(''.join(['captcha_predict/',labels[i],'.png']))

    result=''
    model=get_model()
    for i in range(5):
        path=''.join(['captcha_predict/',labels[i],'.png'])
        img=Image.open(path)
        img_gray = img.convert('L')
        img_array = np.array(img_gray)
        w, h = img_array.shape
        for x in range(w):
            for y in range(h):
                gray = img_array[x, y]
                if gray <= 240:
                    img_array[x, y] = 0
                else:
                    img_array[x, y] = 1
        img_re = img_array.reshape(1, -1)
        X=img_re[0]
        Y_pre=model.predict([X])
        result=''.join([result,str(Y_pre[0])])
    return result

if __name__ == '__main__':
   #先生成本地模型,本地模型只需生成一次。
    # X,Y=load_data()
    # generate_model(X,Y)
    #测试。
    model=get_model()
    result=captcha_predict()
    print(result)
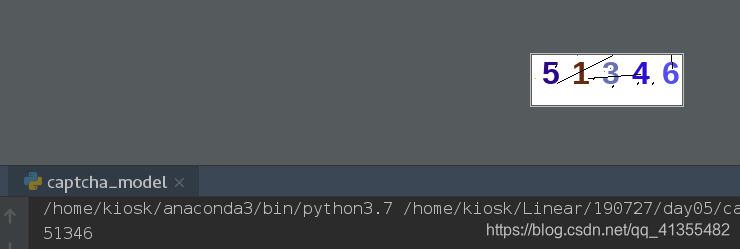
我们的结果测试是很准确的。
本文内容由网友自发贡献,版权归原作者所有,本站不承担相应法律责任。如您发现有涉嫌抄袭侵权的内容,请联系:hwhale#tublm.com(使用前将#替换为@)