相关概念
参考文章:
u-boot FIT image介绍 (wowotech.net)X-010-UBOOT-使用booti命令启动kernel(Bubblegum-96平台) (wowotech.net)
FDT
device tree(全称是flattened device tree,后续将会以FDT代称)的时候,让同一个Image可以支持多个不同的平台:
Image
linux内核经过编译后会生成一个elf格式的可执行程序,叫vmlinux或vmlinuz,这个就是原始的未经任何处理加工的原版内核elf文件;嵌入式系统部署时烧录的一般不是这个vmlinuz/vmlinux,而是要用objcopy工具去制作成烧录镜像格式,经过制作加工后的烧录镜像文件就叫Image
zImage
对Image进行压缩,并且在image压缩后的文件的前端附加了一部分解压缩代码,构成了一个压缩格式的镜像就叫zImage。运行的时候,通过zImage镜像头部的解压缩代码进行自解压,然后执行解压出来的内核镜像。
uImage
uboot为了启动linux内核,还发明了一种内核格式叫uImage。uImage是uboot专用的映像文件,它是在zImage之前加上一个长度为64字节的“头”,说明这个内核的版本、加载位置、生成时间、大小等信息;其64字节之后与zImage没区别。
此处描述的uImage即为Legacy uImage,uIamge还有另一个版本FIT uImage。
参考:https://blog.csdn.net/ooonebook/article/details/53495002 (bootm跳转到kernel流程1)
参考:https://blog.csdn.net/ooonebook/article/details/53495021 (bootm跳转到kernel流程2)
Legacy uImage
在kernel镜像的基础上,加上64Byte的信息提供给uboot使用,定义在include/image.h中。
/*
 * Legacy format image header,
 * all data in network byte order (aka natural aka bigendian).
 */
typedef struct image_header {
	uint32_t	ih_magic;	/* Image Header Magic Number	*/
	uint32_t	ih_hcrc;	/* Image Header CRC Checksum	*/
	uint32_t	ih_time;	/* Image Creation Timestamp	*/
	uint32_t	ih_size;	/* Image Data Size		*/
	uint32_t	ih_load;	/* Data	 Load  Address		*/
	uint32_t	ih_ep;		/* Entry Point Address		*/
	uint32_t	ih_dcrc;	/* Image Data CRC Checksum	*/
	uint8_t		ih_os;		/* Operating System		*/
	uint8_t		ih_arch;	/* CPU architecture		*/
	uint8_t		ih_type;	/* Image Type			*/
	uint8_t		ih_comp;	/* Compression Type		*/
	uint8_t		ih_name[IH_NMLEN];	/* Image Name		*/
} image_header_t;
1)使用mkimage工具(位于u-boot source code的tools/mkimage中)生成。
2)支持OS Kernel Images、RAMDisk Images等多种类型的Image。
3)支持gzip、bzip2等压缩算法。
4)支持CRC32 checksums。
5)等等。
之所以称作Legacy,说明还有更新的uImage。
FIT uImage
以类似FDT的方式,将kernel、fdt、ramdisk等等镜像打包到一个image file中,并且加上一些需要的信息(属性)。uboot只要获得了这个image file,就可以得到kernel、fdt、ramdisk等等镜像的具体信息和内容。
具体参考文档:u-boot FIT image介绍 (wowotech.net)
Legacy-uImage实现较为简单,并且长度较小。但是实际上使用较为麻烦,需要在启动kernel的命令中额外添加fdt、ramdisk的加载信息。
而FIT-uImage实现较为复杂,但是使用起来较为简单,兼容性较好,(可以兼容多种配置)。但是需要的额外信息也较长。
BOOT配置文件
.config,编译时会转换为include/generated/autuconf.h文件,如:
.config include/generated/autuconf.h
CONFIG_SYS_ARCH="arm" --> #define CONFIG_SYS_ARCH "arm"
CONFIG_PHY_MARVELL=y --> #define CONFIG_PHY_MARVELL 1
BOOT引导命令
针对不同的Kernel image格式,u-boot提供了不同的boot指令,例如:
booti,引导ARM64 kernel image----Image;
bootz,引导ARM kernel image----zImage;
bootm,引导u-boot自定义的kernel image----uImage。
u-boot自定义的image格式(uImage)有着强大而又复杂的功能,FIT uImage、Legacy uImage。
BOOT引导程序理解
booti命令
如 booti 0x90000000 0x94000000 0x92000000;booti 0x90000000 - 0x92000000
ARM64的Image头部结构如下(arch/arm/lib/image.c):
/* See Documentation/arm64/booting.txt in the Linux kernel */
struct Image_header {
	uint32_t	code0;		/* Executable code */
	uint32_t	code1;		/* Executable code */
	uint64_t	text_offset;	/* Image load offset, LE */
	uint64_t	image_size;	/* Effective Image size, LE */
	uint64_t	flags;		/* Kernel flags, LE */
	uint64_t	res2;		/* reserved */
	uint64_t	res3;		/* reserved */
	uint64_t	res4;		/* reserved */
	uint32_t	magic;		/* Magic number */
	uint32_t	res5;
};
在linux内核的arch/arm64/kernel/head.S中可找到与Image_header对应的代码,所以第一个code0就是跳转语句b stext,所以kernel入口最先执行stext。
	__HEAD
_head:
	b	stext				// branch to kernel start, magic
	.long	0				// reserved
	le64sym	_kernel_offset_le		// Image load offset from start of RAM, little-endian
	le64sym	_kernel_size_le			// Effective size of kernel image, little-endian
	le64sym	_kernel_flags_le		// Informative flags, little-endian
	.quad	0				// reserved
	.quad	0				// reserved
	.quad	0				// reserved
	.ascii	"ARM\x64"			// Magic number
	.long	0				// reserved
	__INIT
......
以ft2004(ARM64,ARMv8)的Linux Image文件为例,Image文件大小0x110DA00:
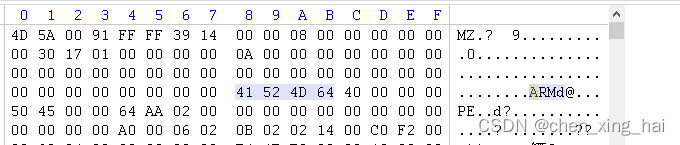
iamge.code0=0x91005A4D /* Executable code */
iamge.code1=0x1439FFFF /* Executable code */
iamge.text_offset=0x0000000 00080000/* Image load offset, LE */
iamge.image_size=0x00000000 01173000 /* Effective Image size, LE */
iamge.flags=0x00000000 0000000A /* Kernel flags, LE */
iamge.res2=0 /* reserved */
iamge.res3=0 /* reserved */
iamge.res4=0 /* reserved */
iamge.magic=0x644D5241/* 其实就是ARM的字符串 + 0x64 */
iamge.res5=0
iamge.code0、iamge.code1:可执行代码,即image的entry:stext()。
iamge.text_offset:指明了对于内核实际加载的位置相对于指定被加载到的位置的偏移,一般为0x00080000,必须4KB对齐。
arch/arm64/kernel/Makefile
# The byte offset of the kernel image in RAM from the start of RAM.
ifeq ($(CONFIG_ARM64_RANDOMIZE_TEXT_OFFSET), y)
TEXT_OFFSET := $(shell awk "BEGIN {srand(); printf \"0x%06x\n\", \
		 int(2 * 1024 * 1024 / (2 ^ $(CONFIG_ARM64_PAGE_SHIFT)) * \
		 rand()) * (2 ^ $(CONFIG_ARM64_PAGE_SHIFT))}")
else
TEXT_OFFSET := 0x00080000
endif
iamge.flags:只用到了4bit,其中Bit 0指出内核image本身用的是什么字节序,0表示小端字节序,1表示大端字节序。值得注意的是,无论image采用什么字节序,image的头一定是小端字节序的。Bit 1~2表示内核所使用的内存页大小,1是4K,2是16K,3是64K,0表示未指定。Bit 3指明bootloader应该加载image到物理内存的什么位置,0表示应该尽量加载在物理内存的最低端,1表示可以加载到物理内存的任何位置,但都要保证是2M对齐的。arch/arm/lib/image.c
/*
	 * If bit 3 of the flags field is set, the 2MB aligned base of the
	 * kernel image can be anywhere in physical memory, so respect
	 * images->ep.  Otherwise, relocate the image to the base of RAM
	 * since memory below it is not accessible via the linear mapping.
	 */
	if (!force_reloc && (le64_to_cpu(ih->flags) & BIT(3)))
		dst = image - text_offset;
	else
		dst = gd->bd->bi_dram[0].start;

	*relocated_addr = ALIGN(dst, SZ_2M) + text_offset;
最终的结果是Image将被拷贝到一个新地址,该地址减去text_offset后满足2兆对齐,之后images->ep = relocated_addr;
images->os.start = relocated_addr;
整个引导过程都会使用到bootm_headers_t images,定义在include/image.h中
/*
 * Legacy and FIT format headers used by do_bootm() and do_bootm_<os>()
 * routines.
 */
typedef struct bootm_headers {
	/*
	 * Legacy os image header, if it is a multi component image
	 * then boot_get_ramdisk() and get_fdt() will attempt to get
	 * data from second and third component accordingly.
	 */
	image_header_t	*legacy_hdr_os;		/* image header pointer */
	image_header_t	legacy_hdr_os_copy;	/* header copy */
	ulong		legacy_hdr_valid;

#if IMAGE_ENABLE_FIT
	const char	*fit_uname_cfg;	/* configuration node unit name */

	void		*fit_hdr_os;	/* os FIT image header */
	const char	*fit_uname_os;	/* os subimage node unit name */
	int		fit_noffset_os;	/* os subimage node offset */

	void		*fit_hdr_rd;	/* init ramdisk FIT image header */
	const char	*fit_uname_rd;	/* init ramdisk subimage node unit name */
	int		fit_noffset_rd;	/* init ramdisk subimage node offset */

	void		*fit_hdr_fdt;	/* FDT blob FIT image header */
	const char	*fit_uname_fdt;	/* FDT blob subimage node unit name */
	int		fit_noffset_fdt;/* FDT blob subimage node offset */

	void		*fit_hdr_setup;	/* x86 setup FIT image header */
	const char	*fit_uname_setup; /* x86 setup subimage node name */
	int		fit_noffset_setup;/* x86 setup subimage node offset */
#endif

#ifndef USE_HOSTCC
	image_info_t	os;		/* os image info */
	ulong		ep;		/* entry point of OS */

	ulong		rd_start, rd_end;/* ramdisk start/end */

	char		*ft_addr;	/* flat dev tree address */
	ulong		ft_len;		/* length of flat device tree */

	ulong		initrd_start;
	ulong		initrd_end;
	ulong		cmdline_start;
	ulong		cmdline_end;
	struct bd_info		*kbd;
#endif

	int		verify;		/* env_get("verify")[0] != 'n' */

#define	BOOTM_STATE_START	(0x00000001)
#define	BOOTM_STATE_FINDOS	(0x00000002)
#define	BOOTM_STATE_FINDOTHER	(0x00000004)
#define	BOOTM_STATE_LOADOS	(0x00000008)
#define	BOOTM_STATE_RAMDISK	(0x00000010)
#define	BOOTM_STATE_FDT		(0x00000020)
#define	BOOTM_STATE_OS_CMDLINE	(0x00000040)
#define	BOOTM_STATE_OS_BD_T	(0x00000080)
#define	BOOTM_STATE_OS_PREP	(0x00000100)
#define	BOOTM_STATE_OS_FAKE_GO	(0x00000200)	/* 'Almost' run the OS */
#define	BOOTM_STATE_OS_GO	(0x00000400)
	int		state;

#ifdef CONFIG_LMB
	struct lmb	lmb;		/* for memory mgmt */
#endif
} bootm_headers_t;
代码流程如下:
//uboot 2020.10版本
//引导命令 booti image_adr ramdisk_adr dtb_adr
//lmb: logical memory blocks 逻辑内存块
bootm_headers_t images;//(common/bootm.c) boot引导阶段用到的全局变量
0 run booti(cmd/booti.c) //命令
    1-> do_booti(cmd/booti.c)
        2-> booti_start(cmd/booti.c)
            3-> do_bootm_states(common/bootm.c) //通过bootm_start初始化全局images->lmb
                4-> bootm_start(common/bootm.c)
                    5-> 清空全局变量images
                    5-> boot_start_lmb(common/bootm.c)
                        6-> env_get_bootm_low(common/image.c) 从env("bootm_low")获取或使用宏CONFIG_SYS_SDRAM_BASE(include/configs/xxx.h) //ft2004为0x80000000
                        6-> env_get_bootm_size(common/image.c) 从env("bootm_size")获取或从全局gd struct global_data中获取:size = gd->bd->bi_dram[0].size;
                        6-> lmb_init_and_reserve_range(lib/lmb.c)
            3-> 获取kernel入口物理地址,等于booti的第一个参数 或 CONFIG_SYS_LOAD_ADDR
            3-> image_decomp_type 根据kernel前2字节判断压缩类型并解压
                0x425a(bzip2)/ 0x1f8b(gzip)/ 0x5d00(lzma)/ 0x894c(lzo)
            3-> booti_setup(arch/arm/lib/image.c) //根据image.magic判断是否为ARM64内核并重定向内核基地址。此处可以看出booti命令是专门加载ARM64 Linux Kernel的
            3-> 拷贝内核到重定向地址,将新内核地址信息赋值给全局images变量
                images->ep = relocated_addr; //ep:entry point
	            images->os.start = relocated_addr;
	            images->os.end = relocated_addr + image_size;
            3-> lmb_reserve(lib/lmb.c) //保留内核地址
            3-> bootm_find_images(common/boom.c)
                4-> boot_get_ramdisk(common/image.c) //从第二个参数或image(如果为FIT uImage)中查找ramdisk根文件系统,并将查找到的ramdisk地址赋值给images.rd_start
                4-> boot_get_fdt(common/image-fdt.c) //在image中查找fdt设备树,并将查找到的ramdisk地址赋值给images.ft_addr
                4-> set_working_fdt_addr(cmd/fdt.c) //working_fdt=images.ft_addr
                4-> boot_get_loadable //查找所有可加载的文件
        2-> bootm_disable_interrupts(common/boom.c) //关闭中断
        2-> images.os.os = IH_OS_LINUX;
            images.os.arch = IH_ARCH_ARM64;//指定os的架构为ARM64
        2-> do_bootm_states(common/bootm.c)
            3-> boot_ramdisk_high(common/image.c) //重定位ramdisk
            3-> boot_relocate_fdt(common/image-fdt.c) //重定位fdt
            3-> bootm_os_get_boot_func(common/bootm_os.c) //获取对应os类型的boot函数
                linux为:do_bootm_linux
            3-> boot_fn(BOOTM_STATE_OS_PREP,...) //boot前准备工作,do_bootm_linux(arch/arm/lib/bootm.c)
                4-> boot_prep_linux(arch/arm/lib/bootm.c)
                    5-> image_setup_linux(common/image.c) //主要处理fdt
                        6-> boot_fdt_add_mem_rsv_regions(common/image-fdt.c)//标记为不可用,防止存放fdt的内存被uboot使用
                        6-> boot_relocate_fdt(common/image-fdt.c)
                        6-> image_setup_libfdt(common/image-fdt.c)
                            7-> fdt_root(common/fdt_support.c)
                            7-> fdt_chosen(common/fdt_support.c)
                                8-> fdt_find_or_add_subnode(common/fdt_support.c)//查找或创设备树节点"chosen"
                                8-> env_get("bootargs"); //获取bootargs参数
                                8-> fdt_setprop(common/fdt_support.c) //通过该函数在"chosen"节点中添加"bootargs"属性,内容为bootargs参数。linux启动后可在/proc/device-tree/chosen/中查看bootargs属性
                            7-> arch_fixup_fdt(arch/arm/lib/bootm-fdt.c)
                            7-> optee_copy_fdt_nodes //什么都没做
                            7-> fdt_fixup_ethernet(common/fdt_support.c)
                            7-> fdt_shrink_to_minimum(common/fdt_support.c)
                            7-> lmb_reserve(lib/lmb.c)
                            7-> fdt_initrd(common/fdt_support.c)
                            7-> ft_verify_fdt(common/fdt_support.c)
                    5-> board_prep_linux(arch/arm/lib/bootm.c)//什么都没做
            3-> boot_selected_os(argc, argv, BOOTM_STATE_OS_GO,images, boot_fn)(common/boot-os.c)//run OS
                4-> arch_preboot_os//什么都没做
                4-> board_preboot_os//什么都没做
                4-> boot_fn(BOOTM_STATE_OS_GO,...) //do_bootm_linux(arch/arm/lib/bootm.c)
                    5-> boot_jump_linux(arch/arm/lib/bootm.c)
                        6-> announce_and_cleanup //打印并准备引导kernel,"Starting kernel ...",关闭中断,关闭caches等
                        6-> do_nonsec_virt_switch //刷新caches
                        6-> armv8_switch_to_el2((u64)images->ft_addr, 0, 0, 0,images->ep,ES_TO_AARCH64); //跳转到内核 arch/arm/cpu/armv8/transition.c
bootm命令代码流程
0 do_bootm
    1-> do_bootm_states
        2-> bootm_start
        2-> bootm_find_os
        2-> bootm_find_other
        2-> bootm_disable_interrupts
        2-> bootm_load_os
        2-> boot_ramdisk_high
        2-> bootm_os_get_boot_func
        2-> boot_fn(BOOTM_STATE_OS_PREP, argc, argv, images);do_bootm_linux
        2-> boot_selected_os
lmb
(logical memory blocks) 为uboot下的一种内存管理机制,用于管理镜像的内存。lmb所记录的内存信息最终会传递给kernel。在/include/lmb.h和/lib/lmb.c中有对lmb的接口和定义的具体描述。lmb_init() 对lmb进行初始化,初始化后相应内存就归lmb管辖。
armv8_switch_to_el2分析
源码位于arch/arm/cpu/armv8/transition.c中。
aarch64架构中uboot到kernel的跳转是通过armv8_switch_to_el2实现的!
armv8_switch_to_el2((u64)images->ft_addr, 0, 0, 0,images->ep,ES_TO_AARCH64)
备注:
aarch64的函数传参规则,第一个参数使用x0传递,第二个参数使用x1传递,以此类推...
所以 x0:ftd地址,x4:kernel entry,x5:arch type
arch/arm/cpu/armv8/transition.S:
ENTRY(armv8_switch_to_el2)
    switch_el x6, 1f, 0f, 0f
0:
    cmp x5, #ES_TO_AARCH64
    b.eq 2f    //如果arch type为arm64,则跳转到label 2处
    /*
     * When loading 32-bit kernel, it will jump
     * to secure firmware again, and never return.
     */
    bl armv8_el2_to_aarch32
2:
    /*
     * x4 is kernel entry point or switch_to_el1
     * if CONFIG_ARMV8_SWITCH_TO_EL1 is defined.
   * When running in EL2 now, jump to the
     * address saved in x4.
     */
    br x4    //跳转到kernel entry处
1:  armv8_switch_to_el2_m x4, x5, x6
ENDPROC(armv8_switch_to_el2)
从uboot到linux kernel
参考:Linux内核4.14版本:ARM64的内核启动过程(一)——start_kernel之前_arm64 linux内核_风雨兼程8023的博客-CSDN博客
详细的ARM64 boot protocol请参考Documentation/arm64/booting.txt文档。文档会详细介绍每个步骤。大概流程如下:
Essentially, the boot loader should provide (as a minimum) the
following:
1. Setup and initialise the RAM
2. Setup the device tree
3. Decompress the kernel image
4. Call the kernel image
......
4. Call the kernel image --定义了Image的头部64字节。
------------------------
Requirement: MANDATORY
The decompressed kernel image contains a 64-byte header as follows:
u32 code0; /* Executable code */
u32 code1; /* Executable code */
u64 text_offset; /* Image load offset, little endian */
u64 image_size; /* Effective Image size, little endian */
u64 flags; /* kernel flags, little endian */
u64 res2 = 0; /* reserved */
u64 res3 = 0; /* reserved */
u64 res4 = 0; /* reserved */
u32 magic = 0x644d5241; /* Magic number, little endian, "ARM\x64" */
u32 res5; /* reserved (used for PE COFF offset) */
......
此处参数表,第一个参数即寄存器x0存放dtb
- Primary CPU general-purpose register settings
x0 = physical address of device tree blob (dtb) in system RAM.
x1 = 0 (reserved for future use)
x2 = 0 (reserved for future use)
x3 = 0 (reserved for future use)
参数表中只有dtb,uboot是如何将其他启动参数传递给linux的呢?
在跳转linux kernel之前(如uboot中),将cmdline数据放到了FDT中,然后将FDT的地址写入到了X0中,然后再跳转linux kernel。uboot阶段,fdt_chosen()函数获取"bootargs"变量并内容将其添加到设备树节点"chosen"的"bootargs"属性中,这样linux启动后便能通过fdt获取bootargs了。
kernel启动
linux kernel从stext开始启动,整个流程大概就是读取X0(FDT地址)保存到X21中,又将X21保存到__fdt_pointer全局变量中,然后再将__fdt_pointer解析处cmdline数据到boot_command_line全局变量中。
x0 -> x21 -> __fdt_pointer -> boot_command_line
setup_arch -> setup_machine_fdt
    -> early_init_dt_scan
        -> early_init_dt_scan_nodes
            -> of_scan_flat_dt(early_init_dt_scan_chosen, boot_command_line);

    扫描 /chosen node,保存运行时参数(bootargs)到boot_command_line,此外,还通过early_init_dt_check_for_initrd处理initrd相关的property,并保存在initrd_start和initrd_end这两个全局变量中 。其中主要是解析dts的配置为
	chosen {
		bootargs = "earlycon=sprd_serial,0x70100000,115200n8 loglevel=8 console=ttyS1,115200n8 init=/init root=/dev/ram0 rw androidboot.hardware=sc9830";
		linux,initrd-start = <0x85500000>;
		linux,initrd-end = <0x855a3212>;
	};
aarch64架构根据文件arch/arm64/kernel/vmlinux.lds、arch/arm64/kernel/head.S可知第一个入口为stext,然后stext() -> __primary_switch -> __primary_switched -> start_kernel()
stext
ENTRY(stext)
	bl	preserve_boot_args
	bl	el2_setup			// Drop to EL1, w0=cpu_boot_mode
	adrp	x23, __PHYS_OFFSET
	and	x23, x23, MIN_KIMG_ALIGN - 1	// KASLR offset, defaults to 0
	bl	set_cpu_boot_mode_flag
	bl	__create_page_tables
	/*
	 * The following calls CPU setup code, see arch/arm64/mm/proc.S for
	 * details.
	 * On return, the CPU will be ready for the MMU to be turned on and
	 * the TCR will have been set.
	 */
	bl	__cpu_setup			// initialise processor
	b	__primary_switch
ENDPROC(stext)
preserve_boot_args
preserve_boot_args:
	mov	x21, x0	// 将dtb的地址(物理地址)暂存在x21寄存器中,释放出x0以便后续做临时变量使用

	adr_l	x0, boot_args // x0保存了boot_args变量的地址
	stp	x21, x1, [x0]	  // 保存x21的值到boot_args[0], 保存x1的值到boot_args[1]。x0(值已被保存到x21中)和x1为bootloader调用kernel入口时传入的第1第2参数
	stp	x2, x3, [x0, #16] // 保存x2的值到boot_args[2]和保存x3的值到boot_args[3]。x2和x3为bootloader调用kernel入口时传入的第3第4参数
	dmb	sy				// 使用dmb sy设置指令屏障
						// MMU off

	mov	x1, #0x20			// x0和x1是传递给__inval_cache_range的参数
	b	__inval_dcache_area		// 此时x0=boot_args, x1=0x20, 作为参数传入。作用:将使该片内存中的cache无效化,原因为bootloader可能使用了cache,在各层级的cache中可能会包含无效的数据,很有必要将其invalidate掉
ENDPROC(preserve_boot_args)
备注:
stp: p 是piar的意思,把一对寄存器写入到右边内存
preserve_boot_args执行完后,uboot传入linux的4个参数被存入到了boot_args[4]中,切无效化了cache。
解释一下adr_l这个宏,该宏的含义是将boot_args标签的物理地址赋值给了x0,即x0 = __pa(boot_args);adr_l宏最终会调用adrp指令,该指令的作用就是将符号地址变为运行时地址,由于此时MMU和cache都是关闭的,而boot_args的标签是虚拟地址(为什么是虚拟地址?事实上vmlinux.lds.S所定义的标签地址都是虚拟地址,因此这个时候,head.s里面的变量/标签所代表的均是虚拟地址),运行时地址,在目前的情况下也就是物理地址,因为MMU还没有打开。
在MMU没有打开的情况下,我们不能直接访问虚拟地址,需要adrp这个指令来获取标签的物理地址。而adrp指令是page对齐的,显然boot_args无法保证这一条件(事实上,它应当是cache_line对齐的),因此ard_l的作用就体现出来了,它并不需要page对齐。
至于dmb sy, ARM文档中,有关于数据访问指令和 data cache指令之间操作顺序的约定。
即,在Inner Non-cacheable 的情况下,所有的data cache instructions执行之前, 除了DC ZVA(cache zeros by Virtual Address. This zeros a block of memory within the cache)之外,都要先执行DMB或者DSB,来保证stp等数据加载指令已经执行完毕。因此,在Non-cacheable的情况下,必须要使用DMB来保证stp指令在dc ivac指令之前执行完成。
el2_setup
ARMv8中有exception level的概念,即EL0~EL3一共4个level。这个概念代替了以往的普通模式、特权模式的定义,也大致延续了ARMv7中的PL0、PL1、PL2的概念,各个level所代表的具体意义可以参见下图(盗图):
即用户态所使用的Application处于特权的最低等级EL0,内核OS的运行则处于EL1层级,EL2则被用于虚拟化的应用,提供Security支持的Seurity Monitor位于EL3。显然,当内核运行到当前时候时,处于EL1层级或者以上,该函数很长,由于还未接触到虚拟化相关的内容,就不全部分析了,留待以后需要的时候再研习。
set_cpu_boot_mode_flag
set_cpu_boot_mode_flag:
	adr_l	x1, __boot_cpu_mode
	cmp	w0, #BOOT_CPU_MODE_EL2
	b.ne	1f
	add	x1, x1, #4
1:	str	w0, [x1]			// This CPU has booted in EL1
	dmb	sy
	dc	ivac, x1			// Invalidate potentially stale cache line
	ret
ENDPROC(set_cpu_boot_mode_flag)
借用大神的描述:由于系统启动之后仍然需要了解cpu启动时候的Exception level(例如判断是否启用hyp mode),因此,有一个全局变量__boot_cpu_mode用来保存启动时候的CPU mode。
__create_page_tables
ARM64的启动过程之(二):创建启动阶段的页表
从bootloader到kernel的时候,MMU是off的(顺带的负作用是无法打开data cache),为了提高性能,加快初始化速度,我们必须某个阶段(越早越好)打开MMU和cache,而在此之前,我们必须要设定好页表。
__cpu_setup
arch\arm64\mm\proc.S
ARM64的启动过程之(三):为打开MMU而进行的CPU初始化
__primary_switch
__primary_switch:
#ifdef CONFIG_RANDOMIZE_BASE
	mov	x19, x0				// preserve new SCTLR_EL1 value
	mrs	x20, sctlr_el1			// preserve old SCTLR_EL1 value
#endif

	bl	__enable_mmu //使能MMU
#ifdef CONFIG_RELOCATABLE
	bl	__relocate_kernel
#ifdef CONFIG_RANDOMIZE_BASE
	ldr	x8, =__primary_switched
	adrp	x0, __PHYS_OFFSET
	blr	x8

	/*
	 * If we return here, we have a KASLR displacement in x23 which we need
	 * to take into account by discarding the current kernel mapping and
	 * creating a new one.
	 */
	pre_disable_mmu_workaround
	msr	sctlr_el1, x20			// disable the MMU
	isb
	bl	__create_page_tables		// recreate kernel mapping

	tlbi	vmalle1				// Remove any stale TLB entries
	dsb	nsh

	msr	sctlr_el1, x19			// re-enable the MMU
	isb
	ic	iallu				// flush instructions fetched
	dsb	nsh				// via old mapping
	isb

	bl	__relocate_kernel
#endif
#endif
	ldr	x8, =__primary_switched
	adrp	x0, __PHYS_OFFSET
	br	x8
ENDPROC(__primary_switch)
使能MMU:ARM64的启动过程之(四):打开MMU
__primary_switched
__primary_switched:
	adrp	x4, init_thread_union
	add	sp, x4, #THREAD_SIZE
	adr_l	x5, init_task
	msr	sp_el0, x5			// Save thread_info

	adr_l	x8, vectors			// load VBAR_EL1 with virtual
	msr	vbar_el1, x8			// vector table address
	isb

	stp	xzr, x30, [sp, #-16]!
	mov	x29, sp

	str_l	x21, __fdt_pointer, x5		// --保存fdt地址到__fdt_pointer中

	ldr_l	x4, kimage_vaddr		// Save the offset between
	sub	x4, x4, x0			// the kernel virtual and
	str_l	x4, kimage_voffset, x5		// physical mappings

	// Clear BSS     --将BSS段清0
	adr_l	x0, __bss_start
	mov	x1, xzr
	adr_l	x2, __bss_stop
	sub	x2, x2, x0
	bl	__pi_memset
	dsb	ishst				// Make zero page visible to PTW

#ifdef CONFIG_KASAN
	bl	kasan_early_init
#endif
#ifdef CONFIG_RANDOMIZE_BASE
	tst	x23, ~(MIN_KIMG_ALIGN - 1)	// already running randomized?
	b.ne	0f
	mov	x0, x21				// pass FDT address in x0
	bl	kaslr_early_init		// parse FDT for KASLR options
	cbz	x0, 0f				// KASLR disabled? just proceed
	orr	x23, x23, x0			// record KASLR offset
	ldp	x29, x30, [sp], #16		// we must enable KASLR, return
	ret					// to __primary_switch()
0:
#endif
	add	sp, sp, #16
	mov	x29, #0
	mov	x30, #0
	b	start_kernel
ENDPROC(__primary_switched)
在__primary_switched最后跳转到start_kernel (init/main.c) C语言入口函数
start_kernel
Linux内核4.14版本:ARM64的内核启动过程——start_kernel_yangguoyu8023的博客-CSDN博客
uboot传入参数dtb解析
(1条消息) Linux设备树详解(四)kernel的解析_奇小葩的博客-CSDN博客
setup_arch -> setup_machine_fdt
    -> early_init_dt_scan
        -> early_init_dt_scan_nodes
            -> of_scan_flat_dt(early_init_dt_scan_chosen, boot_command_line);
/*
    扫描 /chosen node,保存运行时参数(bootargs)到boot_command_line,此外,还通过early_init_dt_check_for_initrd处理initrd相关的property,并保存在initrd_start和initrd_end这两个全局变量中 。其中主要是解析dts的配置为
	chosen {
		bootargs = "earlycon=sprd_serial,0x70100000,115200n8 loglevel=8 console=ttyS1,115200n8 init=/init root=/dev/ram0 rw androidboot.hardware=sc9830";
		linux,initrd-start = <0x85500000>;
		linux,initrd-end = <0x855a3212>;
	};
*/
            -> early_init_dt_scan_root
/*
    扫描根节点,获取 {size,address}-cells信息,并保存在dt_root_size_cells和dt_root_addr_cells全局变量中 ,memory中的reg属性的地址是32位还是64位,大小是用一个32位表示,还是两个32位表示
    扫描DTB中的memory node,并把相关信息保存在meminfo中,全局变量meminfo通过memblock_add保存了系统内存相关的信息
*/
解析的设备树可通过 /proc/device-tree 查看,如:
    sata1: sata@fe220000 {
		compatible = "rockchip,rk-ahci", "snps,dwc-ahci";
		reg = <0 0xfe220000 0 0x1000>;
		clocks = <&cru ACLK_SATA1>, <&cru CLK_PMALIVE1>,
			 <&cru CLK_RXOOB1>, <&cru CLK_PIPEPHY1_REF>,
			 <&cru CLK_PIPEPHY1_PIPE_ASIC_G>;
		clock-names = "sata", "pmalive", "rxoob", "ref", "asic";
		interrupts = <GIC_SPI 274 IRQ_TYPE_LEVEL_HIGH>;
		interrupt-names = "hostc";
		phys = <&combphy1_ps PHY_TYPE_SATA>;
		phy-names = "sata-phy";
		ports-implemented = <0x1>;
		status = "disabled";
	};
root@firefly:/proc/device-tree/sata@fe220000# ll
total 0
drwxr-xr-x   2 root root  0 Jan 13 18:40 ./
drwxr-xr-x 386 root root  0 Jan 13 15:49 ../
-r--r--r--   1 root root 28 Jan 14 18:29 clock-names
-r--r--r--   1 root root 40 Jan 14 18:29 clocks
-r--r--r--   1 root root 31 Jan 14 18:29 compatible
-r--r--r--   1 root root  6 Jan 14 18:29 interrupt-names
-r--r--r--   1 root root 12 Jan 14 18:29 interrupts
-r--r--r--   1 root root  5 Jan 14 18:29 name
-r--r--r--   1 root root  9 Jan 14 18:29 phy-names
-r--r--r--   1 root root  8 Jan 14 18:29 phys
-r--r--r--   1 root root  4 Jan 14 18:29 ports-implemented
-r--r--r--   1 root root 16 Jan 14 18:29 reg
-r--r--r--   1 root root  9 Jan 14 18:29 status

root@firefly:/proc/device-tree/sata@fe220000# hexdump reg -C
00000000  00 00 00 00 fe 22 00 00  00 00 00 00 00 00 10 00  |....."..........|
00000010

root@firefly:/proc/device-tree/sata@fe220000# cat compatible
rockchip,rk-ahcisnps,dwc-ahcir

root@firefly:/proc/device-tree/chosen# ls
bootargs  linux,initrd-end  linux,initrd-start  name
uboot把设备树DTB文件随便放到内存的某一个地方就可以使用,为什么内核运行中,他不会去覆盖DTB所占用的那块内存呢?在设备树文件中,可以使用/memreserve/指定一块内存,这块内存就是保留的内存,内核不会占用它。即使你没有指定这块内存,当我们内核启动时,他也会把设备树所占用的区域保留下来。
do_basic_setup
start_kernel->kernel_init->kernel_init_freeable->do_basic_setup()
static void __init do_basic_setup(void)
{
	cpuset_init_smp();	/*针对SMP系统,初始化内核control group的cpuset子系统。如果非SMP,此函数为空。
						*cpuset是在用户空间中操作cgroup文件系统来执行进程与cpu和进程与内存结点之间的绑定。
						*本函数将cpus_allowed和mems_allwed更新为在线的cpu和在线的内存结点,并为内存热插拨注册了钩子函数,最后创建一个单线程工作队列cpuset。*/
	shmem_init();
	driver_init();		//初始化驱动模型中的各子系统,可见的现象是在/sys中出现的目录和文件
	init_irq_proc();	//在proc文件系统中创建irq目录,并在其中初始化系统中所有中断对应的目录。
	do_ctors();			//调用链接到内核中的所有构造函数,也就是链接进.ctors段中的所有函数。
	usermodehelper_enable();
	do_initcalls();		// 调用所有编译内核的驱动模块中的初始化函数。
driver_init()
/**
 * driver_init - initialize driver model.
 *
 * Call the driver model init functions to initialize their
 * subsystems. Called early from init/main.c.
 */
void __init driver_init(void)
{
	/* These are the core pieces */
	 /* 初始化devtmpfs文件系统,驱动核心设备将在这个文件系统中添加它们的设备节点。
这个文件系统可以由内核在挂载根文件系统之后自动挂载到/dev下,也可以在文件系统的启动脚本中手动挂载。 */
	devtmpfs_init();
	/* 初始化驱动模型中的部分子系统和kobject:
		devices
		dev
		dev/block
		dev/char */
	devices_init();
	buses_init();		//初始化驱动模型中的bus子系统
	classes_init();		//初始化驱动模型中的class子系统
	firmware_init();	//初始化驱动模型中的firmware子系统
	hypervisor_init();	//初始化驱动模型中的hypervisor子系统

	/* These are also core pieces, but must come after the
	 * core core pieces.
	 */
	platform_bus_init();		//初始化驱动模型中的bus/platform子系统
	cpu_dev_init();				//初始化驱动模型中的devices/system/cpu子系统
	//初始化驱动模型中的devices/system/memory子系统虽然从代码上看这样,但是我在实际的系统中并没有找到/sys/devices/system/memory这个目录。
	memory_dev_init();
	container_dev_init();
	of_core_init();
}
do_initcalls()
static void __init do_initcall_level(int level)
{
	initcall_entry_t *fn;

	strcpy(initcall_command_line, saved_command_line);
	parse_args(initcall_level_names[level],
		   initcall_command_line, __start___param,
		   __stop___param - __start___param,
		   level, level,
		   NULL, &repair_env_string);

	trace_initcall_level(initcall_level_names[level]);
	for (fn = initcall_levels[level]; fn < initcall_levels[level+1]; fn++)
		do_one_initcall(initcall_from_entry(fn));
}
static void __init do_initcalls(void)
{
	int level;

	for (level = 0; level < ARRAY_SIZE(initcall_levels) - 1; level++)
		do_initcall_level(level);
}
do_initcalls()这里就是驱动程序员需要关心的步骤,其中按照各个内核模块初始化函数所自定义的启动级别(1~7),按顺序调用器初始化函数。对于同一级别的初始化函数,安装编译是链接的顺序调用,也就是和内核Makefile的编写有关。