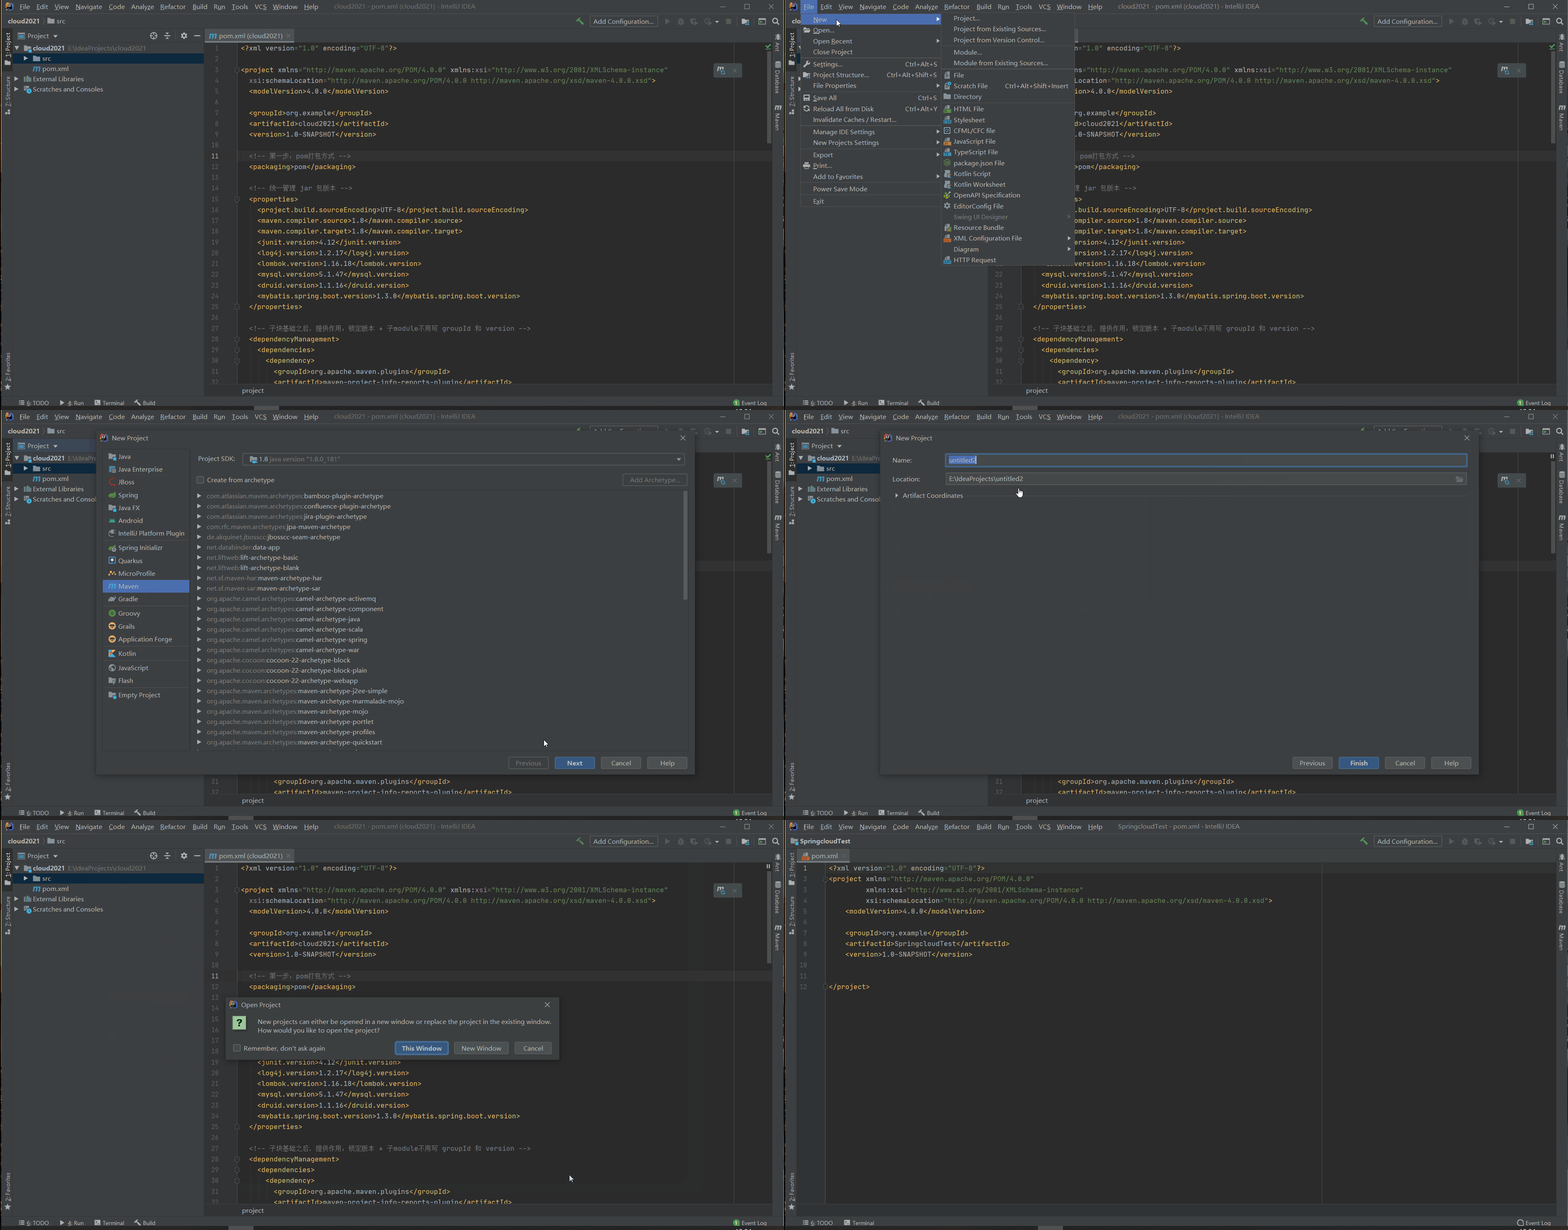
提示:本文包括父工程创建和环境配置,3个子Module为一个简单的订单微服务工程。
新建一个Maven项目
创建一个普通的maven项目

项目处理
- 删除src目录

- 设置File Encoding都为UTF-8

- 激活注解

- 设置版本为8

导入依赖
- pom.xml
<?xml version="1.0" encoding="UTF-8"?>
<project xmlns="http://maven.apache.org/POM/4.0.0"
         xmlns:xsi="http://www.w3.org/2001/XMLSchema-instance"
         xsi:schemaLocation="http://maven.apache.org/POM/4.0.0 http://maven.apache.org/xsd/maven-4.0.0.xsd">
    <modelVersion>4.0.0</modelVersion>

    <groupId>org.example</groupId>
    <artifactId>SpringcloudTest</artifactId>
    <version>1.0-SNAPSHOT</version>
    <!-- 第一步 -->
    <packaging>pom</packaging>

    <!-- 统一管理 jar 包版本 -->
    <properties>
        <project.build.sourceEncoding>UTF-8</project.build.sourceEncoding>
        <maven.compiler.source>1.8</maven.compiler.source>
        <maven.compiler.target>1.8</maven.compiler.target>
        <junit.version>4.12</junit.version>
        <log4j.version>1.2.17</log4j.version>
        <lombok.version>1.16.18</lombok.version>
        <mysql.version>8.0.21</mysql.version>
        <druid.version>1.1.16</druid.version>
        <mybatis.spring.boot.version>1.3.0</mybatis.spring.boot.version>
    </properties>

    <!-- 子块基础之后,提供作用:锁定版本 + 子module不用写 groupId 和 version -->
    <dependencyManagement>
        <dependencies>
            <dependency>
                <groupId>org.apache.maven.plugins</groupId>
                <artifactId>maven-project-info-reports-plugin</artifactId>
                <version>3.0.0</version>
            </dependency>

            <!-- 下面三个基本是微服务架构的标配 -->
            <!--spring boot 2.2.2-->
            <dependency>
                <groupId>org.springframework.boot</groupId>
                <artifactId>spring-boot-dependencies</artifactId>
                <version>2.2.2.RELEASE</version>
                <type>pom</type>
                <scope>import</scope>
            </dependency>
            <!--spring cloud Hoxton.SR1-->
            <dependency>
                <groupId>org.springframework.cloud</groupId>
                <artifactId>spring-cloud-dependencies</artifactId>
                <version>Hoxton.SR1</version>
                <type>pom</type>
                <scope>import</scope>
            </dependency>
            <!--spring cloud 阿里巴巴-->
            <dependency>
                <groupId>com.alibaba.cloud</groupId>
                <artifactId>spring-cloud-alibaba-dependencies</artifactId>
                <version>2.1.0.RELEASE</version>
                <type>pom</type>
                <scope>import</scope>
            </dependency>

            <!--mysql-->
            <dependency>
                <groupId>mysql</groupId>
                <artifactId>mysql-connector-java</artifactId>
                <version>${mysql.version}</version>
                <scope>runtime</scope>
            </dependency>
            <!-- druid-->
            <dependency>
                <groupId>com.alibaba</groupId>
                <artifactId>druid</artifactId>
                <version>${druid.version}</version>
            </dependency>
            <dependency>
                <groupId>org.mybatis.spring.boot</groupId>
                <artifactId>mybatis-spring-boot-starter</artifactId>
                <version>${mybatis.spring.boot.version}</version>
            </dependency>
            <!--junit-->
            <dependency>
                <groupId>junit</groupId>
                <artifactId>junit</artifactId>
                <version>${junit.version}</version>
            </dependency>
            <!--log4j-->
            <dependency>
                <groupId>log4j</groupId>
                <artifactId>log4j</artifactId>
                <version>${log4j.version}</version>
            </dependency>
        </dependencies>
    </dependencyManagement>

    <build>
        <plugins>
            <plugin>
                <groupId>org.springframework.boot</groupId>
                <artifactId>spring-boot-maven-plugin</artifactId>
                <configuration>
                    <fork>true</fork>
                    <addResources>true</addResources>
                </configuration>
            </plugin>
        </plugins>
    </build>
</project>
- maven中的 dependencyManagement 和 dependencies 的区别?
1.dependencyManagement
一般出现在最顶层父工程的pom文件中,我们会看到dependencyManagement元素。通过它来管理jar包的版本,让子项目中引用一个依赖而不用显示的列出版本号。Maven会沿着父子层次向上走,直到找到一个拥有dependencyManagement元素的项目,然后它就会使用在这个dependencyManagement元素中指定的版本号。【注意】dependencyManagement 声明的依赖并没有被导入项目
2. dependencies
管理项目中所有需要导入的依赖
dependencyManagement里只是声明依赖,并不实现引入,因此子项目需要显示的声明需要用的依赖。如果不在子项目中声明依赖,是不会从父项目中继承下来的;只有在子项目中写了该依赖项,并且没有指定具体版本,才会从父项目中继承该项,并且version和scope都读取自父pom;另外如果子项目中指定了版本号,那么会使用子项目中指定的jar版本。
总结:dependencyManagement里只是声明依赖,并不实现引入,因此子项目需要显示的声明需要用的依赖,如果不在子项目中声明依赖,是不会从父项目中继承下来的;只有在子项目中写了该依赖项,并且没有指定具体版本,才会从父项目中继承该项,并且version和scope都读取自父pom。
关于SpringBoot、SpringCloud、SpringCloudAlibaba版本选择
可以根据网站:https://start.spring.io/actuator/info来选择
{
git: {
branch: "f43bda3cdd3be489aa8ce207fb10c6360aeefdd5",
commit: {
id: "f43bda3",
time: "2021-01-20T10:00:44Z"
}
},
build: {
version: "0.0.1-SNAPSHOT",
artifact: "start-site",
versions: {
spring-boot: "2.4.2",
initializr: "0.10.0-SNAPSHOT"
},
name: "start.spring.io website",
time: "2021-01-20T10:04:03.142Z",
group: "io.spring.start"
},
bom-ranges: {
azure: {
2.2.4: "Spring Boot >=2.2.0.RELEASE and <2.3.0.M1",
3.0.0: "Spring Boot >=2.3.0.M1 and <2.4.0-M1"
},
codecentric-spring-boot-admin: {
2.2.4: "Spring Boot >=2.2.0.RELEASE and <2.3.0.M1",
2.3.1: "Spring Boot >=2.3.0.M1 and <2.5.0-M1"
},
solace-spring-boot: {
1.0.0: "Spring Boot >=2.2.0.RELEASE and <2.3.0.M1",
1.1.0: "Spring Boot >=2.3.0.M1 and <2.5.0-M1"
},
solace-spring-cloud: {
1.0.0: "Spring Boot >=2.2.0.RELEASE and <2.3.0.M1",
1.1.1: "Spring Boot >=2.3.0.M1 and <2.5.0-M1"
},
spring-cloud: {
Hoxton.SR9: "Spring Boot >=2.2.0.RELEASE and <2.3.9.BUILD-SNAPSHOT",
Hoxton.BUILD-SNAPSHOT: "Spring Boot >=2.3.9.BUILD-SNAPSHOT and <2.4.0.M1",
2020.0.0-M3: "Spring Boot >=2.4.0.M1 and <=2.4.0.M1",
2020.0.0-M4: "Spring Boot >=2.4.0.M2 and <=2.4.0-M3",
2020.0.0: "Spring Boot >=2.4.0.M4 and <2.4.3-SNAPSHOT",
2020.0.1-SNAPSHOT: "Spring Boot >=2.4.3-SNAPSHOT"
},
spring-cloud-alibaba: {
2.2.1.RELEASE: "Spring Boot >=2.2.0.RELEASE and <2.3.0.M1"
},
spring-cloud-gcp: {
2.0.0: "Spring Boot >=2.4.0-M1 and <2.5.0-M1"
},
spring-cloud-services: {
2.2.6.RELEASE: "Spring Boot >=2.2.0.RELEASE and <2.3.0.RELEASE",
2.3.0.RELEASE: "Spring Boot >=2.3.0.RELEASE and <2.4.0-M1"
},
spring-geode: {
1.2.12.RELEASE: "Spring Boot >=2.2.0.RELEASE and <2.3.0.M1",
1.3.8.RELEASE: "Spring Boot >=2.3.0.M1 and <2.4.0-M1",
1.4.1: "Spring Boot >=2.4.0-M1 and <2.5.0-M1"
},
vaadin: {
14.4.6: "Spring Boot >=2.1.0.RELEASE and <2.5.0-M1"
},
wavefront: {
2.0.2: "Spring Boot >=2.1.0.RELEASE and <2.4.0-M1",
2.1.0-RC1: "Spring Boot >=2.4.0-M1 and <2.4.3-SNAPSHOT",
2.1.0-SNAPSHOT: "Spring Boot >=2.4.3-SNAPSHOT"
}
},
dependency-ranges: {
okta: {
1.4.0: "Spring Boot >=2.2.0.RELEASE and <2.4.0-M1",
1.5.1: "Spring Boot >=2.4.0-M1 and <2.4.1",
2.0.0: "Spring Boot >=2.4.1 and <2.5.0-M1"
},
mybatis: {
2.1.4: "Spring Boot >=2.1.0.RELEASE and <2.5.0-M1"
},
camel: {
3.3.0: "Spring Boot >=2.2.0.RELEASE and <2.3.0.M1",
3.5.0: "Spring Boot >=2.3.0.M1 and <2.4.0-M1",
3.7.0: "Spring Boot >=2.4.0.M1 and <2.5.0-M1"
},
open-service-broker: {
3.1.1.RELEASE: "Spring Boot >=2.2.0.RELEASE and <2.4.0-M1"
}
}
}
Rest微服务工程构建
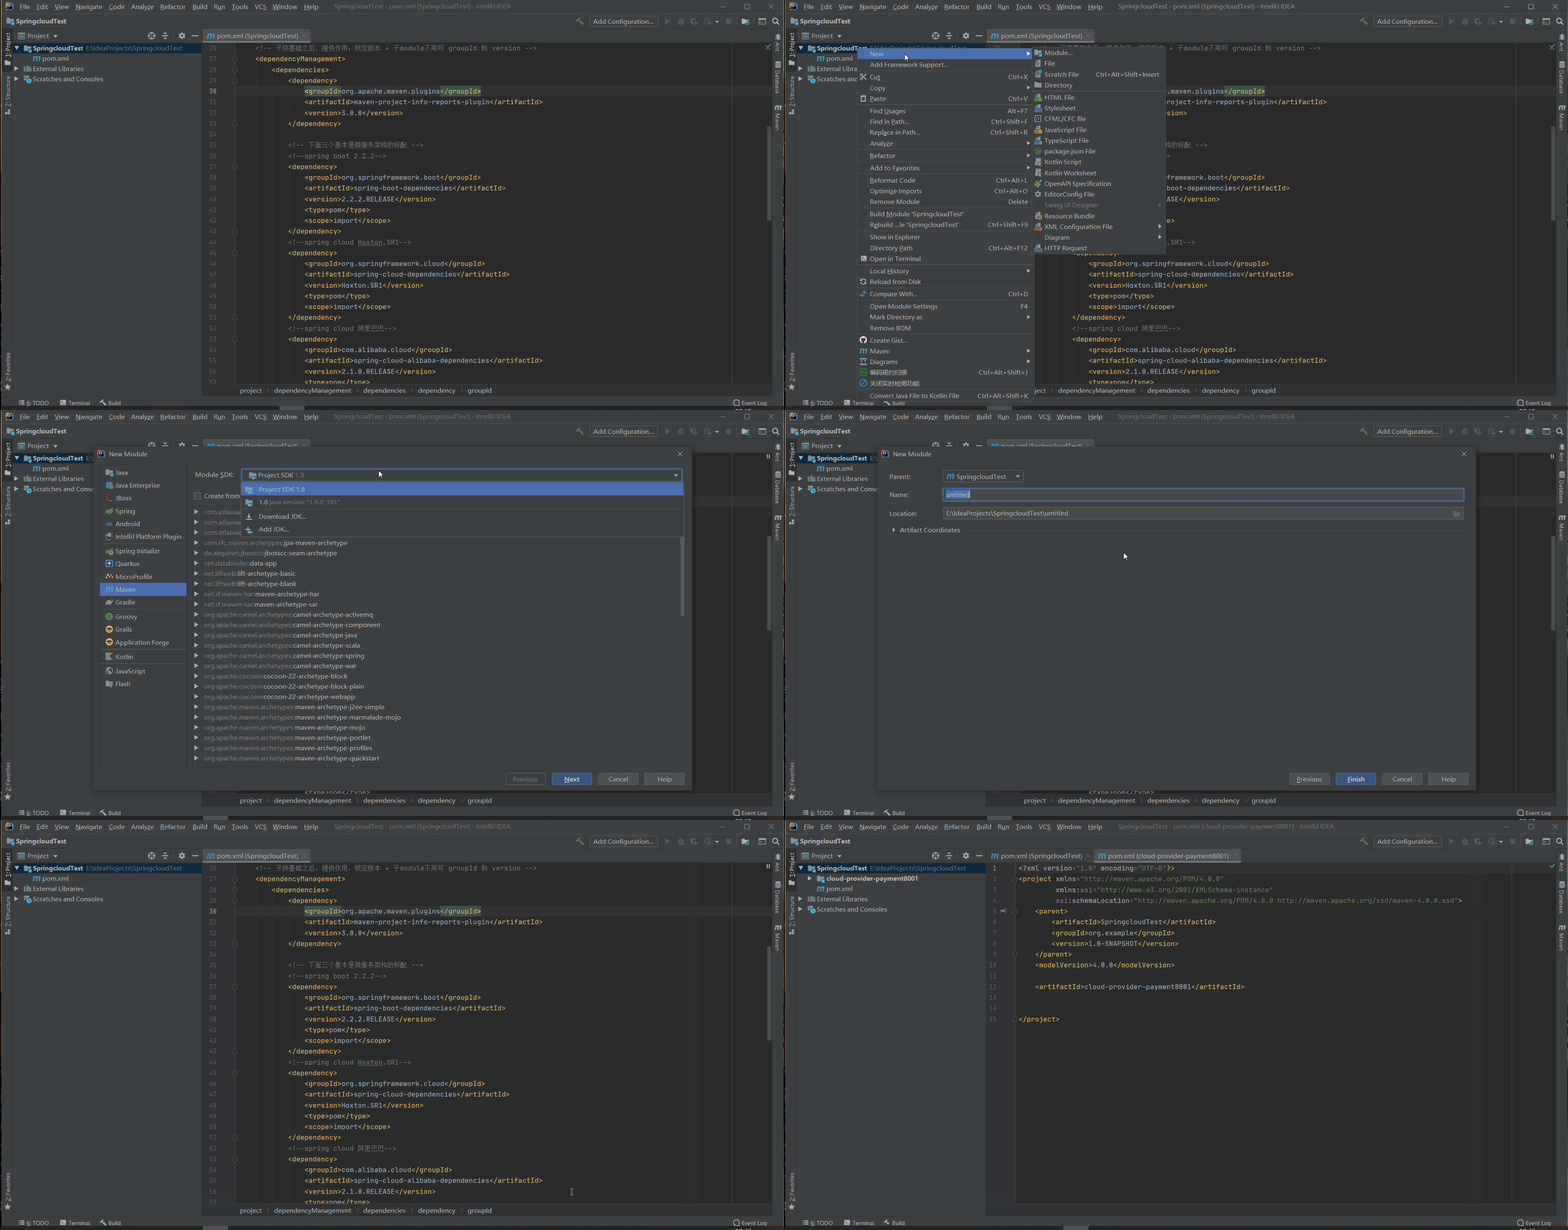
前面环境搭建好了,现在正式搭建微服务工程,以订单系统为例:上面配置的为父工程,在父工程下我需要新建3个Module,分别表示:微服务提供者、微服务消费者以及两者相同部分重构。【下GIF图为创建Module的步骤】
项目大致结构图:
数据库创建
暂时只需要创建一张订单表:
CREATE TABLE `payment`(
`id` BIGINT(20) NOT NULL AUTO_INCREMENT COMMENT 'ID',
`serial` VARCHAR(200) DEFAULT '',
PRIMARY KEY(`id`)
)ENGINE=InnoDB AUTO_INCREMENT=1 DEFAULT CHARSET=utf8
公共部分
- 新建一个Module为普通的Maven项目cloud-api-commons。
- 依赖pom.xml
<?xml version="1.0" encoding="UTF-8"?>
<project xmlns="http://maven.apache.org/POM/4.0.0"
         xmlns:xsi="http://www.w3.org/2001/XMLSchema-instance"
         xsi:schemaLocation="http://maven.apache.org/POM/4.0.0 http://maven.apache.org/xsd/maven-4.0.0.xsd">
    <parent>
        <artifactId>SpringcloudTest</artifactId>
        <groupId>org.example</groupId>
        <version>1.0-SNAPSHOT</version>
    </parent>
    <modelVersion>4.0.0</modelVersion>

    <artifactId>cloud-api-commons</artifactId>
    <dependencies>

        <dependency>
            <groupId>org.projectlombok</groupId>
            <artifactId>lombok</artifactId>
            <optional>true</optional>
        </dependency>

        <!-- https://mvnrepository.com/artifact/cn.hutool/hutool-all -->
        <dependency>
            <groupId>cn.hutool</groupId>
            <artifactId>hutool-all</artifactId>
            <version>5.1.0</version>
        </dependency>
    </dependencies>

</project>
- 在src/main/java下新建包名为
com.gaolang.entities,然后创建两个实体类Payment和CommonResult
Payment 类与数据库表对应
@Data
@AllArgsConstructor
@NoArgsConstructor
public class Payment implements Serializable {
    private Long id;
    private String serial;

}
CommonResult类为了配合前后端发,响应码和信息
@Data
@AllArgsConstructor
@NoArgsConstructor
public class CommonResult<T> {
    private Integer code;
    private String message;
    private T data;

    public CommonResult(Integer code,String message){
        this(code,message,null);
    }
}
- 做完上面的我们需要对这个Maven项目执行
clean和install命令(先clean后install)

微服务提供者
-
新建一个Module为普通的Maven项目cloud-provider-payment8001。
-
导入依赖pom.xml
<?xml version="1.0" encoding="UTF-8"?>
<project xmlns="http://maven.apache.org/POM/4.0.0"
         xmlns:xsi="http://www.w3.org/2001/XMLSchema-instance"
         xsi:schemaLocation="http://maven.apache.org/POM/4.0.0 http://maven.apache.org/xsd/maven-4.0.0.xsd">
    <parent>
        <artifactId>SpringcloudTest</artifactId>
        <groupId>org.example</groupId>
        <version>1.0-SNAPSHOT</version>
    </parent>
    <modelVersion>4.0.0</modelVersion>

    <artifactId>cloud-provider-payment8001</artifactId>
    <dependencies>
         <!--导入公共部分实体类cloud-api-commons-->
        <dependency>
            <groupId>org.example</groupId>
            <artifactId>cloud-api-commons</artifactId>
            <version>${project.version}</version>
        </dependency>

        <dependency>
            <groupId>org.springframework.boot</groupId>
            <artifactId>spring-boot-starter-web</artifactId>
        </dependency>
        <dependency>
            <groupId>org.springframework.boot</groupId>
            <artifactId>spring-boot-starter-actuator</artifactId>
        </dependency>
        <dependency>
            <groupId>org.mybatis.spring.boot</groupId>
            <artifactId>mybatis-spring-boot-starter</artifactId>
        </dependency>
        <dependency>
            <groupId>com.alibaba</groupId>
            <artifactId>druid-spring-boot-starter</artifactId>
            <version>1.1.10</version>
        </dependency>
        <!--mysql-connector-java-->
        <dependency>
            <groupId>mysql</groupId>
            <artifactId>mysql-connector-java</artifactId>
        </dependency>
        <!--jdbc-->
        <dependency>
            <groupId>org.springframework.boot</groupId>
            <artifactId>spring-boot-starter-jdbc</artifactId>
        </dependency>
        <dependency>
            <groupId>org.projectlombok</groupId>
            <artifactId>lombok</artifactId>
            <optional>true</optional>
        </dependency>
        <dependency>
            <groupId>org.springframework.boot</groupId>
            <artifactId>spring-boot-starter-test</artifactId>
            <scope>test</scope>
        </dependency>
    </dependencies>

</project>
- 在resource目录下新建一个application.yml配置文件【设置端口、数据库、mybatis】
server:
  port: 8001

spring:
  application:
    name: cloud-provider-payment8001
  datasource:
    type: com.alibaba.druid.pool.DruidDataSource
    driver-class-name: com.mysql.cj.jdbc.Driver
    url: jdbc:mysql://localhost:3306/test?serverTimezone=UTC&useUnicode=true&characterEncoding=utf8&useSSL=false
    username: root
    password: 123456
mybatis:
  mapper-locations: classpath:mapper/*.xml
  type-aliases-package: com.gaolang.entities  # 所有Entity 别名类所在包
- SpringBoot的启动类,在在src/main/java下新建包名为
com.gaolang,然后创建一个PaymentMain8001类
@SpringBootApplication
public class PaymentMain8001 {
    public static void main(String[] args) {
        SpringApplication.run(PaymentMain8001.class,args);
    }
}
- dao层:在src/main/java下新建包名为
com.gaolang.dao,然后创建一个PaymentDao的接口。
@Repository
@Mapper
public interface PaymentDao {
    /**
     *  增加订单操作
     * @param payment  增加的订单
     * @return int
     */
    public int create(Payment payment);

    /**
     *  根据ID查询订单
     * @param id id号
     * @return 订单
     */
    public Payment getPaymentById(@Param("id") Long id);
}
对应在resource/mapper目录下建一个PaymentMapper.xml
<?xml version="1.0" encoding="UTF-8" ?>
<!DOCTYPE mapper
        PUBLIC "-//mybatis.org//DTD Mapper 3.0//EN"
        "http://mybatis.org/dtd/mybatis-3-mapper.dtd">
<!--namespace=绑定一个对应的dao接口/mapper接口-->
<mapper namespace="com.gaolang.dao.PaymentDao">

    <insert id="create" parameterType="Payment" useGeneratedKeys="true" keyProperty="id">
        insert into payment(serial) values (#{serial});
    </insert>

    <select id="getPaymentById" parameterType="Long" resultType="Payment">
        select * from payment where id = #{id};
    </select>

</mapper>
- service层:调用dao层,在src/main/java下新建包名为
com.gaolang.service,然后创建一个PaymentService的接口和实现类PaymentServiceImpl。
PaymentService
public interface PaymentService {
    /**
     *  增加订单操作
     * @param payment  增加的订单
     * @return int
     */
    public int create(Payment payment);

    /**
     *  根据ID查询订单
     * @param id id号
     * @return 订单
     */
    public Payment getPaymentById(@Param("id") Long id);
}
PaymentServiceImpl
@Service
public class PaymentServiceImpl implements PaymentService{

    @Autowired
    private PaymentDao paymentDao;

    @Override
    public int create(Payment payment) {
        return paymentDao.create(payment);
    }

    @Override
    public Payment getPaymentById(Long id) {
        return paymentDao.getPaymentById(id);
    }
}
- controller层:调用service层,在src/main/java下新建包名为
com.gaolang.controller,然后创建一个PaymentController类
@RestController
@Slf4j
public class PaymentController {

    @Autowired
    private PaymentService paymentService;

    @PostMapping(value = "/payment/create")
    public CommonResult create(@RequestBody Payment payment){

        int result = paymentService.create(payment);
        log.info("====插入结果:  "+result);

        if (result > 0){
            return new CommonResult(200,"数据库插入成功",result);
        }else {
            return new CommonResult(444,"数据库插入失败",null);
        }
    }

    @GetMapping(value = "/payment/{id}")
    public CommonResult getPaymentById(@PathVariable("id") Long id){
        Payment result = paymentService.getPaymentById(id);
        log.info("****查询结果:" + result);
        if(result != null){
            return new CommonResult(200, "查询成功", result);
        }
        return new CommonResult(444, "没有对应id的记录", null);
    }
}
- 运行启动类PaymentMain8001,进行测试,在数据库中插入一条id为1的数据,访问:http://localhost:8001/payment/1

微服务消费者
-
新建一个Module为普通的Maven项目cloud-customer-order80。
-
导入依赖pom.xml
<?xml version="1.0" encoding="UTF-8"?>
<project xmlns="http://maven.apache.org/POM/4.0.0"
         xmlns:xsi="http://www.w3.org/2001/XMLSchema-instance"
         xsi:schemaLocation="http://maven.apache.org/POM/4.0.0 http://maven.apache.org/xsd/maven-4.0.0.xsd">
    <parent>
        <artifactId>SpringcloudTest</artifactId>
        <groupId>org.example</groupId>
        <version>1.0-SNAPSHOT</version>
    </parent>
    <modelVersion>4.0.0</modelVersion>

    <artifactId>cloud-customer-order80</artifactId>

    <dependencies>
        <dependency>
            <groupId>org.example</groupId>
            <artifactId>cloud-api-commons</artifactId>
            <version>${project.version}</version>
        </dependency>

        <dependency>
            <groupId>org.springframework.boot</groupId>
            <artifactId>spring-boot-starter-web</artifactId>
        </dependency>
        <dependency>
            <groupId>org.springframework.boot</groupId>
            <artifactId>spring-boot-starter-actuator</artifactId>
        </dependency>

        <dependency>
            <groupId>org.projectlombok</groupId>
            <artifactId>lombok</artifactId>
            <optional>true</optional>
        </dependency>
        <dependency>
            <groupId>org.springframework.boot</groupId>
            <artifactId>spring-boot-starter-test</artifactId>
            <scope>test</scope>
        </dependency>
    </dependencies>
</project>
- 在resource目录下新建一个application.yml配置文件【设置端口】
server:
  port: 80
- SpringBoot的启动类,在在src/main/java下新建包名为
com.gaolang,然后创建一个OrderMain80类
@SpringBootApplication
public class OrderMain80 {
    public static void main(String[] args) {
        SpringApplication.run(OrderMain80.class,args);
    }
}
- config层:配置RestTemplate,新建一个ApplicationContextConfig类
@Configuration
public class ApplicationContextConfig {
    @Bean
    public RestTemplate getRestTemplate(){
        return new RestTemplate();
    }
}
- controller层:新建一个OrderController类
@RestController
@Slf4j
public class OrderController {

    public static final String PAYMENT_URL = "http://localhost:8001";

    @Autowired
    private RestTemplate restTemplate;

    @PostMapping("customer/payment/create")
    public CommonResult<Payment> create (Payment payment){
        /**
         param1 请求地址,param2 请求参数, param3 返回类型
         */
        return restTemplate.postForObject(PAYMENT_URL + "/payment/create", payment, CommonResult.class);
    }

    @GetMapping("customer/payment/{id}")
    public CommonResult<Payment> getPaymentById(@PathVariable("id")Long id){
        return restTemplate.getForObject(PAYMENT_URL + "/payment/" + id, CommonResult.class);
    }
}
- 运行启动进行测试:访问 localhost/customer/payment/create?serial=100001

项目结构图

小结
6个步骤
- 建Module
- 改pom
- 写YML
- 主启动类
- 业务类
- 测试