通过使用 自定义 parser 替代特定的 webpack loader,可以将任何 toml、yaml 或 json5 文件作为 JSON 模块导入。
在 src 文件夹下创建一个 data.toml、一个 data.yaml 以及一个 data.json5 文件:
data.toml
src/data.toml文件:
title = "This is a TOML Example"

[owner]
name = "Tom"
organization = "GitHub"
bio = "This bio"
dob = 1979-05-27T07:32:00Z
data.yaml
src/data.yaml:
title: This is a YAML Example
owner:
  name: Tom
  organization: GitHub
  bio: |-
    Gitgit
    Likes tater tots and beer.
  dob: 1979-05-27T07:32:00.000Z
data.json5
src/data.json5:
{
  // comment
  title: "This is a JSON5 Example",
  owner: {
    name: "Tom Preston-Werner",
    organization: "GitHub",
    bio: "Git git is\n\
    Likes tater tots and beer.",
    dob: "1979-05-27T07:32:00.000Z"
  }
}
项目结构
在项目中添加 了上面的三个文件,此时项目结构:
  webpack-demo
  |- package.json
  |- package-lock.json
  |- webpack.config.js
  |- /dist
    |- bundle.js
    |- index.html
  |- /src
   |- data.xml
   |- data.csv
   |- data.toml
   |- data.yaml
   |- data.json5
   |- OPPOSans-B.ttf
   |- OPPOSans-H.ttf
   |- logo.png
   |- icon.png
   |- style.css
   |- index.js
  |- /node_modules
安装 toml,yamljs 和 json5 的 packages:
npm install toml yamljs json5 --save-dev
安装完成:

webpack.config.js
并在 webpack 中进行配置:
webpack.config.js:
const path = require('path')
const toml = require('toml');
const yaml = require('yamljs');
const json5 = require('json5');

module.exports = {
  entry: './src/index.js',
  output: {
    filename: 'bundle.js',
    path: path.resolve(__dirname, 'dist')
  },
  module: {
    rules: [
      {
        test: /\.css$/i,
        use: ['style-loader', 'css-loader'],
      },
      {
        test: /\.(png|svg|jpg|jpeg|gif)$/i,
        type: 'asset/resource'
      },
      {
        test: /\.(woff|woff2|eot|ttf|otf)$/i,
        type: 'asset/resource'
      },
      {
        test: /\.(csv|tsv)$/i,
        use: ['csv-loader']
      },
      {
        test: /\.xml$/i,
        use: ['xml-loader']
      },
      {
        test: /\.toml$/i,
        type: 'json',
        parser: {
          parse: toml.parse,
        }
      },
      {
        test: /\.yaml$/i,
        type: 'json',
        parser: {
          parse: yaml.parse,
        }
      },
      {
        test: /\.json5$/i,
        type: 'json',
        parser: {
          parse: json5.parse,
        }
      }
    ]
  }
}
修改src/index.js:
import _ from 'lodash';
import './style.css'
import Logo from './logo.png'
import Data from './data.xml';
import Notes from './data.csv';
import toml from './data.toml';
import yaml from './data.yaml';
import json from './data.json5';
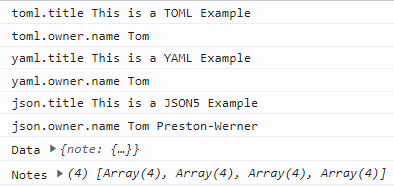
console.log('toml.title', toml.title);
console.log('toml.owner.name', toml.owner.name);
console.log('yaml.title', yaml.title);
console.log('yaml.owner.name', yaml.owner.name);
console.log('json.title', json.title);
console.log('json.owner.name', json.owner.name);
function component () {
const element = document.createElement('div');
// lodash 在当前 script 中使用 import 引入
element.innerHTML = _.join(['Hello', 'webpack'], ' ');
element.classList.add('hello');
// 将图像添加到div中
const myLogo = new Image();
myLogo.src = Logo;
element.appendChild(myLogo);
console.log('Data', Data);
console.log('Notes', Notes);
return element;
}
document.body.appendChild(component());
执行 npm run build 命令:

然后,打开 dist/index.html,打开控制台: