本项目博客总结:【前端】Vue项目:旅游App-博客总结
目标
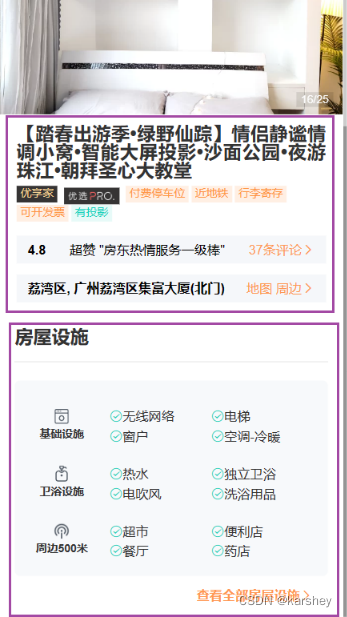
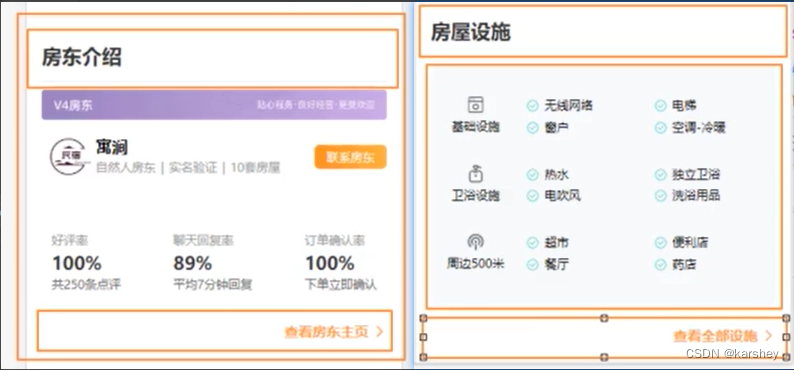
第一个框是房屋信息info,第二个框是房屋设施facility。
过程与代码
房屋信息部分info
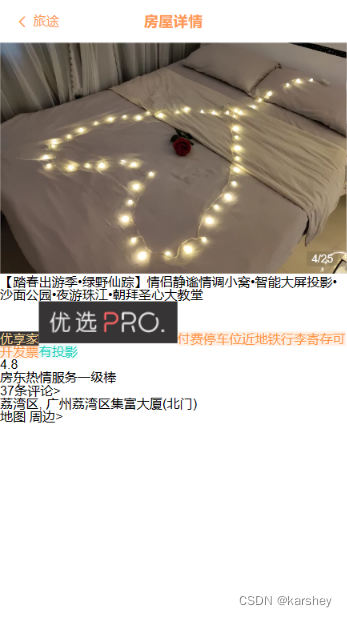
目标是这样:

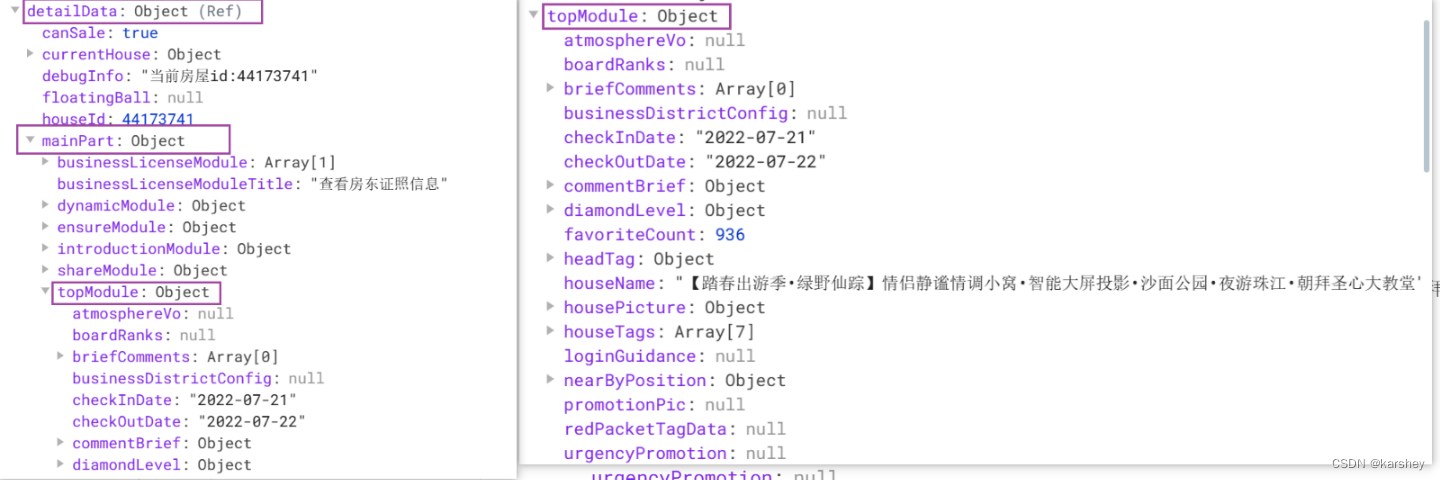
目标数据在整个页面数据的位置:
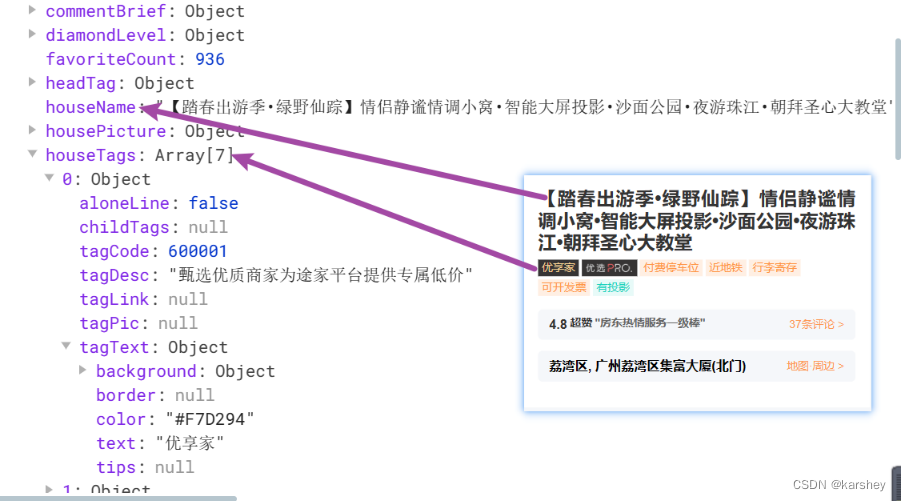
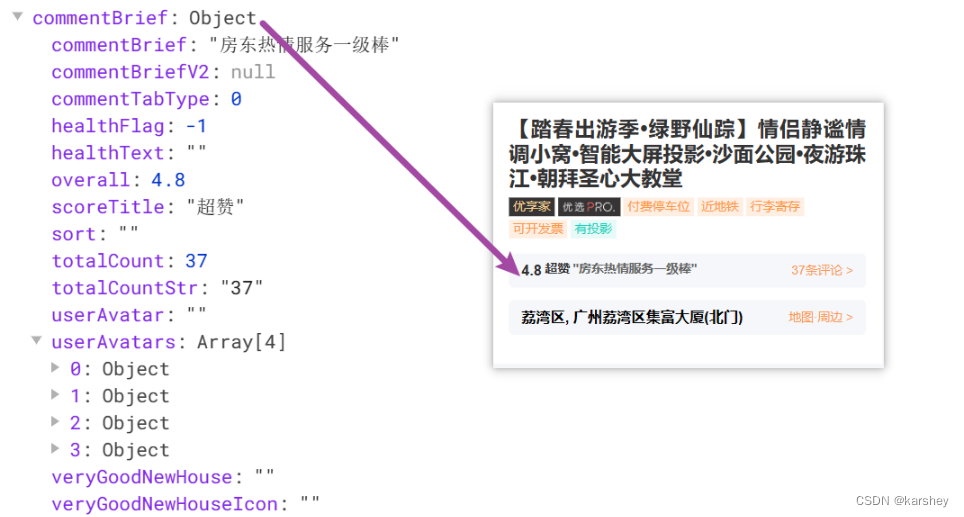
数据的对应:
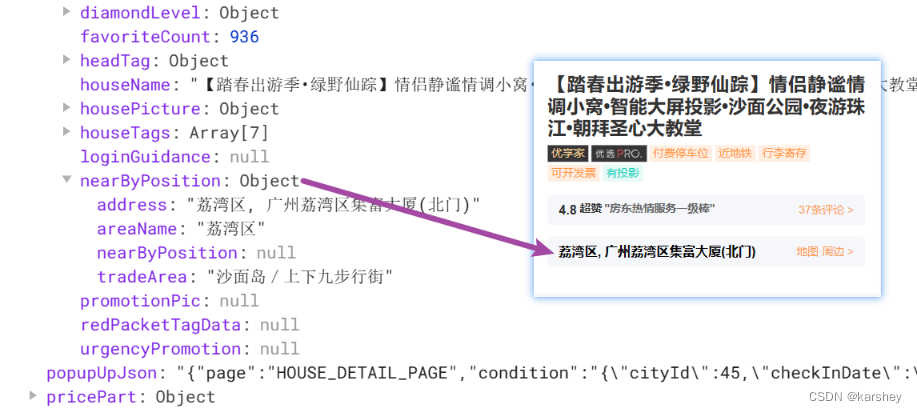
因此,我们需要给组件传数据:
detailData.mainPart.topModule
detail.vue:
 <!-- 标题 -->
 <div class="info" v-if="detailData.mainPart">
     <detailInfo :house-info="detailData.mainPart.topModule"/>
 </div>
detail-info对数据的定义:
const props = defineProps({
    houseInfo: {
        type: Object,
        default: () => { }
    }
})
根据目标搭建结构:
<template>
    <div class="info">
        <div class="name">{{ props.houseInfo.houseName }}</div>

        <div class="tag">
            <template v-for="(item,index) in houseTags" :key="index">
                <!-- 注意,有的房屋详情可能没有tagText -->
                <span class="item1" v-if="item.tagText" :style="{ color:  item.tagText.color ,background:item.tagText.background.color }">{{ item.tagText.text }}</span>
                <span class="item1" v-else>
                    <img :src="item.tagPic" alt="">
                </span>
            </template>
        </div>

        <div class="comment item2">
            <div class="score">{{ commentBrief.overall }}</div>
            <div class="content">{{ commentBrief.commentBrief }}</div>
            <div class="more">{{ commentBrief.totalCount }}条评论></div>
        </div>

        <div class="location item2">
            <div class="content">{{ nearByPosition.address }}</div>
            <div class="more">地图 周边></div>
        </div>
    </div>
</template>

<script setup>
const props = defineProps({
    houseInfo: {
        type: Object,
        default: () => { }
    }
})

const houseTags = props.houseInfo.houseTags
const commentBrief=props.houseInfo.commentBrief
const nearByPosition=props.houseInfo.nearByPosition

</script>

<style lang="less" scoped>

</style>
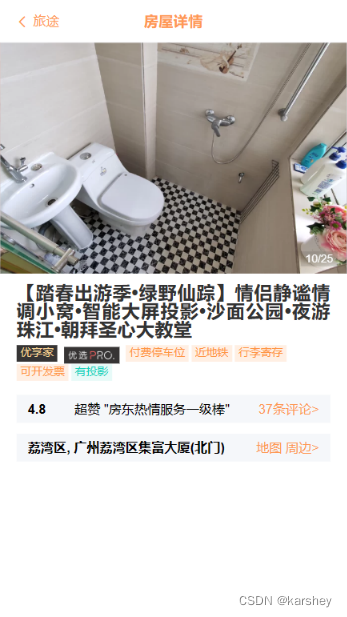
效果:
加入样式:
.info {
    .name {
        color: #333;
        font-size: 20px;
        font-weight: 700;
        text-align: justify;
        margin-bottom: 6px;
        letter-spacing: 0.3px;
    }

    .tag {

        display: flex;
        flex-wrap: wrap;

        .item1 {
            height: 14px;
            margin: 0 3px 3px 0;
            padding: 2px 4px;
            font-size: 12px;

            img {
                height: 18px;
            }
        }
    }

    .item2{
        display: flex;
        align-items: center;
        justify-content: space-between;

        margin: 12px 0;
        padding: 8px 12px;
        background-color: #f5f7fa;


        .score{
            font-weight: 700;
        }
        .address{
            font-weight: 700;
        }
        .more{
            color: var(--primary-color);
        }

    }
}
效果:
相似结构的组件section
接下来要做的内容如下:
显然,它们的结构是相似的,可以把它们抽取为一个组件,中间不同的地方是插槽slot。
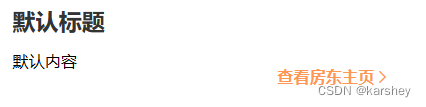
此组件的结构和样式代码:
<template>
    <div class="section">
        <div class="header">
            <h2 class="title">{{ headerText }}</h2>
        </div>
        <div class="content">
            <slot>默认内容</slot>
        </div>
        <div class="footer" v-if="moreText.length">
            {{ moreText }}
            <van-icon name="arrow" />
        </div>
    </div>
</template>

<script setup>
defineProps({
    headerText: {
        Object: String,
        default: "默认标题"
    },
    moreText: {
        Object: String,
        default: ""
    }
})
</script>

<style lang="less" scoped>
.section {
    margin-top: 10px;
    padding: 0 16px;

    .header {
        height: 52px;
        line-height: 52px;

        h2 {
            color: #333;
            font-size: 20px;
            font-weight: 600;
        }
    }

    .footer{
        display: flex;
        justify-content: flex-end;
        align-items: center;

        padding: 0 16px;
        color: var(--primary-color);
        font-weight: 600;
    }
}
</style>
效果:
房屋设施facility
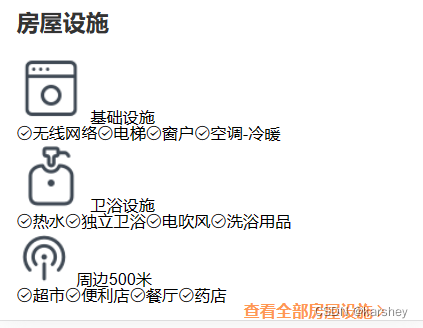
目标:
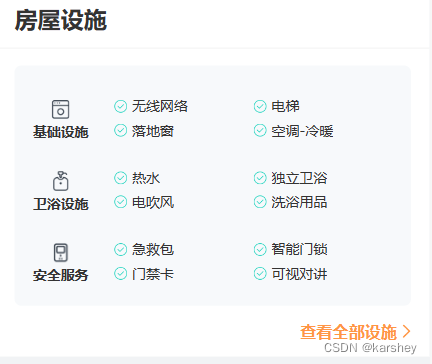
根据前面组件section代码可知,我们只需要写content的内容,至于header和footer,只需要传入数据即可。
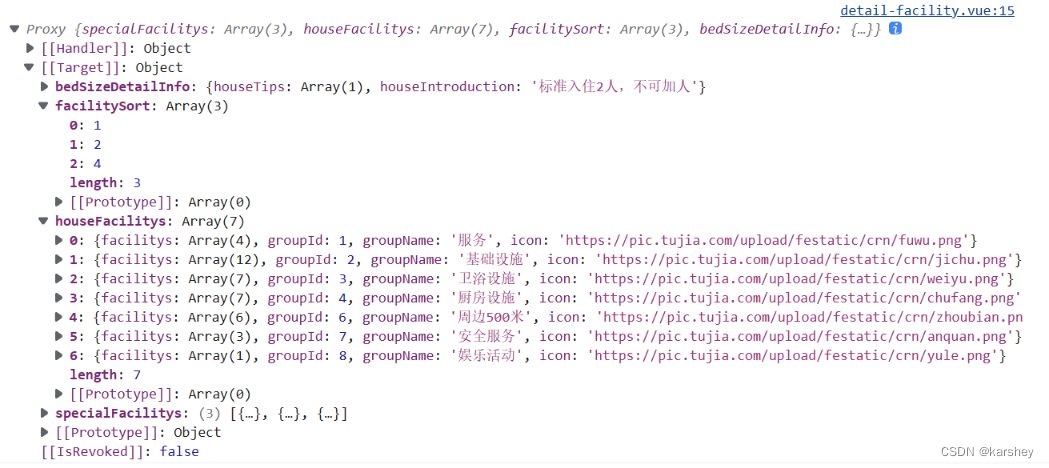
分析一下数据:框起来的是我们要显示的数据。
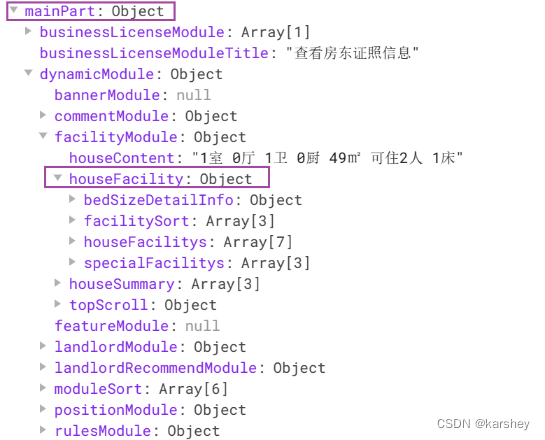
具体显示情况:要显示houseFacilitys[facilitySort]中数据。

<!-- 内容 -->
<detailSection :header-text="'房屋设施'" :more-text="'全部房屋设施'">
    <!-- 插槽内容 -->
    <detailFacility :houseFacility="detailData.mainPart.dynamicModule.facilityModule.houseFacility" />
</detailSection>
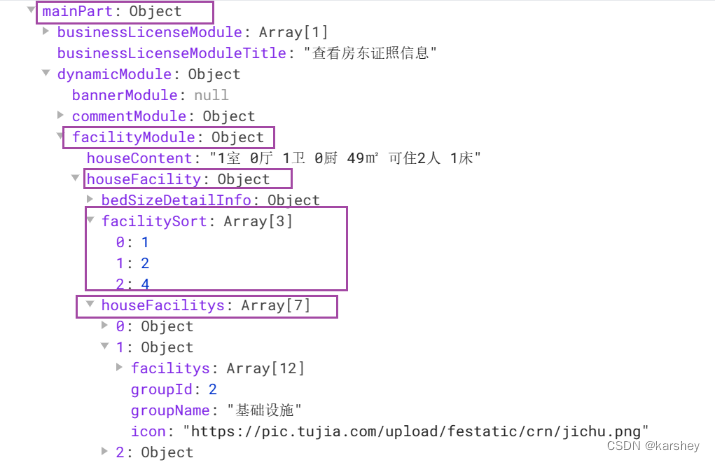
把传给facility组件的对象打印出来:
接下来就是根据数据搭建html结构:
<template>
    <div class="facility">
        <template v-for="(itemIndex, index) in facilitySort" :key="index">
            <div class="item1">
                <!-- 左侧title -->
                <div class="groupName">
                    <img :src="houseFacilitys[itemIndex].icon" alt="">
                    {{ houseFacilitys[itemIndex].groupName }}
                </div>
                <div class="nameList">
                    <!-- 右侧最多四个name -->
                    <template v-for="(item, indexx) in houseFacilitys[itemIndex].facilitys.slice(0, 4)" :key="indexx">
                        <van-icon name="passed" />{{ item.name }}
                    </template>
                </div>
            </div>
        </template>
    </div>
</template>

<script setup>
const props = defineProps({
    houseFacility: {
        type: Object,
        default: () => ({})
    }
})

const facilitySort = props.houseFacility.facilitySort
const houseFacilitys = props.houseFacility.houseFacilitys


</script>

<style lang="less" scoped>

</style>
效果:
注意:数据中右边的每个小item最多只有4个,因此要把要循环的数组先切割为只有4个的:
<template v-for="(item, indexx) in houseFacilitys[itemIndex].facilitys.slice(0,4)" :key="indexx">
加样式:
detail-facility:
.facility {
    background-color: #f7f9fb;
    color: #333;
    padding: 5px 16px 20px;
    border-radius: 6px;

    .item1 {
        display: flex;
        align-items: center;
        margin-top: 20px;

        .left {
            display: flex;
            flex-direction: column;
            align-items: center;
            width: 70px;

            .groupName {
                font-weight: 600;
                font-size: 11px;
                margin-top: 3px;
            }


            img {
                width: 20px;
                height: 20px;
            }
        }

        .nameList {
            display: grid;
            grid-template-columns: auto auto ;
            grid-template-rows: auto auto;
            margin-left: 17px;

            .item2 {
                width: 110px;
                height: 14px;

                margin-top: 7px;
            }
        }
    }
}
detail-section:
.section {
    margin-top: 10px;
    padding: 0 16px;

    .header {
        height: 52px;
        line-height: 52px;
        border-bottom: 1px solid  #DCDCDC;

        h2 {
            color: #333;
            font-size: 20px;
            font-weight: 600;
        }
    }

    .content{

        margin-top: 20px;
    }

    .footer{
        display: flex;
        justify-content: flex-end;
        align-items: center;

        padding: 15px 16px;
        color: var(--primary-color);
        font-weight: 600;
    }
}
效果:
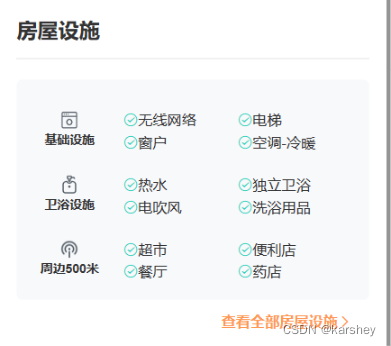
效果

总代码
修改或添加的文件
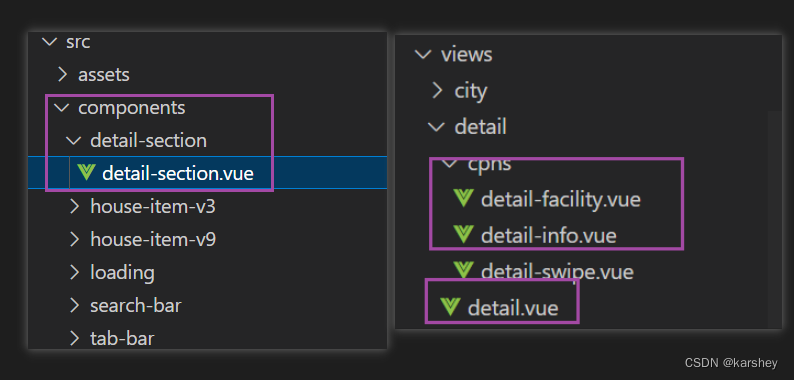
detail-section
将有相似结构的内容抽取出来,不同的部分用插槽实现。
<template>
    <div class="section">
        <div class="header">
            <h2 class="title">{{ headerText }}</h2>
        </div>
        <div class="content">
            <slot>默认内容</slot>
        </div>
        <div class="footer" v-if="moreText.length">
            查看{{ moreText }}
            <van-icon name="arrow" />
        </div>
    </div>
</template>

<script setup>
defineProps({
    headerText: {
        Object: String,
        default: "默认标题"
    },
    moreText: {
        Object: String,
        default: ""
    }
})
</script>

<style lang="less" scoped>
.section {
    margin-top: 10px;
    padding: 0 16px;

    .header {
        height: 52px;
        line-height: 52px;
        border-bottom: 1px solid  #DCDCDC;

        h2 {
            color: #333;
            font-size: 20px;
            font-weight: 600;
        }
    }

    .content{

        margin-top: 20px;
    }

    .footer{
        display: flex;
        justify-content: flex-end;
        align-items: center;

        padding: 15px 16px;
        color: var(--primary-color);
        font-weight: 600;
    }
}
</style>
detail-facility
插槽:房屋设施 这一内容组件。
<template>
    <div class="facility">
        <template v-for="(itemIndex, index) in facilitySort" :key="index">
            <div class="item1">
                <!-- 左侧title -->
                <div class="left">
                    <img :src="houseFacilitys[itemIndex].icon" alt="">
                    <div class="groupName">{{ houseFacilitys[itemIndex].groupName }}</div>
                </div>
                <div class="nameList">
                    <!-- 右侧最多四个name -->
                    <template v-for="(item, indexx) in houseFacilitys[itemIndex].facilitys.slice(0, 4)" :key="indexx">
                        <div class="item2">
                            <van-icon name="passed" color="#17d2bc" />{{ item.name }}
                        </div>
                    </template>
                </div>
            </div>
        </template>
    </div>
</template>

<script setup>
const props = defineProps({
    houseFacility: {
        type: Object,
        default: () => ({})
    }
})

const facilitySort = props.houseFacility.facilitySort
const houseFacilitys = props.houseFacility.houseFacilitys


</script>

<style lang="less" scoped>
.facility {
    background-color: #f7f9fb;
    color: #333;
    padding: 5px 16px 20px;
    border-radius: 6px;

    .item1 {
        display: flex;
        align-items: center;
        margin-top: 20px;

        .left {
            display: flex;
            flex-direction: column;
            align-items: center;
            width: 70px;

            .groupName {
                font-weight: 600;
                font-size: 11px;
                margin-top: 3px;
            }


            img {
                width: 20px;
                height: 20px;
            }
        }

        .nameList {
            display: grid;
            grid-template-columns: auto auto ;
            grid-template-rows: auto auto;
            margin-left: 17px;

            .item2 {
                width: 110px;
                height: 14px;

                margin-top: 7px;
            }
        }
    }
}
</style>
detail-info
房屋信息。
<template>
    <div class="info">
        <div class="name">{{ props.houseInfo.houseName }}</div>

        <div class="tag">
            <template v-for="(item, index) in houseTags" :key="index">
                <!-- 注意,有的房屋详情可能没有tagText -->
                <span class="item1" v-if="item.tagText"
                    :style="{ color: item.tagText.color, background: item.tagText.background.color }">{{
                        item.tagText.text
                    }}</span>
                <span class="item1" v-else>
                    <img :src="item.tagPic" alt="">
                </span>
            </template>
        </div>

        <div class="comment item2">
            <div class="score">{{ commentBrief.overall }}</div>
            <div class="content">{{ commentBrief.scoreTitle }}   "{{ commentBrief.commentBrief }}"</div>
            <div class="more">{{ commentBrief.totalCount }}条评论<van-icon name="arrow" /></div>
        </div>

        <div class="location item2">
            <div class="address">{{ nearByPosition.address }}</div>
            <div class="more">地图 周边<van-icon name="arrow" /></div>
        </div>
    </div>
</template>

<script setup>
const props = defineProps({
    houseInfo: {
        type: Object,
        default: () => { }
    }
})

const houseTags = props.houseInfo.houseTags
const commentBrief = props.houseInfo.commentBrief
const nearByPosition = props.houseInfo.nearByPosition

</script>

<style lang="less" scoped>
.info {
    .name {
        color: #333;
        font-size: 20px;
        font-weight: 700;
        text-align: justify;
        margin-bottom: 6px;
        letter-spacing: 0.3px;
    }

    .tag {

        display: flex;
        flex-wrap: wrap;

        .item1 {
            height: 14px;
            margin: 0 3px 3px 0;
            padding: 2px 4px;
            font-size: 12px;

            img {
                height: 18px;
            }
        }
    }

    .item2{
        display: flex;
        align-items: center;
        justify-content: space-between;

        margin: 12px 0;
        padding: 8px 12px;
        background-color: #f5f7fa;


        .score{
            font-weight: 700;
        }
        .address{
            font-weight: 700;
        }
        .more{
            color: var(--primary-color);
        }

    }


}
</style>
detail
整个detail页面。
<template>
    <div class="detail top-page">
        <!-- 返回上级的导航栏 -->
        <van-nav-bar title="房屋详情" left-text="旅途" left-arrow @click-left="onClickLeft" />


        <div class="main" v-if="detailData.mainPart">
            <!-- 轮播图 -->
            <detailSwipe :swipe-data="detailData.mainPart.topModule.housePicture.housePics" />
            <!-- 标题 -->
            <div class="info">
                <detailInfo :house-info="detailData.mainPart.topModule" />
            </div>
            <!-- 内容 -->
            <detailSection :header-text="'房屋设施'" :more-text="'全部房屋设施'">
                <!-- 插槽内容 -->
                <detailFacility :houseFacility="detailData.mainPart.dynamicModule.facilityModule.houseFacility" />
            </detailSection>
        </div>

    </div>
</template>

<script setup>
import useDetailStore from '@/store/modules/detail';
import detailSwipe from '../detail/cpns/detail-swipe.vue'
import detailInfo from './cpns/detail-info.vue';
import detailSection from '@/components/detail-section/detail-section.vue';
import detailFacility from './cpns/detail-facility.vue';

import { useRoute } from 'vue-router';
import { storeToRefs } from 'pinia';

// const
const detailStore = useDetailStore()
const route = useRoute()

// 返回导航栏
const onClickLeft = () => history.back();

// houseId
const houseId = route.params.id

// store
detailStore.fetchDetailData(houseId)
const { detailData } = storeToRefs(detailStore)
</script>

<style lang="less" scoped>
.detail {

    .info {
        margin: 9px;
    }
}
</style>
参考
vue 静态/动态绑定style的几种方式【Vue】
CSS text-align 属性 (w3school.com.cn)
CSS 文字间距 (w3school.com.cn)
Flex 布局语法教程 | 菜鸟教程 (runoob.com)
彻底搞懂slot插槽,图文详解 - 简书 (jianshu.com)
CSS 网格布局 | 菜鸟教程 (runoob.com)