简介
因工作中需要对接物联网设备,设备数据的上传和下发都需要不同的连接账号作为topic。因此采用mqtt+mysql的方式,动态的维护mqtt的账号。
一、安装依赖
yum install openssl-devel
yum install gcc-c++
yum install mysql-devel

rpm --import https://repo.mysql.com/RPM-GPG-KEY-mysql-2022
二、下载压缩包
下载安装包到 /home/mosquitto/
mosquitto下载(1.6.10)
mosquitto-auth-plug下载
三、安装mosquitto
cd /home/mosquitto/
tar -zxvf  mosquitto-1.6.10.tar.gz
cd /mosquitto-1.6.10
make
mosquitto安装完毕
四、安装mosquitto-auth-plug-master
cd ..
cd /mosquitto-auth-plug-master
make
报错:
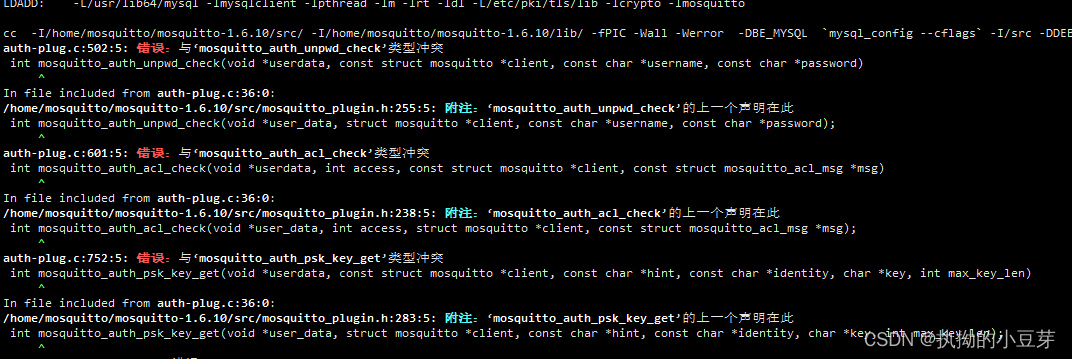
由于auth-plug.c文件中格式错误,将const 删掉,如下
vim auth-plug.c

继续执行make
报错:

sudo ln -sf /home/mosquitto/mosquitto-1.6.10/lib/libmosquitto.so.1 /usr/lib/libmosquitto.so.1
sudo ln -s /usr/lib/libmosquitto.so.1 /usr/lib/libmosquitto.so
sudo ldconfig
再执行make,成功。生成auth-plug.so文件

五、配置mosquitto配置文件
将auth-plug.so移至mosquitto下
mv auth-plug.so /home/mosquitto/mosquitto-1.6.10
备份原有的mosquitto.conf,将mosquitto-mysql.conf文件移动到mosquitto目录下
cd /home/mosquitto/mosquitto-1.6.10
mv mosquitto.conf mosquitto.conf.tmp
mv /home/mosquitto/mosquitto-auth-plug-master/mosquitto-mysql.conf  mosquitto.conf
编辑配置文件,修改如下所示
vim mosquitto.conf
完整配置文件如下:
autosave_interval 1800
persistence true
persistence_file mosquitto.db
persistence_location /tmp/
connection_messages true
log_timestamp true
log_dest stderr

#log_type error
#log_type warning
#log_type notice
#log_type information
#log_type all
log_type debug

listener 1883 # mqtt端口号


#
#   __  __       ____   ___  _
#  |  \/  |_   _/ ___| / _ \| |
#  | |\/| | | | \___ \| | | | |
#  | |  | | |_| |___) | |_| | |___
#  |_|  |_|\__, |____/ \__\_\_____|
#          |___/
#
#

auth_plugin /home/mosquitto/mosquitto-1.6.10/auth-plug.so  # auth-plug.so 文件所在位置
auth_opt_backends mysql
auth_opt_host 192.168.3.122    # mysql的ip
auth_opt_port 3306             # mysql的端口
auth_opt_dbname mosquitto      # mysql的数据库名
auth_opt_user root             # mysql的用户名
auth_opt_pass xxxxxxxxxxx      # mysql的密码
auth_opt_userquery SELECT pw FROM users WHERE username = '%s'  # 认证
auth_opt_superquery SELECT IFNULL(COUNT(*), 0) FROM users WHERE username = '%s' AND super = 1 #是否是超级用户
auth_opt_aclquery SELECT topic FROM acls WHERE username = '%s' AND (rw >= %d)   #查询权限
auth_opt_superusers S*
user root
六、数据库管理
根据上方的mysql配置,创建数据库
在examples文件中获取创建表的sql

也可直接复制下方创建sql
DROP TABLE IF EXISTS users;

CREATE TABLE users (
	id INTEGER AUTO_INCREMENT,
	username VARCHAR(25) NOT NULL,
	pw VARCHAR(128) NOT NULL,
	super INT(1) NOT NULL DEFAULT 0,  -- 0:普通用户,1:超级用户
	PRIMARY KEY (id)
  );

CREATE UNIQUE INDEX users_username ON users (username);

DROP TABLE IF EXISTS acls;

CREATE TABLE acls (
	id INTEGER AUTO_INCREMENT,
	username VARCHAR(25) NOT NULL,
	topic VARCHAR(256) NOT NULL,
	rw INTEGER(1) NOT NULL DEFAULT 1,	-- 1: 只读, 2: 读写
	PRIMARY KEY (id)
	);
CREATE UNIQUE INDEX acls_user_topic ON acls (username, topic(228));
添加测试数据,使用np指令生成加密密码

如上输入两次密码,生成密码后将密码复制到数据库users表中

super等于1 标识超级用户

rw等于2 标识读和写权限. 1–只读
/#通配符,标识所有的topic
测试连接
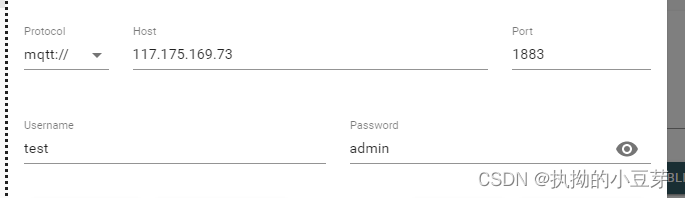
连接成功,超级用户看到系统topic
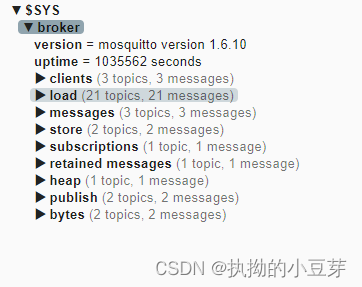
到此就可以动态的管理mqtt的用户啦
七、java加密 密码工具类
import javax.crypto.SecretKey;
import javax.crypto.SecretKeyFactory;
import javax.crypto.spec.PBEKeySpec;
import java.nio.charset.StandardCharsets;
import java.security.NoSuchAlgorithmException;
import java.security.spec.InvalidKeySpecException;
import java.security.spec.KeySpec;
import java.util.Base64;
import java.util.Random;
import java.util.logging.Level;
import java.util.logging.Logger;
/**
 * @author gongl
 * @date 2023-02-24
 */

public class MosquittoPBKDF2 {
    private static final int KEY_LENGTH = 24 * 8;
    private static final int SALT_LENGTH = 12;
    private static final int ITERATIONS = 901;

    public static String createPassword(String plainPassword) {
        byte[]  someBytes= new byte[MosquittoPBKDF2.SALT_LENGTH];
        Random randomGenerator = new Random();
        randomGenerator.nextBytes(someBytes);
        String encodedSalt = Base64.getEncoder().encodeToString(someBytes);

        SecretKeyFactory f = null;
        try {
            f = SecretKeyFactory.getInstance("PBKDF2WithHmacSHA256");
        } catch (NoSuchAlgorithmException ex) {
            Logger.getLogger(MosquittoPBKDF2.class.getName()).log(Level.SEVERE, null, ex);
        }
        KeySpec ks = new PBEKeySpec(plainPassword.toCharArray(), encodedSalt.getBytes(), MosquittoPBKDF2.ITERATIONS, MosquittoPBKDF2.KEY_LENGTH);
        SecretKey s;
        try {
            s = f.generateSecret(ks);
            String encodedKey = Base64.getEncoder().encodeToString(s.getEncoded());
            return "PBKDF2$sha256$" + MosquittoPBKDF2.ITERATIONS + "$" + encodedSalt + "$" + encodedKey;
        } catch (InvalidKeySpecException ex) {
            Logger.getLogger(MosquittoPBKDF2.class.getName()).log(Level.SEVERE, null, ex);
        }
        return "";
    }

    public static boolean isValidPassword(String plainPassword, String hashedPasword) {
        String[] encodedPassword = hashedPasword.split("\\$");
        int encodedIterations = Integer.parseInt(encodedPassword[2]);
        byte[] encodedSalt = encodedPassword[3].getBytes(StandardCharsets.UTF_8);
        String encodedHash = encodedPassword[4];
        SecretKeyFactory f = null;
        try {
            f = SecretKeyFactory.getInstance("PBKDF2WithHmacSHA256");
        } catch (NoSuchAlgorithmException e) {
            System.out.println("Need a Java implementation with cryptography.");
        }
        KeySpec ks = new PBEKeySpec(plainPassword.toCharArray(), encodedSalt, encodedIterations, MosquittoPBKDF2.KEY_LENGTH);
        SecretKey s = null;
        try {
            s = f.generateSecret(ks);
        } catch (InvalidKeySpecException e) {
            System.out.println("Encoded password is corrupt.");
        }
        return encodedHash.equals(Base64.getEncoder().encodeToString(s.getEncoded()));
    }
}