公司项目需要涉及到用户权限的问题,每个用户都应该有自己的权限,而且权限应该是灵活可变的,系统的登陆模块因为涉及到分布式部署的问题以及前后端分离,不能采用传统的session作为登陆方式,而是采用JWT的方式实现,保证了接口的无状态性,但是这样的话也就让市面上的很多权限控制和登陆框架显得有些不太适合,比如:Spring Security、Apache Shiro,也许能将这些框架强行塞进系统里面,但是却可能不适应目前的这个系统需求,灵活性不够,也不好完美的适应现有的登录模块,忘了当时是怎么考虑的,仔细评估和分析之后还是放弃了现有的一些框架而选择自己重新开发这个权限模块。
首先,我们看一下用户与模块、模块与接口的关系:
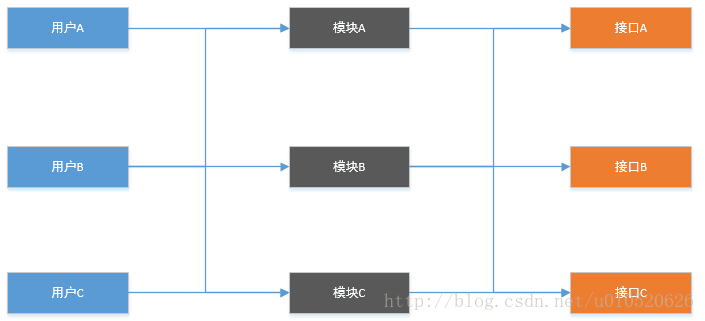
在这张图里面,用户与模块,模块与接口的关系可以这么来说:
一个用户可以同时拥有多个模块的权限,一个模块也可以同时被多个用户所拥有,而一个模块下面可以有多个接口,一个接口又可以属于多个模块。
这样的话,就必须保证代码的松耦合,同时又要能完美的控制用户权限,保证系统的安全和权限职责的清晰。
首先,利用Spring Tool Suite创建一个Spring Boot的Web工程,引入Mybatis、Druid、Spring AOP等工具。
为了不影响现有功能,同时也必须要方便为接口添加权限控制,这里我们就需要涉及到面向切面的技术了,Spring的两大特征之一。这样的话,我们就可以保证权限模块与主程序之间的耦合降到最低,提供系统的可维护性和可操作性。
我们新建一个注解类PermissionModule,用来为接口添加注解,标识接口的所属模块,代码如下:
package org.opensource.pri.annotations;

import static java.lang.annotation.ElementType.METHOD;
import static java.lang.annotation.RetentionPolicy.RUNTIME;

import java.lang.annotation.Retention;
import java.lang.annotation.Target;

import org.opensource.pri.enums.Module;


/**
 *
 * 对方法实现模块权限控制
 *
 * @author TanRq
 * @date 2017年11月14日
 *
 * @param belong
 *
 */
@Retention(RUNTIME)
@Target(METHOD)
public @interface PermissionModule {

	/**
	 * 执行方法所需要的权限,ALL表示所有权限都可以执行
	 * belong的类型为数组,方便为接口添加多个模块,即一个接口可以属于多个模块
	 * 同时也可以反映出一个模块可以包含多个接口的关系
	 * @return
	 */
	public Module[] belong() default {Module.ALL};
}
刚刚我们说了,我们需要利用到面向切面的技术,那么,在这里我们新建一个类专门用来配置切面,代码如下:
package org.opensource.pri.config;

import java.io.OutputStream;
import java.lang.reflect.Method;
import java.util.HashMap;
import java.util.Map;

import javax.servlet.http.HttpServletRequest;
import javax.servlet.http.HttpServletResponse;

import org.aspectj.lang.ProceedingJoinPoint;
import org.aspectj.lang.Signature;
import org.aspectj.lang.annotation.Around;
import org.aspectj.lang.annotation.Aspect;
import org.aspectj.lang.reflect.MethodSignature;
import org.opensource.pri.annotations.PermissionModule;
import org.opensource.pri.auth.AuthContext;
import org.opensource.pri.auth.AuthStrategy;
import org.opensource.pri.enums.Module;
import org.springframework.beans.factory.annotation.Autowired;
import org.springframework.stereotype.Component;
import org.springframework.web.context.request.RequestAttributes;
import org.springframework.web.context.request.RequestContextHolder;
import org.springframework.web.context.request.ServletRequestAttributes;

import com.fasterxml.jackson.databind.ObjectMapper;


/**
 * 权限认证配置,利用切面技术
 * @author TanRq
 *
 */
@Aspect
@Component
public class AuthConfig {

	@Autowired
	private AuthStrategy authStrategy;

	@Around("execution(* org.opensource.pri.controller..*(..)) and @annotation(org.springframework.web.bind.annotation.RequestMapping)")
	public Object executeAround(ProceedingJoinPoint jp) throws Throwable{
		//获取RequestAttributes
	    RequestAttributes requestAttributes = RequestContextHolder.getRequestAttributes();
	    //从获取RequestAttributes中获取HttpServletRequest的信息
	    HttpServletRequest request = (HttpServletRequest) requestAttributes.resolveReference(RequestAttributes.REFERENCE_REQUEST);
	    HttpServletResponse response=((ServletRequestAttributes)requestAttributes).getResponse();

	    String userId= request.getHeader("userId");//获取请求头里面用户的ID,此处只做简单处理,实际应该有加密,否则将会导致用户信息泄露,无法保证安全

	    Signature signature = jp.getSignature();
	    MethodSignature methodSignature = (MethodSignature)signature;
	    Method targetMethod = methodSignature.getMethod();

	    Method realMethod = jp.getTarget().getClass().getDeclaredMethod(signature.getName(), targetMethod.getParameterTypes());

	    Object  obj =null;

	    if(isHasPermission(realMethod,userId)) {
	    	obj =  jp.proceed();//用户拥有该方法权限时执行方法里面的内容
	    }else {//用户没有权限,则直接返回没有权限的通知
	    	response.setHeader("Content-type","application/json; charset=UTF-8");
	    	OutputStream outputStream=response.getOutputStream();
	    	Map<String,String> resultMsg=new HashMap<String,String>();
	    	resultMsg.put("msg", "Not allowed to pass, you do not have the authority");
	    	outputStream.write(new ObjectMapper().writeValueAsString(resultMsg).getBytes("UTF-8"));
	    }
	    return obj;
	}

	/**
	 * 判断用户是否拥有权限
	 * @param realMethod
	 * @param userId
	 * @return
	 */
	private boolean isHasPermission(Method realMethod,String userId) {
		try {
			if(realMethod.isAnnotationPresent(PermissionModule.class)) {
				PermissionModule permissionModule=realMethod.getAnnotation(PermissionModule.class);
				Module[] modules= permissionModule.belong();
				//执行权限策略,判断用户权限
				return new AuthContext(authStrategy).execute(modules,userId);
			}
		}catch(Exception e) {
			System.out.println(e.getMessage());
			return false;
		}
		return false;
	}
}
上面的切面配置类中涉及到了权限策略,此处采用了策略模式进行代码的解耦,主要考虑到用户类型可能较多,控制权限的方式可能存在多样性,方便后期的维护,因为只需要切换策略就可以达到不同用户的策略处理方式。我们看一下涉及到权限策略的三个类是如何编写:
package org.opensource.pri.auth;

import org.opensource.pri.enums.Module;

/**
 * 权限策略上下文控制类
 * @author TanRq
 *
 */
public class AuthContext {

	private AuthStrategy authStrategy;

	public AuthContext(AuthStrategy strategy) {
		this.authStrategy=strategy;
	}

	/**
	 * 执行策略
	 * @param modules
	 * @param userId
	 * @return
	 * @throws Exception
	 */
	public boolean execute(Module[] modules,String userId) throws Exception {
		return this.authStrategy.executeAuth(modules,userId);
	}

}
package org.opensource.pri.auth;

import org.opensource.pri.enums.Module;

/**
 * 策略接口,所有策略都应该实现的接口
 * @author TanRq
 *
 */
public interface AuthStrategy {

	public boolean executeAuth(Module[] modules,String userId) throws Exception;

}
package org.opensource.pri.auth.impl;

import java.util.ArrayList;
import java.util.List;
import java.util.Map;

import org.apache.commons.lang3.ArrayUtils;
import org.apache.commons.lang3.StringUtils;
import org.opensource.pri.auth.AuthStrategy;
import org.opensource.pri.enums.Module;
import org.opensource.pri.service.AuthService;
import org.springframework.beans.factory.annotation.Autowired;
import org.springframework.stereotype.Component;

/**
 *
 * 用户权限控制策略算法实现类
 * @author TanRq
 *
 */
@Component
public class UserAuthStrategy implements AuthStrategy {

	@Autowired
	private AuthService authService;

	@Override
	public boolean executeAuth(Module[] modules,String userId) throws Exception {

		//表示标注的方式属于所有用户可执行
		if(ArrayUtils.contains(modules, Module.ALL)) {
			return true;
		}
		//用户ID为空,不允许通过,直接返回false
		if(StringUtils.isBlank(userId)) {
			return false;
		}

		List<Map<String,String>> permissionList = authService.getPermission(Integer.parseInt(userId));

		List<String> moduleList=new ArrayList<String>();

		for(Module module:modules) {
			moduleList.add(module.getModuleName());
		}

		List<String> hasList=new ArrayList<String>();

		for(Map<String,String> map:permissionList) {
			hasList.add(map.get("priName").toString());
		}
		//如果用户拥有该接口所属模块的任何一个模块的权限则返回true,否则false
		return hasList.removeAll(moduleList);
	}

}
通过上面的方式,我们基本就可以完成一个权限模块代码的编写,至于其他一些非主要的类将会提供下载连接方便下载demo并查看。
接下来就是验证功能的时候了,我们新建一个控制器类,然后通过postman来发送请求,测试权限功能是否能正常使用,控制器类如下:
package org.opensource.pri.controller;

import java.util.Map;

import org.opensource.pri.annotations.PermissionModule;
import org.opensource.pri.enums.Module;
import org.opensource.pri.service.HelloWorldService;
import org.springframework.beans.factory.annotation.Autowired;
import org.springframework.web.bind.annotation.RequestMapping;
import org.springframework.web.bind.annotation.RequestMethod;
import org.springframework.web.bind.annotation.RestController;

/**
 * 一个简单的rest接口控制器
 * @author TanRq
 *
 */
@RestController
public class HelloWorldController {

	@Autowired
	HelloWorldService helloWorldService;

	/**
	 * Module.ALL类型表示所有用户都能访问该接口
	 * @return
	 */
	@PermissionModule(belong= {Module.ALL})
	@RequestMapping(value = "/sayhello",produces = "application/json; charset=UTF-8", method = RequestMethod.GET)
	public Map<String,Object> sayHello(){
		return helloWorldService.sayHello();
	}

	/**
	 * Module.TOTAL_EVERY_NO表示该接口只属于TOTAL_EVERY_NO所代表的模块,
	 * 如果用户没有TOTAL_EVERY_NO的权限,将无法访问该接口的内容
	 * @return
	 */
	@PermissionModule(belong= {Module.TOTAL_EVERY_NO})
	@RequestMapping(value = "/everyhello",produces = "application/json; charset=UTF-8", method = RequestMethod.GET)
	public Map<String,Object> sayEveryHello(){
		return helloWorldService.sayHello();
	}

	/**
	 * Module.TOTAL_PRE_NO表示该接口只属于TOTAL_PRE_NO所代表的模块,
	 * 如果用户没有TOTAL_PRE_NO的权限,将无法访问该接口的内容
	 * @return
	 */
	@PermissionModule(belong= {Module.TOTAL_PRE_NO})
	@RequestMapping(value = "/prehello",produces = "application/json; charset=UTF-8", method = RequestMethod.GET)
	public Map<String,Object> sayPreHello(){
		return helloWorldService.sayHello();
	}

}
测试结果如下:
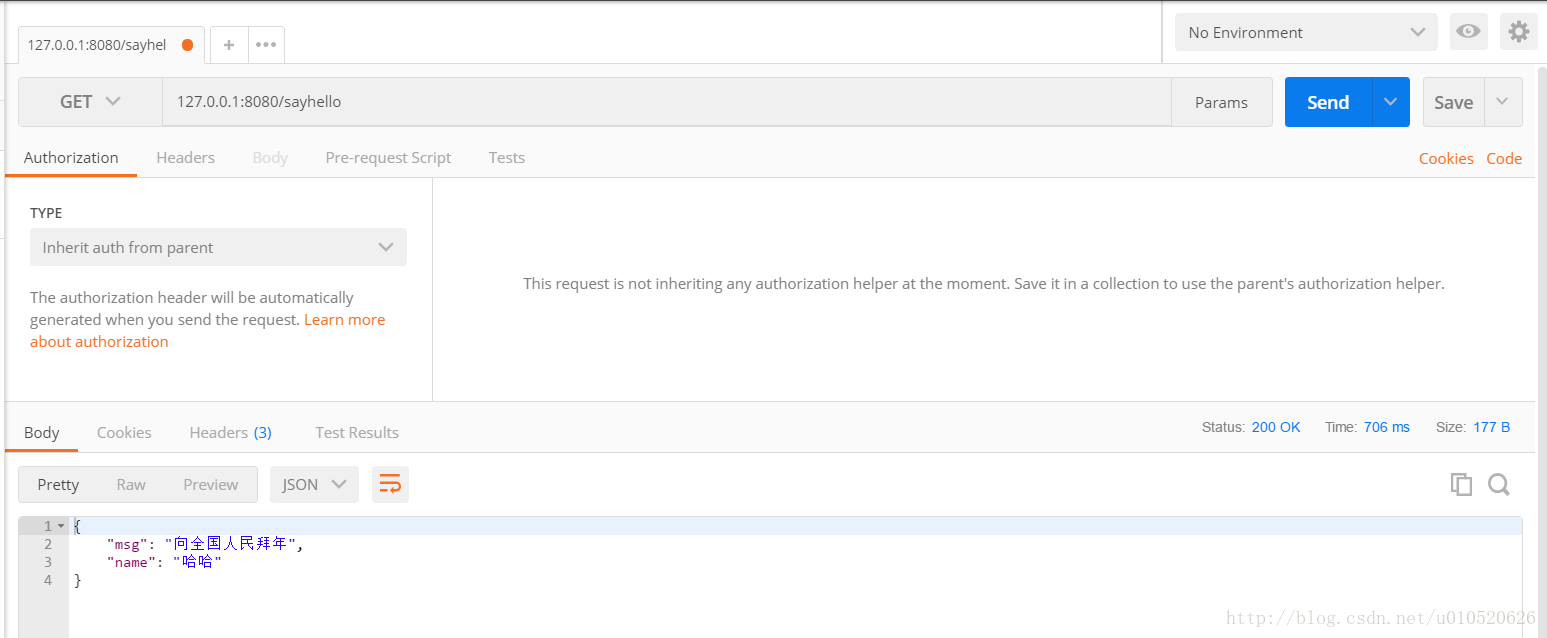
sayhello接口测试结果:
sayhello接口因为权限为ALL,所以不需要userId都可以成功执行。
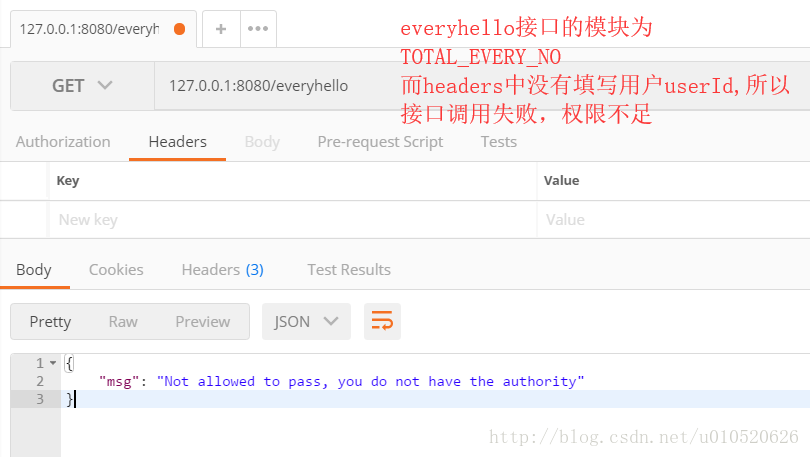
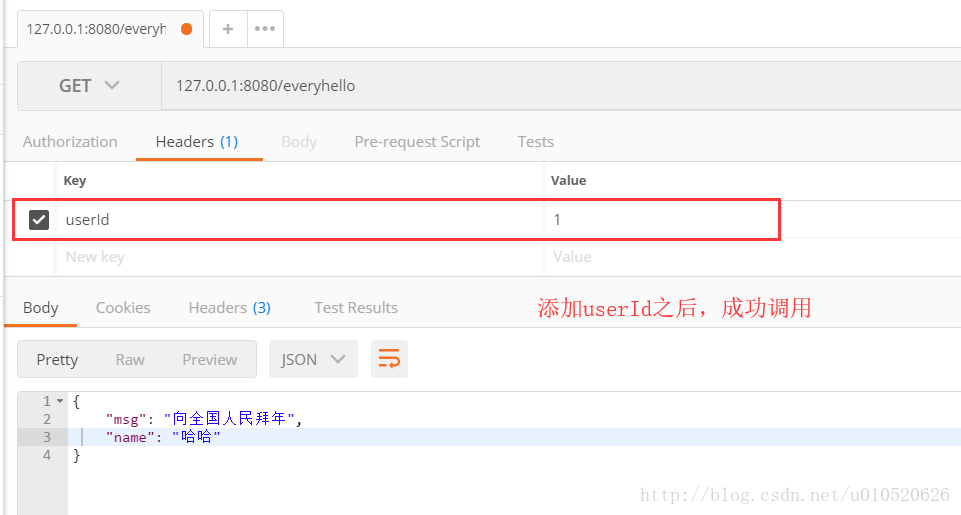
everyhello接口测试结果:
没有userId
有userId
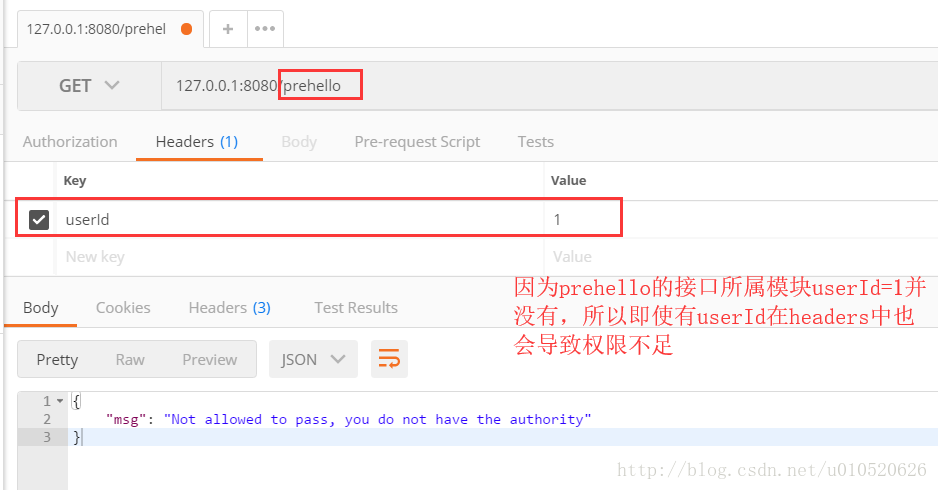
prehello接口测试结果:
通过上面的方式,我们就可以轻松创建一个属于自己的权限控制模块,因为不需要传统session,而且采用的是AOP的方式进行开发,使得该功能更方便用于分布式系统中,而且没有很多繁琐的配置。
示例代码下载地址:http://download.csdn.net/download/u010520626/10267210