springBoot+vue-admin-template框架下的文件传输
我想实现的内容
- [project背景] 使用idea + vs-code 进行的前后端分离项目的开发
- [部分想要实现的内容] 对el-table中的某一个字段进行处理,该字段下的内容是一系列的本地图片路径,
希望可以通过路径对图片进行展示并可以实现图片传到指定位置的功能
前端部分代码的实现
- 使用el-upload组件实现文件的上传于展示
- 使用“<img src=“” ” 实现本地图片的渲染
下面通过我写的一个练习demo为例
<template>
  <div class="app-container">
    <!--
       class:上传后路径
       action:后端接口
       on-success:成功方法
       -->
   <div class="upload-box" style="text-align:center;margin:10px">
     <el-upload
     class="avatar-uploader"
     action="http://localhost:9528/dev-api/admin/system/upload"
     :show-file-list="false"
     :on-success="handleAvatarSuccess">
     <img v-if="imageUrl" :src="imageUrl" class="avatar">
     <i v-else class="el-icon-plus avatar-uploader-icon"></i>
     </el-upload>
    </div>

    <div class="showIamge-button" style="text-align:center;margin:10px">
        <el-button type="success" @click="handleButton">打开文件列表</el-button>
    </div>

    <div class="dialogVisble">
        <el-dialog
        title="设备检查记录"
        :visible.sync="dialogVisble"
        width="30%">
         <el-dialog
           width="30%"
           title="内层 Dialog"
           :visible.sync="innerVisible"
           append-to-body>
           <div class="imgae" style="text-align: -moz-center;">
            <img v-if="imageUrl" :src="imageUrl" class="avatar">
           </div>
         </el-dialog>
          <el-upload
          class="upload-demo"
          action="http://localhost:9528/dev-api/[]"
          :before-upload="handleBeforeUpload"
          :on-success="handleMoreAcatarSuccess"
          :on-preview="handlePreview"
          :on-remove="handleRemove"
          :limit="5"
          :file-list="fileList">
            <el-button size="small" type="primary">点击上传</el-button>
            <div slot="tip" class="el-upload__tip">只能上传jpg/png文件,且不超过500kb</div>
          </el-upload>
        </el-dialog>
    </div>
  </div>
</template>


<script>
import api from'@/api/sysSpecial/sysSpecialEqus';
export default{
    data(){
        return{
            imageUrl:'',
            fileList:[],
            innerVisible:false,
            dialogVisble:false,
            fileType:["pdf","doc","docx","xls","xlsx","txt","png","jpg","bmp","jepg"],
            //上传附件限制大小
            fileSize:50,

            equVo:{},

            //登记当前上传文件数
            sum:0,
        }
    },

    created(){
        this.fetchdata();
    },

    methods: {
        //
        fetchdata(){
            var i = 1;
            api.getEqusAndChildren(this.equVo).then((response)=>{
                console.log(response);
                console.log(response.data[0].children[0].checkImagePath);
                let responseFile = response.data[0].children[0].checkImagePath;
                responseFile.forEach(element => {
                  this.fileList.push({name:'检查记录'+i++,path:element});
                });
                this.sum = i;
            })
        },

        //查看检查清单绑定方法
        handleButton(){
            console.log(this.fileList);
            this.dialogVisble = true;
        },

        //res:当前上传对象
        handleAvatarSuccess(res){
            console.log(res)
            this.imageUrl = res;
        },
        //上传前检验
        handleBeforeUpload(file){
             //1、 判断上传文件类型
            if(file.type !== "" || file.type !== null || file.type !== undefined){
              //截断文件后缀判断文件类型
              const FileExt = file.name.replace(/.+\./,"").toLowerCase();
              console.log(FileExt);
              //计算文件大小
              const islt5M = file.size/ 1024/1024 <50;
              console.log(islt5M);
              //判断大小
              if(!islt5M){
                this.$message.error("文件大小不能超过50MB!");
                return false;
              }
              //判断类型
              if(this.fileType.includes(FileExt)){
                return true;
              }else{
                this.$message.error("上传文件格式不正确");
                return false;
              }
            }
        },
        //上传成功后
        handleMoreAcatarSuccess(res){
            var i = this.sum;
            this.fileList.push({name:'检查记录'+i++ , path:res});
        },
        //操作已上传文件
        handlePreview(file){
            console.log(file);
            this.imageUrl = file.path;
            this.innerVisible = true;
        },
        handleRemove(){

        }
    }
}
</script>

<style>
  .avatar-uploader .el-upload {
    border: 1px dashed #d9d9d9;
    border-radius: 6px;
    cursor: pointer;
    position: relative;
    overflow: hidden;
  }
  .avatar-uploader .el-upload:hover {
    border-color: #409EFF;
  }
  .avatar-uploader-icon {
    font-size: 28px;
    color: #8c939d;
    width: 178px;
    height: 178px;
    line-height: 178px;
    text-align: center;
  }
  .avatar {
    width: 100%;
    height: 100%;
    display: block;
  }
</style>
效果展示
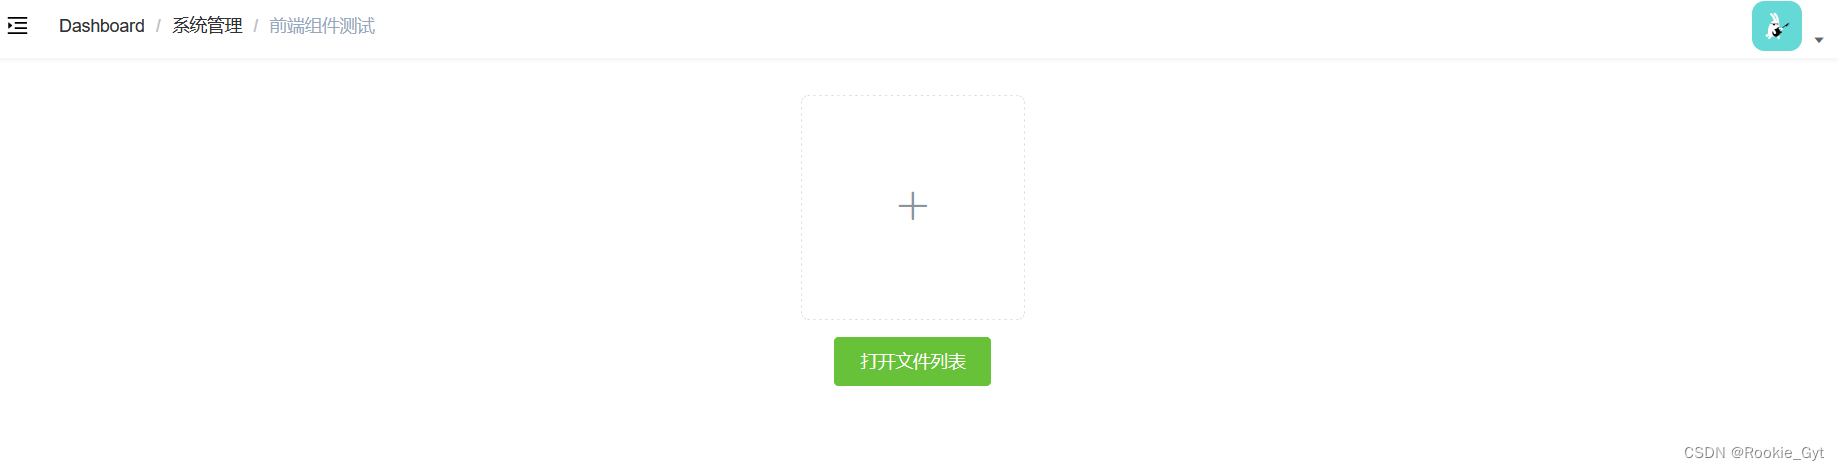
el-upload的学习与拓展
- el-upload的methods & attribute
下面对el-upload进行解释
//class: upload 样式设计
//action:接口方法,可以使用:http-request="[声明方法进行代替]"
//:before-upload: 调用后端接口前的钩子,一般用于判断文件上传类型于大小是否合规
//:on-success: 文件成功上传后的钩子
//:on-preview: 点击上传后的文件时的钩子
//:before-remove: 文件删除前的钩子,一般由于消息提示
//:on-remove:文件删除时的钩子
//mutiplate:是否支持多文件上传
//limit:最多允许上传文件数
//on-exceed:超过limit时的钩子
//file-list:展示时的数据
<el-upload
  class="upload-demo"
  action="http://localhost:9528/dev-api/admin/system/upload"
  :before-upload="beforeAvatarUpload"
  :on-success="handleMoreAcatarSuccess"
  :limit="fileLimit"
  :on-preview="handlePreview"
  :on-remove="handleRemove"
  :before-remove="beforeRemove"
  multiple
  :on-exceed="handleExceed"
  :file-list="fileList">
</el-upload>
在这里插入代码片
逻辑
文件的upload与download
写方法前需要声明的attribute
data(){
	fileType:["pdf","doc","docx","xls","xlsx","txt","png","jpg","bmp","jepg"],
	fileSize:50,
}
上传及下载方法的调用
//上传前检验(1、判断文件类型是否合规 2、判断文件大小是否合规)
handleBeforeUpload(file){
//1、 判断上传文件类型
if(file.type !== "" || file.type !== null || file.type !== undefined){
//截断文件后缀判断文件类型(忽略大小写)
const FileExt = file.name.replace(/.+\./,"").toLowerCase();
console.log(FileExt);
//计算文件大小(除以两个1024获得的是:MB)
const islt5M = file.size/ 1024/1024 <50;
console.log(islt5M);
//判断大小
if(!islt5M){
this.$message.error("文件大小不能超过50MB!");
return false;
}
//判断类型
if(this.fileType.includes(FileExt)){
return true;
}else{
this.$message.error("上传文件格式不正确");
return false;
}
}
},
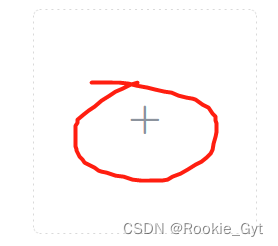
//在点击“+”后自动调用:action内接口
//[注]在使用vue-admin-template是要查看自身的vue-config.js查看是否存在路径的重写
//vue2会自动重新端口号,同时为了信息安全经常重新接口路径
在vue-config.js中
1、查看端口号

2、查看重写路径
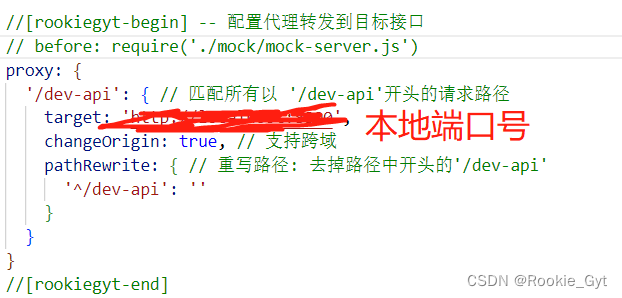
综上所述
实际使用接口路径为:(这也就是我们本地的静态路路径)
http://localhost:9528/dev-api/…
用别的:例如绝对路径,或者相对路劲都会导致渲染失效QvQ
但是!!!不使用action方法也是可以的,此时我们需要用
:http-request
上代码,这时候调用api下的接口路径就好
    handleUploadFiles(item){
      let FormDatas = new FormData();
      //因为后端接口是通过读取文件名来获取请求文件的,所以要调用FormData()类来实现文件命名于数据存储
      //[对比]后端接口声明的形参@RequestPart("file") MultipartFile multipartFile
      FormDatas.append('file',item.file);
      // console.log(FormDatas);
      //调用api下的接口
      //api:是在export default{}(script工作区前声明的import,指向js)
      api.upload(FormDatas).then((response)=>{
        if(response.code === 200){
        //展示图片,这里我们用的是页面上缓存的数据,将其生产一个url对象
        //后期我们可以通过调用本地的图片的静态路径来实现
          const img = URL.createObjectURL(item.file);
          this.fileList.push({
            name:item.file.name,
            url:img,
          })
          console.log(this.fileList)
        }
      })
    },
上传成功
 //上传成功后
 //在这里我声明了一个公有属性sum,用于统计上传数目于
        handleMoreAcatarSuccess(res){
            var i = this.sum;
            this.fileList.push({name:'[name]'+i++ , path:res});
        },
文件的show(回显)
使用< img src=“” >
包括两种方式
1、调用位于vue-project中的静态路径:首先需要将图片存放在vue-project中的assets文件夹下
使用时可以通过
< img :src=“require(‘@/assets/[pictureName].type’)” >l
来回显图片,但是当src指向的路径为动态是,即项目开始后再传入路径则会出现
”警告 module不存在“问题
这是由于当npm启动之后项目访问的都是声明在static中的路径,这个static类似于后端的target(编译结果文件夹),在static中找绝对路径当然找不到
2、调用后端的静态路径(声明在target目录下的文件)
[注]调用时需要父文件夹要声明在target/classes下于com同级
后端部分代码的实现
upload接口
 @Value("${files.upload.path}")
    private String fileUploadPath;

    @ApiOperation("文件上传接口管理")
    @PostMapping("/upload")
    public String upload(
            @ApiParam("JSON返回的Multiple文件") @RequestPart("file") MultipartFile multipartFile
    ){
        //1.1、通过Multiple原生name同时给新文件命名
        String requestName = multipartFile.getOriginalFilename();
        //1.2、设置上传目录
        File file = new File(fileUploadPath);
        if(!file.exists()){
            //如果不存在,创建对应文件夹
            file.mkdirs();
        }
        //2.利用uuid获取加密字符
        String nameOne = UUID.randomUUID().toString().replace("-", "");
        String fileName = nameOne.concat("-" + requestName);
        String filePath = fileUploadPath + "/" + fileName;
        //3、利用multipartFile自带方法将JSON数据转化为对应的
        try {
            multipartFile.transferTo(new File(filePath));
        } catch (IOException e) {
            e.printStackTrace();
        }
        //要与下载接口路径保持一致注意最后一个/的添加!!!
        String url = "http://localhost:9528/dev-api/[]/views/" + fileName;
        return url;
    }
关于fileUploadPath
//声明在application.yml或application-dev.yml中均可
#springboot 定义文件存储位置
files:
  upload:
    path:
download接口
注意路径的拼接
@RequestMapping("[]")
@ApiOperation("文件下载接口")
    @GetMapping("/views/{filePath}")
    public void views(
            @ApiParam("需要展示图片地址") @PathVariable("filePath") String path,
            HttpServletResponse response
    ) throws IOException {
        //1、获取文件位置
        File uploadFile = new File(fileUploadPath + path);
        //2、获取输出流格式
        ServletOutputStream os = response.getOutputStream();
        //添加响应头
        response.addHeader("Content-Disposition:","attachment;filename=" + URLEncoder.encode(path,"UTF-8"));
        //声明二进制类型
        response.setContentType("application/octet-stream");

        //获取字节流,并写出
        os.write(FileUtil.readBytes(uploadFile));
        os.flush();
        os.close();

    }
fileList方法
//如何获得一个文件下的所有文件
public static void main(String[] args){
	List<String> childrenFiles = new ArraysList<>();
	File fatherList = new File([String 类型的path]);
	if(fatherList == null){
		System.exit(0);
	}
	String[] files = fatherList.list();
	for(int i = 0;i < files.length;i++){
		childrenFiles.add(files[i]);
	}
	childrenLsit.forEach(System.out::println);
}