虽然React Router已经到了V6版本了,但在我们项目中,目前主要用的还是React Router的V5版本,所以此处我们从V5版本着手,去了解前端路由的实现原理。
目标:希望收获
- 前端路由的基本原理
- React Router 的实现原理
- React Router 的启发和借鉴
前置知识点
原生JS如何实现前端路由
前端路由,我们无非要实现两个功能:在不刷新页面的前提下,监听和匹配路由的变化,并根据路由匹配渲染页面内容
前端路由一般提供两种匹配模式, hash 模式和 history 模式,二者的主要差别在于对 URL 监听部分的不同,hash 模式监听 URL 的 hash 部分,也就是 # 号后面部分的变化
hash实现前端路由示例
<div class="box">
    <a href="#/route1">route1</a>
    <a href="#/route2">route2</a>
    <a href="#/route3">route3</a>
    <a href="#/route4">route4</a> </div>
<div id="root"></div>

const routes = [
      {
        path: '/route1',
        template: '<div>route1</div>',
      },
      {
        path: '/route2',
        template: '<div>route2</div>',
      },
      {
        path: '/route3',
        template: '<div>route3</div>',
      },
      {
        path: '/route4',
        template: '<div>route4</div>',
      },
];
const mount = document.getElementById('root');
window.addEventListener('hashchange', function (e) {
    const path = e.newURL.split('#')[1];
    const item = routes.find(function (item) {
        return item.path == path;
    });
    mount.innerHTML = item.template;
});
history实现前端路由示例
<div class="box">
    <a href="/route1">route1</a>
    <a href="/route2">route2</a>
    <a href="/route3">route3</a>
    <a href="/route4">route4</a>
</div>
<div id="root"></div>

const routes = [
      {
        path: '/route1',
        template: '<div>route1</div>',
      },
      {
        path: '/route2',
        template: '<div>route2</div>',
      },
      {
        path: '/route3',
        template: '<div>route3</div>',
      },
      {
        path: '/route4',
        template: '<div>route4</div>',
      },
    ];

// 重写所有 a 标签事件
const elements = document.querySelectorAll('a[href]');
elements.forEach((el) =>
    el.addEventListener('click', (e) => {
        e.preventDefault(); // 阻止默认点击事件
        const test = el.getAttribute('href');
        history.pushState(null, null, el.getAttribute('href'));
        // 修改当前url(前两个参数分别是 state 和 title,这里暂时不需要用到
        onPopState();
        // 由于pushState不会触发onpopstate事件, 所以我们需要手动触发事件
    })
);

// onpopstate事件回调, 匹配路由的改变并渲染对应内容, 和 hash 模式基本相同
function onPopState() {
    const mount = document.getElementById('root');

    const item = routes.find(function (item) {
        return item.path == location.pathname;
    });
    mount.innerHTML = item.template;
}

// 绑定onpopstate事件, 当页面路由发生更改时(如前进后退),将触发popstate事件
window.addEventListener('popstate', onPopState);
此处简单实现了history路由功能,但是这里有一个问题就是刷新后因为地址栏url原因会报错,找不到这个页面,这是由于刷新的时候是重载,重新向网站目录查找文件,而我们当前目录并没有这个文件资源所以导致报错。需要后台拦截。
原因分析
如果直接访问了首页就是访问 index.html ,此时在服务器是有匹配的,不会有404。前端跳转路由变化,是前端的history api来控制的,和服务器没有关系。如果直接访问了https://xxx.com/具体的页面路径,此时服务器是没有匹配的资源的,就会报 404,所以需要配置服务,当 404的时候,配置回退路由,指向 index.html,让路由在前端控制。
对于nginx可以这么配置:
location / {
    try_files $uri $uri/ /index.html;<br/>
}
React.createContext
使用Context来实现跨层级的组件数据传递
Context 提供了一个无需为每层组件手动添加props,就能在组件树间进行数据传递的方法,该组件导出两个对象Provider提供数据,Consumer消费数据
React.createContext的简单使用
// 创建上下文
let {Provider, Consumer} = React.createContext()

// 假设我们有很多个组件,我们只需要在父组件使用Provider提供数据,然后我们就可以在子组件任何位置使用Consumer拿到数据,不存在跨组件的问题
// 提供数据
import React, {Component} from 'react';
import ReactDOM from 'react-dom';
let {Provider, Consumer} = React.createContext()
// 父组件
function Parent (props) {
    return (
        <div>
            <div>Parent: </div>
           <Son></Son>
        </div>
    )
}
// 子组件
function Son (props) {
    return (
        <div>
            <div>Son: </div>
            <Child></Child>
        </div>

    )
}
// 孙子组件
function Child (props) {
    return (
        <Consumer>
            // 子组件必须渲染一个函数,函数的参数就是Context得值
            {value => <div>
                value: {value}
            </div>}
        </Consumer>
    )
}
ReactDOM.render(<Provider value="1">
    <Parent />
</Provider>, document.getElementById('root'));
原理解析:创建两个组件Provider、Consumer,Provider有一个参数value,在Provider组件内遍历子组件,如果组件是Consumer,就返回一个组件,并将value作为值传递给新创建的子组件Consumer。
组件国际化使用Context
// 组件库使用了 contextType 可以简化 context 的使用,不使用 consumer 也可以共享变量

// LocaleContext组件
export const LocaleContext = React.createContext({ language: 'zh-cn' });

// Upload组件
export class Upload extends React.Component<UploadProps, UploadState> {
  ...
  // 申明静态变量、contextType 将 context 直接赋值于 contextType
  static contextType = LocaleContext;

  ...

  renderFileList() {
    const { fileList } = this.props;
    const data: FileListItem[] = fileList || this.state.fileList;
    // 可以直接 访问 this.context 获取共享变量、这样就可以不使用 consumer
    const localeContent = locales[this.context.language];

    return (
      <ul className={`${this.styleName}-fileList`}>
        {data.map(item => (
          <li key={item.uid}>
            <span>{item.name}</span>
            <div>
              <span className={`${this.styleName}-deleteFile`} onClick={this.handleDelete(item)}>
                {localeContent['component.upload.delete']}
              </span>
            </div>
          </li>
        ))}
      </ul>
    );
  }

  render() {
    ...
  }
}

// 使用
<LocaleContext.Provider value={{ language: language }}>
    <Layout>
        <Upload></Upload>
    </Layout>
</LocaleContext.Provider>
History
history库是react-router依赖的核心库,它将应用的history做了统一的抽象,包含一系列统一的属性和方法,支持浏览器的BrowserHistory、HashHistory以及服务端的MemoryHistory。
history库对自己的描述是:通过history可以在任何运行 JavaScript的地方轻松管理会话历史记录。一个history对象可以抽象出各种环境中的差异,并提供一个最小的API,使我们可以管理历史记录堆栈,导航和在会话之间保持状态。
react-router源码
react-router仓库目录
├── packages
    ├── react-router    // 核心、公用代码
    ├── react-router-config   // 路由配置
    ├── react-router-dom   // 浏览器环境路由
    └── react-router-native   // React Native 路由
react-router的仓库是以monorepo(单一代码库)的方式管理包的,在这个仓库里面同时包含有react-router、react-router-dom、react-router-native、react-router-config这四个包,其中react-router是核心包, react-router-dom、react-router-native都依赖于它
react-router 和 react-router-dom 的区别:
react-router-dom依赖react-router,所以我们使用npm安装依赖的时候,只需要安装相应环境下的库即可,不用再显式安装react-router
React Router 的源码实现
在前面我们用原生JS实现了一个基本的前端路由,现在介绍 React Router 的源码实现,通过比较二者的实现方式,分析 React Router 实现的动机和优点
我们项目里是怎么用到React-router的?
const routes = [
  { path: '/login', component: Login },
  { path: '/', component: Main }
];
const entry = () => <Switch>
    {routes.map((route: { path: string; component: any }) => (
        <Route key={route.path} path={route.path} component={route.component} />
    ))}
</Switch>

history = createHashHistory();

app.navigator = new Navigator(this.history);

ReactDOM.render(
    <Router history={history}>
        <Switch>
            <Route component={entry} />
        </Switch>
    </Router>,
    document.querySelector(selector)
);
可以看到我们用到了Router组件,Switch组件和Route组件,其中Switch和Route都被Router所包裹。React Router 的组件通常分为三种:
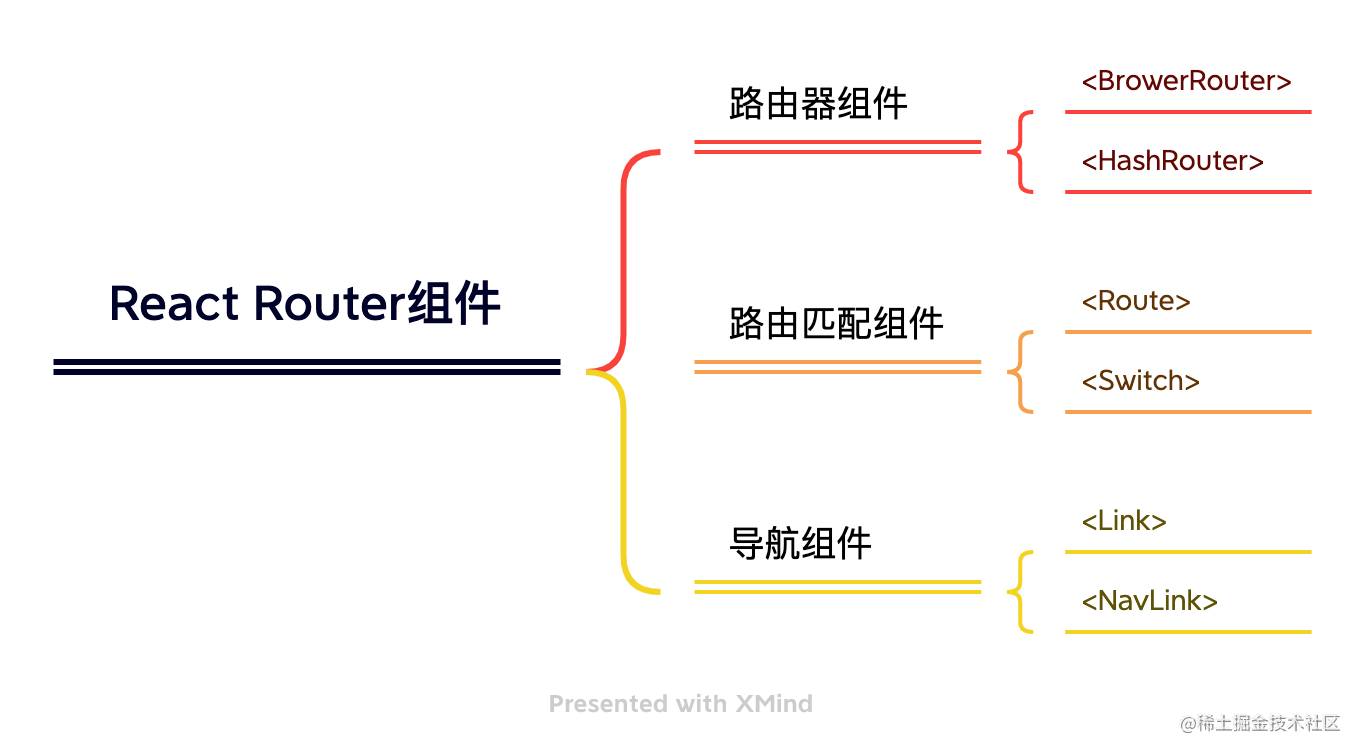
- 路由器组件: 路由器组件的作为根容器组件, 路由组件必须被包裹在内才能够使用。
- 路由匹配组件: 路由匹配组件通过匹配 path,渲染对应组件。
- 导航组件: 导航组件起到类似 a 标签跳转页面的作用
我们可以整体看看react-router的整个流程是怎样实现的:

和
所有的路由组件都必须被包裹在这两个组件中才能使用
源码
import React from "react";
import { Router } from "react-router";
import { createBrowserHistory as createHistory } from "history";

class BrowserRouter extends React.Component {
  history = createHistory(this.props);

  render() {
    return <Router history={this.history} children={this.props.children} />;
  }
}

export default BrowserRouter;

// createBrowserHistory解析
import { createBrowserHistory } from 'history';
// 创建history实例
const history = createBrowserHistory();
// 获取当前 location 对象,类似 window.location
const location = history.location;
// 设置监听事件回调,回调接收两个参数 location 和 action
const unlisten = history.listen((location, action) => {
  console.log(location.pathname, location.state);
});

// 可以使用 push 、replace、go 等方法来修改会话历史
history.push('/home', { some: 'state' });
// 如果要停止监听,调用listen()返回的函数.
unlisten();
源码
import React from "react";
import { Router } from "react-router";
import { createHashHistory as createHistory } from "history";

class HashRouter extends React.Component {
  history = createHistory(this.props);

  render() {
    return <Router history={this.history} children={this.props.children} />;
  }
}

export default HashRouter;
不管是HashRouter,还是BrowserRouter,底层都是Router组件。 Router 其实是两个 context(HistoryContext和RouterContext)组成的,由于React16和15的Context互不兼容, 所以React Router使用了一个第三方的 context 以同时兼容 React 16 和 15,这个 context 基于mini-create-react-context实现, 这个库也是React context的Polyfil, 所以可以直接认为二者用法相同,react router 团队已经在计划用React.createContextAPI 来创建它们。HistoryContext的名称是Router-History,RouterContext的名称是Router。
Router 组件会调用 history 的 listen 方法进行 路由监听,将监听到的 location 的值放大 RouterContext 中。
源码
import React from "react";
import PropTypes from "prop-types";
import warning from "tiny-warning";

import HistoryContext from "./HistoryContext.js";
import RouterContext from "./RouterContext.js";

/**
 * The public API for putting history on context.
 */
class Router extends React.Component {
  // 生成根路径的 match 对象
  static computeRootMatch(pathname) {
    return { path: "/", url: "/", params: {}, isExact: pathname === "/" };
  }

  constructor(props) {
    super(props);

    // state 初始化,Router组件维护了一个内部状态location对象,初始值为外部传入history
    this.state = {
      location: props.history.location
    };

    // This is a bit of a hack. We have to start listening for location
    // changes here in the constructor in case there are any <Redirect>s
    // on the initial render. If there are, they will replace/push when
    // they mount and since cDM fires in children before parents, we may
    // get a new location before the <Router> is mounted.

    // _isMounted 表示组件是否加载完成
    this._isMounted = false;
    // 组件未加载完毕,但是 location 发生的变化,暂存在 _pendingLocation 字段中
    this._pendingLocation = null;

    // 没有 staticContext 属性,表示是 HashRouter 或是 BrowserRouter
    if (!props.staticContext) {

      // 调用 history 的 listen 方法,用来更新当前Router内部状态中的location的
      this.unlisten = props.history.listen(location => {
        if (this._isMounted) {
          // 组件加载完毕,将变化的 location 方法 state 中
          this.setState({ location });
        } else {
          // 如果组件未挂载, 就先把 location 存起来, 等到 didmount 阶段再 setState
          this._pendingLocation = location;
        }
      });
    }
  }

  componentDidMount() {
    this._isMounted = true;

    if (this._pendingLocation) {
      this.setState({ location: this._pendingLocation });
    }
  }

  // 卸载监听器
  componentWillUnmount() {
    if (this.unlisten) this.unlisten();
  }

  render() {
    return (
      <RouterContext.Provider
        value={{
          // 根据 HashRouter 还是 BrowserRouter,可判断 history 类型
          history: this.props.history,
          // 这个 location 就是监听 history 变化得到的 location
          location: this.state.location,
          // 是否为根路径
          match: Router.computeRootMatch(this.state.location.pathname),
          // 只有 StaticRouter(服务端渲染) 会传 staticContext
          // HashRouter 和 BrowserRouter 都是 null
          staticContext: this.props.staticContext
        }}
      >
        <HistoryContext.Provider
          // 透传子组件
          children={this.props.children || null}
          value={this.props.history}
        />
      </RouterContext.Provider>
    );
  }
}

export default Router;
现在我们明白为什么路由组件要求被包裹在路由器容器组件内才能使用,因为路由信息都由外层的容器组件通过 context 的方式,传递给所有子孙组件,子孙组件在拿到当前路由信息后,才能匹配并渲染出对应内容。此外在路由发生改变的时候,容器组件会通过setState()的方式,触发子组件重新渲染。
这里我们完成了监听这一步,在 React Router 中,这一步由 history 库来完成,代码内调用了history.listen 就完成了对几种模式路由的监听。下面我们看看React Router里是如何进行匹配的。
的三种匹配方式
匹配模式:
// 精确匹配
// 严格匹配 匹配反斜杠,规定是否匹配末尾包含反斜杠的路径,如果strict为true,则如果path中不包含反斜杠结尾,则他也不能匹配包含反斜杠结尾的路径
// 大小写敏感
<Route path="/user" exact component={User} />
<Route path="/user" strict component={User} />
<Route path="/user" sensitive component={User} />

路径 path 写法:
// 字符串形式
// 命名参数
// 数组形式
<Route path="/user" component={User} />
<Route path="/user/:userId" component={User} />
<Route path={["/users", "/profile"]} component={User} />

渲染方式:
// 通过子组件渲染
// 通过 props.component 渲染
// 通过 props.render 渲染
<Route path='/home'><Home /></Route>
<Route path='/home' component={Home}></Route>
<Route path='/home' render={() => <p>home</p>}></Route>
源码
import React from "react";
import { isValidElementType } from "react-is";
import PropTypes from "prop-types";
import invariant from "tiny-invariant";
import warning from "tiny-warning";
import RouterContext from "./RouterContext.js";
import matchPath from "./matchPath.js";
/**
* The public API for matching a single path and rendering.
*/
class Route extends React.Component {
render() {
return (
<RouterContext.Consumer>
{context => {
invariant(context, "You should not use <Route> outside a <Router>");
// 可以看出,用户传的 location 覆盖掉了 context 中的 location
const location = this.props.location || context.location;
// 如果有 computedMatch 就用 computedMatch 作为结果
// 如果没有,则判断是否有 path 传参
// matchPath 是调用 path-to-regexp 判断是否匹配
// path-to-regexp 需要三个参数
// exact: 如果为 true,则只有在路径完全匹配 location.pathname 时才匹配
// strict: 如果为 true 当真实的路径具有一个斜线将只匹配一个斜线location.pathname
// sensitive: 如果路径区分大小写,则为 true ,则匹配
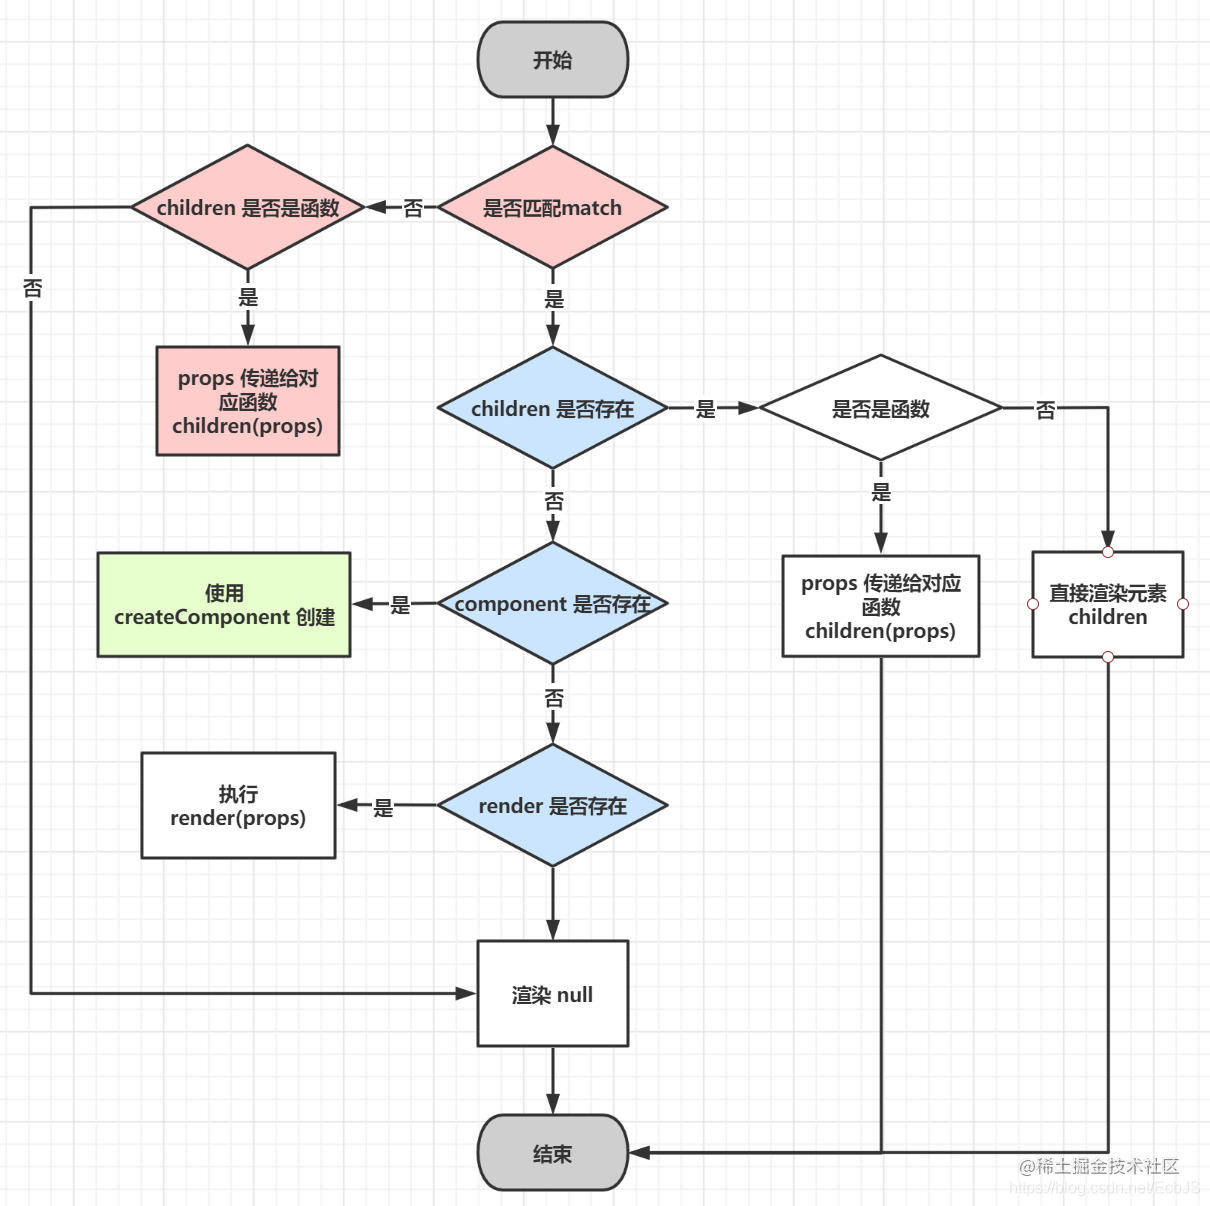
const match = this.props.computedMatch
? this.props.computedMatch // <Switch>组件中已经计算了match
: this.props.path
? matchPath(location.pathname, this.props)
: context.match;
// 把当前的 location 和 match 拼成新的 props,这个 props 会通过 Provider 继续向下传
// props 就是更新后的 context
// location 做了更新(有可能是用户传入的location)
// match 做了更新
const props = { ...context, location, match };
// 三种渲染方式
let { children, component, render } = this.props;
// Preact uses an empty array as children by
// default, so use null if that's the case.
// children 默认是个空数组,如果是默认情况,置为 null
if (Array.isArray(children) && children.length === 0) {
children = null;
}
return (
// RouterContext 中更新了 location, match
<RouterContext.Provider value={props}>
{props.match
// 首先判断的是有无 children
? children
// 如果 children 是个函数,执行,否则直接返回 children
? typeof children === "function"
: children(props)
: children
// 如果没有 children,判断有无 component
: component
// 有 component,重新新建一个 component
? React.createElement(component, props)
// 没有 component,判断有无 render
: render
// 有 render,执行 render 方法
? render(props)
// 没有返回 null
: null
// 这里是不 match 的情况,判断 children 是否函数
: typeof children === "function"
// 是的话执行
? children(props)
: null}
</RouterContext.Provider>
);
}}
</RouterContext.Consumer>
);
}
}
export default Route;
matchPath匹配路径
//const match = this.props.computedMatch
//  ? this.props.computedMatch // <Switch> already computed the match for us
//  : this.props.path
//  ? matchPath(location.pathname, this.props)  // 判断 path 是否和 location 中的路径项匹配
//  : context.match;


function matchPath(pathname, options = {}) {
  // 如果 options 传的是个 string,那默认这个 string 代表 path
  // 如果 options 传的是个 数组,那只要有一个匹配,就认为匹配
  if (typeof options === "string" || Array.isArray(options)) {
    options = { path: options };
  }

  // exact, strict, sensitive 默认 false
  const { path, exact = false, strict = false, sensitive = false } = options;

  // 转化成数组进行判断
  const paths = [].concat(path);

  return paths.reduce((matched, path) => {
    if (!path && path !== "") return null;

    // 只要有一个 match,直接返回,认为是 match
    if (matched) return matched;

    // regexp 是正则表达式
    // keys 是切割出来的得 key 的值
    const { regexp, keys } = compilePath(path, {
      end: exact,
      strict,
      sensitive
    });

    // exec() 该方法如果找到了匹配的文本的话,则会返回一个结果数组,否则的话,会返回一个null
    const match = regexp.exec(pathname);

    if (!match) return null;

    // url 表示匹配到的部分
    const [url, ...values] = match;

    // pathname === url 表示完全匹配
    const isExact = pathname === url;

    if (exact && !isExact) return null;

    return {
      path, // the path used to match
      url: path === "/" && url === "" ? "/" : url, // the matched portion of the URL
      isExact, // whether or not we matched exactly
      // 匹配到的参数
      params: keys.reduce((memo, key, index) => {
        memo[key.name] = values[index];
        return memo;
      }, {})
    };
  }, null);
}
const cache = {};
const cacheLimit = 10000;
let cacheCount = 0;

function compilePath(path, options) {
  // 一个全局缓存,确保计算出的结果能够得到复用
  const cacheKey = `${options.end}${options.strict}${options.sensitive}`;
  const pathCache = cache[cacheKey] || (cache[cacheKey] = {});

  if (pathCache[path]) return pathCache[path];

  const keys = [];

  // pathToRegexp 就是将路径字符串转为正则表达式
  // path 就是配置的路径
  // regexp 是一个正则表达式
  const regexp = pathToRegexp(path, keys, options);
  const result = { regexp, keys };

  // 最多缓存 10000 个
  if (cacheCount < cacheLimit) {
    pathCache[path] = result;
    cacheCount++;
  }

  return result;
}
从源码我们可以看到:
- Route的
component,render,children三个属性是互斥的
- 优先级
children>component>render
-
children在无论路由匹配与否,都会渲染
匹配流程:
通过以上解析可以了解到
-
React-Router通过监听location变化触发刷新,实现路由更新
- 利用React的Context机制,实现嵌套路由分析,和状态传递
- Route组件中
component,render,children三个属性的渲染机制
- 所有的机制都在
render中,所以能够在渲染时进行动态路由
招贤纳士
青藤前端团队是一个年轻多元化的团队,坐落在有九省通衢之称的武汉。我们团队现在由 20+ 名前端小伙伴构成,平均年龄26岁,日常的核心业务是网络安全产品,此外还在基础架构、效率工程、可视化、体验创新等多个方面开展了许多技术探索与建设。在这里你有机会挑战类阿里云的管理后台、多产品矩阵的大型前端应用、安全场景下的可视化(网络、溯源、大屏)、基于Node.js的全栈开发等等。
如果你追求更好的用户体验,渴望在业务/技术上折腾出点的成果,欢迎来撩~ yan.zheng@qingteng.cn
附:V6对比V5的变化
-
Switch 名称变为 Routes
-
Route 不再支持子组件,改为使用 element 属性
-
exact 属性不再需要
-
Route 先后顺序不再重要,React Router 能够自动找出最优匹配路径
-
保留 Link, NavLink, 但是 NavLink 的 activeClassName 属性被移除。
-
移除 Redirect组件,改为使用 Navigate
-
嵌套路由改为相对匹配
a. 嵌套路由 必须 放在 中,且使用相对路径,不再像 v5 那样必须提供完整路径
b. 如果有 Link 组件,那么其 to 属性也使用相对路径
c. 使用 Outlet 组件,此组件是一个占位符,告诉 React Router 嵌套的内容应该放到哪里用
-
useNavigate 实现编程式导航,useHistory 被移除
参考
React Router v5 和 v6的比较
React-router源码—好家伙!
深入浅出解析React Router 源码
-
移除 Redirect组件,改为使用 Navigate
-
嵌套路由改为相对匹配
a. 嵌套路由 必须 放在 中,且使用相对路径,不再像 v5 那样必须提供完整路径
b. 如果有 Link 组件,那么其 to 属性也使用相对路径
c. 使用 Outlet 组件,此组件是一个占位符,告诉 React Router 嵌套的内容应该放到哪里用
-
useNavigate 实现编程式导航,useHistory 被移除