目录
10.1Selenium和PhantomJS和headless-chrome
10.1.1Selenium的概念和安装
10.1.2浏览器的选择和安装
10.2Selenium和PhantomJS与Chrome的配合使用
10.2.1模拟浏览器操作
10.2.2获取异步加载数据
10.2.3常见的问题
10.3Selenium反爬设置
10.3.1设置请求头
PhantomJS
FireFox
Chrome
10.3.2设置代理IP
PhantomJS
FireFox
Chrome
对于采用异步加载技术的网页,有时候通过逆向工程来构造爬虫是比较困难的。想用Python获取异步加载返回的数据,可以使用Selenium模块模拟浏览器。
10.1Selenium和PhantomJS和headless-chrome
10.1.1Selenium的概念和安装
Selenium是一个用于web应用程序测试的工具,它直接运行在浏览器中,就像真实的用户在操作一样。由于这个性质,Selenium也是一个强大的网络数据采集工具,它可以让浏览器自动加载页面,这样使用了异步加载技术的网页,也可获取其需要的数据。
Selenium模块是Python的第三方库,可以通过PIP安装:
pip install selenium
10.1.2浏览器的选择和安装
Selenium自己不带浏览器,需要配合第三方浏览器来使用。可以通过help命令查看Selenium的Webdriver功能及Webdriver支持的浏览器
from selenium import webdriver
help(webdriver)
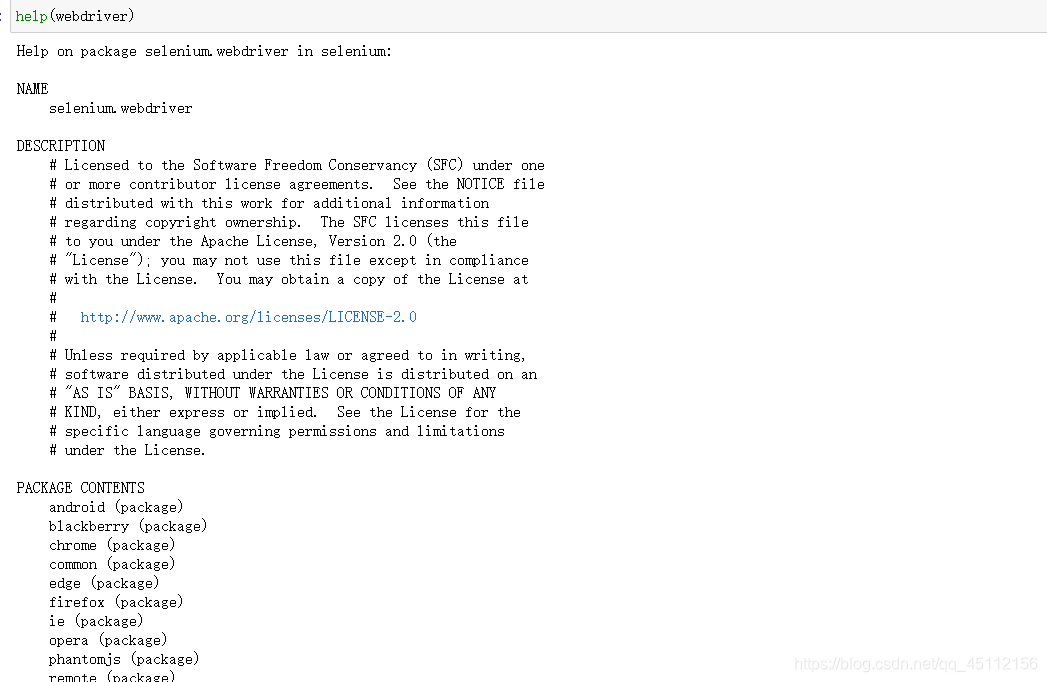
其中,android和blackberry是移动端的浏览器,这里不做考虑。事实上,常用的浏览器是Firefox,Chrome和PhantomJS。我们这里要用的无界浏览器是chrome和PhantomJS。但是由于PhantomJS已经停更,所以只稍微涉猎,主要以chrome为主(原理其实大体相同罢了)
(1)打开百度网盘链接拿去。链接:https://pan.baidu.com/s/1Q7gOII6faiSBXNZfj8fSpQ
提取码:data 对应的chrome webdriver下载可以去这里http://chromedriver.storage.googleapis.com/index.html 更详细的资料可以查看Headless Chrome官方文档。
(2)点击下载,其实就是一个.exe应用程序,然后将PhantomJs或chrome放在python或anaconda目录之下。chrome得设置环境变量。
(3)在Pyhton环境中进行测试,如果没有报错说明可用。
from selenium import webdriver
driver = webdriver.PhantomJS()


from selenium import webdriver
chrome_options = webdriver.ChromeOptions()
#设置无界面模式
chrome_options.add_argument("--headless")
#禁用gpu
chrome_options.add_argument("--disable-gpu")
driver = webdriver.Chrome(options=chrome_options)
driver.get('https://www.baidu.com/')
print('打开浏览器')
print(driver.title)
driver.find_element_by_id('kw').send_keys('测试')
print('关闭')
driver.quit()
print('测试完成')
10.2Selenium和PhantomJS与Chrome的配合使用
Selenium和PhantomJS的配合使用可以实现浏览器的各种操作,也可以轻松获取异步加载后的数据。
10.2.1模拟浏览器操作
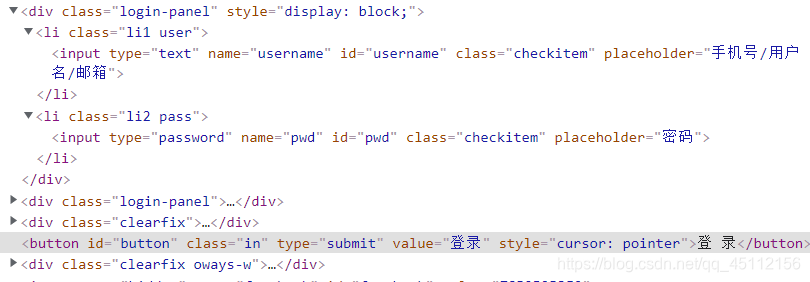
Selenium和PhantomJS配合的使用可以完全模拟用户在浏览器上的所有操作,包括输入框的内容填写、点击、截屏、下滑等各种操作。这样,对于需要登录的网站,用户可以不需要通过构造表单或提交cookie信息来登录网站。下面以药智网(药智网会员注册登录)为例,秩序输入以下代码即可完成登录。
from selenium import webdriver #导入库
driver = webdriver.PhantomJS()    #指定浏览器
driver.get('https://www.yaozh.com/login/')    #请求URL
driver.implicitly_wait(10)                #隐式等待10秒
driver.find_element_by_id('username').clear()    #清除输入框数据
driver.find_element_by_id('username').send_keys('账号')    #输入账号
driver.find_element_by_id('pwd').clear()    #
driver.find_element_by_id('pwd').send_keys('密码')    #输入密码
driver.find_element_by_class_name('in').click()        #单击登录
print(driver.page_source)        #打印网页源代码


from selenium import webdriver

chrome_options = webdriver.ChromeOptions()
chrome_options.add_argument("--headless")
chrome_options.add_argument("--disable-gpu")
browser = webdriver.Chrome(options=chrome_options)

browser.get("http://www.taobao.com")
input_str = browser.find_element_by_id('q')
#在搜索栏输入字符
input_str.send_keys("衬衣")
#等待一秒
browser.implicitly_wait(1)
#清空搜索栏
input_str.clear()
input_str.send_keys("裤子")
#寻找搜索按钮
button = browser.find_element_by_xpath('//*[@id="J_TSearchForm"]/div[1]/button')
button.click()
#退出
browser.quit()
10.2.2获取异步加载数据
前面提到的driver.get()方法请求过后的网页源代码中有异步加载的信息,这样便可以轻松获取JavaScript数据。首先来学习有哪些函数可以定位获取元素信息,对于单个元素来说有以下函数:
find_element_by_id
find_element_by_name
find_element_by_xpath
find_element_by_link_text
find_element_by_partial_link_text
find_element_by_tag_name
find_element_by_class_name
find_element_by_css_selector
对于获取多个元素信息,有如下几个函数,通常返回的为列表结构
find_element_by_id
find_element_by_name
find_element_by_xpath
find_element_by_link_text
find_element_by_partial_link_text
find_element_by_tag_name
find_element_by_class_name
find_element_by_css_selector
对于不复杂的网页结构,可以使用class,name,id属性来定位,但对于复杂的网页结构来说,使用Xpath更加合适。前面已经详细介绍了Xpath语法,但在Selenium中有些不容。下面以简书网的“文章”专题为例子进行展示。

前面讲简书网的阅读、评论、喜欢、收录专题采用了异步加载技术,但通过Selenium和chrome配合使用,不需要进行逆向工程,代码如下
from selenium import webdriver
from selenium.webdriver.chrome.options import Options

url = 'https://www.jianshu.com/p/c9bae3e9e252'

def get_info(url):
    chrome_options = Options()
    chrome_options.add_argument('--headless')  #设计参数无界
    chrome_options.add_argument('--disable-gpu')  #设置参数禁用GPU
    driver = webdriver.Chrome(options = chrome_options)
    driver.get(url)
    driver.implicitly_wait(20)     #隐式等待20秒
    author = driver.find_element_by_xpath('//div[@class="_3U4Smb"]/span/a').text
    date = driver.find_element_by_xpath('//div[@class="s-dsoj"]/time').text
    word = driver.find_element_by_xpath('//div[@class="s-dsoj"]/span[1]').text
    view = driver.find_element_by_xpath('//div[@class="s-dsoj"]/span[2]').text
    print(author,date,word,view)

get_info(url)
10.2.3常见的问题
爬虫的代码有一点需要注意,需要操作事件的时候最好不要直接用相应的方法,比如click。最好嵌入js脚本的方式进行调用。因为爬虫的代码执行速度很快,前端元素结构往往反应不过来,从而找出元素不可见或者不存在的错误。
province_items = DRIVER.find_element_by_class_name("city-province").find_elements_by_tag_name("a")
#province_item.click()  #前端加载不赢
DRIVER.execute_script('arguments[0].click();',province_item)
高人指教
10.3Selenium反爬设置
Selenium是一个自动化的模拟浏览器,同样也是一个爬虫。因此,在使用selenium的过程中可以设置请求头或者设置代理IP等措施来防止被封。
10.3.1设置请求头
webdriver是浏览器的驱动。Selenium可以使用的webdribver有多个,如谷歌、火狐、PhantomJS。Requests和Scrapy设置请求头只需要一行代码。Selenium每个webdriver的请求头设置方式都不一样,代码也比较麻烦。
PhantomJS
from selenium import webdriver
from selenium.webdriver.common.desired_capabilities import DesiredCapabilities  #引入设置

dcap = dict(DesiredCapabilities.PHANTOMJS)  #字典化PhantomJS参数
dcap["phantomjs.page.settings.userAgent"] = ('Mozilla/5.0 (Windows NT 10.0; Win64; x64) AppleWebKit/537.36 (KHTML, like Gecko) Chrome/90.0.4430.93 Safari/537.36")

browser = webdriver.PhantomJS(desired_capabilities=dcap)  #手动设置PhantomJS的useragent
FireFox
firefox需要用到Firefoxprofile来自定义请求头。firefoxprofile保存你的个人设置,启动FireFox时加载firefoxprofile则可以启用你的自定义设置。
from selenium import webdriver

user_agent =  'Mozilla/5.0 (Windows NT 10.0; Win64; x64) AppleWebKit/537.36 (KHTML, like Gecko) Chrome/90.0.4430.93 Safari/537.36'

profile = webdriver.FireFoxProfile()   #实例化firefoxprofile
profile.set_preference("general.useragent.override,user_agent")  #手动设置请求头UA
driver = webdriver.FireFox(profile)
Chrome
from selenium import webdriver
options = webdriver.ChromeOptions()      #实例化chrome浏览器参数设置
options.add_argument('lang=zh_CN.UTF-8')  #设置中文
options.add_argument('user-agent="Mozilla/5.0 (Windows NT 10.0; Win64; x64) AppleWebKit/537.36 (KHTML, like Gecko) Chrome/90.0.4430.93 Safari/537.36"')

browser = webdriver.Chrome(chrome_options=options)
10.3.2设置代理IP
一般的网站使用请求头可以有效伪装,防止被发现是爬虫。不过真正能够防止被对方网站ban的方法,还是使用代理IP。
PhantomJS
from selenium import webdriver
from selenium.webdriver.common.proxy import Proxy
from selenium.webdriver.common.proxy import ProxyType
from selenium.webdriver.common.desired_capabilities import DesiredCapabilities

proxy = Proxy(
    {
        'proxyType':ProxyType.MANUAL,
        'httpProxy':'ip:prot'  #代理IP和端口
})  #初始化代理IP和端口

desired_capabilities = DesiredCapabilities.PHANTOMJS.copy()  #复制DesiredCapabilities参数

proxy.add_to_capabilities(desired_capabilitys)  #将代理参数添加到DesiredCapabilities中

driver = webdriver.PhantomJS(desired_capabilities=desired_capabilities)   #启用代理
FireFox
from selenium import webdriver

profile = webdriver.FirefoxProfile()  #实例化firefoxprofile
profile.set_preference('network.proxy.type',1)  #0为直接连接,1为手工链接
profile.set_preference('network.proxy.http','ip')  #代理IP
profile.set_preference('network.proxy.http_prot','ip的端口')  #端口,必须为整型int
profile.update_preferences()
driver = webdriver.Firefox(firefox_profile=profile)
Chrome
from selenium import webdriver

chrome_options = webdriver.ChromeOptions()  #实例化chromeoptions
chrome_options.add_agrument('--proxy-sever=http://ip:端口')  #添加代理IP和端口
driver = webdriver.Chrome(options=chrome_options)  #启用