在wxPython中,book控件允许用户在各种面板之间切换。最常见的例子是带有选项卡界面的浏览器和系统选项对话框。本文将向您介绍这些控件的创建和基本配置。
wxPython目前内置了多个这样的控件,除文章"wxPython-高级控件之选项卡Notebook"介绍了wx.NoteBook选项卡控件外,我们将分两篇文章来介绍剩下的这些控件。
一、准备工作
为了方便演示各种Book控件的页面切换,我们首先准备了三个独立的页面,它们都继承自wx.Panel,分别将这三个页面命名为panelOne, panelTwo和panelThree。
panelOne.py
import wx

class TabPanel(wx.Panel):
    """
    This will be the first notebook tab
    """
    #----------------------------------------------------------------------
    def __init__(self, parent):
        """"""

        wx.Panel.__init__(self, parent=parent, id=wx.ID_ANY)

        sizer = wx.BoxSizer(wx.VERTICAL)
        txtOne = wx.TextCtrl(self, wx.ID_ANY, "")
        txtTwo = wx.TextCtrl(self, wx.ID_ANY, "")

        sizer = wx.BoxSizer(wx.VERTICAL)
        sizer.Add(txtOne, 0, wx.ALL, 5)
        sizer.Add(txtTwo, 0, wx.ALL, 5)

        self.SetSizer(sizer)


class DemoFrame(wx.Frame):
    def __init__(self):
        wx.Frame.__init__(self, None, wx.ID_ANY, "Panel Tutorial")
        panel = TabPanel(self)
        self.Show()

#----------------------------------------------------------------------
if __name__ == "__main__":
    app = wx.App()
    frame = DemoFrame()
    app.MainLoop()
panelOne面板创建了两个按垂直方向排列的单行文本编辑框。
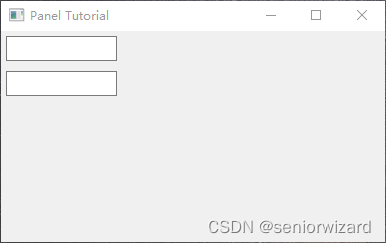
图1:panelOne
panelTwo.py
import wx
import  wx.lib.mixins.listctrl  as  listmix

musicdata = {
1 : ("Bad English", "The Price Of Love", "Rock"),
2 : ("DNA featuring Suzanne Vega", "Tom's Diner", "Rock"),
3 : ("George Michael", "Praying For Time", "Rock"),
4 : ("Gloria Estefan", "Here We Are", "Rock"),
5 : ("Linda Ronstadt", "Don't Know Much", "Rock"),
6 : ("Michael Bolton", "How Am I Supposed To Live Without You", "Blues"),
7 : ("Paul Young", "Oh Girl", "Rock"),
8 : ("Paula Abdul", "Opposites Attract", "Rock"),
9 : ("Richard Marx", "Should've Known Better", "Rock"),
10: ("Rod Stewart", "Forever Young", "Rock"),
11: ("Roxette", "Dangerous", "Rock"),
12: ("Sheena Easton", "The Lover In Me", "Rock"),
13: ("Sinead O'Connor", "Nothing Compares 2 U", "Rock"),
14: ("Stevie B.", "Because I Love You", "Rock"),
15: ("Taylor Dayne", "Love Will Lead You Back", "Rock"),
16: ("The Bangles", "Eternal Flame", "Rock"),
17: ("Wilson Phillips", "Release Me", "Rock"),
18: ("Billy Joel", "Blonde Over Blue", "Rock"),
19: ("Billy Joel", "Famous Last Words", "Rock"),
20: ("Billy Joel", "Lullabye (Goodnight, My Angel)", "Rock"),
21: ("Billy Joel", "The River Of Dreams", "Rock"),
22: ("Billy Joel", "Two Thousand Years", "Rock")
}

class TestListCtrl(wx.ListCtrl, listmix.ListCtrlAutoWidthMixin):
    def __init__(self, parent, ID, pos=wx.DefaultPosition,
                 size=wx.DefaultSize, style=0):
        wx.ListCtrl.__init__(self, parent, ID, pos, size, style)
        listmix.ListCtrlAutoWidthMixin.__init__(self)

class TabPanel(wx.Panel, listmix.ColumnSorterMixin):
    """
    This will be the second notebook tab
    """
    #----------------------------------------------------------------------
    def __init__(self, parent):
        """"""
        wx.Panel.__init__(self, parent=parent, id=wx.ID_ANY)
        self.createAndLayout()

    def createAndLayout(self):
        sizer = wx.BoxSizer(wx.VERTICAL)
        self.list = TestListCtrl(self, wx.ID_ANY, style=wx.LC_REPORT
                                 | wx.BORDER_NONE
                                 | wx.LC_EDIT_LABELS
                                 | wx.LC_SORT_ASCENDING)
        sizer.Add(self.list, 1, wx.EXPAND)
        self.populateList()
        # Now that the list exists we can init the other base class,
        # see wx/lib/mixins/listctrl.py
        self.itemDataMap = musicdata
        listmix.ColumnSorterMixin.__init__(self, 3)
        self.SetSizer(sizer)
        self.SetAutoLayout(True)

    def populateList(self):
        self.list.InsertColumn(0, "Artist")
        self.list.InsertColumn(1, "Title", wx.LIST_FORMAT_RIGHT)
        self.list.InsertColumn(2, "Genre")
        items = musicdata.items()

        for key, data in items:
            index = self.list.InsertItem(0, data[0])
            self.list.SetItem(index, 1, data[1])
            self.list.SetItem(index, 2, data[2])
            self.list.SetItemData(index, key)

        self.list.SetColumnWidth(0, wx.LIST_AUTOSIZE)
        self.list.SetColumnWidth(1, wx.LIST_AUTOSIZE)
        self.list.SetColumnWidth(2, 100)

        # show how to select an item
        self.list.SetItemState(5, wx.LIST_STATE_SELECTED, wx.LIST_STATE_SELECTED)

        # show how to change the colour of a couple items
        item = self.list.GetItem(1)
        item.SetTextColour(wx.BLUE)
        self.list.SetItem(item)
        item = self.list.GetItem(4)
        item.SetTextColour(wx.RED)
        self.list.SetItem(item)

        self.currentItem = 0

    # Used by the ColumnSorterMixin, see wx/lib/mixins/listctrl.py
    def GetListCtrl(self):
        return self.list

class DemoFrame(wx.Frame):
    def __init__(self):
        wx.Frame.__init__(self, None, wx.ID_ANY, "Panel Tutorial")
        panel = TabPanel(self)
        self.Show()

#----------------------------------------------------------------------
if __name__ == "__main__":
    app = wx.App()
    frame = DemoFrame()
    app.MainLoop()
panelTwo面板添加了一个ListCtrl控件,用来显示乐队歌手所唱的歌曲列表。

图2:panelTwo
panelThree.py
import wx
import wx.gizmos as gizmos

class TabPanel(wx.Panel):
    """
    This will be the third notebook tab
    """
    #----------------------------------------------------------------------
    def __init__(self, parent):
        """"""
        wx.Panel.__init__(self, parent=parent, id=wx.ID_ANY)

        self.Bind(wx.EVT_SIZE, self.OnSize)

        self.tree = gizmos.TreeListCtrl(self, -1, style =
                                        wx.TR_DEFAULT_STYLE
                                        | wx.TR_FULL_ROW_HIGHLIGHT
                                        )

        isz = (16,16)
        il = wx.ImageList(isz[0], isz[1])
        fldridx     = il.Add(self.GetImage("folder.png"))
        fldropenidx = il.Add(self.GetImage("file_open.png"))
        fileidx     = il.Add(self.GetImage("file_normal.png"))
        bulbidx     = il.Add(self.GetImage("tip.png"))

        self.tree.SetImageList(il)
        self.il = il

        # create some columns
        self.tree.AddColumn("主列")
        self.tree.AddColumn("列1")
        self.tree.AddColumn("列2")
        self.tree.SetMainColumn(0) # the one with the tree in it...
        self.tree.SetColumnWidth(0, 175)

        self.root = self.tree.AddRoot("The Root Item")
        self.tree.SetItemText(self.root, "col 1 root", 1)
        self.tree.SetItemText(self.root, "col 2 root", 2)
        self.tree.SetItemImage(self.root, fldridx, which = wx.TreeItemIcon_Normal)
        self.tree.SetItemImage(self.root, fldropenidx, which = wx.TreeItemIcon_Expanded)

        for x in range(15):
            txt = "Item %d" % x
            child = self.tree.AppendItem(self.root, txt)
            self.tree.SetItemText(child, txt + "(c1)", 1)
            self.tree.SetItemText(child, txt + "(c2)", 2)
            self.tree.SetItemImage(child, fldridx, which = wx.TreeItemIcon_Normal)
            self.tree.SetItemImage(child, fldropenidx, which = wx.TreeItemIcon_Expanded)

            for y in range(5):
                txt = "item %d-%s" % (x, chr(ord("a")+y))
                last = self.tree.AppendItem(child, txt)
                self.tree.SetItemText(last, txt + "(c1)", 1)
                self.tree.SetItemText(last, txt + "(c2)", 2)
                self.tree.SetItemImage(last, fldridx, which = wx.TreeItemIcon_Normal)
                self.tree.SetItemImage(last, fldropenidx, which = wx.TreeItemIcon_Expanded)

                for z in range(5):
                    txt = "item %d-%s-%d" % (x, chr(ord("a")+y), z)
                    item = self.tree.AppendItem(last,  txt)
                    self.tree.SetItemText(item, txt + "(c1)", 1)
                    self.tree.SetItemText(item, txt + "(c2)", 2)
                    self.tree.SetItemImage(item, fileidx, which = wx.TreeItemIcon_Normal)
                    self.tree.SetItemImage(item, bulbidx, which = wx.TreeItemIcon_Selected)

        self.tree.Expand(self.root)

        self.tree.GetMainWindow().Bind(wx.EVT_RIGHT_UP, self.OnRightUp)
        self.tree.Bind(wx.EVT_TREE_ITEM_ACTIVATED, self.OnActivate)

    def GetImage(self, filename, w=16, h=16):
        #img = wx.Image(filename, "image/png").Scale(w,h) #通过wx.Image 加载图片,并缩放图片到长宽为w,w的尺寸
        img = wx.Bitmap(filename, wx.BITMAP_TYPE_ANY).ConvertToImage().Scale(w, h) #将位图转换为图片后在改变尺寸
        return wx.Bitmap(img, wx.BITMAP_SCREEN_DEPTH)

    def OnActivate(self, evt):
        print('OnActivate: %s' % self.tree.GetItemText(evt.GetItem()))

    def OnRightUp(self, evt):
        pos = evt.GetPosition()
        item, flags, col = self.tree.HitTest(pos)
        if item:
            print('Flags: %s, Col:%s, Text: %s' % (flags, col, self.tree.GetItemText(item, col)))

    def OnSize(self, evt):
        self.tree.SetSize(self.GetSize())


class DemoFrame(wx.Frame):
    def __init__(self):
        wx.Frame.__init__(self, None, wx.ID_ANY, "Panel Tutorial")
        panel = TabPanel(self)
        self.Show()

#----------------------------------------------------------------------
if __name__ == "__main__":
    app = wx.App()
    frame = DemoFrame()
    app.MainLoop()
panelThree面板中添加了一个树形控件TreeListCtrl按树状方式显示一些子项。

图3:panelThree
二、wx.Choicebook
wx.Choicebook是一个类似wx.Notebook的控件,使用wx.Choice控件来显示标签。因此它允许用户单击下拉控件来选择要查看的页面。Choicebook继承自wx.BookCtrlBase,所以它具有与wx.Notebook相同的大部分方法。
wx.Choicebook支持的窗口样式:
- wx.CHB_DEFAULT:根据当前平台为标签选择默认位置(默认为wx.CHB_TOP)。
- wx.CHB_TOP:在页面区域上方放置标签。
- wx.CHB_LEFT:在页面区域左边放置标签。
- wx.CHB_RIGHT:在页面区域右边放置标签。
- wx.CHB_BOTTOM:在页面区域下方放置标签。
wx.Choicebook发出的消息:
- EVT_CHOICEBOOK_PAGE_CHANGED:页面选择发生改变后发出。
- EVT_CHOICEBOOK_PAGE_CHANGING:页面选择发生改变时发出。
三、wx.Choicebook演示
#wx.Choicebook

import wx
import panelOne, panelTwo, panelThree

class MyChoicebook(wx.Choicebook):

    def __init__(self, parent):
        wx.Choicebook.__init__(self, parent, wx.ID_ANY)

        # 创建第一个页面, 并添加到Choicebook
        tabOne = panelOne.TabPanel(self)
        tabOne.SetBackgroundColour("Gray")
        self.AddPage(tabOne, "页面一")

        # 创建第二个页面, 并添加到Choicebook
        tabTwo = panelTwo.TabPanel(self)
        self.AddPage(tabTwo, "页面二")

        # 创建第三个页面, 并添加到Choicebook
        self.AddPage(panelThree.TabPanel(self), "页面三")

        self.Bind(wx.EVT_CHOICEBOOK_PAGE_CHANGED, self.OnPageChanged)
        self.Bind(wx.EVT_CHOICEBOOK_PAGE_CHANGING, self.OnPageChanging)

    def OnPageChanged(self, e):
        old = e.GetOldSelection()
        new = e.GetSelection()
        sel = self.GetSelection()
        print("OnPageChanged,  old:%d, new:%d, sel:%d\n" % (old, new, sel))
        e.Skip()

    def OnPageChanging(self, e):
        old = e.GetOldSelection()
        new = e.GetSelection()
        sel = self.GetSelection()
        print("OnPageChanging,  old:%d, new:%d, sel:%d\n" % (old, new, sel))
        e.Skip()

class SampleChoicebook(wx.Frame):

    def __init__(self, *args, **kw):
        super(SampleChoicebook, self).__init__(*args, **kw)

        self.InitUi()

    def InitUi(self):
        self.SetTitle("实战wxPython: Choicebook演示")
        self.SetSize(600, 400)

        panel = wx.Panel(self)

        notebook = MyChoicebook(panel)
        sizer = wx.BoxSizer(wx.VERTICAL)
        sizer.Add(notebook, 1, wx.ALL|wx.EXPAND, 5)
        panel.SetSizer(sizer)
        self.Layout()

        self.Centre()

def main():
    app = wx.App()
    sample = SampleChoicebook(None)
    sample.Show()
    app.MainLoop()

if __name__ == "__main__":
    main()
上面的代码演示了使用wx.Choicebook的AddPage方法添加三个页面,使用wx.Choice下拉列表选择就可以在不同的页面之间切换。

图4:wx.Choicebook演示
四、wx.Listbook
wx.Listbook是一个类似于wx.Notebook的类,但它使用wx.ListCtrl来显示标签。默认情况下,底层wx.ListCtrl在单列报表视图中显示页面标签。调用wx.BookCtr.SetImageList将隐式地切换控件以使用图标视图。
与Choicebook一样,此控件继承自BookCtrlBase并具有相同的方法。主要的区别似乎在于列表的外观和它独特的事件集。
wx.Listbook支持的窗口样式:
- wx.LB_DEFAULT:根据当前平台为标签选择默认位置。
- wx.LB_TOP:在页面区域上方放置标签。
- wx.LB_LEFT:在页面区域左边放置标签。
- wx.LB_RIGHT:在页面区域右边放置标签。
- wx.LB_BOTTOM:在页面区域下方放置标签。
wx.Listbook发出的消息:
- EVT_LISTBOOK_PAGE_CHANGED:页面选择发生改变后发出。
- EVT_LISTBOOK_PAGE_CHANGING:页面选择发生改变时发出。
五、wx.Listbook演示
#wx.Listbook

import wx
import panelOne, panelTwo, panelThree

class MyListbook(wx.Listbook):

    def __init__(self, parent):
        wx.Listbook.__init__(self, parent, wx.ID_ANY)

        img_list= wx.ImageList(32, 32)
        img_list.Add(wx.Bitmap("img01.png", wx.BITMAP_TYPE_ANY))
        img_list.Add(wx.Bitmap("img02.png", wx.BITMAP_TYPE_ANY))
        img_list.Add(wx.Bitmap("img03.png", wx.BITMAP_TYPE_ANY))
        self.AssignImageList(img_list)

        pages = [(panelOne.TabPanel(self), "页面一"),
                 (panelTwo.TabPanel(self), "页面二"),
                 (panelThree.TabPanel(self), "页面三")]

        img_id = 0
        for page,label in pages:
            self.AddPage(page, label, imageId=img_id)
            img_id += 1

        self.Bind(wx.EVT_CHOICEBOOK_PAGE_CHANGED, self.OnPageChanged)
        self.Bind(wx.EVT_CHOICEBOOK_PAGE_CHANGING, self.OnPageChanging)

    def OnPageChanged(self, e):
        old = e.GetOldSelection()
        new = e.GetSelection()
        sel = self.GetSelection()
        print("OnPageChanged,  old:%d, new:%d, sel:%d\n" % (old, new, sel))
        e.Skip()

    def OnPageChanging(self, e):
        old = e.GetOldSelection()
        new = e.GetSelection()
        sel = self.GetSelection()
        print("OnPageChanging,  old:%d, new:%d, sel:%d\n" % (old, new, sel))
        e.Skip()

class SampleListbook(wx.Frame):

    def __init__(self, *args, **kw):
        super(SampleListbook, self).__init__(*args, **kw)

        self.InitUi()

    def InitUi(self):
        self.SetTitle("实战wxPython: Listbook演示")
        self.SetSize(600, 400)

        panel = wx.Panel(self)

        notebook = MyListbook(panel)
        sizer = wx.BoxSizer(wx.VERTICAL)
        sizer.Add(notebook, 1, wx.ALL|wx.EXPAND, 5)
        panel.SetSizer(sizer)
        self.Layout()

        self.Centre()

def main():
    app = wx.App()
    sample = SampleListbook(None)
    sample.Show()
    app.MainLoop()

if __name__ == "__main__":
    main()
就像wx.Notebook一样, wx.Listbook的“tab”控件可以设置在任意边。
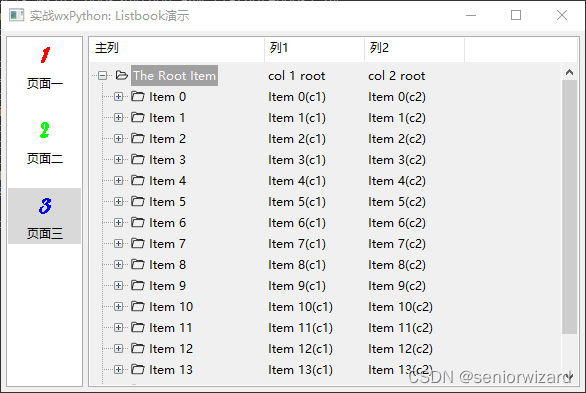
图5:wx.Listbook演示
六、wx.Toolbook
wx.Toolbook是一个类似于wx.Notebook的类,但它使用wx.ToolBar来显示标签。可以看作是一个wx.Toolbar加上一个wx.Notebook构成wx.Toolbook。这意味着可以使用带标签的位图按钮来控制您正在查看的笔记本的哪个“选项卡”。
wx.Toolbook支持的窗口样式:
- wx.TBK_BUTTONBAR:在macOS下使用基于wx.buttontoolbar的实现(在其他平台下忽略)。
- wx.TBK_HORZ_LAYOUT:在旁边显示文本和图标,而不是垂直堆叠(仅在Windows和GTK 2平台下实现,因为它依赖于wx.TB_HORZ_LAYOUT标志支持)。
wx.Listbook发出的消息:
- EVT_TOOLBOOK_PAGE_CHANGED:页面选择发生改变后发出。
- EVT_TOOLBOOK_PAGE_CHANGING:页面选择发生改变时发出。
七、wx.Toolbook演示
#wx.Toolbook

import wx
import panelOne, panelTwo, panelThree

class MyToolbook(wx.Toolbook):

    def __init__(self, parent):
        wx.Toolbook.__init__(self, parent, wx.ID_ANY)

        img_list= wx.ImageList(32, 32)
        img_list.Add(wx.Bitmap("img01.png", wx.BITMAP_TYPE_ANY))
        img_list.Add(wx.Bitmap("img02.png", wx.BITMAP_TYPE_ANY))
        img_list.Add(wx.Bitmap("img03.png", wx.BITMAP_TYPE_ANY))
        self.AssignImageList(img_list)

        pages = [(panelOne.TabPanel(self), "页面一"),
                 (panelTwo.TabPanel(self), "页面二"),
                 (panelThree.TabPanel(self), "页面三")]

        img_id = 0
        for page,label in pages:
            self.AddPage(page, label, imageId=img_id)
            img_id += 1

        self.Bind(wx.EVT_CHOICEBOOK_PAGE_CHANGED, self.OnPageChanged)
        self.Bind(wx.EVT_CHOICEBOOK_PAGE_CHANGING, self.OnPageChanging)

    def OnPageChanged(self, e):
        old = e.GetOldSelection()
        new = e.GetSelection()
        sel = self.GetSelection()
        print("OnPageChanged,  old:%d, new:%d, sel:%d\n" % (old, new, sel))
        e.Skip()

    def OnPageChanging(self, e):
        old = e.GetOldSelection()
        new = e.GetSelection()
        sel = self.GetSelection()
        print("OnPageChanging,  old:%d, new:%d, sel:%d\n" % (old, new, sel))
        e.Skip()

class SampleToolbook(wx.Frame):

    def __init__(self, *args, **kw):
        super(SampleToolbook, self).__init__(*args, **kw)

        self.InitUi()

    def InitUi(self):
        self.SetTitle("实战wxPython: Toolbook演示")
        self.SetSize(600, 400)

        panel = wx.Panel(self)

        notebook = MyToolbook(panel)
        sizer = wx.BoxSizer(wx.VERTICAL)
        sizer.Add(notebook, 1, wx.ALL|wx.EXPAND, 5)
        panel.SetSizer(sizer)
        self.Layout()

        self.Centre()

def main():
    app = wx.App()
    sample = SampleToolbook(None)
    sample.Show()
    app.MainLoop()

if __name__ == "__main__":
    main()
wx.Toolbook的外观和wx.Listbook有些类似,但是其选项卡切换方式采用wx.ToolBar方式实现。
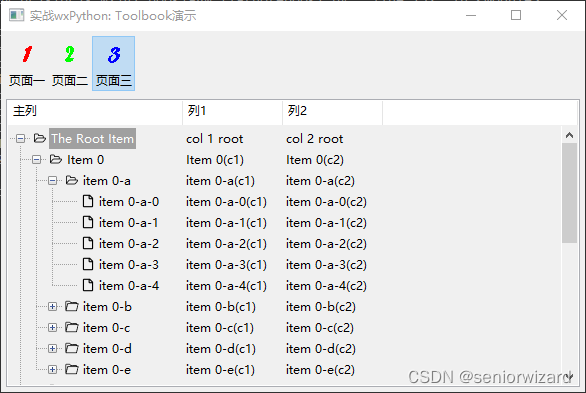
图6:wx.Toolbook演示
八、wx.Treebook
wx.Treebook是wx.Notebook类的扩展,它允许在控件中显示树状结构的页面集。它可以看作是wx.TreeCtrl和wx.Notebook的组合。
创建wx.Treebook对象后,使用InsertPage()、InsertSubPage()、AddPage()、AddSubPage()即可填充页面。如果树深度不超过1层,那么可以简单地使用AddPage()和AddSubPage()通过在树的每一步添加一个页面或子页面到树的末尾来顺序填充的树。
wx.Treebook发送的事件:
- EVT_TREEBOOK_PAGE_CHANGED:页面选择发生改变后发出。
- EVT_TREEBOOK_PAGE_CHANGING:页面选择发生改变时发出。
- EVT_TREEBOOK_NODE_COLLAPSED:页面节点被折叠时发出。
- EVT_TREEBOOK_NODE_EXPANDED:页面节点被展开时发出。
九、wx.Treebook演示
#wx.Treebook

import wx
import panelOne, panelTwo, panelThree

class MyTreebook(wx.Treebook):

    def __init__(self, parent):
        wx.Treebook.__init__(self, parent, wx.ID_ANY)

        img_list= wx.ImageList(32, 32)
        img_list.Add(wx.Bitmap("img01.png", wx.BITMAP_TYPE_ANY))
        img_list.Add(wx.Bitmap("img02.png", wx.BITMAP_TYPE_ANY))
        img_list.Add(wx.Bitmap("img03.png", wx.BITMAP_TYPE_ANY))
        self.AssignImageList(img_list)

        pages = [(panelOne.TabPanel(self), "页面一"),
                 (panelTwo.TabPanel(self), "页面二"),
                 (panelThree.TabPanel(self), "页面三")]

        img_id = 0
        for page,label in pages:
            self.AddPage(page, label, imageId=img_id)
            self.AddSubPage(page, "子页面", imageId=img_id)
            img_id += 1

        self.Bind(wx.EVT_CHOICEBOOK_PAGE_CHANGED, self.OnPageChanged)
        self.Bind(wx.EVT_CHOICEBOOK_PAGE_CHANGING, self.OnPageChanging)

        # 解决在Mac上大小错误
        wx.CallLater(100, self.AdjustSize)

    def AdjustSize(self):
        self.GetTreeCtrl().InvalidateBestSize()
        self.SendSizeEvent()

    def OnPageChanged(self, e):
        old = e.GetOldSelection()
        new = e.GetSelection()
        sel = self.GetSelection()
        print("OnPageChanged,  old:%d, new:%d, sel:%d\n" % (old, new, sel))
        e.Skip()

    def OnPageChanging(self, e):
        old = e.GetOldSelection()
        new = e.GetSelection()
        sel = self.GetSelection()
        print("OnPageChanging,  old:%d, new:%d, sel:%d\n" % (old, new, sel))
        e.Skip()

class SampleTreebook(wx.Frame):

    def __init__(self, *args, **kw):
        super(SampleTreebook, self).__init__(*args, **kw)

        self.InitUi()

    def InitUi(self):
        self.SetTitle("实战wxPython: Treebook演示")
        self.SetSize(600, 400)

        panel = wx.Panel(self)

        notebook = MyTreebook(panel)
        sizer = wx.BoxSizer(wx.VERTICAL)
        sizer.Add(notebook, 1, wx.ALL|wx.EXPAND, 5)
        panel.SetSizer(sizer)
        self.Layout()

        self.Centre()

def main():
    app = wx.App()
    sample = SampleTreebook(None)
    sample.Show()
    app.MainLoop()

if __name__ == "__main__":
    main()
与wx.Toolbook一样,我们再次使用了前面演示中的一些代码来创建这个演示。除了wx.Treebook的专门事件外,还应该注意它有一个AddSubPage方法,该方法向树中添加一个子节点,该子节点又向笔记本中添加另一页。

图7:wx.Treebook演示
十、本文知识点
- 了解wx.lib.mixins.listctrl;
- 了解gizmos.TreeListCtrl;
- 了解和使用wx.Choicebook;
- 了解和使用wx.Lisybool ;
- 了解和使用wx.Toolbook;
- 了解和使用wx.Treebook。
前一篇:实战wxPython:046 - AGW扩展包