一、网络请求的基本知识
1.get方法与post方法
1. get是从服务器上获取数据,post是向服务器传送数据。
2. get是把参数数据队列加到提交表单的ACTION属性所指的URL中,值和表单内各个字段一一对应,
   在URL中可以看到。post是通过HTTP post机制,将表单内各个字段与其内容放置在HTML HEADER内一起
   传送到ACTION属性所指的URL地址。用户看不到这个过程。
3. 对于get方式,服务器端用Request.QueryString获取变量的值,对于post方式,服务器端用Request.
   Form获取提交的数据。
4.get是明文传输,post是转为NSData
还是不明白,回头再看
这篇原创文章讲了些post和get的问题,观点有些不同
http://www.nowamagic.net/librarys/veda/detail/1919
这是400、500、301、200等网站状态码的含义
http://www.maolvge.cn/news/jianzhanchangshi/29.html
2.同步和异步
同步:提交请求->等待服务器处理->处理完毕返回 这个期间客户端浏览器不能干任何事
异步: 请求通过事件触发->服务器处理(这是浏览器仍然可以作其他事情)->处理完毕
session自己内部封装了线程,不存在同步请求的问题了
3.
NSURLConnection和
NSURLConnection
iOS7以前,使用的都是NSURLConnection
在WWDC2013中,推出了NSURLSession作为替代。
下面这篇文章比较清楚地讲了NSURLConnection和NSURLSession的一些区别和内容
URLSession是一种任务模式
iOS 7系列译文:忘记NSURLConnection,拥抱NSURLSession吧!
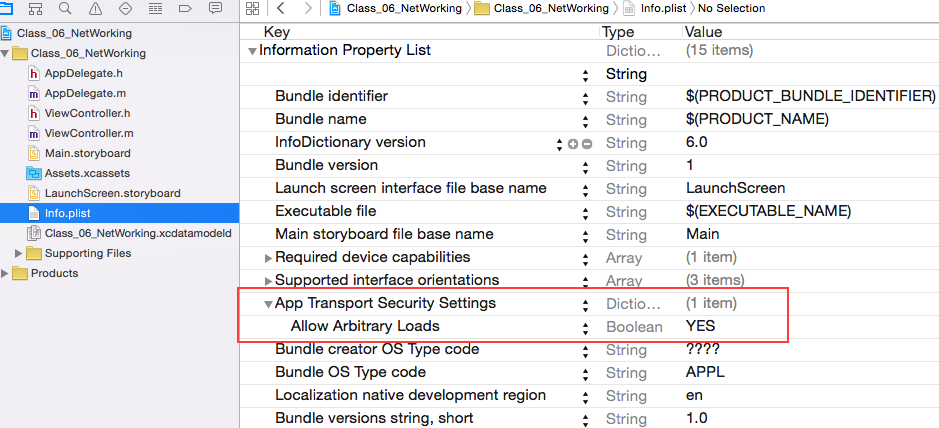
4.设置Info.plist文件
添加一条App Transport Secutity Settings
把其下的Allow Arbitrary Loads 属性改为YES
二、使用NSURLConnection
1.get方法
//get的同步请求
-(void)getAndSynchronize
{
    NSString *urlStr = @"http://ipad-bjwb.bjd.com.cn/DigitalPublication/publish/Handler/APINewsList.ashx?date=20151031&startRecord=1&len=5&udid=1234567890&terminalType=Iphone&cid=213";
    //得到网址
    NSURL *url = [NSURL URLWithString:urlStr];
    //创建请求
    NSURLRequest *req = [NSURLRequest requestWithURL:url];
    //创建同步链接
    NSData *data = [NSURLConnection sendSynchronousRequest:req returningResponse:nil error:nil];

    //json解析
    NSDictionary *dic = [NSJSONSerialization JSONObjectWithData:data options:NSJSONReadingAllowFragments error:nil];
    NSLog(@"11%@",dic);

}

//get的异步请求,使用block方法
-(void)getAndAsynchronize
{
    NSString *urlStr = @"http://ipad-bjwb.bjd.com.cn/DigitalPublication/publish/Handler/APINewsList.ashx?date=20151031&startRecord=1&len=5&udid=1234567890&terminalType=Iphone&cid=213";
    //得到网址
    NSURL *url = [NSURL URLWithString:urlStr];
    //创建请求
    NSURLRequest *req = [NSURLRequest requestWithURL:url];

    __block NSDictionary *dic = [NSDictionary dictionary];
    //创建异步
    [NSURLConnection sendAsynchronousRequest:req queue:[NSOperationQueue mainQueue] completionHandler:^(NSURLResponse * _Nullable response, NSData * _Nullable data, NSError * _Nullable connectionError) {

        dic = [NSJSONSerialization JSONObjectWithData:data options:NSJSONReadingAllowFragments error:nil];
        NSLog(@"%@",dic);
    }];
    NSLog(@"异步链接下面");
}
2.post方法同步请求
//post同步请求
-(void)postAndSynchronize
{
    //post请求,一般只包含 协议://host/路径
    NSString *urlStr = @"http://ipad-bjwb.bjd.com.cn/DigitalPublication/publish/Handler/APINewsList.ashx";
    //得到网址
    NSURL *url = [NSURL URLWithString:urlStr];
    //请求方式为post,所有要创建为NSMutableURLRequest
    NSMutableURLRequest *mReq = [[NSMutableURLRequest alloc]initWithURL:url];
    //设置情感方式,不设置时,默认为GET请求
    [mReq setHTTPMethod:@"POST"];
    //创建参数
    NSString *pStr = @"date=20151031&startRecord=1&len=5&udid=1234567890&terminalType=Iphone&cid=213";
    NSData *pData = [pStr dataUsingEncoding:NSUTF8StringEncoding];
    //设置参数
    [mReq setHTTPBody:pData];

    //建立同步链接
    NSData *resultData = [NSURLConnection sendSynchronousRequest:mReq returningResponse:nil error:nil];
    NSDictionary *dic = [NSJSONSerialization JSONObjectWithData:resultData options:NSJSONReadingAllowFragments error:nil];
    NSLog(@"%@",dic);
}
post方法,使用block和代理方式
//POST异步请求
-(void)postAndAsynchronize
{
    NSString *str = @"http://ipad-bjwb.bjd.com.cn/DigitalPublication/publish/Handler/APINewsList.ashx";
    NSURL *url = [NSURL URLWithString:str];
    NSMutableURLRequest *mReq = [NSMutableURLRequest requestWithURL:url];
    //cahce策略,超时time
    NSMutableURLRequest *mReq1 = [NSMutableURLRequest requestWithURL:url cachePolicy:NSURLRequestReloadIgnoringLocalCacheData timeoutInterval:30];

    [mReq setHTTPMethod:@"POST"];
    //设置参数
    NSString *pStr = @"date=20151031&startRecord=1&len=5&udid=1234567890&terminalType=Iphone&cid=213";
    NSData *pData = [pStr dataUsingEncoding:NSUTF8StringEncoding];
    [mReq setHTTPBody:pData];


    //1.block
    __block NSDictionary *dic = [NSDictionary dictionary];
    //建立异步链接
    [NSURLConnection sendAsynchronousRequest:mReq queue:[NSOperationQueue mainQueue] completionHandler:^(NSURLResponse * _Nullable response, NSData * _Nullable data, NSError * _Nullable connectionError) {
        dic = [NSJSONSerialization JSONObjectWithData:data options:NSJSONReadingAllowFragments error:nil];
//        NSLog(@"%@",dic);
    }];


    //2.使用协议代理方法
    NSURLConnection *conn = [NSURLConnection connectionWithRequest:mReq delegate:self];
}
#pragma mark -- connect的异步代理方法

//开始
-(void)connection:(NSURLConnection *)connection didReceiveResponse:(NSURLResponse *)response
{
    NSLog(@"开始相应,可以在此代理方法中初始化容器");
    _mData = [[NSMutableData alloc]init];
}

//接收数据,data只是数据片段,不是完整数据,需要拼接
-(void)connection:(NSURLConnection *)connection didReceiveData:(nonnull NSData *)data
{
    NSLog(@"开始返回数据片段");

    [_mData appendData:data];
}

//本次链接完成
-(void)connectionDidFinishLoading:(NSURLConnection *)connection
{
    NSLog(@"链接完成");
    //可以在此解析数据
    NSDictionary *dic = [NSJSONSerialization JSONObjectWithData:self.mData options:NSJSONReadingAllowFragments error:nil];
    NSLog(@"%@",dic);
}

//链接出错
-(void)connection:(NSURLConnection *)connection didFailWithError:(NSError *)error
{
    NSLog(@"error - %@",error);
}
三、使用NSURLSession
在WWDC2013中,推出了NSURLSession作为替代。
支持后台运行的网络任务
暂停、停止、重启网络任务、不再需要NSOpation封装
请求可以使用同样的配置容器
不同的session可以使用不同的私有存储,block和代理可以同时起作用
直接从文件系统上传下载
为了方便程序员使用,苹果提供了一个全局session
所有的任务(Task)都是由Session发起的
所有的任务默认是挂起的,需要Resume
NSURLSession的三种工作模式
默认会话模式(default)
瞬间会话模式(ephemeral)//不会有任何缓存
后台会话模式(background)//在后台进行网络请求,在没有session以前使用gcd可以让应用程序在进入后台时继续运行0分钟
支持三种任务
加载瞬间,下载,上传,父类都是NSURLSessionTask
NSURLSessionDataTask
NSURLSessionUploadTask
NSURLSessionDownloadTask
1.session get block的方法
//session get block
-(void)sessionGet
{
    //第一种方式创建session,单例,获取全局session对象
    NSURLSession *session = [NSURLSession sharedSession];

    //第二种方式创建session,可以给session设置工作模式
//    NSURLSessionConfiguration *config = [NSURLSessionConfiguration defaultSessionConfiguration];
//    NSURLSession *session = [NSURLSession sessionWithConfiguration:config];

    //创建url对象
    NSString *urlStr = @"http://ipad-bjwb.bjd.com.cn/DigitalPublication/
    publish/Handler/APINewsList.ashx?date=20151031&startRecord=1&len=5&udid=1234567890&terminalType=Iphone&cid=213";
    //得到网址
    NSURL *url = [NSURL URLWithString:urlStr];

//    //建立请求任务.block方式,通过url建立task,不需要建立request
//    NSURLSessionDataTask *task = [session dataTaskWithURL:url
      completionHandler:^(NSData * _Nullable data, NSURLResponse * _Nullable response, NSError * _Nullable error)
      {
//
//        //解析数据
//
//    }];

    //如果需要设置缓存策略、请求超时等,需要创建请求对象request
    NSURLRequest *req = [[NSURLRequest alloc]initWithURL:url cachePolicy:NSURLRequestUseProtocolCachePolicy
                        timeoutInterval:30];

    //通过request方式建立任务
    NSURLSessionTask *task = [session dataTaskWithRequest:req
        completionHandler:^(NSData * _Nullable data, NSURLResponse * _Nullable response, NSError * _Nullable error)
   {
        NSString *str = [[NSString alloc]initWithData:data encoding:NSUTF8StringEncoding];
        NSLog(@"%@",str);
    }];

    //启动任务
    [task resume];
}
2.session get 代理方法
导入NSURLSessionDelegate,NSURLSessionDataDelegate协议
//session post delegate
-(void)sessionDelegate
{

    //创建url对象
    NSString *urlStr = @"http://ipad-bjwb.bjd.com.cn/DigitalPublication/publish/Handler/APINewsList.ashx";
    //得到网址
    NSURL *url = [NSURL URLWithString:urlStr];

    //创建参数
    NSString *pStr = @"date=20151031&startRecord=1&len=5&udid=1234567890&terminalType=Iphone&cid=213";
    NSData *pData = [pStr dataUsingEncoding:NSUTF8StringEncoding];

    NSMutableURLRequest *mReq = [[NSMutableURLRequest alloc]initWithURL:url cachePolicy:NSURLRequestUseProtocolCachePolicy timeoutInterval:30];
    //设置请求超时
    [mReq setTimeoutInterval:30];
    [mReq setCachePolicy:NSURLRequestReloadIgnoringCacheData];
    [mReq setHTTPMethod:@"POST"];
    [mReq setHTTPBody:pData];

    //代理的方法,主线程
    NSURLSession *session_1 = [NSURLSession sessionWithConfiguration:[NSURLSessionConfiguration defaultSessionConfiguration] delegate:self delegateQueue:[NSOperationQueue mainQueue]];

    //创建任务(因为要使用代理方法,就不需要block方法初始化)
    NSURLSessionDataTask *task_1 = [session_1 dataTaskWithRequest:mReq];
    //启动
    [task_1 resume];

}

#pragma mark -- session delegate

//服务器开始响应,准备返回数据
-(void)URLSession:(NSURLSession *)session dataTask:(NSURLSessionDataTask *)dataTask didReceiveResponse:(NSURLResponse *)response completionHandler:(void (^)(NSURLSessionResponseDisposition))completionHandler
{
    //运行出来服务器的响应
    completionHandler(NSURLSessionResponseAllow);
    //当网络请求是基于http协议的时候,response的本质为NSHTTPURLResponse
//    NSHTTPURLResponse *httpResponse = (NSHTTPURLResponse*)response;

    //初始化容器
    _mData = [NSMutableData data];
}

//客户端接收数据
-(void)URLSession:(NSURLSession *)session dataTask:(NSURLSessionDataTask *)dataTask didReceiveData:(NSData *)data
{
    [_mData appendData:data];
}

//数据请求完成网络请求成功,当error不为空,说明响应出错
-(void)URLSession:(NSURLSession *)session task:(NSURLSessionTask *)task didCompleteWithError:(NSError *)error
{
    if (error) {
        NSLog(@"error -- %@",error);
    }
    else
    {
        NSString *str = [[NSString alloc]initWithData:_mData encoding:NSUTF8StringEncoding];
        NSLog(@"delegate  -- %@",str);
    }
}
3.session post方法 block
-(void)sessionPost
{
    //创建url对象
    NSString *urlStr = @"http://ipad-bjwb.bjd.com.cn/DigitalPublication/publish/Handler/APINewsList.ashx";
    //得到网址
    NSURL *url = [NSURL URLWithString:urlStr];

    //创建参数
    NSString *pStr = @"date=20151031&startRecord=1&len=5&udid=1234567890&terminalType=Iphone&cid=213";
    NSData *pData = [pStr dataUsingEncoding:NSUTF8StringEncoding];


    //创建request
  NSMutableURLRequest *mReq = [[NSMutableURLRequest alloc]initWithURL:url
      cachePolicy:NSURLRequestUseProtocolCachePolicy timeoutInterval:30];

    //设置
    [mReq setHTTPMethod:@"POST"];
    [mReq setHTTPBody:pData];
//建session
    NSURLSession *session = [NSURLSession sharedSession];
//加载任务的数据对象
    NSURLSessionTask *task = [session dataTaskWithRequest:mReqcompletionHandler:^
   (NSData * _Nullable data, NSURLResponse * _Nullable response, NSError * _Nullable error)
   {
    NSString *str = [[NSString alloc]initWithData:data encoding:NSUTF8StringEncoding];
    NSLog(@"%@",str); }];

//开启任务
    [task resume];
}
缓存策略NSURLRequestCachePolicy 1> NSURLRequestUseProtocolCachePolicy = 0, 默认的缓存策略,如果缓存不存在,直接从服务端获取。如果缓存存在,会根据response中的Cache-Control字段判断下一步操作,如:Cache-Control字段为must-revalidata,则询问服务端该数据是否有更新,无更新的话直接返回给用户缓存数据,若已更新,则请求服务端.2> NSURLRequestReloadIgnoringLocalCacheData = 1,忽略本地缓存数据,直接请求服务端.3> NSURLRequestIgnoringLocalAndRemoteCacheData = 4,忽略本地缓存,代理服务器以及其他中介,直接请求源服务端.4> NSURLRequestReloadIgnoringCacheData =NSURLRequestReloadIgnoringLocalCacheData5> NSURLRequestReturnCacheDataElseLoad= 2, 有缓存就使用,不管其有效性(即忽略Cache-Control字段), 无则请求服务端.6> NSURLRequestReturnCacheDataDontLoad =3, 死活加载本地缓存. 没有就失败.(确定当前无网络时使用)7>NSURLRequestReloadRevalidatingCacheData =5, 缓存数据必须得得到服务端确认有效才使用(貌似是NSURLRequestUseProtocolCachePolicy中的一种情况)Tips: URL Loading System默认只支持如下5中协议: 其中只有http://和https://才有缓存策略./(1) http://(2) https://(3) ftp://(4) file://(5) data://四、session 下载
-(void)startDownLoadVideo
{
    NSURLSessionConfiguration *configure = [NSURLSessionConfiguration defaultSessionConfiguration];//默认设置
    //初始化session
    self.currentSession = [NSURLSession sessionWithConfiguration:configure delegate:self delegateQueue:nil];
    //描述
    self.currentSession.sessionDescription = self.downLoadVideoModel.flv;
    //下载地址
    NSURLRequest *request = [NSURLRequest requestWithURL:[NSURL URLWithString:@"http://sc.111ttt.com/up/mp3/39165/2EC8D31900361E607A92BC17EDAFF6BC.mp3"]];


    self.task = [self.currentSession downloadTaskWithRequest:request];
    [self.task resume];//任务开始
    _isDownLoading = YES;
    while (_isDownLoading) {
        //当前线程一直跑?
        [[NSRunLoop currentRunLoop]runUntilDate:[NSDate distantFuture]];
    }

}
#pragma mark -- session代理方法

//下载完成
-(void)URLSession:(NSURLSession *)session downloadTask:(NSURLSessionDownloadTask *)downloadTask didFinishDownloadingToURL:(NSURL *)location
{

    NSFileManager *fileManager = [NSFileManager defaultManager];
    NSArray *URLs = [fileManager URLsForDirectory:NSDocumentDirectory inDomains:NSUserDomainMask];
    NSURL *documentsDirectory = [URLs objectAtIndex:0];
    //下载任务的url
    NSURL *originalURL = [[downloadTask originalRequest] URL];
    //存储位置的url
    NSURL *destinationURL = [documentsDirectory URLByAppendingPathComponent:[originalURL lastPathComponent]];
    NSError *errorCopy;
    // For the purposes of testing, remove any esisting file at the destination.
    //移除目标url上的内容
    [fileManager removeItemAtURL:destinationURL error:NULL];
    //移动
    BOOL success = [fileManager copyItemAtURL:location toURL:destinationURL error:&errorCopy];
    if (success) {
        dispatch_async(dispatch_get_main_queue(), ^{

            self.destinationURL = destinationURL;


        });
    } else {
        NSLog(@"复制文件发生错误: %@", [errorCopy localizedDescription]);
    }
}


//收到数据的代理
-(void)URLSession:(NSURLSession *)session downloadTask:(NSURLSessionDownloadTask *)downloadTask didWriteData:(int64_t)bytesWritten totalBytesWritten:(int64_t)totalBytesWritten totalBytesExpectedToWrite:(int64_t)totalBytesExpectedToWrite
{

    NSLog(@"上此执行代理到此次传送的字节数 %lld , 已经下载的总量%lld , 总共要下载的%lld",bytesWritten,totalBytesWritten,totalBytesExpectedToWrite);

    //进度
    double progress = (double)totalBytesWritten / totalBytesExpectedToWrite;

    dispatch_async(dispatch_get_main_queue(), ^{
        self.progressView.progress = progress;

        self.progressLabel.text = [NSString stringWithFormat:@"%% %.0f",progress*100];
    });

}
//下载完成后执行
-(void)URLSession:(NSURLSession *)session task:(NSURLSessionTask *)task didCompleteWithError:(NSError *)error
{
    if (error == nil) {
        NSLog(@"任务: %@ 成功完成", task);
    } else {
        NSLog(@"任务: %@ 发生错误: %@", task, [error localizedDescription]);
    }
}


//恢复下载后执行的方法
-(void)URLSession:(NSURLSession *)session downloadTask:(NSURLSessionDownloadTask *)downloadTask didResumeAtOffset:(int64_t)fileOffset expectedTotalBytes:(int64_t)expectedTotalBytes
{
    NSLog(@"%.0f",fileOffset/(float)expectedTotalBytes);
}