有时候做客户端开发阶段得测试,需要一个模拟服务器的环境,我使用得最顺手得还是WAMP环境。后台给出的api接口的路径千奇百怪,在WAMP环境中如何模拟这些路径呢,如何将某个路径下的PHP文件映射到另一个URL路径下并隐藏PHP文件后缀呢,在此小小的总结一下。
实现上面重新映射路径的需求,我们使用PHP中的HTTP重写技术,让符合特定正则表达式的URL,交由某个特定的PHP脚本处理。
.htaccess是一个完整的文件名(只有后缀),它是用于Apache服务器下的配置文件,当.htaccess文件放在某一文件夹下,它仅对该文件夹下的文件和文件夹有效。通过.htaccess文件,可以配置服务器实现很多功能,比如错误定位,密码保护,IP拒绝,URL重写等等。
默认的Apache不支持.htaccess,需要修改Apache的配置文件httpd.conf,才能使得.htaccess有效。
配置方法:
(1)找到apache的安装目录下的conf下的httpd.conf文件,打开文件修改
LoadModule rewrite_module modules/mod_rewrite.so 这行代码,它前面有个#号,把#号删掉
(2)还是在httpd.conf文件中,找到如下的配置,把None改为All(节点可能有多个,修改和PHP路径相关的那个)
<Directory "E:/php/workspace">
    Options Indexes FollowSymLinks
    AllowOverride None
    Require all granted
</Directory>
在我自己的环境中配置如下所示
<Directory "D:/wamp/www">

    #
    # Possible values for the Options directive are "None", "All",
    # or any combination of:
    #   Indexes Includes FollowSymLinks SymLinksifOwnerMatch ExecCGI MultiViews
    #
    # Note that "MultiViews" must be named *explicitly* --- "Options All"
    # doesn't give it to you.
    #
    # The Options directive is both complicated and important.  Please see
    # http://httpd.apache.org/docs/2.2/mod/core.html#options
    # for more information.
    #
    Options Indexes FollowSymLinks

    #
    # AllowOverride controls what directives may be placed in .htaccess files.
    # It can be "All", "None", or any combination of the keywords:
    #   Options FileInfo AuthConfig Limit
    #
    AllowOverride all

    #
    # Controls who can get stuff from this server.
    #
#   onlineoffline tag - don't remove
    Order Allow,Deny
    Allow from all

</Directory>
(3)重启WAMP
(4)在项目目录下创建.htaccess文件,并在里面写配置,简单的例子如下:
www文件夹下所有文件列表:

.htaccess文件内容
RewriteEngine on                       //on为打开,off为关闭

RewriteRule ^hello/api/student$ /php/student.php
RewriteRule ^hello/image/image$ /php/image.php

ErrorDocument 404 /php/404.php
/php/student.php源码
<html>
<head>
  <meta http-equiv='Content-Type' content='text/html; charset=utf-8' />
</head>
<body>
<?php
  echo "获取页面传来的参数";
  $studentId=null;
  if(isset($_GET["student_id"]))
  {
      $studentId=$_GET["student_id"];
  }

  echo "学生ID: ".$studentId."<br>";

  // 从文件中读取数据到PHP变量
  $json_string = file_get_contents($_SERVER["DOCUMENT_ROOT"]."/json/students.json");

  // 用参数true把JSON字符串强制转成PHP数组
  $data = json_decode($json_string, true);

  // 显示出来看看
  // var_dump($json_string);
  // var_dump ($data);
  // print_r($data);
  //产品循环
  function getName($d, $stuId)
  {
    foreach ($d["students"] as $key => $value) {  //遍历students中的对象
      if($key == $stuId){
        return $value["name"];
      }
    }
  }

  function getAge($d, $stuId)
  {
    if(empty($d["students"][$stuId]["age"]))
    {
      return -1;
    }
    return $d["students"][$stuId]["age"];
  }

  function getStudentJson($d, $stuId)
  {
    $stu=$d["students"][$stuId];
    if(empty($stu))
    {
      return "";
    }
    else
    {
      return json_encode($stu);
    }
  }

  echo "学生名: ".getName($data, $studentId)."<br>";
  echo "学生年龄: ".getAge($data, $studentId)."<br>";
  echo "学生JSON: ".getStudentJson($data, $studentId)."<br>";
?>
</body>
</html>
/php/image.php源码
<?php

/*
 * php 页面直接输出图片
 */
function showImg($img){
	$info = getimagesize($img);
	$imgExt = image_type_to_extension($info[2], false);  //获取文件后缀
	$fun = "imagecreatefrom{$imgExt}"; //需要php_gd2模块支持(进入php.ini 找到extension=php_gd2.dll,将其前面的 ‘;’ 去掉即可)
	$imgInfo = $fun($img); 	//1.由文件或 URL 创建一个新图象。如:imagecreatefrompng ( string $filename )
	$mime = image_type_to_mime_type(exif_imagetype($img)); //获取图片的 MIME 类型
	header('Content-Type:'.$mime);  //需要php_exif模块支持(进入php.ini 找到extension=php_exif.dll,将其前面的 ‘;’ 去掉即可)
	$quality = 100;
	if($imgExt == 'png') $quality = 9;		//输出质量,JPEG格式(0-100),PNG格式(0-9)
	$getImgInfo = "image{$imgExt}";
	$getImgInfo($imgInfo, null, $quality);	//2.将图像输出到浏览器或文件。如: imagepng ( resource $image )
	imagedestroy($imgInfo);
}

showImg($_SERVER["DOCUMENT_ROOT"]."/image/image.jpg")

?>
/php/404.php源码
<html>
<head>
  <meta http-equiv='Content-Type' content='text/html; charset=utf-8' />
</head>
<body>
<?php
    echo "对不起,您访问的资源不存在!";
?>
</body>
</html>
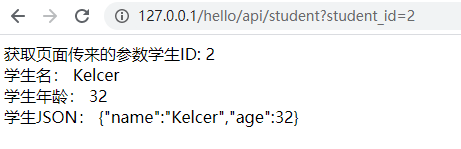
运行效果如下:


(------------------------完-----------------------------)