目录
一.基础入门
1.Spring Boot 是什么?
2.SpringBoot 快速入门
2.1完成步骤
2.2快速入门小结
3.Spring SpringMVC SpringBoot 的关系
3.1梳理关系
3.2如何理解 -约定优于配置
二.依赖管理和自动配置
1.依赖管理
1.1 什么是依赖管理
1.2 修改自动仲裁/默认版本号
2.starter 场景启动器
2.1 starter 场景启动器基本介绍
2.2 官方提供的 starter
2.3第三方 starter
3.自动配置
1.自动配置基本介绍
2.SpringBoot 自动配置了哪些?
3. 如何修改默认配置
4.SpringBoot 在哪配置读取 application.properites
5.自动配置 遵守按需加载原则
一.基础入门
1.Spring Boot 是什么?
第一句话
: Spring Boot
可以轻松创建独立的、生产级的基于
Spring
的应用程序
第二句话
: Spring Boot
直接嵌入
Tomcat
、Jetty 或
Undertow
,可以
"
直接运行
" Spring
Boot
应用程序
2.SpringBoot 快速入门
需求
/
图解说明
●
构建一个
SpringBoot
项目,浏览器发送
/hello
请求
[http://localhost:8080/hello],响应Hello
,
SpringBoot
2.1完成步骤

1.
确认开发环境是
jdk 8
或以上,
maven
在
3.5+
2.pom.xml 引入 SpringBoot 父工程和 web 项目场景启动器
    <!-- 导入 springboot 父工程,规定的写法 -->
    <parent>
        <groupId>org.springframework.boot</groupId>
        <artifactId>spring-boot-starter-parent</artifactId>
        <version>2.5.3</version>
    </parent>
    <!-- 导入 web 项目场景启动器,会自动导入和 web 开发相关依赖,非常方便 -->
    <dependencies>
        <dependency>
            <groupId>org.springframework.boot</groupId>
            <artifactId>spring-boot-starter-web</artifactId>
        </dependency>
    </dependencies>
3.MainApp.java SpringBoot 应用主程序
/**
 * Created with IntelliJ IDEA.
 *
 * @Author: 海绵hong
 * @Date: 2022/11/15/10:20
 * @Description:
 * @SpringBootApplication:表示这是一个springboot的应用/项目
 */
@SpringBootApplication
public class MainApp {
    public static void main(String[] args) {
        //启动springboot应用程序/项目
        SpringApplication.run(MainApp.class,args);
    }
}
4.HelloController.java 控制器
@Controller
public class HelloController {
//   写一个方法,返回hellospring boot
    @RequestMapping("/hello")
    @ResponseBody
    public String hello(){
        return "hello,SpringBoot";
    }
}
2.2快速入门小结
1. SpringBoot
比较传统的
SSM
开发, 简化整合步骤
,
提高开发效率
2.
简化了
Maven
项目的
pom.xml
依赖导入
,
可以说是
一键导入
,
如图
.
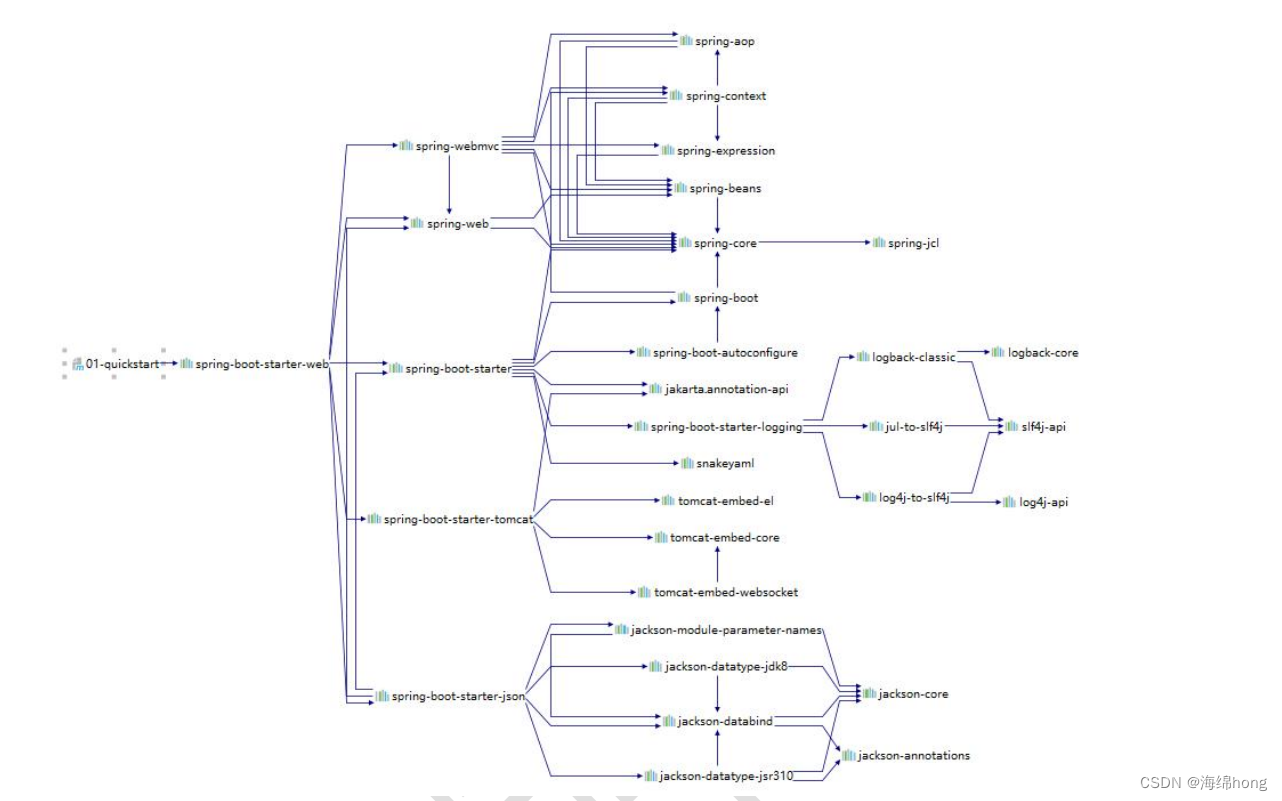
3. 引入一个 spring-boot-starter-web, 到底发生了什么? 一图胜千言
4.
内置
Tomcat ,
简化服务器的配置
5.
当然
SpringBoot
还有很多优势,后面慢慢细谈
3.Spring SpringMVC SpringBoot 的关系
3.1梳理关系
1.
他们的关系大概是
: Spring Boot > Spring > Spring MVC
2. Spring MVC
只是
Spring
处理
WEB
层请求的一个模块
/
组件
, Spring MVC
的基石是 Servlet
3. Spring
的核心是
IOC
和
AOP, IOC
提供了依赖注入的
容器
, AOP
解决了面向切面编程
4. Spring Boot
是为了简化开发
,
推出的
封神框架
(
约定优于配置
[COC]
,简化了
Spring
项目
的配置流程
), SpringBoot
包含很多组件
/
框架,Spring就是最核心的内容之一,也包含
Spring
MVC
5. Spring
家族,有众多衍生框架和组件例如
boot
、security、jpa 等
,
他们的基础都是
Spring
3.2如何理解 -约定优于配置
1、约定优于配置
(Convention over Configuration/COC)
,又称按约定编程,是一种软件设计
规范
,
本质上是对系统、类库或框架中一些东西假定一个大众化合理的默认值
(
缺省值
)
2、例如在模型中存在一个名为
User
的类,那么对应到数据库会存在一个名为
user
的表,
只有在偏离这个约定时才需要做相关的配置
(
例如你想将表名命名为
t_user
等非
user
时才 需要写关于这个名字的配置)
3、简单来说就是假如你所
期待的配置
与
约定的配置
一致,那么就可以不做任何配置,约 定不符合期待时,
才需要对约定进行替换配置
4、约定优于配置理念【解读:为什么要搞一个约定优于配置】 约定其实就是一种规范,遵循了规范,那么就存在通用性,存在
通用性
,那么事情就会变 得
相对简单
,程序员之间的沟通成
本会降低
,工作效率会提升,合作也会变得更加简单 - 生活中
,
这样的情况,大量存在
二.依赖管理和自动配置
1.依赖管理
1.1 什么是依赖管理
1. spring-boot-starter-parent
还有父项目
,
声明了开发中常用的依赖的版本号
2.
并且进行
自动版本仲裁
,
即如果程序员没有指定某个依赖
jar
的版本,则以父项目指
定的版本为准


1.2 修改自动仲裁/默认版本号
1.
需求说明
:
将
SpringBoot mysql
驱动修改成
5.1.49
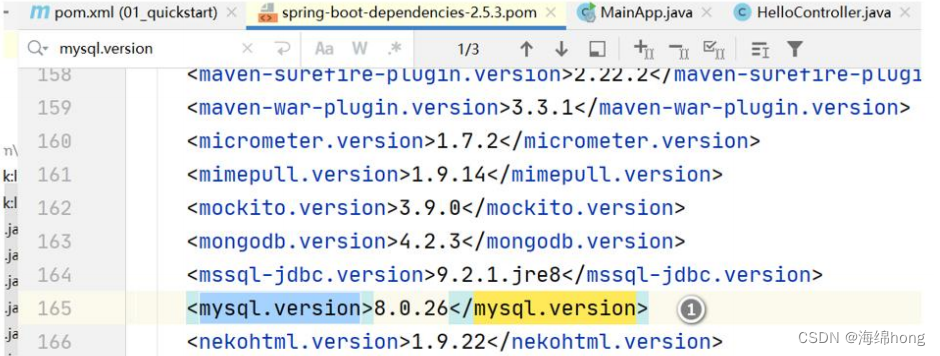
2.
查看
spring-boot-dependencies.pom
里面规定当前依赖的版本 对应的
key ,
这里是
mysql.version

3.
修改
springboot2\01_quickstart\pom.xml
重写配置
,
当更新
Maven
时,就依赖到新的
mysql
驱动
.
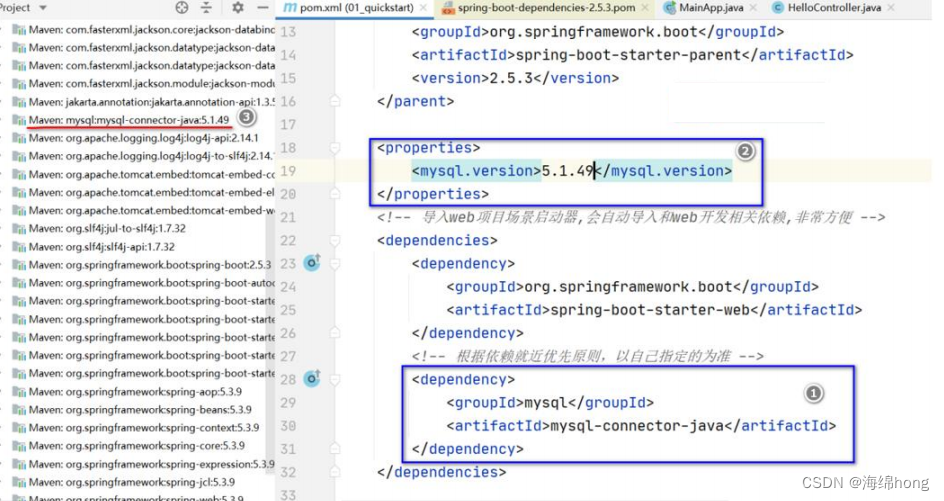
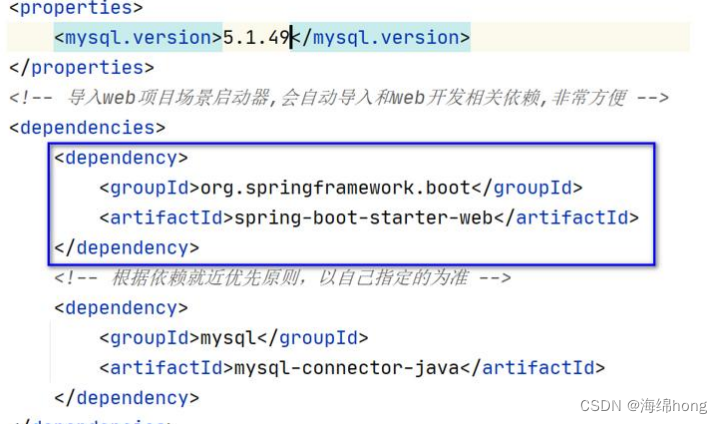
    <!--这里我们可以指定mysql.version-->
    <properties>
        <mysql.version>5.1.49</mysql.version>
    </properties>


    <!--导入web项目场景启动器: 会自动导入和web开发相关的所有依赖[库/jar]
    后面还会说spring-boot-starter-web 到底引入哪些相关依赖
    -->
    <dependencies>
        <dependency>
            <groupId>org.springframework.boot</groupId>
            <artifactId>spring-boot-starter-web</artifactId>
        </dependency>

        <!--我们自己指定mysql/驱动版本- 修改版本仲裁

        1. 方式1:显示的导入mysql依赖, 并明确的指定<version>
        2. 方式2.在自己的pom.xml文件中, 在<properties> 中指定mysql的key
        形如:
            <properties>
            <mysql.version>5.1.49</mysql.version>
            </properties>
        3. 为什么可以达到修改版本仲裁: 根据依赖就近优先原则.
        -->
        <dependency>
            <groupId>mysql</groupId>
            <artifactId>mysql-connector-java</artifactId>
            <!--<version>5.1.49</version>-->
        </dependency>
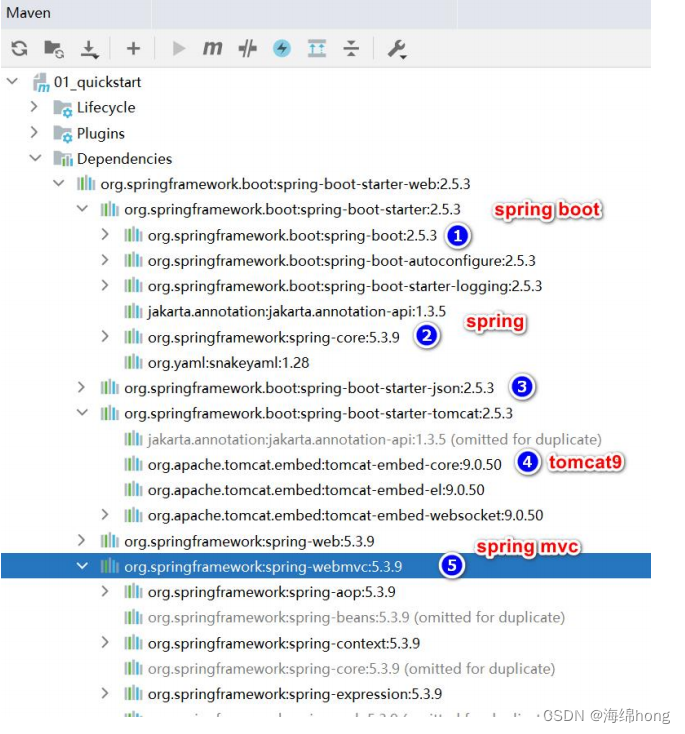
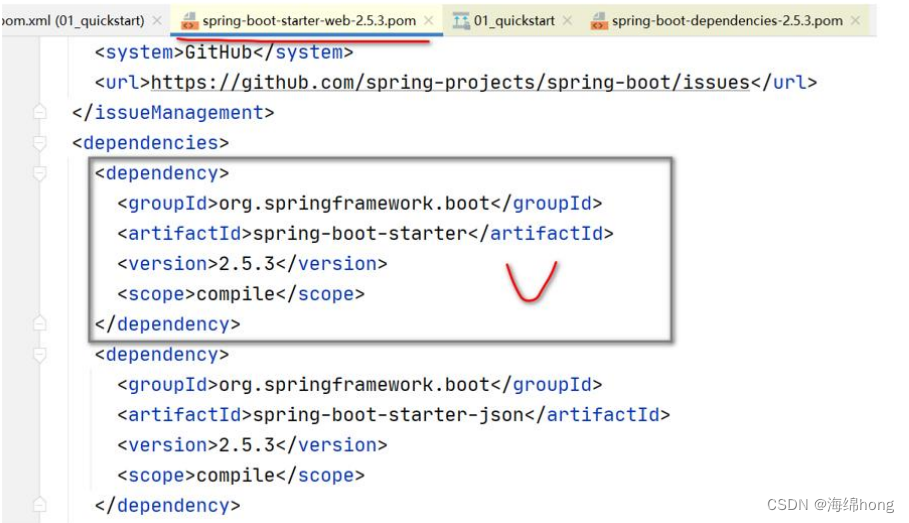
2.starter 场景启动器
2.1 starter 场景启动器基本介绍
1.
开发中我们引入了相关场景的
starter
,这个场景中所有的相关依赖都引入进来了,比如
我们做
web
开发引入了,该
starter
将导入与
web
开发相关的所有包
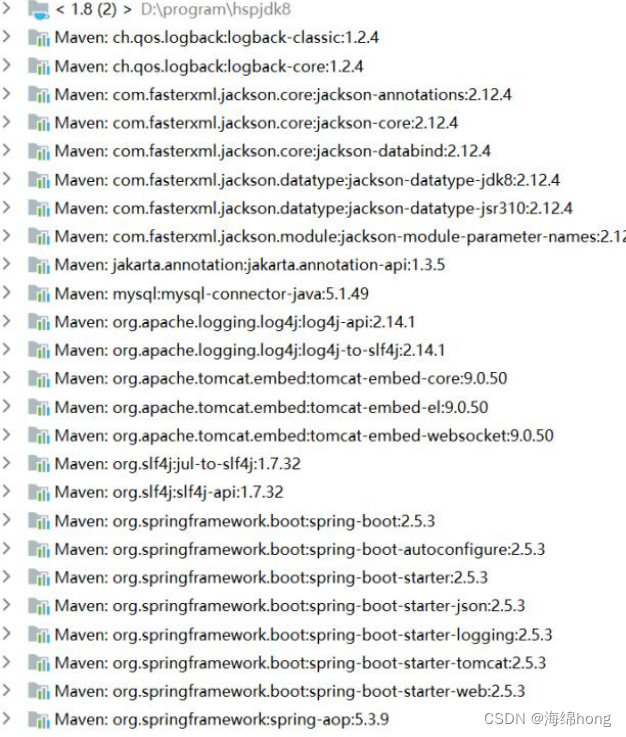
2.
依赖树
:
可以看到
spring-boot-starter-web
,帮我们引入了
spring-webmvc
,
spring-web
开发模块,还引入了
spring-boot-starter-tomcat
场景,
spring-boot-starter-json
场景,这些
场景下面又引入了一大堆相关的包,这些依赖项可以快速启动和运行一个项目,提高开发
效率

3.
所有场景启动器最基本的依赖就是
spring-boot-starter ,
前面的依赖树分析可以看到
,
这个依赖也就是
SpringBoot
自动配置的核心依赖
2.2 官方提供的 starter
介绍
1.
在开发中我们经常会用到
spring-boot-starter-xxx
,比如
spring-boot-starter-web
,该场
景是用作
web
开发,也就是说
xxx
是某种开发场景。
2.
我们只要引入
starter
,这个场景的所有常规需要的依赖我们都自动引入。
3.
SpringBoot2
支
持
的
所
有
场
景
如
下
:
https://docs.spring.io/spring-boot/docs/current/reference/html/using.html#using.build-sys
tems.starters
2.3第三方 starter
1. SpringBoot
也支持第三方
starter
2.
第三方
starter
不要从
spring-boot
开始,因为这是官方
spring-boot
保留的命名方式的。第三方启动程序通常以项目名称开头。例如,名为 thirdpartyproject
的第三方启动程序项目通常被命名为 thirdpartyproject-spring-boot-starter
。
3.
也就是说:
xxx-spring-boot-starter
是第三方为我们提供的简化开发的场景启动器
3.自动配置
1.自动配置基本介绍
1.
前面学习
SSM
整合时,需要配置
Tomcat
、配置
SpringMVC
、配置如
何扫描包、配置字符过滤器、配置视图解析器、文件上传等
[
如图
]
,非常麻烦。而在
SpringBoot
中,存在
自动配置机制
,提高开发效率
2.SpringBoot 自动配置了哪些?
1. 自动配置 Tomcat
2. 自动配置 SpringMVC
3. 自动配置 Web 常用功能: 比如字符过滤器
4.
自 动 配 置
:
默 认 扫 描 包 结 构
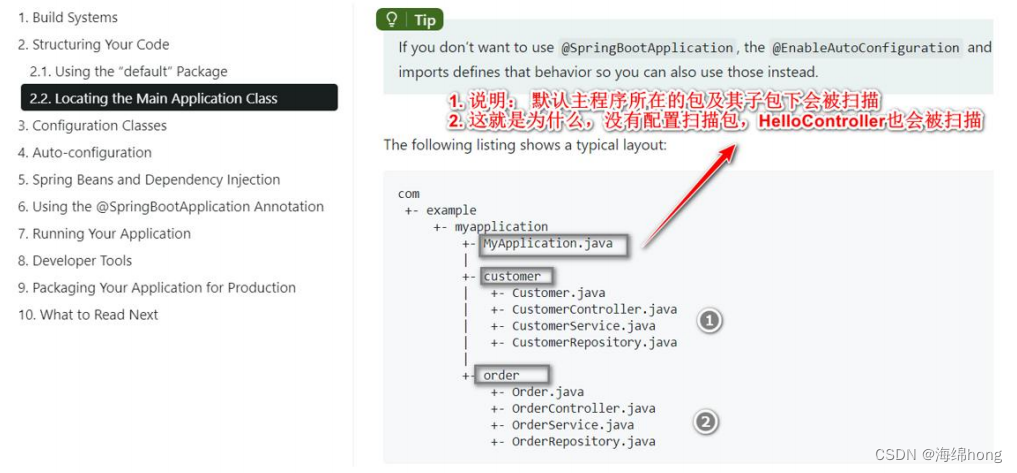
3. 如何修改默认配置
3.1如何修改默认扫描包结构
1.
需求:要求能扫描
com.hspedu
包下的
HiController.java
应该如何处理
?

3.2resources\application.properties 配置大全
- SpringBoot
项目最重要也是最核心的配置文件就是
application.properties
,所有的框架配
置都可以在这个配置文件中说明
-
地址
:
https://blog.csdn.net/pbrlovejava/article/details/82659702
●
各 种 配 置 都 有 默 认
,
可 以 在
resources\application.properties
修 改
,
application.properties
文件
我们可以手动
创建
#默认 server.port=8080
server.port=10000
#比如: 默认 spring.servlet.multipart.max-file-size=1MB
#该属性可以指定 springboot 上传文件大小的限制
#默认配置最终都是映射到某个类上,比如这里配置会映射到 MultipartProperties
#把光标放在该属性,ctrl+b 就可以定位该配置映射到的类
spring.servlet.multipart.max-file-size=10MB
配置信息都会体现到配置属性类(bean)
3.3resources\application.properties 常用配置
● 常用配置一览
#
端口号
server.port=10000
#
应用的上下文路径
(
项目路径
)
server.servlet.context-path=/allModel
#
指定
POJO
扫描包来让
mybatis
自动扫描到自定义的
POJO
mybatis.type-aliases-package=com.cxs.allmodel.model
#
指定
mapper.xml
的路径
#(application
上配置了
@MapperScan(
扫面
mapper
类的路径
)
和
pom.xml
中放行了
mapper.xml
后,
#
配 置
mapper-locations
没 有 意 义 。 如 果
mapper
类 和
mapper.xml
不 在 同 一 个 路 径 下 时 ,
mapper-locations
就有用了
)
mybatis.mapper-locations=classpath:com/cxs/allmodel/mapper
#session
失效时间
(
单位
s)
spring.session.timeout=18000
#
数据库连接配置
#mysql
数据库
url
mysql.one.jdbc-url=jdbc:mysql://127.0.0.1:3306/test?serverTimezone=Asia/Shanghai&useSSL=false
#mysql
数据库用户名
mysql.one.username=
#
数据库密码
mysql.one.password=
#
线程池允许的最大连接数
mysql.one.maximum-pool-size=15
#
日志打印
:
日志级别
trace<debug<info<warn<error<fatal
默认级别为
info
,即默认打印
info
及其以
上级别的日志
#logging.level
设置日志级别,后面跟生效的区域,比如
root
表示整个项目,也可以设置为某个包下,
也可以具体到某个类名(日志级别的值不区分大小写)
logging.level.com.cxs.allmodel.=debug
logging.level.com.cxs.allmodel.mapper=debug
logging.level.org.springframework.web=info
logging.level.org.springframework.transaction=info
logging.level.org.apache.ibatis=info
logging.level.org.mybatis=info
logging.level.com.github.pagehelper = info
logging.level.root=info
#
日志输出路径
logging.file=/tmp/api/allmodel.log
#
配置
pagehelper
分页插件
pagehelper.helperDialect=mysql
pagehelper.reasonable=true
pagehelper.supportMethodsArguments=true
pagehelper.params=count=countSql
#jackson
时间格式化
spring.jackson.serialization.fail-on-empty-beans=false
#
指定日期格式,比如
yyyy-MM-dd HH:mm:ss
,或者具体的格式化类的全限定名
spring.jackson.date-format=yyyy-MM-dd HH:mm:ss
#
指定日期格式化时区,比如
America/Los_Angeles
或者
GMT+10
spring.jackson.time-zone=GMT+8
#
设置统一字符集
spring.http.encoding.charset=utf8
#redis
连接配置
# redis
所在主机
ip
地址
spring.redis.host=
#redis
服务器密码
spring.redis.password=
#redis
服务器端口号
spring.redis.port=
#redis
数据库的索引编号
(0
到
15)
spring.redis.database=14
##
连接池的最大活动连接数量,使用负值无限制
#spring.redis.pool.max-active=8
#
##
连接池的最大空闲连接数量,使用负值表示无限数量的空闲连接
#spring.redis.pool.max-idle=8
#
##
连接池最大阻塞等待时间,使用负值表示没有限制
#spring.redis.pool.max-wait=-1ms
#
##
最小空闲连接数量,使用正值才有效果
#spring.redis.pool.min-idle=0
#
##
是否启用
SSL
连接
.
##spring.redis.ssl=false
#
##
连接超时,毫秒为单位
#spring.redis.timeout= 18000ms
#
##
集群模式下,集群最大转发的数量
#spring.redis.cluster.max-redirects=
#
##
集群模式下,逗号分隔的键值对(主机:端口)形式的服务器列表
#spring.redis.cluster.nodes=
#
##
哨兵模式下,
Redis
主服务器地址
#spring.redis.sentinel.master=
#
##
哨兵模式下,逗号分隔的键值对(主机:端口)形式的服务器列表
#spring.redis.sentinel.nodes= 127.0.0.1:5050,127.0.0.1:5060
3.3resources\application.properties 自定义配置
● 还可以在 properties 文件中自定义配置,通过@Value("${}")获取对应属性值
application.properties
文件
my.website=https://www.baidu.com
//
某个
Bean
@Value("${my.website}")
private String website;
4.SpringBoot 在哪配置读取 application.properites
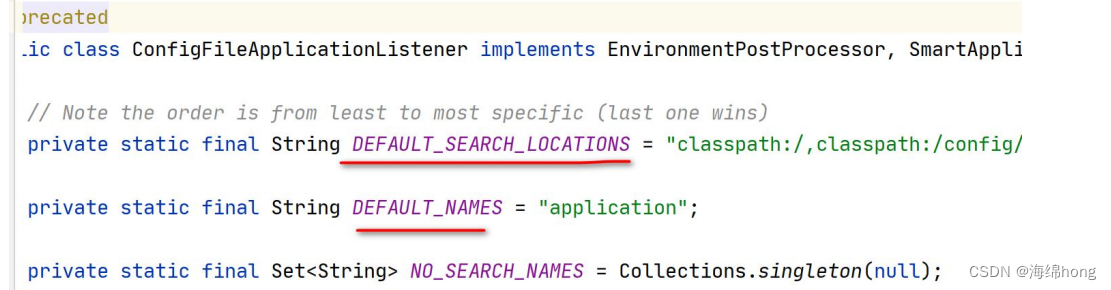
测试
,
如果我们把
application.properties
放在
resources\config
目录下
,
你会发现依然
是管用的
.
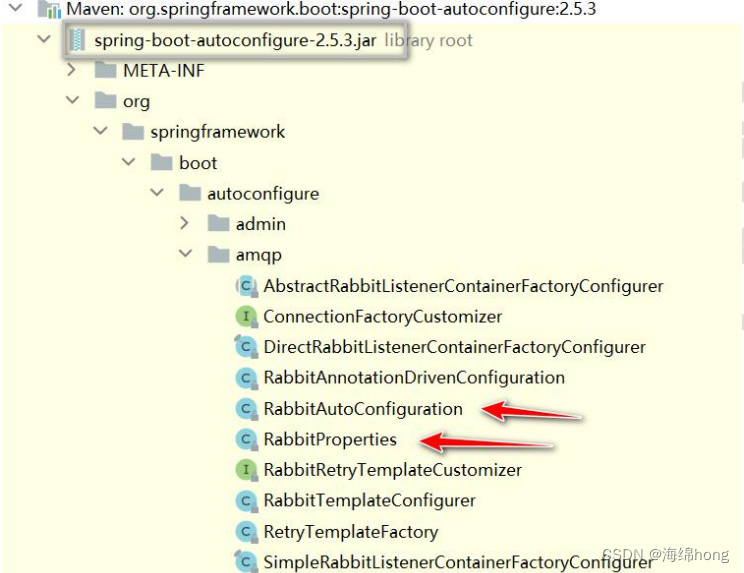
5.自动配置 遵守按需加载原则
基本说明
1.
自动配置遵守按需加载原则:也就是说,引入了哪个场景
starter 就会加载该场景关联的
jar
包,没有引入的
starter
则不会加载其关联
jar

2. SpringBoot 所 有 的 自 动 配 置 功 能 都 在 spring-boot-autoconfigure 包 里 面
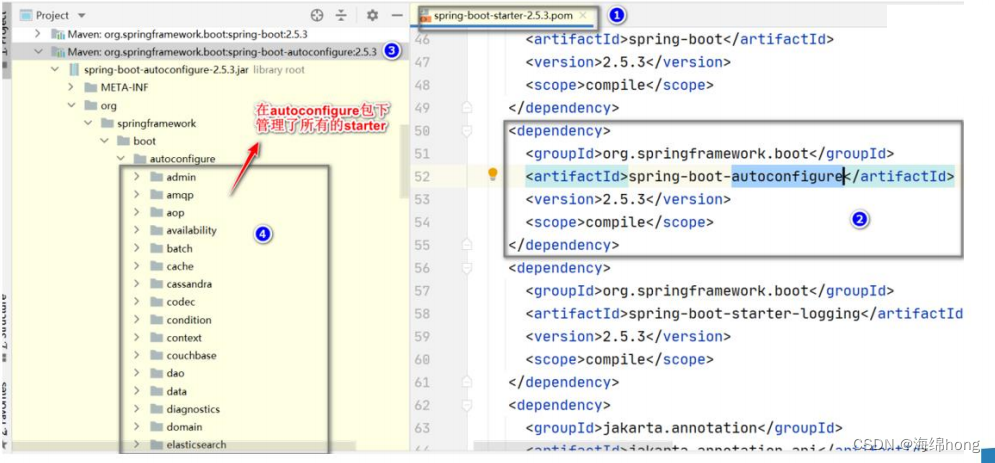
3.
在
SpringBoot
的 自 动 配 置 包
,
一 般
是
XxxAutoConfiguration.java,
对 应
XxxxProperties.java, 如图