SpringBoot 版本2.1.4.RELEASE、Spring Cloud版本Greenwich.RELEASE
说明:token采用redis存储,用户信息采用数据库存储
oauth2官网整合springboot的例子(含服务端配置和客户端)
官方介绍:
spring Cloud Security为构建安全的应用程序和服务提供了一组原语,它们的麻烦最小。声明性模型可以在外部(或集中)进行大量配置,它有助于实现大型系统的协作、远程组件,通常使用中央indentity管理服务。它在云计算这样的服务平台上也非常容易使用。基于Spring Boot和Spring Security OAuth2,我们可以快速创建实现常见模式(如单点登录、令牌中继和令牌交换)的系统。
Spring Security 特点:
1、在Zuul代理中将SSO令牌从前端中继到后端服务
2、在资源服务器之间传递令牌
3、拦截器使伪客户机的行为类似于OAuth2RestTemplate(获取令牌等)
4、在Zuul代理中配置下游身份验证
但以上基本是oauth2的客户端需要注意和解决的问题。
OAuth2介绍
OAuth2 角色
resource owner:资源所有者,对资源具有授权能力的人,一般指用户
resource server:资源服务器,它存储资源,并处理对资源的访问请求
client:第三方应用,它获得RO的授权后便可以去访问RO的资源
authrization server:授权服务器,它认证资源持有者的身份,为资源持有者提供授权审批流程,并最终颁发授权令牌(Access Token)
OAuth2授权流程
授权的流程和原理,网上有很多,这里不详细描述
1、OAuth2服务器
1.1、maven依赖
<dependencies>
		<!-- 注册到注册中心 -->
		<dependency>
			<groupId>org.springframework.cloud</groupId>
			<artifactId>spring-cloud-starter-netflix-eureka-client</artifactId>
		</dependency>
		<!-- web应用 -->
		<dependency>
			<groupId>org.springframework.boot</groupId>
			<artifactId>spring-boot-starter-web</artifactId>
		</dependency>
		<!-- oauth2授权 -->
		<dependency>
			<groupId>org.springframework.cloud</groupId>
			<artifactId>spring-cloud-starter-oauth2</artifactId>
		</dependency>
		<!-- jdbc模板 -->
		<dependency>
			<groupId>org.springframework.boot</groupId>
			<artifactId>spring-boot-starter-jdbc</artifactId>
		</dependency>
		<!-- jpa数据库查询 -->
		<dependency>
			<groupId>org.springframework.boot</groupId>
			<artifactId>spring-boot-starter-data-jpa</artifactId>
		</dependency>
		<!-- druid连接池 start -->
		<dependency>
			<groupId>commons-dbcp</groupId>
			<artifactId>commons-dbcp</artifactId>
			<version>1.4</version>
		</dependency>
		<dependency>
			<groupId>commons-pool</groupId>
			<artifactId>commons-pool</artifactId>
			<version>1.6</version>
		</dependency>
		<!-- druid连接池 end -->
		<!-- redis存储token -->
		<dependency>
			<groupId>org.springframework.boot</groupId>
			<artifactId>spring-boot-starter-data-redis</artifactId>
		</dependency>
		<!-- mysql数据库驱动 -->
		<dependency>
			<groupId>mysql</groupId>
			<artifactId>mysql-connector-java</artifactId>
		</dependency>
		<!-- 自定义登录页 -->
		<dependency>
			<groupId>org.springframework.boot</groupId>
			<artifactId>spring-boot-starter-freemarker</artifactId>
		</dependency>
		<dependency>
			<groupId>org.springframework.boot</groupId>
			<artifactId>spring-boot-starter-test</artifactId>
		</dependency>
		<!-- 自定义的 SpringBoot starter -->
		<dependency>
			<groupId>com.wit.sc</groupId>
			<artifactId>support-spring-boot-starter</artifactId>
			<version>0.0.1-SNAPSHOT</version>
		</dependency>
		<!-- elk管理日志 -->
		<dependency>
			<groupId>net.logstash.logback</groupId>
			<artifactId>logstash-logback-encoder</artifactId>
			<version>5.1</version>
		</dependency>
	</dependencies>
1.2、application.properties配置
redis存储token、数据库存储用户数据,此文件的其他配置可不用关心
#配置contextPath,要和客户端应用的接口保持一致
server.servlet.context-path=/auth
#数据库配置
spring.datasource.driver-class-name=com.mysql.cj.jdbc.Driver
spring.datasource.url=jdbc:mysql://localhost:3306/sc
spring.datasource.username=root
spring.datasource.password=123456
spring.jpa.hibernate.ddl-auto=update
spring.jpa.show-sql=true

# redis配置
spring.redis.host=localhost
spring.redis.port=6379
spring.redis.password=
spring.main.allow-bean-definition-overriding=true
1.3、授权服务器配置
/**
*
* client_secret和password需要加密才存到数据库中: "{bcrypt}" + bCryptPasswordEncoder.encode("8080")
* **/
Configuration
@EnableAuthorizationServer
public class Oauth2AuthorizationConfigure extends AuthorizationServerConfigurerAdapter {

    @Autowired
    AuthenticationManager authenticationManager;

    @Autowired
    RedisConnectionFactory redisConnectionFactory;

    @Autowired
    private DataSource dataSource;

    @Autowired
    Oauth2UserDetailsService userDetailsService;

    @Autowired
    ClientDetailsService clientDetailsService;

    /**
     * jdbc加载client_details
     * 要求数据库中的表名为:oauth_client_details
     * @return
     */
    @Bean
    public ClientDetailsService clientDetailsService() {
        return new JdbcClientDetailsService(dataSource);
    }

    @Override
    public void configure(ClientDetailsServiceConfigurer clients) throws Exception {
        clients.withClientDetails(clientDetailsService);
    }

    /**
     * 设置token存入redis
     * @param endpoints
     * @throws Exception
     */
    @Override
    public void configure(AuthorizationServerEndpointsConfigurer endpoints) throws Exception {
        endpoints.tokenStore(new RedisTokenStore(redisConnectionFactory))
                .authenticationManager(authenticationManager)
                .userDetailsService(userDetailsService);
    }

    @Override
    public void configure(AuthorizationServerSecurityConfigurer oauthServer) {
        oauthServer.tokenKeyAccess("permitAll()").checkTokenAccess("isAuthenticated()");
    }
}
oauth2客户端的配置,均在此文件中,关键代码:
@Autowired
private DataSource dataSource;

@Autowired
ClientDetailsService clientDetailsService;

/**
* jdbc加载client_details
 * 要求数据库中的表名为:oauth_client_details
 * @return
 */
@Bean
public ClientDetailsService clientDetailsService() {
    return new JdbcClientDetailsService(dataSource);
}

@Override
public void configure(ClientDetailsServiceConfigurer clients) throws Exception {
    clients.withClientDetails(clientDetailsService);
}
用户信息加载的代码,关键如下:
@Autowired
Oauth2UserDetailsService userDetailsService;

 /**
     * 设置token存入redis
     * @param endpoints
     * @throws Exception
     */
    @Override
    public void configure(AuthorizationServerEndpointsConfigurer endpoints) throws Exception {
        endpoints.tokenStore(new RedisTokenStore(redisConnectionFactory))
                .authenticationManager(authenticationManager)
                //用户信息加载
                .userDetailsService(userDetailsService);
    }
Oauth2UserDetailsService 为用户信息查询接口
1.4、WebMvc配置
@Configuration
@EnableWebMvc
public class WebMvcConfig implements WebMvcConfigurer {

    @Bean
    public HttpMessageConverter<String> responseBodyConverter(){
        StringHttpMessageConverter converter = new StringHttpMessageConverter(Charset.forName("UTF-8"));
        return converter;
    }

    @Override
    public void configureMessageConverters(List<HttpMessageConverter<?>> converters) {
        //解决中文乱码
        converters.add(responseBodyConverter());
        //解决 添加解决中文乱码后 上述配置之后,返回json数据直接报错 500:no convertter for return value of type
        converters.add(messageConverter());
    }

    @Bean
    public MappingJackson2HttpMessageConverter messageConverter() {
        MappingJackson2HttpMessageConverter converter = new MappingJackson2HttpMessageConverter();
        converter.setObjectMapper(getObjectMapper());
        return converter;
    }

    @Bean
    public ObjectMapper getObjectMapper() {
        return new ObjectMapper();
    }

    /**
     * 将访问路径以static开头的资源映射到public路径下
     * @param registry
     */
    @Override
    public void addResourceHandlers(final ResourceHandlerRegistry registry) {
        registry.addResourceHandler("/static/**").addResourceLocations("classpath:/public/");
    }
}
此文件主要是mvc的一些配置,前面四个注入的bean,是为解决乱码,最后一个用户静态资源访问。
1.5、web安全配置
@Order(1)
@Configuration
@EnableWebSecurity
public class WebSecurityConfig extends WebSecurityConfigurerAdapter {

	/**
	*
	* 加密方式
	**/
    @Bean
    PasswordEncoder passwordEncoder() {
        return PasswordEncoderFactories.createDelegatingPasswordEncoder();
    }

    /**
     * @param http
     * @throws Exception
     */
    @Override
    protected void configure(HttpSecurity http) throws Exception {
        http.requestMatchers().antMatchers("/oauth/**", "/login/**", "/logout/**")
                .and()
                .authorizeRequests().anyRequest().authenticated()
                .and()
                // 自定义登录页面,这里配置了 loginPage, 就会通过 LoginController 的 login 接口加载登录页面
                .formLogin().loginPage("/login").permitAll()
                .and().
                csrf().disable();
    }

    @Bean
    @Override
    public AuthenticationManager authenticationManagerBean() throws Exception {
        AuthenticationManager manager = super.authenticationManagerBean();
        return manager;
    }

    @Override
    public void configure(WebSecurity web) {
        //解决静态资源被拦截的问题
        web.ignoring().antMatchers("/static/**","/favicon.ico","/user/registered", "/user/update");
    }
}
此文件配置了不拦截的路径和登录页面的路径,还注入了一个身份验证的bean,用于Oauth2AuthorizationConfigure文件中。
1.6、视图转发
@Controller
public class LoginController {
    /**
     * 自定义登录页面
     * @return
     */
    @GetMapping("/login")
    public String login() {
        return "login";
    }
}
1.7、用户controller
@RestController
public class UserController {

    /**
     * 日志
     */
    public static final Logger logger = LoggerFactory.getLogger(UserController.class);

    @Autowired
    Oauth2UserDetailsService userDetailsService;

    @Autowired
    PasswordEncoder passwordEncoder;

    /**
     * 资源服务器提供的受保护接口,提供用户信息
     * @param principal
     * @return
     */
    @RequestMapping("/user")
    public Object user(Principal principal) {
        logger.info("principal = [{}]", principal);
        return principal;
    }

    /**
     * 用户注册
     * @param username
     * @param password
     * @return
     */
    @GetMapping("/user/registered")
    public Object registered(String username, String password) {
        logger.info("registered username = [{}], password = [{}]", username, password);
        if(StringUtils.isAnyBlank(username, password)) {
            logger.error("username or password can't be null");
            // 做了全局异常处理
            throw new RuntimeException("username or password can't be null");
        }
        String encodePassword = "{bcrypt}" + passwordEncoder.encode(password);
        int userId = userDetailsService.insertOauth2User(username, encodePassword);
        logger.info("userId = [{}] password [{}] to [{}]", userId, password, encodePassword);
        return userId;
    }
}
1.8、用户service
@Service
public class Oauth2UserDetailsService implements UserDetailsService,Serializable {

    /**
     * 日志
     */
    public static final Logger logger = LoggerFactory.getLogger(Oauth2UserDetailsService.class);

    @Autowired
    OauthUser2Dao oauth2Dao;

    @Override
    public UserDetails loadUserByUsername(String username) throws UsernameNotFoundException {
        Oauth2User user = oauth2Dao.getOauth2UserByUsername(username);
        return user;
    }

    /**
     * 新增用户,返回用户id
     * @param username
     * @param password
     * @return
     */
    public int insertOauth2User(@NotNull String username, @NotNull String password) {
        Oauth2User oauth2User = new Oauth2User();
        oauth2User.setUsername(username);
        oauth2User.setPassword(password);
        oauth2User = oauth2Dao.saveAndFlush(oauth2User);
        return oauth2User.getId();
    }
}
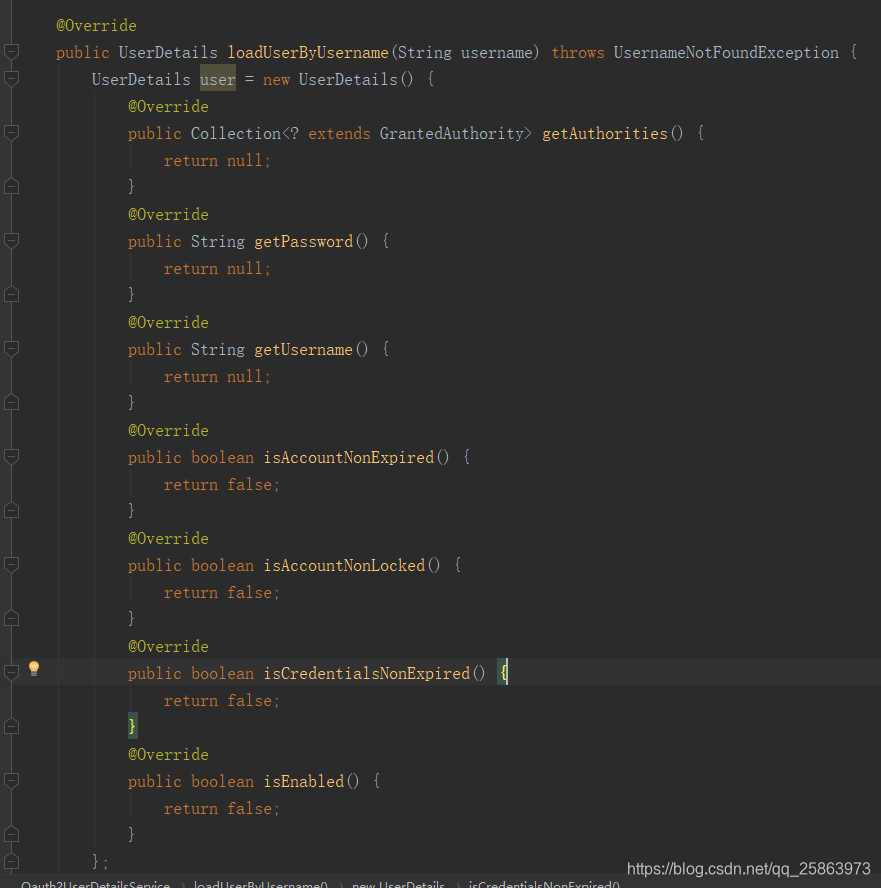
如果使用如下图的方法返回UserDetails(这样做是为了避免自己的用户实体类不用实现UserDetails接口),程序怎么修改总是会报序列化或反序列化失败。只能通过“public class Oauth2User implements UserDetails, Serializable”的方式创建用户。
1.9、用户dao
@Repository
public interface OauthUser2Dao extends JpaRepository<Oauth2User, String> {

    /**
     * 查询用户信息
     * @param username
     * @return
     */
    Oauth2User getOauth2UserByUsername(String username);
}
1.10、用户实体类
@Entity(name = "oauth2_user")
public class Oauth2User implements UserDetails, Serializable {

    @Id
    private int id;

    private String username;

    private String password;

    public int getId() {
        return id;
    }

    public void setId(int id) {
        this.id = id;
    }

    @Override
    public String getUsername() {
        return username;
    }

    @Override
    public boolean isAccountNonExpired() {
        return true;
    }

    @Override
    public boolean isAccountNonLocked() {
        return true;
    }

    @Override
    public boolean isCredentialsNonExpired() {
        return true;
    }

    @Override
    public boolean isEnabled() {
        return true;
    }

    public void setUsername(String username) {
        this.username = username;
    }

    @Override
    public Collection<? extends GrantedAuthority> getAuthorities() {
        return new ArrayList<>();
    }

    @Override
    public String getPassword() {
        return password;
    }

    public void setPassword(String password) {
        this.password = password;
    }
}
1.11、启动文件Application
@EnableEurekaClient
@EnableSupport
@SpringBootApplication
@EnableResourceServer
public class OauthServerApplication {
	public static void main(String[] args) {
		SpringApplication.run(OauthServerApplication.class, args);
	}
}
其中@EnableSupport是自定义的starter模块注解
1.12、login.ftl文件
<!DOCTYPE html>
<html>
<head>
    <meta charset="UTF-8">
    <title>统一认证登录平台</title>
    <link rel="icon" href="./static/images/favicon.ico" type="image/x-icon" />

   <#--<link rel="stylesheet" href="./static/css/element-ui/index.css">
    <script src="./static/js/vue.min.js"></script>
    <script src="./static/js/element-ui/index.js"></script>
    <script src="./static/js/jquery.js"></script>-->

    <#--    cdn资源   -->
    <link rel="stylesheet" href="https://lib.baomitu.com/element-ui/2.11.1/theme-chalk/index.css"/>
    <script src="https://cdn.bootcss.com/vue/2.5.16/vue.min.js"></script>
    <script src="https://lib.baomitu.com/element-ui/2.11.1/index.js"></script>
    <script src="https://cdn.bootcss.com/jquery/3.4.1/jquery.min.js"></script>
</head>

<body>
<div class="login-box" id="app" >
    <el-form action="/auth/login" method="post" label-position="left" label-width="0px" class="demo-ruleForm login-container">
        <h2 class="title" >统一认证登录平台</h2>
        <el-form-item>
            <el-input type="text"  name="username" v-model="username" auto-complete="off" placeholder="账号"></el-input>
        </el-form-item>
        <el-form-item>
            <el-input type="password" name="password" v-model="password" auto-complete="off" placeholder="密码"></el-input>
        </el-form-item>
        <el-form-item style="width:100%; text-align:center;">
            <el-button type="primary" style="width:47%;" @click.native.prevent="reset">重 置</el-button>
            <el-button type="primary" style="width:47%;" native-type="submit" :loading="loading">登 录</el-button>
        </el-form-item>
        <el-form>
</div>
</body>

<script type="text/javascript">
    new Vue({
        el : '#app',
        data : {
            loading: false,
            username: 'admin',
            password: '1111'
        },
        methods : {
        }
    })

</script>

<style lang="scss" scoped>

    body{
        background: url(./static/images/login_bg.png)  no-repeat center center;
        background-size:cover;
        background-attachment:fixed;
        background-color:#CCCCCC;
    }

    .login-container {
        -webkit-border-radius: 5px;
        border-radius: 5px;
        -moz-border-radius: 5px;
        background-clip: padding-box;
        margin: 100px auto;
        width: 320px;
        padding: 35px 35px 15px 35px;
        background: #fff;
        border: 1px solid #eaeaea;
        box-shadow: 0 0 25px #cac6c6;
    }
    .title {
        margin: 0px auto 20px auto;
        text-align: center;
        color: #505458;
    }
</style>

</html>
其中静态资源,使用的是cdn资源。如果请求在访问登录页的时候,发现静态资源的访问较慢,可以考虑使用本地的资源,将cdn的资源文件内容拷贝至新文件,放到classpath下,或自己建静态资源服务器。
1.13、数据库表
CREATE TABLE `oauth_client_details` (
  `client_id` varchar(128) COLLATE utf8_unicode_ci NOT NULL,
  `resource_ids` varchar(128) COLLATE utf8_unicode_ci DEFAULT NULL,
  `client_secret` varchar(128) COLLATE utf8_unicode_ci DEFAULT NULL,
  `scope` varchar(128) COLLATE utf8_unicode_ci DEFAULT NULL,
  `authorized_grant_types` varchar(128) COLLATE utf8_unicode_ci DEFAULT NULL,
  `web_server_redirect_uri` varchar(128) COLLATE utf8_unicode_ci DEFAULT NULL,
  `authorities` varchar(128) COLLATE utf8_unicode_ci DEFAULT NULL,
  `access_token_validity` int(11) DEFAULT NULL,
  `refresh_token_validity` int(11) DEFAULT NULL,
  `additional_information` varchar(4096) COLLATE utf8_unicode_ci DEFAULT NULL,
  `autoapprove` varchar(128) COLLATE utf8_unicode_ci DEFAULT NULL,
  PRIMARY KEY (`client_id`)
) ENGINE=InnoDB DEFAULT CHARSET=utf8 COLLATE=utf8_unicode_ci;

CREATE TABLE `oauth2_user` (
  `id` int(11) NOT NULL AUTO_INCREMENT,
  `username` varchar(50) COLLATE utf8_unicode_ci DEFAULT NULL,
  `password` varchar(500) COLLATE utf8_unicode_ci DEFAULT NULL,
  PRIMARY KEY (`id`)
) ENGINE=InnoDB AUTO_INCREMENT=12 DEFAULT CHARSET=utf8 COLLATE=utf8_unicode_ci;
其中autoapprove为true时,不需要手动授权,就相当于csdn网站用第三方应用QQ登陆时,不需要手动点击用户qq头像。


其中client_secret和password需要加密才存到数据库中,加密方式:"{bcrypt}" + bCryptPasswordEncoder.encode(“8080”)
1.14、oauth2截图
下面请求会经过三个应用,sc-zuul(8080端口) —> sc-portal(8000端口) —> sc-book(8020端口)
sc-zuul到sc-portal时路由转发,sc-portal到sc-book是feign请求
每个应用单独访问,均会被拦截:
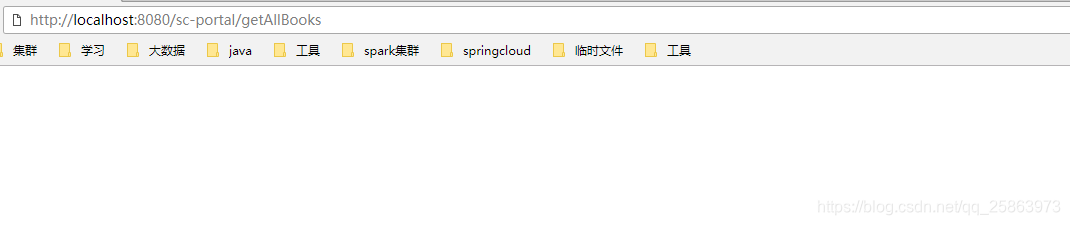
- 未授权直接访问sc-portal被拦截
 2)未授权直接访问sc-book被拦截
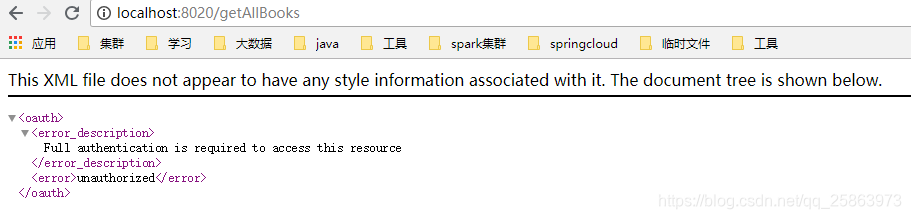
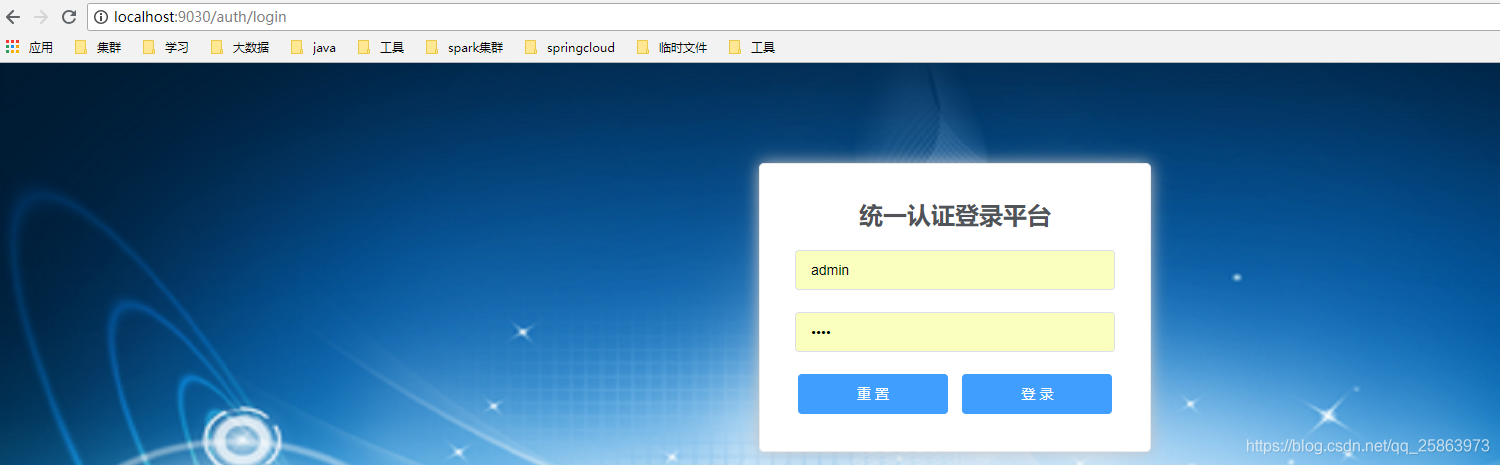
3)未授权访问sc-zuul,被拦截至登陆页,登陆认证后,即可正常获取资源

在整个微服务系统中,oauth2作为授权服务器,可以为所有的服务授权,保证所有服务的安全性。利用zuul令牌中继和服务间令牌中继,可以完成授权信息在服务间转递,避免每调用一个服务的接口,会被授权服务器拦截。每个服务的登陆业务被授权服务器接管,每个服务可以专注于自己的业务逻辑,而不必关心登陆的问题。
1.15、oauth2四种授权方式测试
@RunWith(SpringRunner.class)
@SpringBootTest(webEnvironment = SpringBootTest.WebEnvironment.RANDOM_PORT)
public class OauthServerApplicationTests {

	@Autowired
	private TestRestTemplate restTemplate;

	/**
	 * 1、接口请求用户密码模式登陆
	 * 2、postman
	 * post方法
	 * 	grant_type :password
	 * 	username :admin
	 * 	password :admin
	 * 	scope :sc-portal
	 * 	basic auth
	 * 	username sc-portal(client_id)
	 * 	password 8000(client_secret)
	 *
	 * 	返回:
	 *        {
	 *     "access_token": "a30e295f-9de0-4c05-8a93-122346b4c4d6",
	 *     "token_type": "bearer",
	 *     "refresh_token": "da47981b-8db6-4699-ae54-f76321a14fb2",
	 *     "expires_in": 43199,
	 *     "scope": "sc-portal"
	 * }
	 */
	@Test
	public void token_password() {
		MultiValueMap<String, String> params = new LinkedMultiValueMap<>();
		params.add("grant_type", "password");
		params.add("username", "admin");
		params.add("password", "1111");
		params.add("scope", "sc-zuul");
		String response = restTemplate.withBasicAuth("sc-zuul", "8080").
				postForObject("/oauth/token", params, String.class);
		System.out.println(response);
	}

	/**
	 * 1、接口方式
	 * token客户端模式登陆(只需要客户端的username和password即可)
	 * 2、postman
	 * grant_type :client_credentials
	 * basic auth
	 * 	 	username sc-portal(client_id)
	 * 	 	password 8000(client_secret)
	 *
	 * 	 返回:
	 *          {
	 *     "access_token": "969ce3a0-2645-4c01-80aa-e49a53d2a96a",
	 *     "token_type": "bearer",
	 *     "expires_in": 43199,
	 *     "scope": "sc-portal"
	 * }
	 */
	@Test
	public void token_client() {
		MultiValueMap<String, String> params = new LinkedMultiValueMap<>();
		params.add("grant_type", "client_credentials");
		String response = restTemplate.withBasicAuth("sc-portal", "8000").
				postForObject("/oauth/token", params, String.class);
		System.out.println(response);
	}

	/**
	 * 访问:http://127.0.0.1:9030/oauth/authorize?client_id=sc-portal&response_type=code&redirect_uri=https://www.csdn.net/
	 * 返回code https://www.csdn.net/?code=YZwXc6
	 * 通过授权码获(code)取token
	 *
	 * 返回:
	 * {
	 *     "access_token": "c9ad6322-d9cc-4e70-b5c6-650418c2de73",
	 *     "token_type": "bearer",
	 *     "refresh_token": "da47981b-8db6-4699-ae54-f76321a14fb2",
	 *     "expires_in": 42826,
	 *     "scope": "sc-portal"
	 * }
	 */
	@Test
	public void token_code() {
		MultiValueMap<String, String> params = new LinkedMultiValueMap<>();
		params.add("grant_type", "authorization_code");
		params.add("code", "u15P62");
		params.add("redirect_uri", "https://www.csdn.net/");
		String response = restTemplate.withBasicAuth("sc-portal", "8000").postForObject("/oauth/token", params, String.class);
		System.out.println(response);
	}

	/**
	 * 刷新tokan
	 *
	 * grant_type :refresh_token
	 * refresh_token:da47981b-8db6-4699-ae54-f76321a14fb2
	 * 返回:
	 * {
	 *     "access_token": "fa041bfd-ce3e-4c73-92d4-223d19e2e3f9",
	 *     "token_type": "bearer",
	 *     "refresh_token": "da47981b-8db6-4699-ae54-f76321a14fb2",
	 *     "expires_in": 43199,
	 *     "scope": "sc-portal"
	 * }
	 */
	@Test
	public void token_refresh() {
		MultiValueMap<String, String> params = new LinkedMultiValueMap<>();
		params.add("grant_type", "refresh_token");
		params.add("refresh_token", "da47981b-8db6-4699-ae54-f76321a14fb2");
		String response = restTemplate.withBasicAuth("sc-portal", "8000").postForObject("/oauth/token", params, String.class);
		System.out.println(response);
	}
}
2、OAuth2客户端client(以sc-zuul网关模块为例)
2.1、application.properties
#普通oauth2客户端配置
auth-server=http://localhost:9030/auth
security.oauth2.client.client-id=sc-zuul
security.oauth2.client.client-secret=8080
security.oauth2.client.access-token-uri=${auth-server}/oauth/token
security.oauth2.client.user-authorization-uri=${auth-server}/oauth/authorize
#此接口有oauth2服务器提供,在UserController文件中定义
security.oauth2.resource.user-info-uri=${auth-server}/user
security.oauth2.client.scope=sc-zuul

#如果客户端是路由zuul,则还要设置zuul.routes.sc-portal.sensitive-headers=、zuul.routes.sc-portal.custom-sensitive-headers=true
zuul.routes.sc-portal.service-id=sc-portal
zuul.routes.sc-portal.path=/sc-portal/**
#不要设置任何值,为空即可
zuul.routes.sc-portal.sensitive-headers=
zuul.routes.sc-portal.custom-sensitive-headers=true
路由是gateway的例子还没有搭建好。
2.2、客户端段配置
@Configuration
@EnableConfigurationProperties
public class Oauth2ClientConfigure {
    @Resource
    private ClientCredentialsResourceDetails clientCredentialsResourceDetails;
    @Bean
    @ConfigurationProperties(prefix = "security.oauth2.client")
    public ClientCredentialsResourceDetails clientCredentialsResourceDetails() {
        return new ClientCredentialsResourceDetails();
    }
    @Bean
    public RequestContextListener requestContextListener() {
        return new RequestContextListener();
    }
    @Bean
    @Primary
    public RequestInterceptor oauth2FeignRequestInterceptor(OAuth2ClientContext feignOAuth2ClientContext) {
        return new OAuth2FeignRequestInterceptor(feignOAuth2ClientContext, clientCredentialsResourceDetails);
    }
    @Bean
    public OAuth2RestTemplate clientCredentialsRestTemplate() {
        return new OAuth2RestTemplate(clientCredentialsResourceDetails);
    }
}
2.3、客户端安全配置
@EnableOAuth2Sso
@Configuration
@EnableOAuth2Client
public class OauthClientSecurityConfigure extends ResourceServerConfigurerAdapter {

	/**
	*
	*设置受保护的资源和不受保护的资源
	**/
    @Override
    public void configure(HttpSecurity http) throws Exception {
        http.csrf().disable()
                .antMatcher("/**")
                .authorizeRequests()
                .antMatchers( "/login**")
                .permitAll()
                .anyRequest()
                .authenticated().and().httpBasic();
    }
}
此处继承WebSecurityConfigurerAdapter也可以完成相同的功能,由于ResourceServerConfigurerAdapter的order=3,而和 WebSecurityConfigurerAdapter的order=100,故相同的设置,前者的生效。
最关键的地方就是去掉@EnableResourceServer注解,未授权页面会被重定向到登陆页,有@EnableResourceServer注解,会被拦截到unauthorized,这就是为什么sc-book和sc-portal模块被拦截后是跳转到unauthorized页面(此页面也可以自定义),而sc-zuul模块被拦截后是进入自定义的登陆页,因为此处没有加注解"@EnableResourceServer"。
oauth配置说明可参考:
1、令牌中继
2、oauth2服务端和客户端配置
oauth2授权服务器和客户端github地址oauth2、sc-portal、sc-zuul、sc-book